Showing posts with label K and Company. Show all posts

Friday, 16 September 2011

Little Me!

Hi everyone...hope you are all well and had a great week!

Can you believe it's Friday? I know that I say this every week but they are flying and this week, has been a very busy week for me, lots of crafty action including last minute card makes for Barbara's, Clarity Stamps ~ Pick of the Week which starts today at noon, on Create and Craft ~ I'm well and truly, exhausted and now, looking forward to the weekend!!

But before the weekend starts, there's some more cards to complete and something a bit different to share with you all today...my first scrapbook page!! I hope you like it...
This layout was made using some more of those gorgeous Miss Nelly Kaisercraft papers and chipboard shapes from Merly Impressions and the only extras that I added were some paper flowers from Prima, some seam binding and decorative pins from The Ribbon Girl, some glittered chipboard letters from K & Company and of course, last but not least, the photo!!
Now, lol...in my old age, I've become a little bit camera shy and there are very few photos of me in circulation. I hate my photo taken!!!!!! I'm one of those people that if there's a wedding photo, you'll probably find me hiding at the back of the congregation somewhere but when I was little, it was all very different...my Mum and Dad have got boxes upon boxes of photos of me, posing away for England and this is one of their favourites, so I think it would have been rude not to use it! lol
And as you can see, when it comes to age, in a child's life...that 5 months is very important to quote! hehe...

Well, I'd better have one more cup of motivation...a strong espresso is being made as I type and then get crafty!!

I hope you all have a great day and as I mentioned, earlier...don't forget all the Clarity shows that will be popping up on Create and Craft over the next week!! There's some fab stamps and a DVD to be bought and you will not be disappointed!

I'll be back with the copious amount of samples I made for these shows, together with samples that I made for Kuretake and for QVC. This is when you will start to see all my hard work over the last few weeks and I really hope you'll love what I have to share!

See you soon!
Love and hugs, Emma
xxx

Wednesday, 4 August 2010

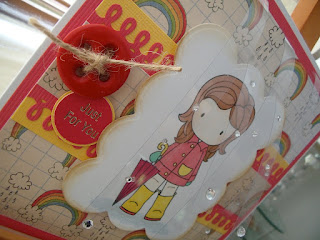
Umbrella Emma

The last few days have been quite eventful. On Sunday, my Mum got bitten by an insect, whilst in the garden. At first we didn't think anything of it but during the night, her face started to swell and she was having difficulty in swallowing and breathing. On Monday, she had to go to hospital and was told that the bite had caused a massive infection and was causing her face to fill with fluid. Thankfully, she's back home now but on antibiotics and the swelling is going down slowly but she really did give us a scare. Now, I'm doing my Florence Nightingale act and looking after her and in between times, I've also been working on my top secret project. All I can tell you at the moment is...and shhh, don't tell anyone else, but....I love it and I think you will too!!

So, back to today's card that I'm sharing with you all and as I'm writing this post, there is only one song that is in my head...

"Now that it's raining more than ever
Know that we'll still have each other
You can stand under my umbrella
You can stand under my umbrella"

Yep, it's Rihanna's fabulous song, Umbrella and for all my friends who read this, they will know exactly why that song springs to mind and that's because I do have a thing about umbrellas. Don't ask me why...but I just love images, photographs and umbrellas!

I've even started to collect rubber stamp images, that show umbrellas...I'm obsessed!! But now, you can see why I had to have this stamp from The Greeting Farm...and wait for it...it's called "Umbrella Emma".
When it came to making this card, I really wanted to have Umbrella Emma standing in a shower of rain and to do this, I cut some acetate strips and just dotted little gems on them, then tucked the strips and adhered them underneath one of the matts of cardstock and just left them to dangle to create the effect of falling rain. The image itself was stamped with a Memento ink pad and coloured in with Promarkers but I used a Sakura Glaze Gel Pen on her little boots to give them that shiny finish.

But the real piece de resistance for me, was that backing paper...it's from K and Company and I just love it and it worked so perfectly with this card. To be honest, when we make a card, I know we always say that this one is our favourite but...this one is kind of special and I was so proud of the way it turned out, that I think it will always remain one of my favourites.

I hope you all have a really happy Wednesday and a big hello to my new followers and a bigger thank you to all those who leave comments. They are greatly appreciated and I love hearing from you all!!
Emma
xx

Wednesday, 21 July 2010

Cheeky Mate

And now for today's card...and something a little bit different!

As I've mentioned before, I love experimenting with different shapes and since I bought my Cuttlebug and Big Shot, I have an absolute passion for die cutting! So, this card is combining both those elements, together with some beautiful K and Company papers and this fabulous little image,  called "Cheeky Mate" from The Greeting Farm, that I handstamped and coloured in using Promarker Pens.
So, how did I make this card. Firstly, I used a Spellbinders Nestabilities, large scalloped circle shape and die cut the basic card blank, which I then made into an easel card. I then covered the card with this beautiful spotted paper by K and Company and used Distress Ink around the edges to give an overall  grungy feel to the card.

Once that was done, I set it aside and using the Tim Holtz, Gadget Gears die from Sizzix, I die cut the shapes from some heavyweight pearlescent cardstock. I then adhered these to the card blank together with my coloured, stamped image.

I used some twine and a greetings plaque from Craftwork Cards as finishing touches and then because, I'm a bit of a perfectionist and wanted this card to stand on it's own and not fall over, I mounted the whole card on a base that I die cut, using the Circle Cutter from WRMK. And here's the final result...hope you love it as much as I do!!
Enjoy the rest of your week and thank you for stopping by and taking a look. I really appreciate all your comments and love!!
Emma
xx

Tuesday, 29 June 2010

Shining Bright

Sorry for the lack of posts over the last few days...I haven't forgotten you all...I'm just busy getting ready for the QVC Craft Extravaganza that's taking place in London at the end of the week. If any of you are lucky enough to be attending, then I'll be demonstrating with The Crafthouse Press...come and say hello!!

Anyway, today is just a quick share but I hope you like it! I had a lot of fun making it, colouring it and adding it's little glitter highlights. I think it's just an adorable image and so very cute.
Well, I've got a little bit more work to be done and then, I'm going to collapse on the sofa with a nice hot cocoa and some cookies before I get some sweet dreams...

Hope you're all having a fabulous week and wish me luck for Thursday and Friday....

Saturday, 26 June 2010

You're Invited!

The weather is absolutely beautiful and as the sun streams through my window, the soundtrack to my day comes courtesy of the Scissor Sisters and Kylie Minogue. And seeing as I have a feeling that next week might be quite busy, I'm going to take this opportunity to relax and enjoy this weekend....

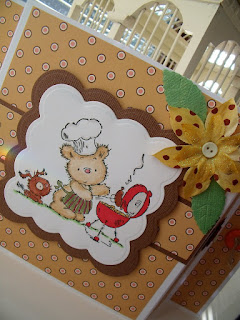
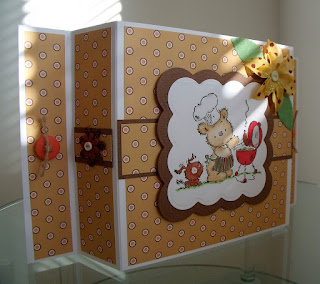
So, what better way to do it ~ than a barbecue and here's what I thought would be a fabulous invitation...
I  was fiddling around with folds and wanting to make something different, when all of a sudden, this style of card, came to me and I really like it...I think it makes a fabulous style for an invitation or menu and it would look wonderful, decorated with beautiful papers to make wedding stationery!

The image itself, once again comes from Lili of the Valley, stamped onto white card, die cut with a Nestabilities die and I used Promarkers to colour in and highlighted with some Stickles Glitter Glue. I combined it with some papers from one of my very favourite companies, K&Company and punched along the border with the Martha Stewart Pansy punch and matted them with some Bazzill Basics cardstock. As finishing touches, I added this glorious fabric flowers from Petaloo, which can be layered to give a dimensional effect and then I attached a button in the centre. I added die cut leaves, buttons threaded with twine and some glitter paper flowers.

The invite itself is just run off on the printer and then I used the corresponding punch from Martha Stewart on the corners.

Whatever you're doing this weekend...have fun, take care and enjoy!!
Emma
xx

Wednesday, 26 May 2010

Urban Belle

Today, I was very proud to be introduced as the latest member of Craftwork Cards Design Team. As some of my regular followers already know, I absolutely adore their products and it's an honour to become involved with the team and to work with such wonderful crafting goodies! Watch out for lots of new cards and projects featuring all their fantastic collections... I also wanted to say a big "HELLO and welcome" to all my new followers...thank you!!!

Anyway, I'm still on cloud 9 but I suppose I should tell you all about today's card....

It's another easel card but instead of sticking to the normal squared base, I actually used Craftwork Cards' flower template, which is what gave me this beautiful shaped background to the image of my little girl. These templates can be bought from QVC, together with another 11 fantastic card making templates and I can't recommend them enough.
This card shows how versatile paper can be. Everything that you see, I've handmade from paper...including the flowers, the butterflies and the little fence. I covered my card blank in these pretty papers from K & Company and I used Martha Stewart's Trellis Border Punch and some Distress Inks, to create a little picket fence. The stamped image is from Kanban's Urban Belles Clear Acrylic Stamp collection and I coloured it in with Promarkers and added highlights of Stickle Glitter glue to her dress.

I made the flowers, using the Spellbinders Flower Creations dies and popped a little adhesive stone in the centre. The butterflies are punched out using another Martha Stewart punch and then I adhered them, with their wings slightly lifted, so that they looked as if they were flying. I added a final touch of a stamped message on a tag and attached it to the card with some twine.

Sunday, 23 May 2010

More Than A Woman

Hope you're all enjoying a relaxing and peaceful Sunday....

I was planning to get this card posted earlier than this but my internet has been down right up until now, which has meant that, I could indulge in the summer sun and sit in the garden for a while. But to tell you the truth, I am more of a winter girl...give me snow over sun any day!!

Anyway, today's card features one of the Kraftin Kimmie stamps that I bought from the fabulous Dies To Die For and who I mentioned in an earlier post. Once again, I can only reiterate what a great company it is and I'm sure that these stamps will be my first of many purchases over the coming months.

So, I introduce you to ....Vivienne! Isn't she fab and so very glamourous, all the way down to her extra special shoes. Yes, *smiles* she owns the Louboutin's that I've always wanted...
The image is stamped onto a scalloped circle which I die cut with a Spellbinders die and then coloured in using Promarker pens. To make the card even more glam, I think it needed a touch of glitter. So, I added highlights to the peacock feathers, using various blue and green tones of Stickles glitter glue.

You might also have noticed that I've also made a little gift tag to attach onto a present and be presented alongside the card... I cut this out by hand from white card and then used the same backing paper on this as I did on the card. I stamped the same image but this time onto a Labels Four die cut shape and then finally stamped "Shake Your Tailfeathers" at the bottom of the tag.

SO, WHAT DID I USE?
Backing Papers: QVC, K and Company
Colouring Mediums: Promarkers, Stickles Glitter Glue
Flowers & Card Candy: Craftwork Cards (card), Petaloo (tag)
Dies: Spellbinders Large Scalloped Circle Die (card), Labels Four (tag)/Tim Holtz Alterations Flourish
Ribbon: QVC
Adhesive Pearls: Papermania
Border Punch: Martha Stewart
Ink: Memento
Stamps: Vivienne ~ Kraftin Kimmie


Friday, 21 May 2010

Single Rose...

Yay! It's Friday, it's sunny and to celebrate, I thought I'd share another card, that I'm so proud of! Once again, it features some of my craft obsessions of the moment, including the Spellbinders Flower Creations, Tim Holtz's dies and Grungeboard and the beautiful illustrations by Leanne Ellis.
Another thing that I love at the moment, is the natural look and these corrugated cards are perfect for that. As soon as I saw them, I knew I had to have them and combined with some beautiful backing papers and these dusky pink tones with a hint of sage green, I think they work perfectly!

Another element that I'm using more and more in my crafting is Tim Holtz's Grungeboard...which is fantastic. It's a very strange product and unlike any other papers or card that you will use, it's flexible, doesn't break or tear and if you haven't used it, you must. Combined with other products in his range, it really can be an essential product in your craft cupboard.

SO, WHAT DID I USE?
Dies: Spellbinders Shapeablities Flower Creations 3
Natural Cardstock: Kanban
Rubber Stamp: Funky Kits
Ribbon: QVC
Papers: K & Company
Tim Holtz Grungeboard: Flourish painted with Crackle Paint
Colouring Mediums: Promarker Pens, Stickles Glitter Glue
Inks: Distress Inks ~ Brushed Corduroy, Memento ~ Tuxedo Black


I hope you all have a great weekend and the sun is shining wherever you are!!
Happy crafting...

Powered By Blogger

Total Pageviews