Hello everyone and welcome to the brand new Simon Says Stamp Monday Challenge! This week our theme is called ~ STENCIL IT and with so many fabulous stencils available right now, there are plenty of techniques that you can use with them. So, whether you ink, spray, use embossing paste or even create your own backgrounds and stencils...whatever you decide to do we will be looking forward to seeing what you create!
For my project, I used one of my favourite Tim Holtz Layering Stencils, Mosaic to create my own background paper in the style and colour that would work with my vintage style layout. I also used stencils with Grit Paste to create layers and texture before adding gorgeous ephemera pieces which I used to create the look of an open book, a paper doll and some stamped butterflies.


...and here's how I created the project!

To begin with I cut a piece of canvas paper to measure, 18 x 24cm.
I usually add a layer of a neutral coloured Distress Paint to begin with and for this project, chose Old Paper, blended with a little Pumice Stone. Once I'd covered the surface of the paper, I dried it thoroughly and then took my Mosaic Layering Stencil, laid it onto the top left hand side of paper and started to add the colour. I used Weathered Wood Distress Paint and applied very small amounts of paint through the stencil using a blending tool. Don't overload your tool as the paint will have a tendency to leak underneath the stencil ~ less is more!
Once you have finished the first section, you can move the stencil down to complete the lower left hand side of the card ~ just line up the pattern and apply the paint onto that area.
Now it came to the right hand side of the panel and because the stencil itself doesn't create a continual receptive pattern, I laid the stencil onto the right hand side but found there was a slight gap between the two stencilled areas but that's fine because I found a way that I can get around that. I continued to cover the paper by applying the paint through the stencil and then drying the surface thoroughly.

As I mentioned, there is a gap down the centre of the paper but by cleverly applying strips of Tissue Tape and various Design Tapes, (all listed below) directly over the top of the stencilled background, this can be hidden and you don't know it's there.

For the next stage, I applied Grit Paste through the Grid Dot stencil concentrating on the central area of the panel of card. Allowing the paste to dry, I then applied some Weathered Wood Distress Paint over the top, blending it out with my finger. To add more depth, I used the Pumice Stone Distress Crayon over the top, then added drips of Ecoline gold watercolour paint.
To complete the background I machine stitched around the outside and then added a few paint splatters in white, gold and black paint.
For the focal point of this piece and to tell the story of my layout, I used one of the Collector Ephemera pieces to create the look of a book for my background layer. I stitched down the centre of the piece before distressing the edges.
I gently curved each side of the piece for the book effect and then when I attached it to the background panel, I used foam pads to create the dimension and look of an open book and layered it over the top of some cheesecloth dyed with Weathered Wood Distress Spray Stain.

I then added Botanical Layers, Snippets and a Paper Doll, coloured with Distress Markers to the open book and completed it with an Index Clip. I also attached a couple of Melange Pebbles painted with Alchemy Paints and a touch of Alchemy Wax.

To add even more dimension, I used the gorgeous Flutter Stamp Set and stamped two butterflies onto watercolour card, then painted them with Distress Marker Pens before die cutting them with the corresponding Sizzix dies.


These dies actually don't cut around the stamens but don't worry about that, I just added some twists of wired attached them to the bodies.

Finally, I added a Clippings Sticker, "The Little Stars" and a quote chip, "Choose To Shine"....
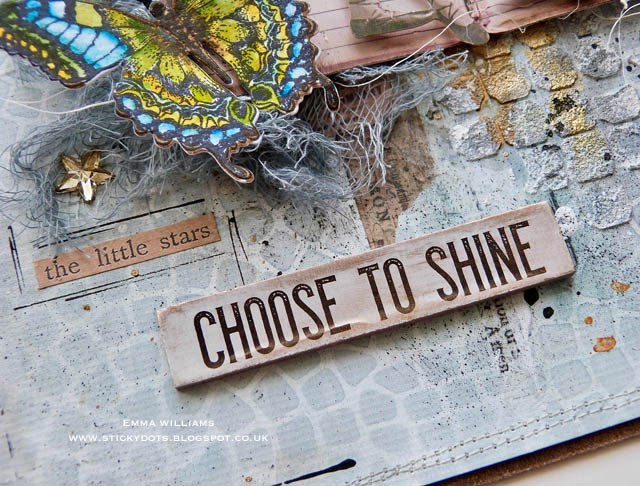
...together with some Mirrored Stars coloured with Mushroom Alcohol Ink to complete the panel.


Thank you so much for stopping by today and see you again very soon!
Love Emma xxx
Recipe for project:
Distress Paints: Old Paper, Weathered Wood, Pumice Stone
Distress Spray Stains: Weathered Wood
Distress Marker Pens
Tim Holtz Layering Stencil: Grid Dot, Mosaic
Distress Crayons: Pumice Stone, Black Soot
Tim Holtz idea-ology: Paper Dolls, Botanical Layers, Collector Ephemera Layers, Index Clips, Symphony Tissue Tape, Snippets, Quote Chips, Mirrored Stars, Journey Design Tape, Aristocrat Design Tape, Butterfly Design Tape, Clippings Sticker
Tim Holtz Watercolor Card
Mediums: Collage Medium, Grit Paste, Jet Black Archival Ink, Gesso, Mushroom Alcohol Ink
Prima Marketing Acrylic Paints: Blue Gold
Ecoline Gold Watercolour Paint
Melange Pebbles
Old Silver Alchemy Wax
Heat Gun
Canvas paper and cheesecloth from my own stash
Canvas paper and cheesecloth from my own stash