Showing posts with label Craftwork Cards. Show all posts

Tuesday, 29 September 2015

Time To Say Goodbye to a DT...

Hey everyone...

Today is my turn to share over on the Craftwork Cards blog but it's a sad day for me, as this is my final time as I've decided to step down from the Design Team. I hope you'll pop over to their blog to read my final post and for now, I'll leave you with this card...
Thank you to everyone who made my time on this team so special and I'm going to miss you!
With love, Emma x

Saturday, 29 August 2015

In An English Country Garden...

Hi everyone...

It's my turn to share over on the Craftwork Cards Blog today and this month, I'm sharing some of the samples that I created for the recent 4 Day Deal on Create and Craft earlier this week! It features the wonderful Potting Shed II collection and if you head on over there, you can see this card below and many more of my makes...
Thanks for stopping by today and see you on Monday with my next Simon Says Stamp project!
Have a great weekend and happy crafting...love Emma xx


Saturday, 18 July 2015

Festive Chalkboard

Hi everyone!

I have a second post this month over on the Craftwork Cards blog, (you can see the first post HERE) and hope you'll pop by to check out the rest of the cards that I made using the Festive Chalkboard collection and just to whet your appetites, here's just a little sneaky peek and part of a project that I'm sharing!
Thanks for stopping by and see you soon!
Happy Weekend...love Emma xx

Saturday, 4 July 2015

Christmas In July at Craftwork Cards

Hey everyone!

It's my turn to share some of my latest card makes over on the Craftwork Cards blog and if you don't want to think about Christmas, just yet...look away now, lol ~ because below are a couple of sneaky peeks of what you'll find if you head on over to the CWC blog and I really hope you love what I made using the Festive Chalkboard collection and some gorgeous Tim Holtz dies!

Thanks for stopping by today and see you on Monday with my next Simon Says Stamp post!
Happy Weekend!!
Love Emma xx

Tuesday, 16 June 2015

Shaken, Not Stirred...

Hey everyone!

First of all, I just wanted to say a really big thank you for all your recent blog visits and your lovely comments! I always read each and every word and they all mean the world to me!

Now back to today's post and with Father's Day this weekend, I thought I'd drop by to show you a couple of cards that I created for the June issue of Making Cards Magazine and made with love, especially for all those wonderful Dads! Full instructions of how to create these cards are included in Making Cards which is available HERE, as a back copy.

For the first card, and I think this has to be my favourite of the two...I created a suit card which is perfect for those Dads who like to think they could be James Bond or maybe even David Beckham, once in a while!

As you can see from all the photos, there's lots of detail in this card from the machine stitched front section to the little handkerchief poking out of the pocket....
....I also included that snappy red polka dot bow tie for an extra bit of pizazz!
And even the suit buttons are all stitched.

I completed the card by adding some Tim Holtz die cut letters and some faux stitching around the outside.

For the second card, I chose a more relaxed look and used Craftwork Cards Suits You Sir papers to create my shirt.
The tie on this card is created using card stock and I added two little buttons to hold down the collar.
If you look closely I also added some faux stitching around the pocket, the tie and the folded sleeve.
The shirt is then layered over the top of some gorgeous woven cardstock from DCWV and as an added touch, I machine stitched a border around the outside.
To complete this card I added some buttons and a die cut message.
I really hope these inspire you to create similar versions of your own and if you do, then I would love to see them...so, don't hesitate to get in touch!

Thanks for stopping by today and see you again soon!
Love Emma xx

Saturday, 6 June 2015

Beside The Seaside...

Hey everyone!

It's my turn to share over on the Craftwork Cards blog and today, I'm posting some of the samples I made using the gorgeous products that were recently on Create & Craft. Below is a just one of many cards that I made for the shows and if you click HERE then you will be whisked over to the blog and you can check out all my cards in detail!
Thanks for stopping by today and hope you all have a lovely weekend!
See you soon ~ love Emma xx

Saturday, 2 May 2015

Enjoy Yourself...

Hey everyone!

It's the first Saturday of the month which means it's my turn to share over on the Craftwork Cards blog and here's a sneaky peek of what I made for the recent Create and Craft shows using the Love A Cuppa collection!
Hope you'll click HERE to pop over to the blog to check out the rest of my makes and that you all have a fabulous weekend!
See you on Monday with my regular Simon Says Stamp post!
Love Emma xx

Saturday, 4 April 2015

Spring Is In The Air at Craftwork Cards

Hey everyone!

Today, it's my turn to share over on the Craftwork Cards blog and below is a little sneaky peek of just one of the projects I've posted using the Fab Fabrics paper collection!
Hope you'll pop over to take a look at all my projects and as always, thank you so much for stopping by today!
See you tomorrow with an Easter Surprise!
Love Emma xx

Saturday, 7 March 2015

Blossom Like A Butterfly...

Hello everyone!

It's my turn to share over on the Craftwork Cards blog today and if you click HERE, then you will be whisked over to the blog to see all the cards I made for the recent Create and Craft shows, including this one... *points down*!
Hope you all have a lovely weekend and thanks for stopping by today!
See you soon ~ love Emma x

Thursday, 19 February 2015

Flying High...

“The caterpillar does all the work, but the butterfly gets all the publicity.” 
― George Carlin

Hello everyone...

Hope you've all had a wonderful week and I can't believe that it's Thursday already!! I've been busy creating lots of new projects here at Chez Williams' and to be honest, time has literally flown!

But today, I just wanted to pop by and share a project that I made for the recent Craftwork Cards shows on Create and Craft.

I was given the gorgeous More Than Words kit to work with, which is available to buy HERE and if you watch the shows, you will have seen that I made quite a few cards which I will be sharing with you all very soon but one thing that I don't think was shown in detail was this little upcycling project! So, I thought I would drop by to share it today, so that you can see it in all it's glory and hope you love it as much as I loved making it!
The first thing that I'll tell you about this project its that it started life as a kitchen roll. Yep, the bobbin is completely handmade and even the wooden effect top and bottom of this bobbin is some old chipboard packaging which I painted with Distress Paints to create the look of wood!

The butterflies which are from the kit, are layered and attached to wire.
For the base, I used an old DVD and covered it with paper. I then added some seam binding, Candi and die cut leaves as extras BUT everything else you see is provided in the kit.
 This is a side view of the display.

When I receive kits such as these, I always like to create cards and projects that showcase all the product to it's best advantage and even though this project is taking the kit to the next level, it is also the perfect kit for beginners. So, whatever your level of crafting is and if you haven't bought it yet...then, this is a must!!!

Before I leave you, I just wanted to let you know that the March issue of Making Cards Magazine is now available and is packed full of wonderful, detailed card projects from all the talented contributors and, also includes a couple of card projects from yours truly...
...and if that wasn't enough, it also includes 32 FREE craft papers with this edition!!
That's if from me for today and thank you so much for popping by!
See you soon ~ love Emma xx


Saturday, 7 February 2015

Truly Scrumptious

Hey everyone!

It's my turn to share over on the Craftwork Cards Blog today and I hope you'll pop over to take a look at a few of the cards that I made for the recent Create and Craft shows in January!
I've included a little peek of just a couple of the cards here but you will need to head on over to the blog to see all my other makes from the shows using the gorgeous Scrumptious paper and stamp collection!
Thank you so much for stopping by today and hope you all have a great weekend!
Love Emma xxx

Tuesday, 16 December 2014

Think Outside The Box...

Hi everyone!

Today, it's my turn to share over on the Craftwork Cards blog and I'm sharing a step by step tutorial of how to make a frame box card. Hope you'll pop over to check out this tutorial and also see some of the cards that I created for the recent Create and Craft shows. There's a sneaky peek below of what you'll find when you get there!
Thanks for stopping by today and I'll see you soon!
Love Emma x

Tuesday, 18 November 2014

The Magic Of Christmas

Hello everyone...

Today, it's my turn to share over on the Craftwork Cards blog and here's a little sneaky peek of what you'll find once you get there! I really hope you love what I've created and I can't wait to read all your comments!
See you soon ~ Emma xx

Saturday, 4 October 2014

Mini Mania

Hi everyone!

Just dropping by to let you all know that it's my turn to share over on the Craftwork Cards blog today and here's a little sneak peek of what you'll find when you click HERE and if you loved the recent 4 Day Deal that was shown on Create and Craft and you need some inspiration for what to do with that mega bundle, then I'm sharing all of my samples today. As always, I hope you love them...
See you soon and have a great weekend!
Love Emma xx

Thursday, 18 September 2014

Fab 50's

Hello everyone,

Thank you so much for all the lovely comments you left on my last post. I really do appreciate all your visits and the time you take to read all my blog posts ~ it always makes all the hard work that goes into each piece so worthwhile!

Today is a flying visit, I've got numerous projects to make and deadlines are looming...in fact, I daren't look at my "to-do" list, it might send me into fright mode, lol!! But I did want to pop by and welcome my new followers ~ *hello* and to share a card that I made for the September issue of Making Cards Magazine. I was commissioned to create a design with a difference and this, is what I came up with. A 7" record sleeve, complete with "vinyl"! As always, I hope you love it...

My inspiration behind this card was my love of vinyl, (yep...I'm afraid what little space isn't taken up with crafting is taken up with vinyl!!!) and Jen Long's recent release of 1950's dies for Sizzix. I used one of these die sets to decorate the front of my card, together with some shapes that I drew and cut myself.

The beautiful car is die cut from Craftwork Cards pearl card and layered with brushed silver card.
I used glitter card for the stars and added all the elements to a background of polka dot paper from Inspire Me.
The vinyl which pulls out of the sleeve is a circle of black card, mounted on black mirri card. I punched a hole in the centre and stamped it with Tim Holtz's Tall Text stamps. To complete the card, I added an easel at the back so that it would be freestanding.
Right, my break time is over and my coffee has been finished...
Thanks again for stopping by today and I'll see you soon!
Love Emma xxx

Saturday, 6 September 2014

Especially For You

Hello everyone!!

Today, is my turn to share over on the Craftwork Cards blog. Here's a little sneaky peek below to whet your appetite but I do hope you'll check out the full project over on the blog.
Thank you so much for stopping by today and I'll see you on Monday!!
Bye for now and have a great weekend!
Emma xx

Thursday, 4 September 2014

Candi Flower Tutorial and Birdhouse

Hello everyone...

Hope you're all having a great week!

A few weeks ago, I shared a project that I made for Craftwork Cards featuring some Candi flowers. I had so many messages and emails about these flowers, asking if I could do a tutorial and, to all those people that kindly took the time to write ~ I promised that I would! Well, better late than never...I've finally got around to sharing this with you, together with another project that I created for Craftwork Cards featuring The Potting Shed paper collection and their cute little birdhouses, and of course...the Candi flowers. Hope you enjoy...
To begin with:
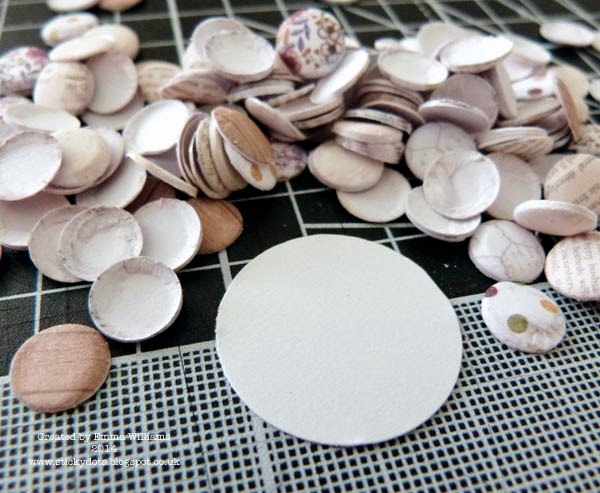
1. Punch out a 1" circle from card. At this point the size of the flower, is dependant on the circle size. So, if you want a bigger flower, all you need do is punch out a bigger circle and just add more Candi.
2. Create a valley fold in the centre of each piece of Candi. For this size circle, I would use 11 pieces.
3. Apply a circle of glue, either silicone glue, Pinflair or using a hot glue gun and place the folded Candi around the edge of your punched circle.
4. Continue all the way around until you have a circle of folded Candi and your first layer to the flower. 
5. To create the second layer of your flower, take 8 pieces of Candi, (I used a co-ordinating pattern for this flower) and add a good sized amount of glue in the centre of the circle. Attach a second layer of your folded Candi, arranging it in a circle.
6. You should now have a double layer of Candi and need to create the centre. For this, take six pieces of Candi from the pack and create a mountain fold in each. Add another good amount of glue in the centre of your flower and stick each piece of Candi into the glue, placing them at a 90° angle, so that they slightly stick up to form the centrepiece.
7. And there you have your finished Candi flower to add to any of your Craftwork Cards projects. 
As you can see, I added my Candi flowers around the base of my birdhouse which is created from chipboard and painted with PaperArtsy paints and Crackle Glaze. I added the flowers, together with some small die cut flowers.


The birdhouse is attached to a cotton spool, which is attached to the base and I also added die cut flowers to the roof of my project, and used real moss and die cut foliage to create a cascade.

To complete the birdhouse, I used a die cut birdie, painted with Distress Paints and attached him to the front of his little house!

So, that's it from me for today and as always, I hope you've loved what I've created and enjoyed the Candi flower tutorial. If you do make any of these flowers, then I would love to see them and hope you'll share them with me!

See you soon and enjoy the rest of your day...
Love Emma xx 


Powered By Blogger

Total Pageviews