Showing posts with label Tim Holtz. Show all posts

Monday, 8 September 2025

Black Moonlight....

Hello friends and Happy Monday...

As we start the new week, it's time for the brand new Simon Says Stamp Monday Challenge and this week we are INSPIRED BY MUSIC.

Anyone who knows me, knows how much I LOVE music, it's been a passion of mine since a very young age and there isn't a day that goes by when I don't listen to, or read about music! So, when I saw this challenge, I just knew I was going to have a lot of fun, and I did...

Why? Well because I have made a project that has been something I've wanted to do for a while but I was saving it for the right moment, and today is the day and I hope you love the piece I've made ~ a replica 7" vinyl complete with sleeve, all inspired by my favourite band, Duran Duran and their most recent album, Danse Macabre which appropriately features songs inspired by Halloween....


So, let's get started because it's time to share how I created this project...


To begin with I walk you through how I created the vinyl and the sleeve...

VINYL


For the vinyl, I used a combination of black card stock and the black mirror card from the Sizzix Opulent Cardstock Pack. I began by cutting my base, a circle of black card, and a circle of the black mirror card, both 7" in diameter. I used a circle cutter but if you don't have one of these, you can always draw around a side plate or similar sized object.

To create a thick piece of card and a substantial base, I adhered these two circles together to form one circular piece.

Next I cut a second circle of mirror card, slightly smaller in size, approx 6⅜" and I adhered this to the centre of my previous circle.

For the remaining circles that make up the centre of the vinyl, I used the Simon Says Stamp Basic Shapes Circle dies. I started by using the 4⅛" to cut a piece of the pewter coloured card from the Sizzix pack. 
***In the photos the pewter does look slightly purple, but it is a dark pewter grey in reality*** 

I moved on to use the 3⅜" die to cut a piece of plain black card and finally the 3½" die to cut a piece of designer paper from the Halloween Backdrops set. (The rest of the sheet will be used later in this make).

I layered all these to form the basic layers to recreate the 7" vinyl.
To complete the vinyl, I stamped the bats from the Sketch Manor Stamp Set directly onto the central circle and then stamped the "Something Wicked" from the Framed Frights stamp set, onto a piece of black card, using white embossing powder which I attached to the circle, placing it below the bats. I completed the 'vinyl' by punching a tiny hole in the centre, using a Crop-A-Dile.

SLEEVE

With the vinyl complete, I moved onto the sleeve....

For this you will need 2 sheets of black card. Cut the first piece to measure 18.5cm square and place to one side. For the second piece, cut this to measure 20 x 21.5cm.

Taking the larger piece of card, score at 1.5cm along three of sides and then fold along the scorelines. Cut across the folded corners on the bottom left and right hand sides of the card and then place red line tape along each of the folded tabs, leaving the top edge free to form the opening to slip your vinyl into.
Line up and place the square piece of black card onto the folded tabs to form your 7¼" square 'record' sleeve. You now have the sleeve ready to decorate.

For this I began by cutting another piece of plain black card, 17.5cm square and lightly spritz the card with Decayed and Empty Tomb Mica Spray Stains. I just wanted a light speckle on the card, not a full coverage and once this is achieved, leave to dry before mounting onto the centre of the sleeve.
Using the remainder of the designer paper from then Halloween Backdrops pack and the stamps from the Sketch Manor stamp set by Stampers Anonymous, I began by cutting the card to measure 15.5cm square. I then added the branches in Black Soot Archival Ink, and stamped these around the top edges of the paper.
I stamped the fence from left to right using the two stamps in the set, and added this approx ¼" from the bottom edge. I added the shadow underneath the fence with coloured pencils from my stash.
Machine stitch a border around the edge and then mount onto a piece of silver metallic Kraft stash card. Mount the layers onto the front of the sleeve.

HAUNTED MANOR HOUSE

For the house, I used the Manor from the Sketch Manor stamp set and stamped this onto watercolour card. I coloured it with Distress Watercolour Pencils and then die cut the layers using the co-ordinating Sketch Manor dies from Simon Says Stamp.
Assemble the house by adding foam pads to each layer. There are full instructions for the assembly on the product page, over on Simon Says Stamp. 
The dimension on this house is amazing, and the layers really do add that wow factor.


Stamp and die cut the moon and the clouds using the stamp and die sets, and then as before use the Distress Pencils to watercolour these images.

COMPLETING THE PICTURE

We're now ready to complete this project and I placed the Manor House in the centre using foam pads and attached the clouds and moon behind.
I then added some die cut bats which are cut from black card using the dies in the Sizzix Haunted House die set by Tim and fixed these onto my background, arranging them around the house.
The Quote Chip "By The Light of The Moon", which I attached underneath the Manor House, is actually from the idea-ology Halloween Baseboard pack from 2024. If you don't have this particular quote chip, then there are some in the 2025 pack or you can use stamps to create the sentiment.
I added two hardware heads to either side of the chip...
....and completed the make by attaching moss underneath the house and adding white pen details for the moon shadows onto the fence.

So that's my project complete and I must say, I am over the moon, (forgive the pun) with this piece ~ it just came together perfectly and will be something I will display for many a Halloween in the future!

As always, if you make anything, or if you've been inspired by anything that you've seen here on my blog ~ then please, let me know by tagging me on social media or leaving a comment here and I will be right over to take a look!

Don't forget that every week, one lucky random participant has the chance to win a $25 gift voucher from Simon Says Stamp and you can join in up to 5 times, which means you could have 5 chances to winYou have until next Monday at 8am Ohio time. 1pm UK time, 2 pm CET to join in and good luck....


Thank you so much for taking the time to stop by today!
Love Emma xxx

Monday, 1 September 2025

Countdown to Autumn...

Hello everyone and HAPPY STAMPtember...

As we celebrate the start of this exciting month, it's time for a brand new Simon Says Stamp Monday Challenge and this week we are showcasing the wonderful products of our very own Simon Says Stamp brand and the theme is called STAMP IT! So, however you choose to use stamps, we can't wait to see what you create and hope you'll join us and play along!

For my make, I started the countdown for my favourite time of year ~ AUTUMN and I chose to use Tim Holtz's Nature's Wonder stamp set together with the Simon Says Stamp co-ordinating die set. I love that these dies cut the images perfectly and there's no more fussy cutting which is definitely something to celebrate!

So, let's get started because it's time to share how I created my tag...

To begin with I used two Etcetera Tags which I layered ~ the Mini Etcetera Tag and the Size 8 Etcetera Tag.

CREATING THE BACKGROUNDS

I started with the larger tag, and began by applying Design Tape around each of the four edges. I then cut  a piece of decorative paper from the Halloween Backdrops pack and added rips and tears to the edges. I machine stitched a border and then adhered the paper to the tag with Matte Collage Medium, adding more tears and curling the corners to create a gnarly, vintage feel to the piece.

After applying a coat of Collage Medium to the surface of the paper, I then took my Walnut Stain Distress Crayon and used this to add colour to the rips and tears. I also added a small Cello Sticker Tape to the edge on the right hand side of the tag.

Moving on to the smaller, Size 8 tag I created my own background. For this I used a Size 8 Mixed Media Heavystock tag and the Numeric Mini Layering Stencil. I placed the stencil so the numbers would be in the centre of the tag and then applied Translucent Grit Paste through the stencil.

Remove the stencil and whilst the paste is still wet, I sprinkled Pumice Stone Distress Glaze over the top, tapping away the excess and then setting it to one side to dry.

Once the paste is touch dry, (or near enough) I then heat embossed the glaze until molten and created a faux enamel effect. Remember to not settle on one area for too long as you only want to melt the glaze and not create bubbles in the paste.

To add colour to the tag, I used a combination of Distress Spray Stains and Oxide Sprays:

Distress Spray: Black Soot, Frayed Burlap, Speckled Egg, Antique Linen

Oxide Spray: Speckled Egg

After misting the tag with water, I layered the sprays until I was happy and then allowed the tag to dry. The stencilled area will resist the colour, and if there is any residual ink, just wipe it away once the tag is dry.

To complete this, I machine stitched a border and then attached it to my Etcetera Tag with Collage Medium, before mounting this tag onto the centre of the larger tag, again using the medium to adhere it.

I added some flicks of Antique Linen 

LEAVES

Now to create the leaves for this piece and create those beautiful colours of Autumn.

As mentioned, I used Tim's Nature's Wonder stamp set by Stampers Anonymous and the co-ordinating die set by SSS.

I stamped each of my leaves onto watercolour card using Black Soot Archival Ink and then watercolored them with a selection of Distress Watercolour Pencils in Aged Mahogany, Crushed Olive, Peeled Paint, Crackling Campfire, Carved Pumpkin.

Once happy, I then used the co-ordinating dies to die cut each of the stamped leaves and then inked the edges with Walnut Stain Distress Ink. I used a total of 8 leaves for this make and shaped each of themes that this will create dimension on the finished piece.

PHOTO BOOTH IMAGE

With the leaves ready, I colour tinted the PhotoBooth image using Distress Crayons and a water brush. I chose this particular photo as I wanted someone wearing a coat and smiling ~ someone who looks as if they're embracing the season. I also wanted to keep the colours that I used to colour tint, quite warm, so chose similar colours to the ones I used on the leaves and added a blue background.

I added some rips and tiny tears to the edges of the photo, and then attached a piece of idea-ology Cello Sticker Tape to the left hand side before machine stitching some detail onto the photo.

I attached the photo to a piece of felt that I cut with Pinking Shears from my own stash, and then mounted the felt onto a piece of mountboard. The mount board will create a stable base once the photo is stuck into place.

To complete the photo, I added the Oct 18 remnant rub from the Labeled set.

LAYERING THE LEAVES AND MOUNTING THE PHOTO

It's now time to create the focal point to this piece and I attached the photo into position with foam pads. I then arranged the leaves to cascade across the tag, by placing these on either side of the image. 

I then tucked in some pieces of Spanish Moss, that I have in my stash but can be found in floristry departments. The moss creates more interest and texture to this arrangement which I love.

FINISHING DETAILS

We're nearly there and all that's left is those tiny details that add so much more to a piece than you think.

Firstly, I clipped a Large Hinge Clip to the top. This clip was painted with a combination of the Lumberjack Plaid Distress Paint, Antiqued Bronze and Black Soot for a beautiful vintage finish. 

I added the 'Merchandise" ephemera piece which is taken from the Field Notes Snippets pack and attached this just below the Hinge Clip. I also attached a Machinery Head to cover the hole in the top of the smaller tag. I painted this piece with Lumberjack Plaid Distress paint for a chippy vintage look.

Beneath the photo arrangement, I added a Theories Quote Chip, "Focus On The Good". I sanded the edges of the chip and then inked them with Walnut Stain Distress Ink before attaching it to my tag. On either side of the chip, I placed a Large Fastener. To add the dents and "dings" to the surface of the fastener, I used the Texture Hammer.

So, that's my make finished for this week and I hope you love the story behind this piece and all the tricks and techniques I've used to create the project.

As always, if you make anything, or if you've been inspired by anything that you've seen here on my blog ~ then please, let me know by tagging me on social media or leaving a comment here and I will be right over to take a look!

Don't forget that every week, one lucky random participant has the chance to win a $25 gift voucher from Simon Says Stamp and you can join in up to 5 times, which means you could have 5 chances to winYou have until next Monday at 8am Ohio time. 1pm UK time, 2 pm CET to join in and good luck....


Thank you so much for taking the time to stop by today!
Love Emma xxx

Sunday, 10 August 2025

It All Started With A Mouse....

Happy Sunday everyone...

Hope you're all having the best weekend and the sun is shining where you are!

Today, I'm really happy to be sharing a make over on the Simon Says Stamp Blog and below is a little sneak peek of what you'll find when you pop on over by clicking HERE!


 Hope you love the make and will be inspired by all the tips and techniques!
See you again very soon... Emma xx

Monday, 21 July 2025

It's a Kind of Magic....

Hello everyone...

As we begin the new week, it's time for a brand new Simon Says Stamp Monday challenge and this week,  we are challenging you to MAKE YOUR OWN BACKGROUND!

So, with so many different ways of doing this, and whether you use inks, sprays, pastes or paints, you will be spoilt for choice and we can't wait to see how you will interpret this fun challenge theme.

For my background I chose to use Distress Spray Stains and Oxide Sprays, together with stamps and I just had so much fun building up those layers to create interest and texture ready for the focal point of those beautiful butterflies.

So, let's get started because it's time to share how I created my background...

For this make, I used a combination of Tim Holtz products and chose an idea-ology clipboard, a Size 8 Etcetera Tag and a size 8 Mixed Media Heavystock tag as my substrates.

BACKGROUNDS

The background on the tag and the clipboard are both created using the same colours of sprays, oxide sprays and inks. I chose the following:

DISTRESS SPRAY STAINS: Iced Spruce, Old Paper, Speckled Egg. Gathered Twigs

OXIDE SPRAYS: Old Paper

DISTRESS INKS: Uncharted Mariner, Scorched Timber

I began by cutting a panel of Mixed Media Heavystock card, and also used a size 8 Mixed Media Heavystock tag. I misted each of these surfaces with water and then started to apply my sprays, using the Distress Spray Stains first and only applying a light touch of Gathered Twigs, and then some light flicks of Old Paper Oxide. I applied a little more water to blend the colours and then allowed these to dry. You can also use a heat tool to dry the inks.

Once my surfaces were dry, I inked around the edges with Scorched Timber Distress Ink.

To add some more interest to my background, I used Black Soot Archival Ink to ink up the script stamp from the Stampers Anonymous Tiny Toadstools stamp set and added the script randomly onto my card panel and tag.

Set the panel to one side and taking the tag, I added some more stamping down the right hand side. I used one of the stamps from the SA Faded Type stamp set and inked this with clear ink, before applying gold embossing powder over the top. Tap away the excess and then heat emboss until molten.

Finally, I used Tim's Splatter Brush to add some white paint speckles and machine stitched a border around each piece to complete the backgrounds.

CLIPBOARD

We're now ready to start constructing this piece and to begin with I worked on the clipboard and after unscrewing the clip, I attached the inked card panel to the board using Matte Collage Medium.

I then stamped the Factory No.1896 down the left hand side of the board. This stamp is from the Eccentric stamp set.

Taking the clip, I wanted to this to have a rusty, crusty appearance which is so easy to achieve and you can see a tutorial on how I do this by clicking HERE.

To alter this clip, I used exactly the same process as I used in my earlier post, but I omitted the Salvaged Patina Paint on this particular piece.

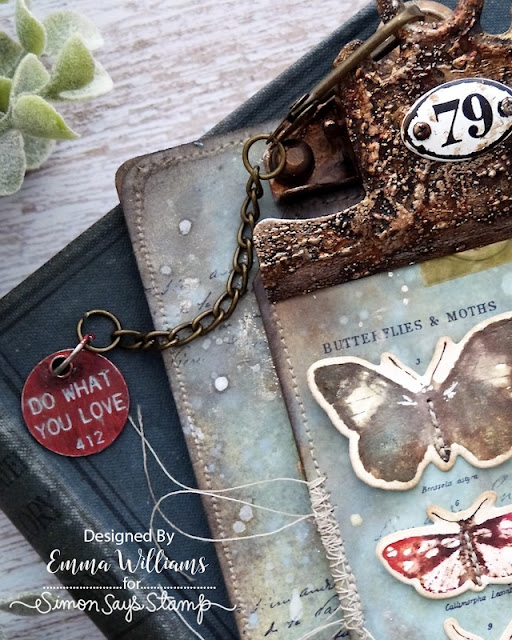
Once the clip was ready, I reattached it to my board and then attached the Mini Plaquette, No.79 to the centre of the clip.

TAG

Moving onto the tag, and to begin with I stamped the butterflies from the Papillon stamp set down the left hand side of the tag. This stamp set now has co-ordinating dies from Simon Says Stamp, so no more fussy cutting when we move onto the next step.

BUTTERFLIES

To create the butterflies, I re-stamped the image onto watercolour card using the brand new Mini Oxide Ink Pads and my stamp platform.

I inked the stamps directly with various colours from this release, including Crackling Campfire, Barn Door, Peacock Feathers, Bundled Sage, Scorched Timber, and Gathered Twigs. I personally find it easier to do one butterfly at time. I then lightly misted water over the inked stamps before stamping them onto the card.

If you feel you need more colour, then re-position your card on the platform and just go in with the ink pad.

Once I was happy with my butterflies, I used the Simon Says Stamp co-ordinating die set to die cut each one from the card.

I inked the edges of the die cuts with Frayed Burlap Distress Ink and then attached them to the tag, lifting the wings and not attaching these. I placed each image over the top of the previously stamped image on my tag, and this ensures I get the correct placement and also you can see the text from the stamp.

Before I attached my tag to the Etcetera Tag, I stitched the bodies of the butterflies to the tag.

With my tag complete, I attached it to the clipboard using Matte Collage Medium.

To complete the tag, I added a Curator Ephemera piece in the top right hand corner.

I also added a Quote Chip, 'A Little Magic Can Take You A Long Way", and once again, I placed a Cello Sticker tape over the chip.

Finally I added an Adornment Star and two hardware heads, all of which I painted with gold acrylic paint.

DETAILS

It's now time for all those tiny finishing details and I began by adding a Numbers Snippet to the right hand side of the clipboard, tucking it underneath the tag, and once again, I added a Cello Sticker Tape.

Finally, I attached a Swivel Clasp to the clip and from the chain, I hung an idea-ology Thought Token which I painted with Candied Apple Distress Paint. Once dry, I then scribbled Phantom Mist Distress Crayon over the token and wiped away the excess to reveal the wording.

So, that's my make complete and I hope you've loved the piece I've created and feel inspired by the techniques.

As always, if you make anything, or if you've been inspired by anything that you've seen here on my blog ~ then please, let me know by tagging me on social media or leaving a comment here and I will be right over to take a look!

Don't forget that every week, one lucky random participant has the chance to win a $25 gift voucher from Simon Says Stamp and you can join in up to 5 times, which means you could have 5 chances to winYou have until next Monday at 8am Ohio time. 1pm UK time, 2 pm CET to join in and good luck....


Thank you so much for taking the time to stop by today!
Love Emma xxx

Powered By Blogger

Total Pageviews