
Hi everyone...
Hope you had a good weekend and feeling refreshed for another week ahead and a brand new Simon Says Stamp Monday Challenge! This week our theme is called ADD A LITTLE SPARKLE and as the title suggests, we want you to add some shimmer and shine to your projects!
This week, I chose to create a card but this isn't any ordinary card, this is a very special card for my parents who are celebrating their 50th wedding anniversary this year! So, with the title of the challenge and this wonderful occasion ahead of us, I thought there was no better time to get sparkly and decided to combine the two to create a card for their special day! I also wanted to show you how you can mix and match some of Tim's flower and foliage dies and how well they all work together to make one beautiful floral bouquet.

So, it's time to get started and time for the new challenge to begin...

...and here's how I created this card and these dimensional sugar coated flowers!

To begin with I began with the background ~ I knew that I wanted to use these flowers because both my parents love their garden and also love this colour of flower...so with this in mind, I chose to create a neutral background that provided natural texture but didn't have much colour but did have a really earthy, botanical feel to it and I went with the Lumber 3D Texture Fade and embossed a piece of kraft card. The card I used was slightly larger than the embossing folder, but all you need to do, is place and align the card in the folder for the first pass and then just turn the card around, align it again in the folder, ensuring that the embossing will meet and there won't be any gaps and pass it through the machine again. I now had my 14 x19cm piece of kraft card embossed and also embossed a second piece of kraft card, approx 11.5 x 14cm. Now to add colour and for this, I began by using Brushed Corduroy Distress Spray Stain and spritzed this over the background before then dry brushing Ground Espresso over the top to accentuate the raised areas and give the paper such a realistic look of wood, which is all due to the folder and a little ink and paint!
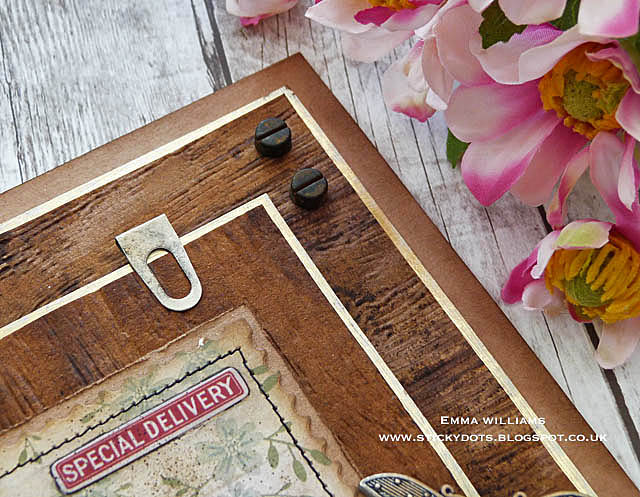
Matt both piece of embossed card onto gold metallic kraft card and then mount them onto the front of a kraft card blank.
Moving onto the next layer and for this I used the Stacked Postage Stamp die to die cut a piece of paper from the Etcetera Paper Stash, and then added a machine stitched around the outside before matting onto kraft card and attaching to my card front using foam pads.

For the border strip across the bottom, I just had to try out one of the brand new, and simply amazing 3D Impresslits Cut and Emboss dies from Tim Holtz and used the Scallop design to cut a piece of metallic kraft card which I then aged using Rust, Black and Sailboat Blue Alcohol Inks. I attached the strip beneath my patterned paper layer.

I now have all my layers in place and just need to start adding those embellishments...starting with the numbers and letters. For the 50, I used the Deco Alpha Die to die cut a piece of chipboard and then added a good coating of Matte Collage Medium over the top before sprinkling the numbers with some Gold Rush Glitter from Prima.

For the word, YEARS I chose to use the Typography Findings letters and once again gave them a coat of Collage Medium and then sprinkled these with Vintage Platinum Glitter Dust. This glitter is such a fine glitter and is perfect for getting into all the nooks and crannies of the letters.
Allow the glittered pieces to dry before attaching them over the top of the patterned paper layer, adding a Metallic Quote Sticker, 'Always & Forever' below.

For the flowers, I chose to use a combination of dies by Tim Holtz ~ Garden Greens, Funky Florals 2 & 3 and finally the Tiny Tattered Florals. I love how you can combine all these dies to create such a beautiful floral display.

For the display down the left hand side and to make the three larger flowers, I used the large flower die from the Funky Floral 3 set and die cut two layers of the petals and stamens from Mixed Media Heavyweight card to create one bloom. I added just a hint of Shabby Shutters to the centres of the petals and the stamens are coloured with Victorian Velvet Stain and to complete the flowers. To add a little more sparkle to this piece, I then applied a smear of Collage Medium to the ends of the stamens before dipping them into Rock Candy Dry Glitter. To complete the flowers, I added a Bauble Finding coloured with Lettuce Alcohol Ink to the centres.

The flat flowers are again cut from the same cardstock and coloured with the same inks before being layered before adding some more Rock Candy Glitter to give them a beautiful sugar coated look.
I then cut some foliage from Classic Kraft Stash Card and used the Garden Greens and some of the foliage dies from Funky Floral 2 to create these.
Once I had all my pieces, I layered them over sisal fibres and just built up the display.
For the left hand side, I made two of the largest flowers from the set using the dies in the Mini Tattered Florals die. Once again I coloured these with Victorian Velvet, created the mini florals and then placed them on the right hand side with some more die cut foliage.


I added a Metal Butterfly to the piece, which has just a light coverage of gliding wax over the top and completed the card with some Mini Hardware pieces on the top right and bottom left hand corners....


Don't forget, you can find more inspiration from my talented teamies over on the challenge blog and every week, one lucky random participant has the chance to win a $50 gift voucher from Simon Says Stamp. You have until Monday 8am Ohio time. 1pm UK time, 2 pm CET to join in and good luck....


Thank you so much for stopping by today and I'll see you very soon!
Love Emma xxx
Recipe for project:
Idea-ology: Bauble Findings, Snippets, Typography Findings, Snippets Ephemera, Butterflies Adornments, Index Clip
Prima Marketing: Mini hardware
Heat Gun
Sisal Fibres from my own stash
Sisal Fibres from my own stash


