Showing posts with label handmade paper flowers. Show all posts

Monday, 6 February 2023

L.O.V.E.

Hello everyone...

Hope you're all well and had a great weekend! As always, a new week means we have a brand new Simon Says Stamp Monday Challenge and this week, with Valentine's Day less than 10 days away, we can feel that LOVE IS IN THE AIR and hope you'll join us for our fun challenge theme, where the DT are also showcasing the products of PaperArtsy.

With so many amazing crafty products to 'love', I'm sure that the ideas for this theme will be endless and we can't wait to see what you create and of course, over the many years of my blog, I've been making a lot of pieces that I hope will inspire you. But back to today, and this year my Valentine's make is all about a love bird, and I can't wait to share how I created this piece using products from Tim Holtz, and Sizzix!

So, here we go...it's time to share some L.O.V.E. and talk you through how I made this week's project!

TAG

This tag began life as a panel of Distress watercolour card, and I spritzed the card with water before sprinkling some of PaperArtsy's In The Navy Infusions over the wet surface. You don't need a lot of this powder, a little goes a long way and you can always add more if you need it. TOP TIP: I pierce a small hole in the top of the metal cap, and shake the powders through the hole, this gives me the minutest amount to use.

With the powder sprinkled over my wet card, I then added another light misting of water to dissolve the crystals and make the colour pop.

I didn't want a complete coverage of colour, I wanted to leave some white space around the infusions.

After heat drying the cardstock, and ensuring there are no wet areas for the next stage ~ I cut my tag from the card, using the largest sized Framed Tag and I inked the die using Clear Embossing Ink and a brayer. I just roll the brayer over the raised part of the tag die to transfer the ink, place the die on my card, and then run through the machine.

Working quickly, remove the die and sprinkle gold embossing powder to highlight the debossed areas of the die cut tag. Tap away the excess and then heat emboss the powder until molten.

I mounted the tag onto grey cardstock, followed by a layer of burlap, each time leaving a border showing around the outside.

To complete the tag, I added an eyelet through the hole to reinforce it and then threaded some rope through the hole itself.

INNER PANEL

Moving onto the inner panel of the tag, and taking the larger panel of the card that I used for the tag, I cut a smaller inlay panel. I machine stitched around the edge and then placed this onto my tag using foam pads.

HEART WOOD SLICE

We're now ready to created the centrepiece and I started with the wood slice.

I used the heart shape from the Wood Slice and Alphabet Thinlits Die Set and cut the layers that I need to build the slice, from various shades of inked Heavystock Mixed Media Card, I also cut a further four layers of the largest section of the die.

COLOURS USED:

Base; Ground Espresso Distress Spray Stain

Middle; Walnut Stain Distress Spray Stain

Top: Antique Linen, Old Paper and Frayed Burlap Distress Spray Stain, plus Gathered Twigs Distress Crayon

After placing each layer over the top of one another, I have a really thick wood slice but without the weight...it's still light enough to be used on a card front, or as I have, used on a tag.

I applied a layer of Matte Collage Medium over the top of the slice, and once dry, I ran the Gathered Twigs Crayon over the top to accentuate the tree rings on the slice, wiping away the excess crayon with a cloth.

I attached the slice to my tag, using foam pads.

FEATHERED FRIEND

For my little bird, I used the smaller bird from the Feathered Friends Die Set to cut watercolour card, and then inked and coloured my bird with Distress Inks, blending the ink over the surface.

INKS; Tumbled Glass, Rusty Hinge, Vintage Photo, Gathered Twigs, Broken China, Old Paper

I then assembled the bird and added white pen highlights.
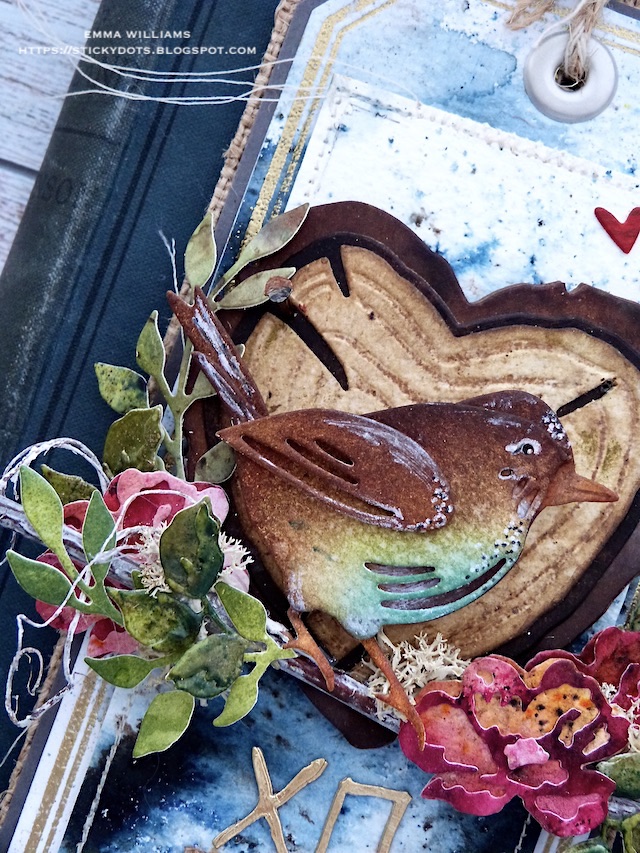
Using a twig from my garden, I adhered this across the tag with hot glue, and then attached the bird to sit on the branch, using foam pads to secure my little feathered friend in place.

The foam pads, also add height and dimension to the tag.

FLORA and GREENERY

To create my greenery and flowers, I used the Mini Brushstroke Flowers Die Set and cut the leaves and flowers from watercolour card, coloured with The Sage and Are You Cerise? Infusions, applied to the damp cardstock in exactly the same way as I made the background panels.

Once I had a varied selection of foliage, I wanted to add a little more depth to the smaller pieces, so I applied an embossing dabber over the surface of the die cuts and sprinkled some Peeled Paint Distress Glaze over the top. After tapping away the excess, I heat embossed the glaze.

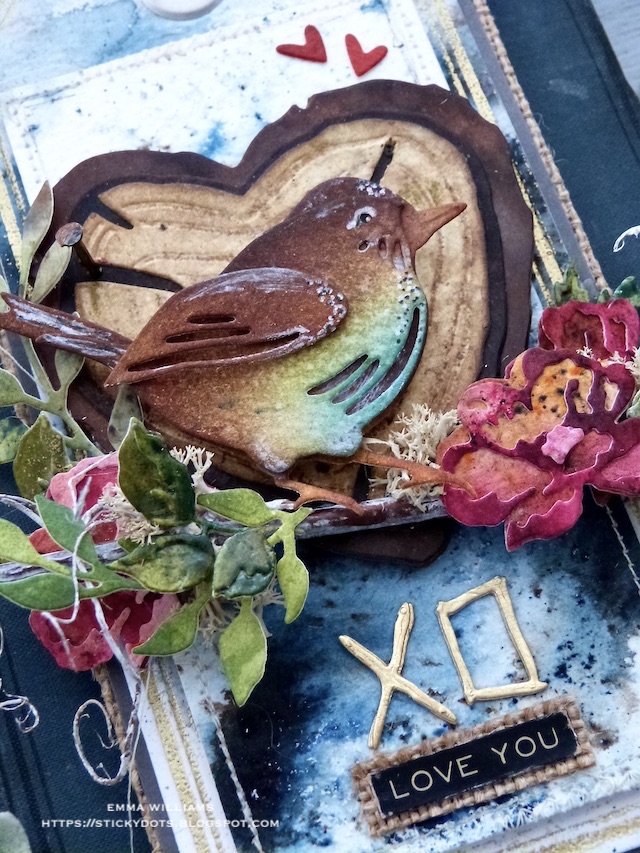
I arranged the flowers and the foliage around the bird, then added some curly moss and reindeer moss, both of which I have in my stash.

SENTIMENT

For the sentiment, I used a combination of the "Love You' from the Metallic Sticker Book, layered over a strip of burlap and the letters, 'xo' cut three times from gold metallic kraft card, using the alpha dies from the Wood Slice and Alphabet Die Set. After I layered each letter, one over the other to resemble the thickness of chipboard, I attached them to my tag.

We're nearly there and all that's left is the details.....

DETAILS

I added two small die cut hearts that I cut from red card using the dies in the Falling Hearts Die Set and placed these in the top right hand corner...

...before adding a Remnant Rub, just above it.

Finally, I hammered a nail tack into the wood slice itself, which is painted with a combination of Black Soot, Crackling Campfire and Ground Espresso to create a rusty effect to the metal.

...and that completes my project for this week, which I hope you love and feel inspired by some of the techniques and products that I've used.

Don't forget that every week, one lucky random participant has the chance to win a $25 gift voucher from Simon Says Stamp and you can join in up to 5 times, which means you could have 5 chances to win. You have until next Monday at 8am Ohio time. 1pm UK time, 2 pm CET to join in and good luck....


Thank you so much for taking the time to stop by today ~ stay safe and keep well.
Love Emma xxx

Recipe for project:

PaperArtsy Infusions: In The Navy, The Sage, Are You Cerise?
Distress Spray Stain: Ground Espresso, Walnut Stain, Antique Linen, Frayed Burlap
Distress Paint: Ground Espresso, Crackling Campfire, Black Soot
Distress Glaze: Peeled Paint
Distress Inks: Tumbled Glass, Rusty Hinge, Vintage Photo, Gathered Twigs, Broken China, Old Paper

Monday, 9 November 2020

Memories...

Hello friends...

Hope you all had a good weekend and as we face another month of lockdown here in England, I hope you're all staying safe and keeping well and ready for a brand new week over on the Simon Says Stamp Monday Challenge Blog!

This week our theme is REMEMBRANCE/THINKING OF YOU and this inspired me to create a project to commemorate the 11th hour of the 11th day of the 11th month ~ Armistice Day! This day holds a special place in my heart as someone very close to our family fought in WW2! Sam, who I came to consider as my adopted grandfather, was a true English gentleman, and his war time stories about the time he spent overseas and the day of the D-Day landings always fascinated me, and even though he sadly passed away a few years ago, we will always remember how much this day meant to him and how he would wear his medals, together with a poppy to lay a wreath at the Cenotaph or attend the Festival of Remembrance at the Royal Albert Hall ~ we were very proud of this man and the contribution and sacrifices he made.

So with this in mind, I hope I've created a project that reflects how much this man would be proud of and here's how I created my very special Remembrance Day project...


I began by creating the poppies and for this I used an old favourite die ~ Tim Holtz's Tattered Florals and combined it with the flower from the larger of the two florals from Tim's Tropical die set and the stamens are one of the dies in the Funky Florals 3 die set. If you haven't got these dies, you really can use any floral die of your choosing and Tim has so many to choose from, it won't be too hard to find one that works.

To create the poppies, I used Dina Wakley's Cotton Watercolour Paper, spritzed with a combination of Candied Apple and Barn Door Distress Spray Stains. Once it was dry, I wanted to create two poppies and for this, I cut four layers of petals using the largest sized floral on the Tattered Florals die and two layers using the larger flower from the Tropical Die Set. 

I also cut a third flower using this die and pulled the petals apart to create five separate petals that I will attach to the finished card.

After inking the edges of each layer with Walnut Stain Distress Ink, I shaped the petals to create a more realistic look, curling the edges in different directions, and then layered the Tattered Florals petal over the top of one another, slightly offsetting each layer. After inking the edges of the Tropical Thinlits die cut, I attached each one to the centres of each of my poppies, again shaping the petals and curling them to create dimension to each layer.

For the black stamens, I painted some tissue with Black Soot Distress Paint and then using the stamen die from the Funky Florals 3 set, I cut three layers of the paper, stuck these together and placed them in the centres of each flower. I completed the poppies by colouring a Bauble Adornment with Pitch Black Alcohol Ink and placing these in the centres of each flower.

The leaves are also made from the cotton watercolour paper, spritzed with Peeled Paint and Bundled Sage Distress Spray Stain and die cut using the leaf from the Funky Floral Large die set. Ink the edges with Walnut Stain and set these to one side.

Now we have the poppies ready and moving onto the background, I chose to keep it quite simple as I really wanted the poppies to be the focal point of this piece. After cutting a panel of Mixed Media Heavystock, (which I am so happy to have back in the larger sized pack) measuring 14 x 19cm, I spritzed a very light mist of water over the surface and then used a combination of Faded Jeans, Speckled Egg and Stormy Sky Distress Spray Stains to create colour, layering each stain in turn to build up the intensity I wanted.

I then applied a small amount of Black Soot Distress Ink to my glass mat and spritzed with a little more water before dipping the card into the inks.

After thoroughly heat drying the card, I inked the edges with Walnut Stain Distress Ink and then machine stitched a border around the outside.

To add a few layers to the inked background, I took my new favourite script stamp from the Stampers Anonymous The Poinsettia stamp set and using Black Soot Archival Ink, stamped the script randomly over the background. I then used the speckle stamp from the same set, inked with clear embossing powder and stamped this onto the background before sprinkling with gold embossing powder and heat embossing.

After mounting the inked card onto a piece of slate coloured cardstock, I then mounted it using foam pads onto a piece of black card. To add another layer to the piece, I applied some of Tim's Design Tape around the edges of the black card ~ this is one that I had in my stash, and I'm so sorry but I don't know which set it came from as mine have become a little mixed up in a box, lol!

Now to create that horizontal strip that sits across the centre of this piece...

...I cut a piece of watercolour card, 6 x 14cm, spritzed with water and after removing the spray nozzle from the bottles, I flicked small amounts of Black Soot, Walnut Stain, Faded Jeans, Stormy Sky and Chipped Sapphire Distress Spray Stains across the wet card, creating little pools of ink but keeping some white space around them. After heat drying the card, I stitched down each side and then mounted it onto my background using foam pads.

To create the plaque, I cut a panel of Blackout Kraft Stash and sanded it to reveal the kraft core before machine stitching a border around the edges.

For the wording I chose to use the Alphanumeric Label Die Set and cut the letters, and the date from silver Metallic Kraft Stash. I then attached each one to the blackout panel creating my plaque with the words ~ LEST WE FORGET and the date 11/11.

I matted the plaque onto silver metallic kraft stash, and a piece of chipboard painted with Black Soot Distress Paint and then mounted it onto my project with some more foam pads to create dimension.

I attached the poppies and leaves to cascade around the plaque and then added the petals as if they were tumbling down the card.

For the finishing details, in the top left hand corner, I added a Union Jack Ephemera piece taken from the Snippets Ephemera pack....

...and in the bottom right hand corner, I added a Clippings Sticker "in memory of' and a small heart that I had previous die cut and had left over from a previous project.

Finally, I placed a Hardware piece onto the panel, together with those tiny little crosses that are die cut using one of the dies from the Media Marks Thinlits Die set.

I hope you've enjoyed how this project was created and it's inspired you to make some poppies of your own that can be displayed to commemorate all those who have given so much to create a world that ok, at the moment might not be perfect but it's the world we will live in for many years to come!

Don't forget that every week, one lucky random participant has the chance to win a $25 gift voucher from Simon Says Stamp and you can join in up to 5 times, which means you could have 5 chances to win. You have until Monday 8am Ohio time. 1pm UK time, 2 pm CET to join in and good luck....


Thank you so much for taking the time to stop by today ~ stay safe and well, and see you again soon.
Love Emma xxx

Recipe for project:

Stampers Anonymous: The Poinsettia
Distress Ink: Walnut Stain
Tim Holtz Idea-ology: Bauble Adornments, Clippings Stickers, Snippets Ephemera
Distress Spray Stains: Candied Apple, Barn Door, Peeled Paint, Bundled Sage, Faded Jeans, Speckled Egg, Stormy Sky, Chipped Sapphire, Walnut Stain, Black Soot
Design Tape from my own stash

Monday, 15 April 2019

The Tale of Cottontail Bunny...

Hello friends...

Happy Monday everyone and welcome to the brand new Simon Says Stamp Monday Challenge! This week are theme is called BEAUTIFUL BLOOMS and we would love for you to join us and play along! So, maybe you will make some flowers of your own using dies, or use stamps within your projects or even embellish your artwork with some gorgeous ready made flowers ~ we hope you'll join us for this fun challenge.

For my project, I was inspired by Beatrix Potter and her wonderful illustrations and books and I chose to create an Easter framed panel that celebrated my childhood, my love for these stories and the tales of Peter Rabbit, Benjamin Bunny and the adorable Flopsy Bunnies.

So, let's get creating ~ it's time for this week's challenge to begin...


...and I started with the frame. This is one of Tim Holtz's framed panels and if you haven't used these before, then they actually come in two separate pieces ~ a back panel and the beaded frame. Taking the two sections, I primed the frame and the edge of the back panel with a layer of gesso, heat dried the paint and then added some colour to both pieces, using Weathered Wood Distress Paint. Once the painted layer was thoroughly dry, I then used a small amount of Picket Fence Paint which I dry brushed over the top. Once again dry the paint before applying a third layer of colour, using the dry brushing technique and this time applying Frayed Burlap. Once the the frame was dry, I then applied some Vintage Gold gilding wax over the top, paying particular attention to to the beading as I wanted to accentuate this.
I now have my frame completed and moved onto the background. For this project I wanted to keep the background fairly neutral and not too fussy as I wanted to really showcase Cottontail and the flowers, so I cut a panel of canvas paper, slightly larger in size than the aperture of the frame and applied a coat of Antique Linen Distress Paint over the top. Using a brush, I picked up some Pumice Stone Distress Paint and with long strokes applied the paint over the surface, just allowing the brush to kiss the surface! If you do find you've applied too much paint at this point, don't worry ~ just dry in between the layers and then add more of the Antique Linen using the long, sweeping brush strokes!
I adhered the dry background onto the base board of the framed panel using Matte Collage Medium. To add an inner border to my frame, I attached some Design Tape, applying this to all four sides of the baseboard, sticking it approx 0.5" from the outside edge of the board ~ to ensure the correct positioning of the tape strips, I would just pop the frame onto the baseboard and put a faint pencil line so that you can see exactly where the frame will sit and exactly where you will need to apply the tape to show a border.
Once I was happy, I attached my frame over the top using Matte Collage Medium.

To add more texture to the background, I applied some Ranger Crackle Texture around the edges and to random areas of the background itself. Allow for the crackle to appear and for the paste to set. I am hoping to do a more detailed tutorial sometime soon and will explain how to apply and colour the crackle paste, so...stay tuned for that if you'd like to know more! Now that the paste is dry, scribble a small amount of Gathered Twigs Crayon onto a mat and using a water brush or a damp paint brush, pick up the colour and just apply the crayon over the top, allowing the ink to sink into the crackles.
To complete the background, I applied some Grit Paste through the Speckles Layering Stencil and added the stamps from the Keepsakes Ephemera set and a Clippings Sticker to the top right hand corner.
Now to get to work on that spring garden....

...and create some 'beautiful blooms" and for this I started by making the dimensional flowers using the Funky Florals 3 die set. Taking the spiky flower die, which has two sections on the one die ~ I cut two layers of card for each flower, so there should be 12 layers in total, petals and stamens. The petals are coloured with a light inking of Antique Linen Distress Ink and the stamens are coloured with a combination of Peeled Paint and Shabby Shutters Oxide Inks. Once the inking is complete, I layered my petals, slightly offsetting each petal and attached the stamens to the centres before shaping and curling each layer. I then added a Bauble Adornment coloured with Butterscotch Alcohol Ink to the centres. Using this die set, I also cut some extra pieces of the smaller foliage which I will tuck into the arrangement.
Set these aside to begin cutting some Wildflower Stems ~ I just used three of the dies from this set, the sprig, the leaves and the flower heads. Each stem is coloured with Oxide Inks ~ shades of green for the stems and the blue tones for the flower heads and the sprig is coloured with Gathered Twigs Distress Paint, tipped with Peeled Paint on the bud heads.
Now for Cottontail, and for this I cut the bunny from two pieces of chipboard which I layered together to create one substantial and very solid figure.
I then applied a coat of gesso over the top of the chipboard and once it was dry, I added a layer of Frayed Burlap Distress Paint, followed by a layer of Gathered Twigs ~ because I wanted to create the look of fur and give texture, I used a sponge to apply the darker colour over the top.

After adding the details to the bunny tail, Antique Linen Distress Paint and to her ears, using Picket Fence and Spun Sugar Distress Paints, I added her pearl eye, nose and whiskers drawn in with Dylusions Paint Pens.
To complete Cottontail I attached her bow, again cut from chipboard and painted with Spun Sugar before adding a small pink gem to the centre of the bow.
Then finally, to create some definition to her, I used the Ground Espresso Distress Crayon and just ran it around the edge of the bunny, blending out any harsh lines with my finger.

I always love dimension on my pieces and to create this I used a Scallop Etcetera Trim, which I cut down slightly to fit across the width of the frame. After crackling the trim with Ranger Crackle Texture Paste and fixing it into position across the bottom section of the frame using foam pads, I then added my wildflowers, Cottontail and the Funky Florals flowers and foliage ~ adding some moss, a few bouquet findings flowers that I cut from the stems and coloured with Weathered Wood Distress Spray Stain and some sisal fibres into the arrangement. I also added some Hardware Heads to each side of the Etcetera Trim to create the look that the shelf has been attached to the background.

I also placed a small butterfly onto the background, shaping the wings so it appears to be in flight.
To complete this project, I used the Alphanumeric Label die to cut my lettering from gold metallic kraft stash card and spelt out the wording 'Easter Greetings' which I then attached along the bottom of my scene.
...and that's this week's project finished and I hope it's given you some ideas of how to create some spring panels and Easter projects of your own! It really was such a fun piece to bring to life and Cottontail is simply adorable ~ she is the perfect shape and so elegant in stature!
Don't forget, you can find more inspiration from my talented teamies over on the challenge blog and every week, one lucky random participant has the chance to win a $50 gift voucher from Simon Says Stamp. You have until Monday 8am Ohio time. 1pm UK time, 2 pm CET to join in and good luck....


Thank you so much for taking the time to stop by today and hope to see you again soon, love Emma xxx

Recipe for project:

Tim Holtz/Stampers Anonymous: Scallop Etcetera Trims
Tim Holtz/Sizzix: Alphanumeric Label, Wildflower Stems 1, Cottontail, Funky Floral 3
Powered By Blogger

Total Pageviews