Showing posts with label 3D dies and folders. Show all posts

Monday, 16 May 2022

Do What You Love....

Hello friends...

Hope you are all keeping well and had a fabulous weekend! Thank you for all your messages about my absence last week ~ everything's ok, it was just a silly accident that kept me from joining in with the challenge but I'm back and ready to share my make, for the brand new Simon Says Stamp Monday Challenge which is all about ADDING SOME TEXTURE! We hope you'll join us and play along, and however you choose to create texture, whether it's embossing folders, pastes or fabric ~ we can't wait to see what you create.

For my make, I created a textural background using one of Tim Holtz's 3D Embossing Folders by Sizzix and the gorgeous Damask and when you combine it with the Sizzix Foldaway Machine, then the detail will never cease to amaze you ~ it's just stunning and has so much depth. So, if you haven't tried a 3D folder yet...you must!


So let's get started, it's time to get creative!

To begin with I started with the background and used two panels of Distress Watercolour Card that I spritzed with a light mist of water. I placed the card into the folder, and ran it through the machine ~ you can do it 3 times to create depth but with the foldaway, I found it worked after a couple of times.

Repeat with the second panel of card and once it's embossed it's time to get inky...

INKING THE EMBOSSED PANELS

As you can see from the finished tag, I created an ombre effect to the background, with the colour fading towards the bottom and this is how I created it.

Place the first of the two panels of embossed card into the splatter box and I used Ground Espresso, Speckled Egg, Frayed Burlap and Antique Linen Distress Spray Stains, together with Speckled Egg Oxide Spray, to add the colour to my card. Spritz with a light mist of water to blend the inks and then heat dry.

On the second panel, I used the same colours but omitted the darker Ground Espresso.

To create the fresco finish, I used my fingertip to gently apply a smear of White Gesso over the top, or you can use Chalk Paint if you prefer.

Heat dry the paint thoroughly before the next stage of applying the Foundry Wax.

I only wanted hints of gold, not a block coverage, so I used my fingertip to apply the Gilded Foundry Wax, or you can use a brush if you have skin sensitivities and I literally just lightly rubbed over the top of the embossing, allowing the wax to highlight areas where I made contact.

Heat set the wax.

Cut the two panels to fit a Mini Etcetera Tag. On the tag itself, I adhered a strip of Tim's older Design Tape down the right and left hand sides, and then placed the darker panel at the top and the lighter one at the bottom. 

Machine stitch around the edge and adhere the background to the tag using Matte Collage Medium.

Where the two panels join, I used two separate strips of the new idea-ology Design Tape Trims to hide it.

The tag is ready and it's time to add those embellishments.

PHOTO

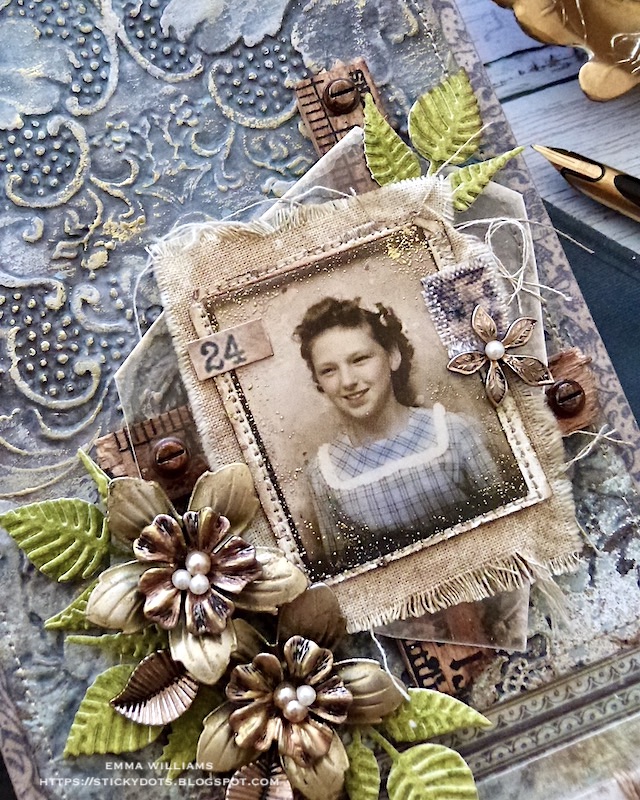
The photo is taken from the idea-ology Photo Booth set and I distressed the edges, inked them with walnut Stain Distress Ink.

Because I wanted this piece to be packed with different textures, I added some more around the edges of the photo by dabbing an embossing dabber gently onto the edges, sprinkling Frosted Crystal over the top and then heat embossing the powder.

Once the powder is set, I then applied a light coverage of Foundry Wax to the raised embossed areas and once again heat embossed.

I then attached the photo using my sewing machine to a piece of frayed calico cotton from my stash, which I inked with Frayed Burlap Distress Stain before I placed the completed image onto a piece of Mica.

The photo itself is mounted onto ruler pieces ~ these are all pieces that I'd previously broken for other projects and after inking them with Walnut Stain Distress Ink, I just arranged them onto my tag, placing them on the right hand side and then mounted the photo on top.

I adhered some Hardware Heads to the broken ruler pieces, attached them with Matte Collage Medium and then altered them with Rusty Hinge, Black Soot and Ground Espresso Distress Paints to create a rusty finish to the metal.

To complete the photo arrangement, I added a Curator Snippets Number 24, and a small piece of adhesive Linen Tape.
FLORAL SPRAY

Now for the floral spray ~ I used the idea-ology Floral Adornments which I layered and combined them with one of my favourite left dies taken from Funky Floral 3 Sizzix die set by Tim Holtz. If you follow me every week, you'll have seen the love I've shown this die over the years!
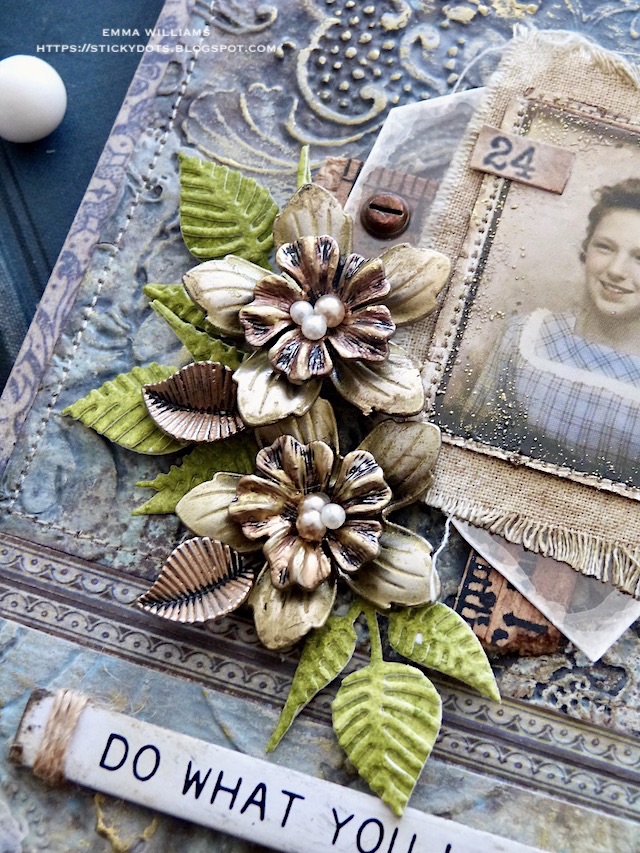
To colour the metal flowers, I used Foundry Wax ~ a combination of Gilded and Statue. I applied the wax to the flowers and leaves and then heat set. I arranged the flowers on the left and right hand side fo the photos, and added pearls to the centres.

To add a some more texture to the piece, I die cut my foliage from card that I inked with Peeled Paint and Bundled Sage Distress Spray Stains.

Once I'd die cut the leaves, I placed them into the floral arrangement.

Beneath the photo, I attached a Theories Quote Chip. I inked the edges of the chip with Walnut Stain Distress Crayon and then wrapped some twine around each end before attaching it to my tag with foam pads.

We're nearly there and all that's left is to add some details in the top left corner...

I added a type chip, which I cut in half and placed a Hardware Head onto it, before finishing the piece with a Hinge Clip, altered with some more Foundry Wax and hung a Antiqued Gem from the clip.

So that's my make finished for this week, and I hope you love what I've done and the techniques I've used. which can also be used with a family photo, to make it more personal, the ideas are endless and I hope you'll give it a try.

As always, if you make anything, or if you've been inspired by anything that you've seen here on my blog ~ then please, let me know by tagging me on social media or leaving a comment here and I will be right over to take a look!

Don't forget that every week, one lucky random participant has the chance to win a $25 gift voucher from Simon Says Stamp and you can join in up to 5 times, which means you could have 5 chances to winYou have until next Monday at 8am Ohio time. 1pm UK time, 2 pm CET to join in and good luck....


Thank you so much for taking the time to stop by today ~ stay safe and keep well.
Love Emma xxx

Recipe for project:

Stampers Anonymous: Mini Etcetera Tag
Distress Spray Stains: Peeled Paint, Bundled Sage, Ground Espresso, Speckled Egg, Frayed Burlap and Antique Linen
Oxide Sprays: Speckled Egg
Distress Ink: Walnut Stain
Distress Paint: Black Soot, Ground Espresso, Rusty Hinge
Cotton Calico, Mica Sheet and twine from my own stash

Monday, 2 May 2022

Born To Be Brave...

Hello friends...

How was your weekend? Hope you all had a great one and ready for the week ahead and a brand new Simon Says Stamp Monday Challenge. This week, we are showcasing the amazing products of the one and only Tim Holtz with our MASCULINE theme and we hope you'll join us and play along!

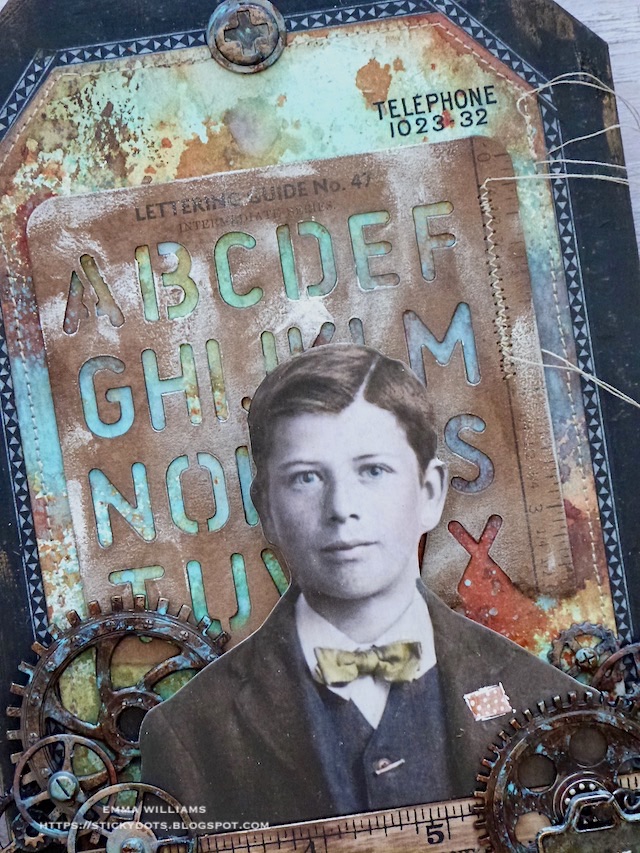
For my make, I chose to create a plaque that is actually an altered Etcetera Tag and I will be taking you through how I made this piece using idea-ology and Ranger Ink products.

So let's get started, it's time to get creative!

TICKET SHAPED PLAQUE

We'll begin with the substrate that I used and for this you will need a Small Etcetera Tag. In the pack you get three tags but you will have already noticed that this surface isn't just a regular tag, it's been turned into a ticket shape plaque. To create this shape, I took two of the tags and placed one over the top of the other, flipping it 180°, so that the top of each tag is opposite one another and the tag on the top will form a template.

Holding the tags firmly in place, I used a pencil to mark where I will need to cut away the corners of tag on the bottom so that I can create the ticket shape. Using a craft knife, I cut the corners off the tag ~ this will take a little bit of effort to get through the layers but but you will get there in the end.

After sanding the edges of tag to smooth them down, I painted the surface with Black Soot Distress Paint.

Once the paint was dry, I sanded back the edges to create more of a vintage feel before I applied Statue  Foundry Wax, using my fingertip, (or a brush as recommended if you have skin sensitivities) and just added smears of the wax to the board. Heat set with a heat tool.

My surface is ready and now I moved onto the next stage ~ background!

BACKGROUND LAYERS

For the first layer, I used Distress Spray Stains to create a patina effect for the background. I cut a panel of Distress Watercolour Card approximately 16cm in length, but slightly smaller in width, so it will allow for a border around the edge.

After spritzing the cardstock with a light misting of water, I then applied and layered my sprays ~ Salvaged Patina, Crackling Campfire and Vintage Photo Distress Stains and Salvaged Patina Oxide Spray. Spritz a little more water over the top and allow for the colours to blend before heat drying, or allowing to dry naturally.

I inked the edges of my panel with Walnut Stain and Rusty Hinge Distress Inks.

After cutting away the corners at the top, I machine stitched around the edge and then adhered the tag to my plaque. I used Matte Collage Medium as my choice of adhesive throughout this make.

Across the bottom section, I wanted some texture, so I used the Circuit 3D Embossing Folder to emboss a panel of silver metallic kraft stash. I cut this down to size, again cutting the corners away so that it will reflect the shape of my plaque. To add the rusty appearance to the embossed panel, I applied some Black Soot Distress Paint, allowed it to go slightly tacky before wiping away the excess. Some of the paint will remain and accentuate all the detail of the folder. I then repeated this using Ground Espresso Distress Paint, again wiping away the excess and always drying the layers between applications. Finally I applied a very light layer of Antiqued Bronze Distress Paint, just dry brushing this over the top.

I machine stitched around the edge before attaching it to my plaque.

To frame the background layers, I used Design Tape Trims, which I just applied around the edge of the inked panels.

For my final layer, I used one of Tim's Stencil Cards. I tore off the bottom section of the card, about two thirds down and then applied some Sterling Foundry wax over the surface of both pieces. I heat set the wax and then inked over the top with Walnut Stain Distress Ink.


Attach the torn Stencil Cards to the background, placing the two pieces so that they do have a slight gap in the middle to elongate the appearance.

We're now ready for...

EMBELLISHMENTS

I used a Paper Doll Portrait, (I called him Johnny, just because I always love to give these images a name, it makes them come to life for me), which I colour tinted with Distress Crayons and added white pen work to highlight the handkerchief in his pocket.

I then took a Ruler Piece, snapped off both ends and ran the Walnut Stain Ink Pad over the surface of the wood to colour it. Using a baby wipe, I blended the ink to create the stain.

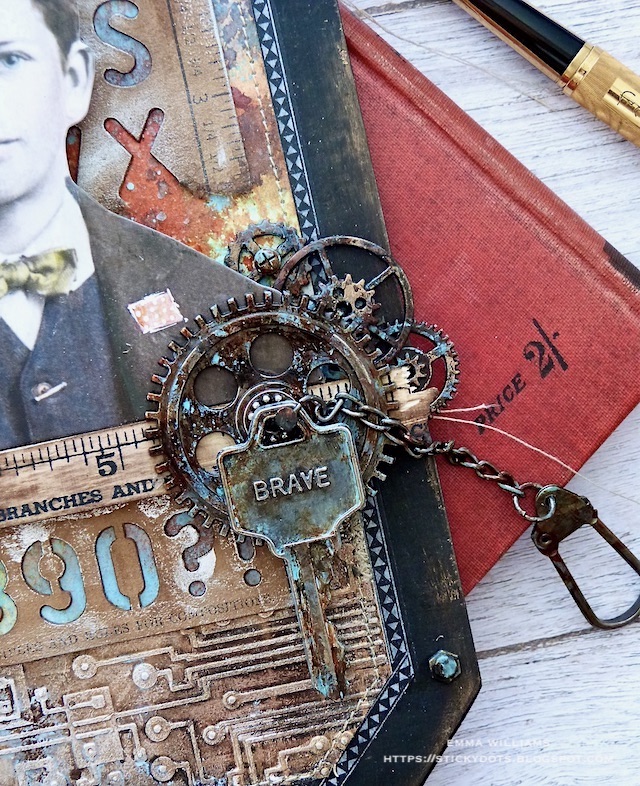
I attached the ruler and Johnny, the Paper Doll portrait to my background layers, using foam pads to add height and then surrounded the image with a combination of Industrial Gears Sprocket Gears and Mini Sprocket Gears.

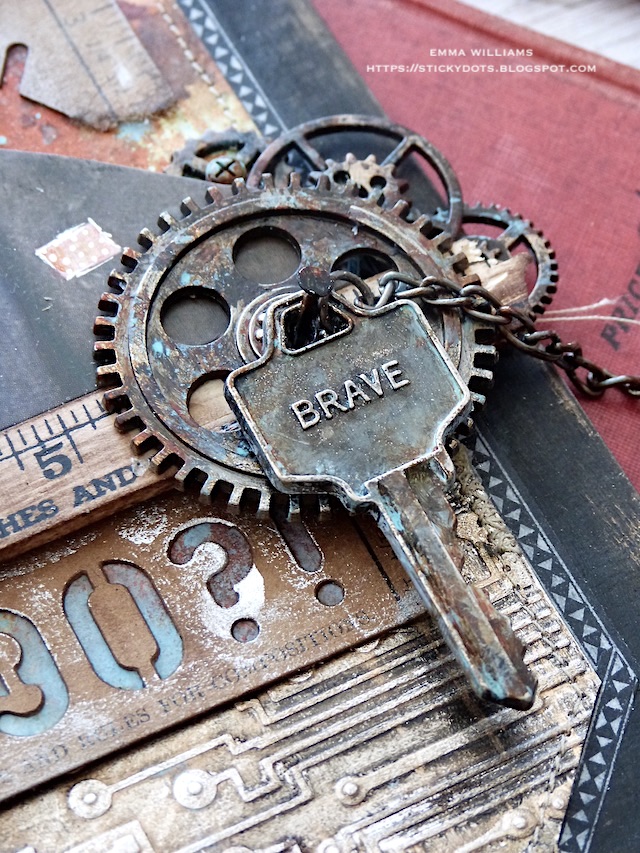
Each of the gears are given a rusty appearance using a combination of Black Soot, Salvaged Patina, Rusty Hinge and Antiqued Bronze Paints, before I applied a touch of Statue Foundry Wax over the surface.

I then layered each gear to create the clusters around the image.

In the grouping of gears on the right, I also attached a Word Key, BRAVE to the arrangement. 

Again I added the rusty appearance before attaching it to a Swivel Clasp, that I just let hang loosely on the side.

Finally, I added some tiny details...

...a clippings sticker with the quote "be happy'.

A Tel No. Remnant Rub from the Eccentric Set in the top right corner.

One of the Machinery Heads was attached at the top...

...and Hardware Heads on either side towards the bottom.

As a finishing touch, I used a Vintage Clip, altered with a little Black Soot Distress Paint and the Statue Foundry Wax. I clipped this to the bottom edge of the tag.

So that's my make finished for this week, and I hope you love what I've done and the techniques I've used. which can also be used with a family photo, to make it more personal, the ideas are endless and I hope you'll give it a try.

As always, if you make anything, or if you've been inspired by anything that you've seen here on my blog ~ then please, let me know by tagging me on social media or leaving a comment here and I will be right over to take a look!

Don't forget that every week, one lucky random participant has the chance to win a $25 gift voucher from Simon Says Stamp and you can join in up to 5 times, which means you could have 5 chances to winYou have until next Monday at 8am Ohio time. 1pm UK time, 2 pm CET to join in and good luck....


Thank you so much for taking the time to stop by today ~ stay safe and keep well.
Love Emma xxx

Recipe for project:

Stampers Anonymous: Small Etcetera Tag
Foundry Wax: Statue, Sterling
Distress Spray StainsSalvaged Patina, Crackling Campfire and Vintage Photo
Oxide Sprays: Salvaged Patina
Distress Ink: Walnut Stain, Rusty Hinge
Distress Paint: Black Soot, Salvaged Patina, Rusty Hinge and Antiqued Bronze Paints

Monday, 5 July 2021

I Meant To Behave...

Hello all...

Hope you've had wonderful and happy weekend and for all my US friends ~ I hope you had a happy 4th July!

As Monday comes around once again, the brand new Simon Says Stamp Monday Challenge begins and this week our theme is all about Fun and Quirky and the DT are also showcasing Katzelkraft within their projects! If you would love to join us, all the details are at the end of my post and we can't wait to see what you create...

I decided to make a card, and as Tim refers to them ~ this is an Emma sized card which measures 19.5 x 15.5cm! You'll also notice that I can't get enough of the brand new Stampers Anonymous releases from Tim Holtz and this time I'm using the Observations set. I just love this gentleman, so regal and every time I see him, he reminds me of the actor who played Queen Victoria's husband, Prince Albert in the drama series Victoria!


So let's get started ~ it's time for me to share this project and here's how I made this card...

I started by creating the backgrounds and for this I used two separate panels of Mixed Media Heavystock card, one measuring 18 x 14cm and a second to measure, 16 x 12cm. I then spritzed the card with a light misting of water before spritzing the following sprays over the surface and blending them with another misting of water:

Speckled Egg Distress Spray Stain

Ground Espresso Distress Spray Stain

Antique Linen Distress Spray Stain

Frayed Burlap Distress Spray Stain

Crackled Campfire Oxide Spray

Tumbled Glass Oxide Spray

After heat drying the backgrounds thoroughly, I began by embossing the larger panel using the Circuit 3D Texture Fade Embossing Folder. Because of the size of the panel, I ran this through a couple of times to ensure the entire panel was embossed. I then machine stitched a border in black cotton around the outside.

After matting the embossed panel onto black kraft stash card from the Neutrals set, I mounted the layered panels onto the white card blank.

Now for the smaller panel and I stamped some text on the background using the advertising stamp from The Professor 2 stamp set. I stamped this in Black Soot Archival Ink and just rolled the stamp over the background, allowing it to kiss the surface but not stamping the whole image.

Now for the gold bursts and I used the Halftones Etoile stamp by Katzelkraft and using Versamark clear ink, I stamped this three times, top left hand corner, along the bottom edge and on the right ahdn side fo the panel, just taking each image over the edge of the panel and then sprinkled gold embossing powder over the images, and heat embossed them until molten.

To complete the panel, I inked up the tiny little crosses from the Inquisitive stamp set, and stamped these in the top right hand corner before I machine stitched a wonky border around the outside of the panel.

I matted the panel onto gold metallic kraft stash which I sanded around the edge and placed foam pads on the back before mounting the panel onto my card blank. To complete the panel, I attached a strip of card across the bottom of the panel, this was an offcuts from the card panel and inked in the same colours and I added it to just give a base for the face to sit on so that it won't be floating in mid air.

Now for the star of the show...Albert!

I stamped the image onto watercolour card and then coloured him with a combination of Distress Re-inkers and Polychromos pencils.

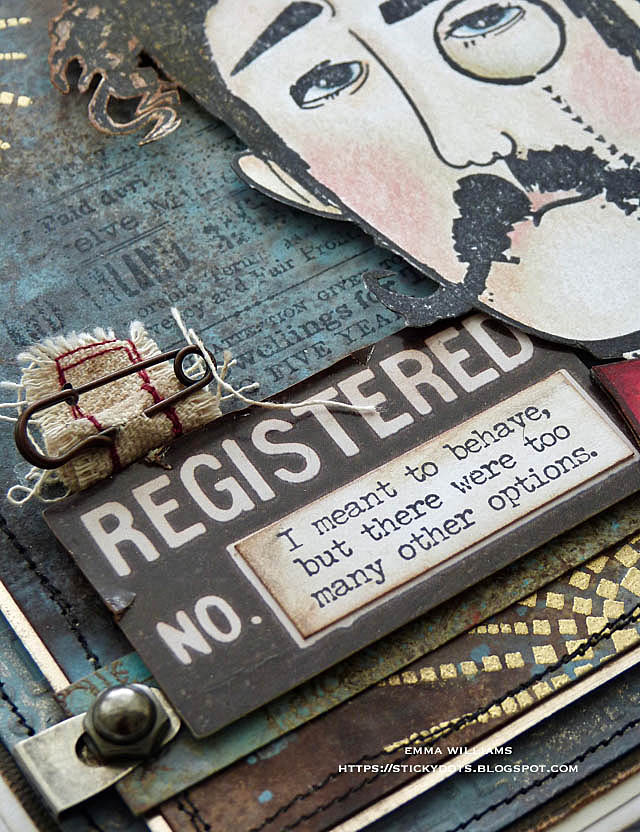
Once I was happy, I fussy cut around the outline and placed him on foam pads to add some height and dimension to the face. I added a gold Metallic Droplet to create the look of a button on his jacket.

I made a few rips and tears in a Urban Layers Ephemera piece, Registered No. and inked around the edge with Walnut Stain Distress Ink. I then stamped my quote in the box. I took the quote from the Halloween Snarky Cats stamp set and just thought it worked for my quirky card. I did stamp the quote directly onto the ephemera piece but I'll admit I smudged it, so had to re-stamp it onto white card and then mount it over the top of the smudgey mistake!!

For the final details, I added a Stitched Scrap which I rolled up and then attached above the ephemera piece and I added a Wire Pin from my stash.

I also attached an Index Clip and some Machine Heads hardware onto each end of the strip that is attached to my panel.

Finally I added a Mini Flair in the top left hand corner, placing it in the centre of one of the golden bursts.

So that completes this week's project which I hope you love...

...as always, if you make anything, or been inspired by anything that you've seen here on my blog ~ then please, let me know by tagging me on social media or leaving a comment here and I will be right over to take a look!

Don't forget that every week, one lucky random participant has the chance to win a $25 gift voucher from Simon Says Stamp and you can join in up to 5 times, which means you could have 5 chances to winYou have until Monday 8am Ohio time. 1pm UK time, 2 pm CET to join in and good luck....


Thank you so much for taking the time to stop by today ~ stay safe and keep well.
Love Emma xxx

Recipe for project:

Distress Inks: Walnut Stain
Distress Spray StainSpeckled Egg Distress Spray Stain, Ground Espresso Distress Spray Stain, Antique Linen Distress Spray Stain, Frayed Burlap Distress Spray Stain
Oxide SpraysCrackled Campfire Oxide Spray, Tumbled Glass Oxide Spray
Powered By Blogger

Total Pageviews