Showing posts with label heat embossing. Show all posts

Monday, 3 October 2022

Walk Like An Egyptian...

Happy Monday friends and welcome to the first week of Simon Says Stamp Monday Challenges in October!

This week our theme is called STITCH IT and the DT are showcasing the products of AALL & CREATE within their projects. If you'd like to join us and play along, then we would love to see how you interpret the challenge theme, whether you choose to stitch onto cards, journal pages, make books or actually sew something using material, the choices are endless and it's going to be a fun challenge.

For my project, I created a card which was inspired by my love of Ancient Egypt, something I was fascinated by at school and to this day, I still study and love including one particular person ~ the Queen of Egypt, Nefertiti, wife of Pharaoh Akhenaten and worshipper of the sun disc.

So with this in mind, and using two stamps from AALL & CREATE, which I combined with a few products from Tim Holtz and Sizzix, I started to make this card come to life.

So let's get started...

To begin with I started by making the tag that is the background to this make.

TAG BACKGROUND

I used a size 8 Mixed Media Heavystock Tag and started by adding the colour using Distress Spray Stains and Oxide Sprays.

I misted water onto my tag, placed it in a splatter box and spritzed the following colours onto the surface:

DISTRESS SPRAY STAINS: Ground Espresso, Speckled Egg, Tumbled Glass, Frayed Burlap

OXIDE SPRAYS: Speckled Egg

Once I was happy with the inked background, I heat dried the tag thoroughly, inked the edges with Walnut Stain Distress Ink and then moved onto the stamping. 

I wiped the surface with an anti static bag before I used the Shattering stamp, inked with Versamark Ink to stamp onto the tag. I re-inked the stamp and then twisted and moved the stamp around to form the design over the entire tag.
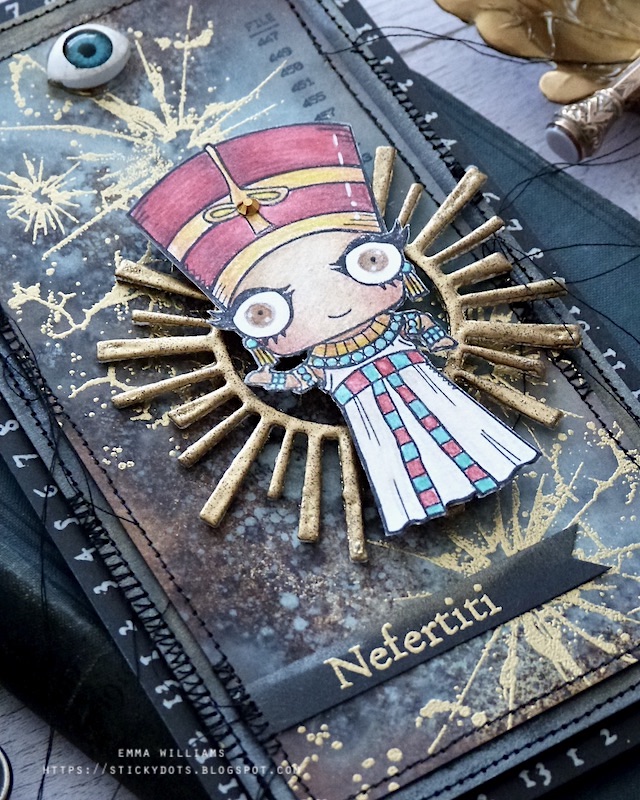
I then sprinkled gold embossing powder over the top of the stamped areas, tapped away the excess and heat embossed the powder until molten.

In the top right hand corner, I used the file numbers from Tim's Mini Glitch stamp set and stamped these in Black Soot Archival Ink.
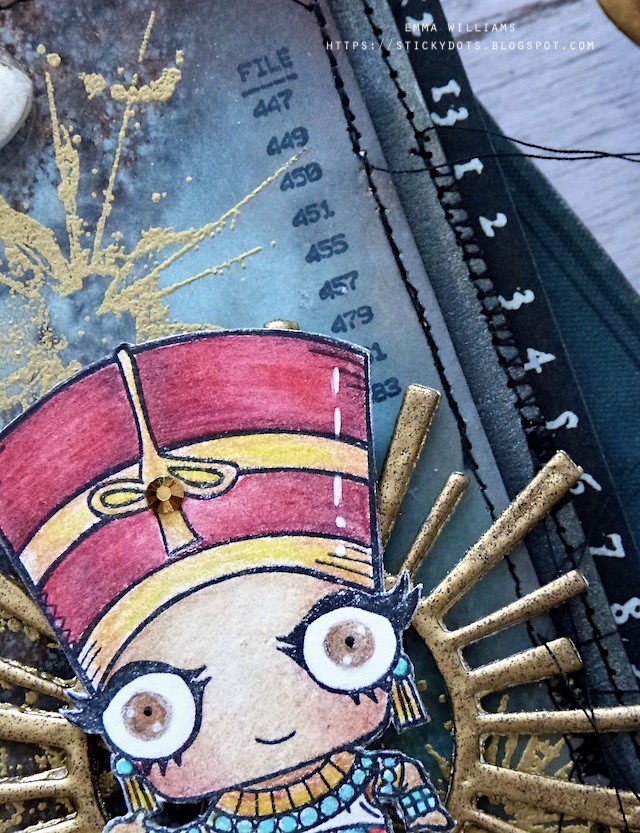
To complete the tag, I machine stitched a border around the edge, leaving loose thread hanging all around the edge.

BACKGROUND LAYERS

I took a panel of black card that I edged with Tim Holtz Halloween Distress Crayons, Iron Gate and Decayed, which created this dusty, vintage look to the surface. I machine stitched this panel and then used foam pads to attach it onto my background of card, which has a border of Tim's Design Tape running around the edge. This numerical tape is from the Halloween set. This forms the matting and layering behind the tag, but don't attach that tag just yet....

Now for the star of this show...

NEFERTITI

I stamped the image onto watercolour card, using Black Soot Archival Ink and then coloured it with the amazing new Watercolour Distress Pencils. If you haven't tried these yet, then you must as they are beautiful to use and have so many uses other than just water-colouring.

I used a water brush and built up my colours, adding shading with the pencils to create light and dark. I then added some white pen work, before fussy cutting around the outline of the image.

I added a small gem in the centre of the headdress and placed this to one side whilst I created the sun that will will sit behind her.

SUN

For this I used the sun from Tim Holtz's Circle Play die by Sizzix. I cut the sun three times from Mixed Media Heavystock card before layering them, and sticking them together to create one substantial die cut. I then applied the embossing dabber to the surface and sprinkled with gold embossing powder. I used Seth Apter's Weathered Gold by Wow which I bought from SSS but unfortunately isn't available any more but you can use any gold powder in your stash.

I repeated this process three times to create an enamelled finish to the sun die cut...

...and then placed the sun behind Nefertiti. 

Using cleverly hidden foam pads to add dimension to this piece, I attached the sun and Nefertiti to my tag.


I then stamped the name tag onto black card, embossing it with gold embossing powder and cut it into a banner shape, with an inverted 'v' at one end before stitching it onto my tag, in the bottom left hand corner.

Now I can attach the tag to the matted background layers and we're nearly there...

All that's left is to attach my "eye of Horus" to the top of my tag, placing it over the reinforcer hole. I used a Creepy Eye, that I inked with Mushroom Alcohol Ink to knock back the whiteness and placed it onto my tag with Matte Collage Medium.

So that's my card finished and I hope you love this as much I loved making it...it was a fun project to work on and really did appeal to my love of Ancient Egypt.

As always, if you make anything, or if you've been inspired by anything that you've seen here on my blog ~ then please, let me know by tagging me on social media or leaving a comment here and I will be right over to take a look and if sometimes I miss it ~ just keep nudging me!

Don't forget that every week, one lucky random participant has the chance to win a $25 gift voucher from Simon Says Stamp and you can join in up to 5 times, which means you could have 5 chances to win. You have until next Monday at 8am Ohio time. 1pm UK time, 2 pm CET to join in and good luck....


Thank you so much for taking the time to stop by today...Love Emma xxx

Recipe for project:

AALL & CREATE: Shattering, Nefertiti
Stampers Anonymous: Mini Glitch
Sizzix/Tim Holtz: Circle Play
Distress Spray Stains: Ground Espresso, Speckled Egg, Tumbled Glass, Frayed Burlap
Distress Oxide Spray: Speckled Egg
Distress Crayons: Decayed, Iron Gate
Distress Ink: Walnut Stain
From my own stash: Weathered Gold Embossing Powder

Monday, 9 August 2021

Life is all about perspective...

Hello friends...

Hope you've all had a good weekend and ready for a brand new week of creativity because if you are, then the brand new Simon Says Stamp Monday Challenge has just begun and this week our theme is all about HEAT EMBOSSING!

This is a technique that always gives me such satisfaction, I always love how you can transform a piece with the magic of powder and heat and I decided to use this technique to create the texture on the Perspective Moth which I added to an inky background to create my card packed full of layers.

So let's get started ~ it's time for me to share my card project and here's how I made this piece...

To begin with I started with my moth and cut this once from Mixed Media Heavystock and once from Kraft Heavystock. I inked the edges of the kraft die cut with Walnut Stain Distress Ink before I started to add the embossing powders to the second die cut.

I used the Embossing Dabber to apply ink to my die cut and then started to add layers of powder beginning with Antique Linen Embossing Glaze. After heat embossing the glaze, I then moved onto the next layer, adding the embossing dabber down the body of the moth and applying some Walnut Stain Embossing Glaze over the top. Again heat emboss the glaze until molten. Apply some Rusty Hinge Embossing Glaze to random areas of the body and heat emboss. 

The next layer of embossing is on the wings and after I applied the Embossing Dabber to the surface, I sprinkled the layers of Embossing Glaze over the top, adding them individually and building up the layers one by one. Top Tip: When adding the powders, start with the palest colour first, then build up the layers but reduce the powder with each application, allowing the previous colour to show beneath.

I started with Speckled Egg, heat embossed the glaze, then added Prize Ribbon. Heat emboss and repeat this process using Salvaged Patina, Hickory Smoke and then a final sprinkling of Walnut Stain.

Finally, I wanted some texture on the body, and where the wings join ~ and for this I used a small amount of Emerald Creek Embossing Powder over the top of the ink and heat embossed this until molten.

I now have my gorgeous moth ready and layered the embossed piece over the top of the kraft die cut, leaving the wings free! I then shaped the wings to create a little more dimension and in the photo below, you can see the width of the wingspan on this beauty ~ it's amazing!!

Now for the background and for this I cut a panel of mixed media heavystock, 12 x 15.5cm.

I began by applying Distress Spray Stains and Oxide Sprays ~ Antique Linen, Ground Espresso, Salvaged Patina, Speckled Egg and a touch of Frayed Burlap Distress Stains and Salvaged Patina and Speckled Egg Oxide Sprays. I built up the colour towards the top of the panel, allowing it to fade towards the bottom.

After adding some stencilling directly onto the panel using Frayed Burlap Oxide Ink, through the Mini Layering Script Stencil from Set 49...

...I then started to add some stamped layers, and for this I used a combination of stamps ~ Entomology Script stamped directly onto the background with Black Soot Archival Ink. Some stamped imagery added to the right hand side using stamps from the Field Notes set and the Mini Glitch, in Barn Door and Black Soot Archival Ink....

...and also adding some stamping in the bottom left hand corner using the same stamp sets and same colours. I always use my stamp platform for this as it creates a really beautiful, clear impression. In this corner, I also added a Remnant Rub, Exhibit A., which I applied above the stamping.

To complete the background, I added some crosses from the Mini Glitch stamp set, and stamped these in the top left hand corner, stamped with Salvaged Patina Oxide Ink.

I inked the edges of the panel with Walnut Stain Distress Ink and then machine stitched a border before matting this panel onto silver metallic kraft stash card, followed by a layer of blue kraft card taken from Tim's Cool Kraft Stock.

I then mounted my layers using foam pads, onto a background of script paper which I think was from one of Tim's older paper pads and a layer of blackout card before mounting these layers onto my card blank. Each time I left a border around the outside to create the layers.

Now for the tiny finishing details and in the top right hand corner, I added an offcuts of silver metallic kraft stash, which I had on my desk. This was embossed using the Foundry 3D Texture Fade and is literally a small piece cut that I keep and never throw away but is perfect for wrapping around the edges of  background panels to create more interest. I then attached a rolled up Stitched Scrap, complete with Mini Pin before I adhered a Field Notes Ephemera piece into place.

Finally, I added some Index Clips ~ I placed three clips around the edges of the inked background panel and altered these with Distress Paints for a more rusty, crusty look. I used Rusty Hinge, Crackling Campfire, Ground Espresso, and Black Soot.

To complete the clips, I adhered some Hardware Heads over the top, again altered with the same colours of Distress Paints and attached with Matte Collage Medium.

So, that completes my project for this week and I hope you've loved the card I've made...

...as always, if you make anything, or been inspired by anything that you've seen here on my blog ~ then please, let me know by tagging me on social media or leaving a comment here and I will be right over to take a look!

Don't forget that every week, one lucky random participant has the chance to win a $25 gift voucher from Simon Says Stamp and you can join in up to 5 times, which means you could have 5 chances to win. You have until Monday 8am Ohio time. 1pm UK time, 2 pm CET to join in and good luck....


Thank you so much for taking the time to stop by today ~ stay safe and keep well.
Love Emma xxx

Recipe for project:


Distress Ink: Walnut Stain
Distress Oxide Ink: Frayed Burlap, Salvaged Patina
Distress Paints: Crackling Campfire, Rusty Hinge, Black Soot and Ground Espresso 
Distress Spray Stain: Ground Espresso, Speckled Egg, Frayed Burlap and Antique Linen
Oxide Spray: Salvaged Patina and Speckled Egg
Embossing Glazes: Speckled Egg, Walnut Stain, Antique Linen, Prize Ribbon, Hickory Smoke, Salvaged Patina

Thursday, 16 January 2014

Come Fly With Me...

Hello everyone...

Where is January going? I can't believe it's Thursday already, even though I keep thinking it's only Wednesday and then it's the biggest shock when I realise I've lost a day!!

Anyway, I've got plenty to keep me busy and out of mischief but I just wanted to pop by to say hello and to welcome all my new followers!! Thanks for joining me here and welcome aboard, I hope you enjoy the journey!!

Today, I'm sharing the first of two cards that I made for the January issue of Making Cards Magazine using a gorgeous set of stamps that were designed by my lovely friend, Sam Poole. The stamp set is available here and the background map is available as a separate stamp, here. As always, I really hope you love what I've created and enjoy my design...
The images are all stamped and then coloured with Distress Marker Pens and to complete the vintage, shabby feel of this project, I used kraft card as a card blank and if you look very closely you will see that I added an inked skyline and starry background.


You can read all about these projects and many other cards that I've made in Making Cards Magazine, back issues are available HERE and if you are looking for some Valentine inspiration, then check out this month's issue where I'm thrilled to be featured on the cover with my Heart In A Spin 3D card project and have two further projects inside.
So, that's it from me for today and be sure to check back to see the second card in this set. Thank you so much for stopping by and as always, I've loved reading all the kind words and lovely comments you've been leaving me either here, on Twitter or on Facebook!! I couldn't do any of this without all your support...it means the world!

See you all soon and have a lovely evening...

Thursday, 17 October 2013

Secrets...

“...and the leaves were telling secrets to the wind.”
― Peter Mulvey

Hello friends!

It's a flying visit from me today...so much to do and so little time!! I need to be an octopus at the moment to deal with all my jobs, lol!!

As promised though, here is some more of my artwork from last weekend's Clarity Stamp shows with Barbara Gray and as always, I really hope you love what I've created using the stamps and stencils from these two lovely kits.


Before I get back to the craft room...I just wanted to let you all know that my good friend, Julie Hickey and Craftwork Cards are back on our screens later today and you will not want to miss these shows because the new collection, designed by the very talented Steph Davies, is out of this world!!! It is....stunning!!! So, tune in to Create and Craft tonight at 6pm for a treat and again at 10am and 1pm tomorrow and you might even spot a few cards from yours truly along with some others from Julie and my lovely teamies!!!

Thanks for stopping by and see you soon with the last of my Clarity shares...bye for now!
Love Emma xxx


Powered By Blogger

Total Pageviews