Showing posts with label layering stencils. Show all posts

Monday, 1 September 2025

Countdown to Autumn...

Hello everyone and HAPPY STAMPtember...

As we celebrate the start of this exciting month, it's time for a brand new Simon Says Stamp Monday Challenge and this week we are showcasing the wonderful products of our very own Simon Says Stamp brand and the theme is called STAMP IT! So, however you choose to use stamps, we can't wait to see what you create and hope you'll join us and play along!

For my make, I started the countdown for my favourite time of year ~ AUTUMN and I chose to use Tim Holtz's Nature's Wonder stamp set together with the Simon Says Stamp co-ordinating die set. I love that these dies cut the images perfectly and there's no more fussy cutting which is definitely something to celebrate!

So, let's get started because it's time to share how I created my tag...

To begin with I used two Etcetera Tags which I layered ~ the Mini Etcetera Tag and the Size 8 Etcetera Tag.

CREATING THE BACKGROUNDS

I started with the larger tag, and began by applying Design Tape around each of the four edges. I then cut  a piece of decorative paper from the Halloween Backdrops pack and added rips and tears to the edges. I machine stitched a border and then adhered the paper to the tag with Matte Collage Medium, adding more tears and curling the corners to create a gnarly, vintage feel to the piece.

After applying a coat of Collage Medium to the surface of the paper, I then took my Walnut Stain Distress Crayon and used this to add colour to the rips and tears. I also added a small Cello Sticker Tape to the edge on the right hand side of the tag.

Moving on to the smaller, Size 8 tag I created my own background. For this I used a Size 8 Mixed Media Heavystock tag and the Numeric Mini Layering Stencil. I placed the stencil so the numbers would be in the centre of the tag and then applied Translucent Grit Paste through the stencil.

Remove the stencil and whilst the paste is still wet, I sprinkled Pumice Stone Distress Glaze over the top, tapping away the excess and then setting it to one side to dry.

Once the paste is touch dry, (or near enough) I then heat embossed the glaze until molten and created a faux enamel effect. Remember to not settle on one area for too long as you only want to melt the glaze and not create bubbles in the paste.

To add colour to the tag, I used a combination of Distress Spray Stains and Oxide Sprays:

Distress Spray: Black Soot, Frayed Burlap, Speckled Egg, Antique Linen

Oxide Spray: Speckled Egg

After misting the tag with water, I layered the sprays until I was happy and then allowed the tag to dry. The stencilled area will resist the colour, and if there is any residual ink, just wipe it away once the tag is dry.

To complete this, I machine stitched a border and then attached it to my Etcetera Tag with Collage Medium, before mounting this tag onto the centre of the larger tag, again using the medium to adhere it.

I added some flicks of Antique Linen 

LEAVES

Now to create the leaves for this piece and create those beautiful colours of Autumn.

As mentioned, I used Tim's Nature's Wonder stamp set by Stampers Anonymous and the co-ordinating die set by SSS.

I stamped each of my leaves onto watercolour card using Black Soot Archival Ink and then watercolored them with a selection of Distress Watercolour Pencils in Aged Mahogany, Crushed Olive, Peeled Paint, Crackling Campfire, Carved Pumpkin.

Once happy, I then used the co-ordinating dies to die cut each of the stamped leaves and then inked the edges with Walnut Stain Distress Ink. I used a total of 8 leaves for this make and shaped each of themes that this will create dimension on the finished piece.

PHOTO BOOTH IMAGE

With the leaves ready, I colour tinted the PhotoBooth image using Distress Crayons and a water brush. I chose this particular photo as I wanted someone wearing a coat and smiling ~ someone who looks as if they're embracing the season. I also wanted to keep the colours that I used to colour tint, quite warm, so chose similar colours to the ones I used on the leaves and added a blue background.

I added some rips and tiny tears to the edges of the photo, and then attached a piece of idea-ology Cello Sticker Tape to the left hand side before machine stitching some detail onto the photo.

I attached the photo to a piece of felt that I cut with Pinking Shears from my own stash, and then mounted the felt onto a piece of mountboard. The mount board will create a stable base once the photo is stuck into place.

To complete the photo, I added the Oct 18 remnant rub from the Labeled set.

LAYERING THE LEAVES AND MOUNTING THE PHOTO

It's now time to create the focal point to this piece and I attached the photo into position with foam pads. I then arranged the leaves to cascade across the tag, by placing these on either side of the image. 

I then tucked in some pieces of Spanish Moss, that I have in my stash but can be found in floristry departments. The moss creates more interest and texture to this arrangement which I love.

FINISHING DETAILS

We're nearly there and all that's left is those tiny details that add so much more to a piece than you think.

Firstly, I clipped a Large Hinge Clip to the top. This clip was painted with a combination of the Lumberjack Plaid Distress Paint, Antiqued Bronze and Black Soot for a beautiful vintage finish. 

I added the 'Merchandise" ephemera piece which is taken from the Field Notes Snippets pack and attached this just below the Hinge Clip. I also attached a Machinery Head to cover the hole in the top of the smaller tag. I painted this piece with Lumberjack Plaid Distress paint for a chippy vintage look.

Beneath the photo arrangement, I added a Theories Quote Chip, "Focus On The Good". I sanded the edges of the chip and then inked them with Walnut Stain Distress Ink before attaching it to my tag. On either side of the chip, I placed a Large Fastener. To add the dents and "dings" to the surface of the fastener, I used the Texture Hammer.

So, that's my make finished for this week and I hope you love the story behind this piece and all the tricks and techniques I've used to create the project.

As always, if you make anything, or if you've been inspired by anything that you've seen here on my blog ~ then please, let me know by tagging me on social media or leaving a comment here and I will be right over to take a look!

Don't forget that every week, one lucky random participant has the chance to win a $25 gift voucher from Simon Says Stamp and you can join in up to 5 times, which means you could have 5 chances to winYou have until next Monday at 8am Ohio time. 1pm UK time, 2 pm CET to join in and good luck....


Thank you so much for taking the time to stop by today!
Love Emma xxx

Sunday, 10 August 2025

It All Started With A Mouse....

Happy Sunday everyone...

Hope you're all having the best weekend and the sun is shining where you are!

Today, I'm really happy to be sharing a make over on the Simon Says Stamp Blog and below is a little sneak peek of what you'll find when you pop on over by clicking HERE!


 Hope you love the make and will be inspired by all the tips and techniques!
See you again very soon... Emma xx

Thursday, 10 July 2025

Tim Holtz and Simon Says Stamp Dies and Stamps Blog Hop

Hello everyone and welcome to the Inspirations Blog Hop featuring the Simon Says Stamp Exclusive co-ordinating dies that match Tim Holtz stamps.

I'm so excited to be joining this hop, and you might have arrived here via my very talented friend, Stacy Hutchinson's blog, but if not, and you want to catch up with everyone who is participating in this hop, then don't worry because you can head back to the beginning, by clicking HERE. Also, if you would like to see the entire product release , then pop on over to HERE.

So, let's get started and I'll can't wait to share all the details of how I used one of the amazing co-ordinating die and stamps sets to create my mini gift envelopes and gift tag.
To begin with I created my bases and for these I used the Collector (for the gift envelopes) and Specimen (for the tag) die sets and cut my pieces from Mixed Media Heavystock card.

GIFT CARD HOLDERS

Once I'd die cut my card to create two gift card envelopes, I scored along the lines and then added some Distress Spray Stain to create more of a vintage feel to the cardstock. I used a combination of Antique Linen and Pumice Stone sprays, and after misting the surface with water, I applied the sprays and then used a heat tool to dry the card.

I then inked the edges with Walnut Stain Distress ink before I assembled each of the envelopes.

Along the flap of each envelope, I inked one of the Ornate Trims stamps with Frayed Burlap Archival Ink, and then stamped the decorative trim. I repeated this on the second envelope using a different design of trim.
With the envelopes ready, I moved onto the layers.

For these background layers, I applied Distress Crackle Paste, through the Stampers Anonymous Splash Layering Stencil (THS080) onto a piece of Distress Watercolour Card. I set the card to one side to dry and for the crackles to appear and once this happens, I added the colour.

For this I used Distress Spray Stain in Speckled Egg, Antique Linen, Bundled Sage and Uncharted Mariner, together with Speckled Egg and Bundled Sage Oxide Spray.

I spritzed some water over the surface of the crackle pasted card, and then applied each of the colours, one by one. I then gave the card another light misting, you don't want to oversaturated the cardstock, just move the colours around to blend and then I gently heat dried the inks.
Once completely dry, I cut the card into two separate panels to fit the fronts of the envelopes and inked the edges with Frayed Burlap Distress Ink.

I then attached the panels to layers of Silver metallic Kraft stash and mounted these completed panels onto the fronts of my envelopes.
To complete the envelopes, I used the Crop-A-Dile to punch holes into the flaps and set a couple of eyelets into each before threading some seam binding ribbon through each eyelet, which I coloured with Tumbled Glass and Antique Linen Distress Spray Stains.

As the finishing touch, I added some Cello Tape Stickers to the envelopes.
We can now move onto the butterflies....

BUTTERFLIES

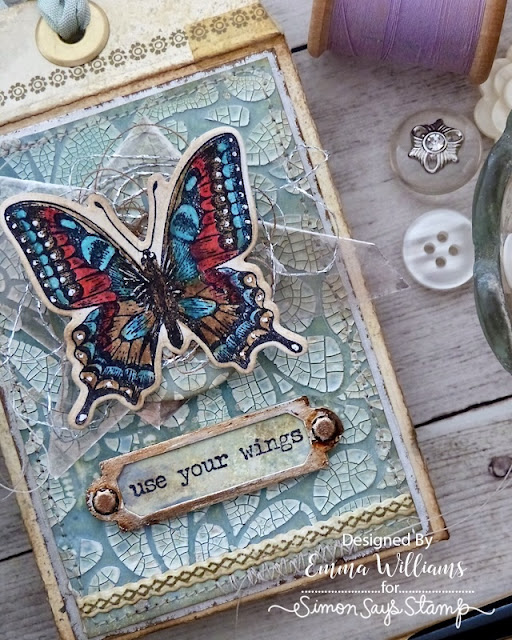
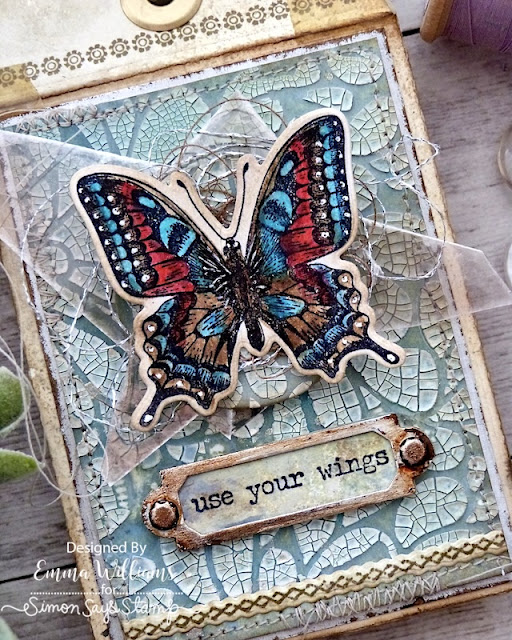
This is now where the fun begins and where we get to use the glorious new co-ordinating die sets from SSS, together with the stamps sets from Tim Holtz. For this make, I chose the Flutter stamp set, and I began by inking each butterfly with Black Soot Archival Ink, (I used three, 1 for each make) and stamping them onto watercolour card stock. I always use the smooth side of the cardstock when I stamp.


I then coloured my butterflies with Distress Watercolour Pencils and once I was happy and the watercoloring was completely dry, I used the co-ordinating Flutter die set to die cut the butterflies.

I then inked the edges of each one with Frayed Burlap Distress Ink, and shaped the wings.

BUILDING UP THE LAYERS

We can now start to build the layers and complete the envelopes.

I began by using mica sheets that I have in my stash and I used two pieces and layered these over the top of one another, fixing them to the envelope with foam pads to add dimension.
I then cut two circles from the remaining crackled cardstock that I used for the background, and used these as my base for the butterfly.
I mounted my butterflies over some loose threads from my haberdashery box which I glued directly onto the circle, and then attached the butterfly over the top, leaving the wings free from adhesive, as I want these to rise up, as if the butterflies are in flight.

We're nearly there and all that's left is the sentiments that sit underneath the butterflies...

SENTIMENTS

For each envelope, I used a frame and sentiment. The frame is die cut from silver Metallic Kraft card using the dies in the Specimen die set. I cut three layers to build up the frame and and then added the sentiment to a piece of mixed media cardstock, that I placed inside the frame.

I completed each frame with Hardware Heads on either side.

The "see the world" sentiment is from the Tiny Text Remnant Rub set by Tim Holtz...
...and the "use your wings is from the Tiny Text Stampers Anonymous stamp set.
I completed the envelope with an Ornate Trim, die cut with the co-ordinating die set, and attached this along the bottom of each of the envelopes.
To create more of a rusty finish to the silver metal, I used a paintbrush to apply Crackling Campfire, Black Soot and Antiqued Bronze Distress Paints to the metallic surface. I wiped away any excess paint, so that it pools and sits in the recesses, especially where I've added the hardware heads.

FILM SLIDE TAG

As a little extra make, I thought it would be fun to make a gift tag and as I mentioned at the beginning, I used the Film Slide die in the Sizzix Specimen Thinlits Die Set by Tim.
Once my film slide was folded and inked, I used all the same elements as I used on the envelopes and layered the mica sheets, threads and butterfly as my focal point. I then added the ornate trim across the bottom section. To complete the make, I added a "no.48' remnant rub, some tiny nailheads and an eyelet in the top, complete with twine from my stash.
So, that's my makes complete and I hope you've enjoyed this process and it's inspired you with ideas of how to use some of the amazing dies and stamps from this release.....

Thank you so much for stopping by today and before I go, don't forget to join Tim and his star student, Heidi for Create Together, live on the Simon Says Stamp YouTube channel, tomorrow at 12 noon ET.

See you soon, love Emma x


Hop Order


Simon Says Stamp Blog
Nina-Marie Trapani
Caly Person
Stacy Hutchinson
Emma Williams 
Cheiron Brandon
Cathie Cowles
Barb Engler


CLICK HERE to shop all products used to make this card

Simon Says Stamp Co-ordinating Dies and Stamps: Flutter, Ornate Trims
Stampers Anonymous: Splash Layering Stencil, Tiny Text
Distress Paint: Antqiued Bronze, Black Soot, Crackling Campfire
Tim Holtz Oxide Sprays: Speckled Egg, Bundled Sage
Tim Holtz Distress Spray StainsSpeckled Egg, Antique Linen, Bundled Sage and Uncharted Mariner
Tim Holtz idea_ology: Tiny Text Remnant Rubs, Hardware Heads
Twine from my own stash


Friday, 22 March 2024

Simon Says Stamp Be Bold Blog Hop Day 1

Hello everyone and welcome to Day 1 of the Be Bold Blog Hop!

I'm so excited to be joining this hop and you might have arrived here from Jean Doeringsfeld's blog, but if not, and you want to catch up with everyone who is participating in this hop, then don't worry because you can head back to the beginning, HERE.

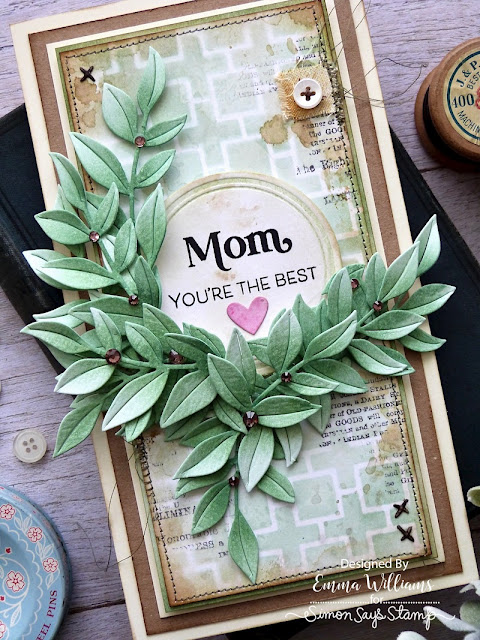
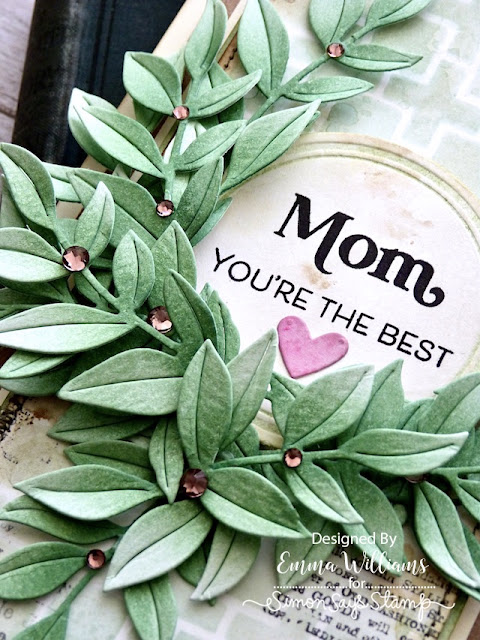
For my card, I chose to use the Lush Leaves Dies, the Lilac Pawsitively Dazzling Gems and the Mamacita Stamp Set from this release, to create a card celebrating a very special person in my life . You can check out all the fabulous new products in the Be Bold release, HERE.

So let's begin and here's how I created my card.


This card measures, 20 x 11cm and is made from Mixed Media Heavystock card.

BACKGROUND

To start with I made my background and for this, I used the Tim Holtz Linked Squares Layering Stencil. I inked through the stencil onto a panel of watercolour card, using a combination of Aspen, and Sage Positively Saturated Inks and Pumice Stone Distress Ink, blending the colours over the card with a stencil brush.

Once happy with the blend, I spritzed water over the background and allowed the inks to puddle and pool before heat drying the surface.

Once this was dry, I applied Frayed Burlap Distress Ink to my glass mat, sprtized with water and then dipped my inked card panel into the droplets of ink. Once again I heat dried the surface before inking the edges with Walnut Stain Distress Ink.

To add more layers to the background, I inked one of the stamps from the Tim Holtz/Stampers Anonymous Botanic Collage stamp set, with Black Soot Distress Ink, inking the type script section of the stamp only and stamping it randomly around the edges of the panel.

To complete the panel, I machine stitched a border and then matted it onto a panel of card, inked using the same colours of Positively Saturated Ink, Sage and Aspen as I used through the stencils.

Matt the layered panel onto Mixed Media Heavystock card using foam pads, followed by a layer of kraft card before mounting onto the card blank.

SENTIMENT LABEL

For the sentiment label in the centre of the card, I used Tim Holtz's Vintage Label dies by Sizzix. These labels create a debossed outline around the edge and using the large circular die, I cut the shape from Heavystock card, inking the raised area of the die with Rustic Wilderness Archival Ink.

I inked the surface of the die cut with Pumice Stone and Frayed Burlap Ink and spritzed with water to blend the inks before heat drying the circle.

I then stamped the sentiment in Black Soot Archival Ink, using two separate stamps from the set.

Beneath the sentiment, I placed a small die cut heart from the Lovebirds die set, that I had on my desk from a previous project and inked this with Kitsch Flamingo Distress Ink.

Mount the sentiment onto the card using foam pads to add dimension.

LUSH LEAVES

Taking the Lush Leaves dies, I cut multiple pieces from Distress Watercolour Card.

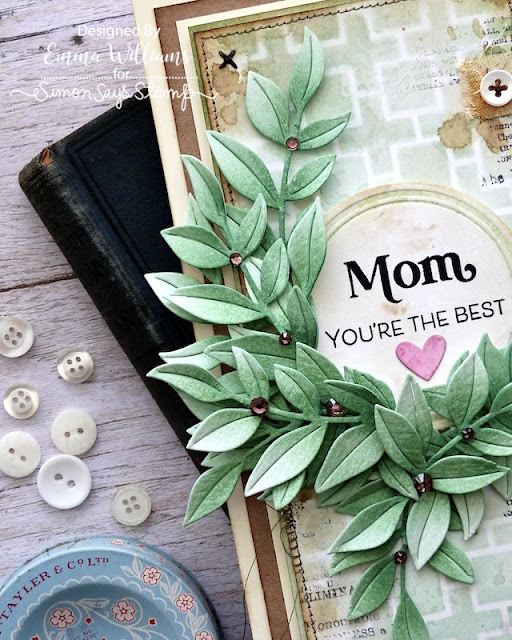
I then inked the die cuts with the Pawsitively Saturated Ink Trio 14, starting with Aspen, followed by Sage and finally adding darker shades with Pine.

After shaping each of the flourishes and leaves, I arranged them onto my card. 

I placed them around the circular vintage label, layering them and arranging them to create a fluffy, dimensional look to the piece.

To complete the leaves, I added some gems, sticking them directly onto the foliage.

FINISHING DETAILS

We're nearly there and all that's left is the finishing details.

I added a scrap of linen from my material box to the top right hand corner, complete with a button that I sewed onto the linen scrap.

Finally I added some fo the tiny stitches, die cut from black card using the Bunny Stitch die by Tim Holtz and Sizzix and placed these in the top left and bottom right hand corners.

...and that finishes my card for this hop.

I hope you love this make and all the techniques I've used.

Now, it's time to hop to the next stop...

Simon Says Stamp is giving away a $25 coupon to every stop on the blog hop from the blog comment section! So, this means you can leave a comment here and on every stop along the way to increase your chances. Winners will be notified and they will be posted on the Simon Says Stamp blog on Wednesday, 27th March and all winners will need to contact/email Simon Says Stamp to claim their prize. 

Also, don't forget that you have until the 24 March at 11:59 EDT to claim $7 off with a purchase of $40 or more and all you need to do is enter the code GREEN at checkout.

Thank you so much for stopping by today and don't forget to go and check out Day 2 of the hop tomorrow!!!

See you soon, Emma x


HOP ORDER:

Emma Williams <—-YOU ARE HERE

Powered By Blogger

Total Pageviews