Showing posts with label Embossing Glaze. Show all posts

Tuesday, 27 May 2025

Enamelling Technique with Ranger Ink Distress Glaze by Tim Holtz

Hello everyone and Happy Tuesday...

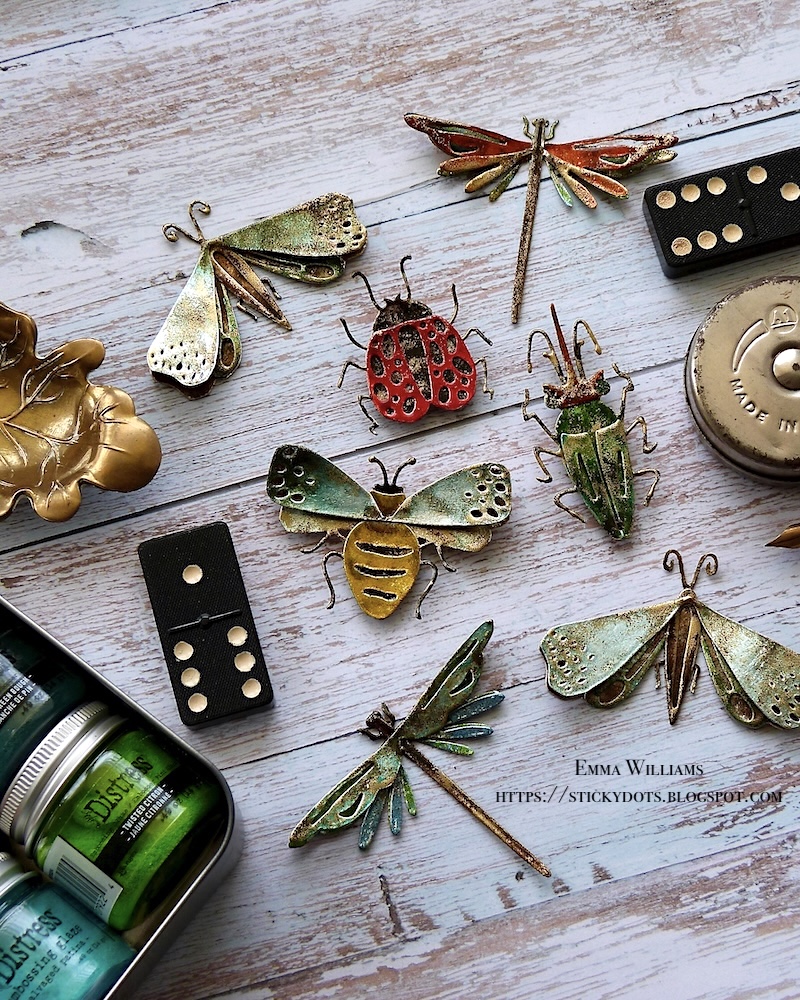
I'm so excited to be here to share a fun tutorial of how to use Distress Glazes to emboss and glaze metallic card stock to make some spectacular enamelled results.

In this post, I’ll guide you through each step and show you how to create this simple layering technique on the Sizzix Funky Insects Thinlits Die by Tim. Then, if you’re anything like me, you’ll just want to keep on going, because this will work on so many pieces ~ from die cut gears to backgrounds, from alphanumerics to flowers ~ the choice is endless and your imagination is the only thing that you will need.

So let's get started and I began with the gorgeous Funky Insect Moth….

The first thing you need to do, is die cut the shapes and pieces you are using. I use the Sizzix Switch Plus Machine to die cut and as mentioned earlier, I will be using the insects which I cut from Silver Metallic Kraft Card. The reason I use silver, is because it's more of a neutral colour, and won't change the colours of the Distress Glaze.

With all your pieces die cut, you now need to choose the colours of Distress Glazes that you want to use. I will be listing the colours that I chose as a guide.

We're now ready for the fun to begin...

DISTRESS GLAZE COLOURS: Hickory Smoke, Speckled Egg, Salvaged Patina, Walnut Stain, Vintage Photo and Ranger Ink Fine Detail Gold Embossing Powder

Using the Tim Holtz Distress Embossing Dabber, I applied the ink over the entire surface of the first layer of the die cut. For this piece, it will be the solid body and I chose Hickory Smoke as my first colour of Distress Glaze.

Heat emboss the powder with a heat tool, until it becomes molten and shiny.

The glaze will cool down almost immediately, and once it is, I applied my second layer of ink using the Embossing Dabber and then sprinkled some Vintage Photo Distress Glaze over the top. When applying the dabber to this piece and any subsequent pieces, you only need to randomly dab the ink, not add a complete coverage. You can also add the ink to highlight certain areas, such as the legs, antennae, etc.

As with the dabber ink, you will also only need to apply the powder sparingly, not create a solid coverage ~ you are trying to achieve a marbled effect. If you find you have too much powder, then you can use a small paintbrush to brush away any excess. Once again, heat emboss the powder and set this piece to one side once finished.
Taking the wings, and using the same process as before ~ apply the Embossing Dabber to the surface and then a first layer of Speckled Egg Distress Glaze...
...followed by a second layer of Walnut Stain Distress Glaze. Always remember to heat emboss between the layers of glazes.
This Funky Insect has four separate die cut pieces, and for the third and final section, I chose to use Salvaged Patina as my first layer of Glaze...
...then a sprinkle of Rustic Wilderness, and finally a sprinkling of Walnut Stain.
For the final die cut piece, I used a solid coverage of Walnut Stain Distress Glaze, but applied two separate layers to this piece before moving onto the next step, adding some hints of gold.
With all my pieces complete, I added that touch of shimmering gold to each die cut, enamelled piece.

Once again, you need to apply the ink using the Embossing Dabber and then a very light sprinkling of Ranger Ink Fine Detail Gold Embossing Powder.

This powder does work in a slightly different way to the Glazes, so therefore you really do only need a dusting of the powder and if you find you have applied too much you can remove it before you heat emboss. Or if you do feel that once you've embossed the powder, it appears too thick, then you can apply more glaze over the top and blend the powders.
All my pieces are now ready to assemble and for this I chose Distress Matte Collage Medium, and I also used foam pads to add dimension to the wings.


Now that I've shown you the basic steps of how to enamel...the world is your oyster and I went onto creating more bugs using this technique and a few more things that will be coming soon!

 
I've listed the colours I chose to use as a guide, but you can choose whatever colours of Distress Glaze that you would like...

LADYBIRD ~ Distress Glazes:


Solid Base Layer: Hickory Smoke, Ranger Ink Fine Detail Black Embossing Powder
Top Layer: Lumberjack Plaid, Candied Apple
Ranger Ink Fine Detail Gold Embossing Powder

DRAGONFLIES....

DRAGONFLY Number 1 ~ Distress Glazes:


Solid Base Layer: Uncharted Mariner, Walnut Stain, Twisted Citron
Top Layer Wings: Cracked Pistachio, Rustic Wilderness, Walnut Stain
Wings: Uncharted Mariner, Walnut Stain
Ranger Ink Fine Detail Gold Embossing Powder

DRAGONFLY Number 2 ~ Distress Glazes:


Solid Base Layer: Uncharted Mariner, Walnut Stain, Twisted Citron
Top Layer Wings: Rusty Hinge, Walnut Stain
Wings: Fired Brick, Rusty Hinge, Walnut Stain
Ranger Ink Fine Detail Gold Embossing Powder

BEETLE


Solid Base Layer: Evergreen Bough, Cracked Pistachio, Twisted Citron, Walnut Stain and Fine Detail Black Embossing Powder
Top Layer Wings: Rustic Wilderness, Cracked Pistachio, Twisted Citron, Walnut Stain
Head: Rusty Hinge, Fired Brick, Walnut Stain, Hickory Smoke
Ranger Ink Fine Detail Gold Embossing Powder


BEE

Solid Base Layer: Hickory Smoke, Walnut Stain, Speckled Egg and Fine Detail Black Embossing Powder
Top Layer: Fossilised Amber, Hickory Smoke
Wings: Speckled Egg, Hickory Smoke
Ranger Ink Fine Detail Gold Embossing Powder

Thanks so much for stopping by today and I hope you've enjoyed the tricks and techniques to create these enamelled pieces...
 ...and if you are inspired by anything you see on my blog, then please just drop me a message, either here or over on my Instagram or Facebook profiles and I will always pop by to take a look.

Don't forget that you can click below to shop for all the products I've used in this tutorial...
SHOP HERE:
See you soon, Emma xxx

Monday, 9 August 2021

Life is all about perspective...

Hello friends...

Hope you've all had a good weekend and ready for a brand new week of creativity because if you are, then the brand new Simon Says Stamp Monday Challenge has just begun and this week our theme is all about HEAT EMBOSSING!

This is a technique that always gives me such satisfaction, I always love how you can transform a piece with the magic of powder and heat and I decided to use this technique to create the texture on the Perspective Moth which I added to an inky background to create my card packed full of layers.

So let's get started ~ it's time for me to share my card project and here's how I made this piece...

To begin with I started with my moth and cut this once from Mixed Media Heavystock and once from Kraft Heavystock. I inked the edges of the kraft die cut with Walnut Stain Distress Ink before I started to add the embossing powders to the second die cut.

I used the Embossing Dabber to apply ink to my die cut and then started to add layers of powder beginning with Antique Linen Embossing Glaze. After heat embossing the glaze, I then moved onto the next layer, adding the embossing dabber down the body of the moth and applying some Walnut Stain Embossing Glaze over the top. Again heat emboss the glaze until molten. Apply some Rusty Hinge Embossing Glaze to random areas of the body and heat emboss. 

The next layer of embossing is on the wings and after I applied the Embossing Dabber to the surface, I sprinkled the layers of Embossing Glaze over the top, adding them individually and building up the layers one by one. Top Tip: When adding the powders, start with the palest colour first, then build up the layers but reduce the powder with each application, allowing the previous colour to show beneath.

I started with Speckled Egg, heat embossed the glaze, then added Prize Ribbon. Heat emboss and repeat this process using Salvaged Patina, Hickory Smoke and then a final sprinkling of Walnut Stain.

Finally, I wanted some texture on the body, and where the wings join ~ and for this I used a small amount of Emerald Creek Embossing Powder over the top of the ink and heat embossed this until molten.

I now have my gorgeous moth ready and layered the embossed piece over the top of the kraft die cut, leaving the wings free! I then shaped the wings to create a little more dimension and in the photo below, you can see the width of the wingspan on this beauty ~ it's amazing!!

Now for the background and for this I cut a panel of mixed media heavystock, 12 x 15.5cm.

I began by applying Distress Spray Stains and Oxide Sprays ~ Antique Linen, Ground Espresso, Salvaged Patina, Speckled Egg and a touch of Frayed Burlap Distress Stains and Salvaged Patina and Speckled Egg Oxide Sprays. I built up the colour towards the top of the panel, allowing it to fade towards the bottom.

After adding some stencilling directly onto the panel using Frayed Burlap Oxide Ink, through the Mini Layering Script Stencil from Set 49...

...I then started to add some stamped layers, and for this I used a combination of stamps ~ Entomology Script stamped directly onto the background with Black Soot Archival Ink. Some stamped imagery added to the right hand side using stamps from the Field Notes set and the Mini Glitch, in Barn Door and Black Soot Archival Ink....

...and also adding some stamping in the bottom left hand corner using the same stamp sets and same colours. I always use my stamp platform for this as it creates a really beautiful, clear impression. In this corner, I also added a Remnant Rub, Exhibit A., which I applied above the stamping.

To complete the background, I added some crosses from the Mini Glitch stamp set, and stamped these in the top left hand corner, stamped with Salvaged Patina Oxide Ink.

I inked the edges of the panel with Walnut Stain Distress Ink and then machine stitched a border before matting this panel onto silver metallic kraft stash card, followed by a layer of blue kraft card taken from Tim's Cool Kraft Stock.

I then mounted my layers using foam pads, onto a background of script paper which I think was from one of Tim's older paper pads and a layer of blackout card before mounting these layers onto my card blank. Each time I left a border around the outside to create the layers.

Now for the tiny finishing details and in the top right hand corner, I added an offcuts of silver metallic kraft stash, which I had on my desk. This was embossed using the Foundry 3D Texture Fade and is literally a small piece cut that I keep and never throw away but is perfect for wrapping around the edges of  background panels to create more interest. I then attached a rolled up Stitched Scrap, complete with Mini Pin before I adhered a Field Notes Ephemera piece into place.

Finally, I added some Index Clips ~ I placed three clips around the edges of the inked background panel and altered these with Distress Paints for a more rusty, crusty look. I used Rusty Hinge, Crackling Campfire, Ground Espresso, and Black Soot.

To complete the clips, I adhered some Hardware Heads over the top, again altered with the same colours of Distress Paints and attached with Matte Collage Medium.

So, that completes my project for this week and I hope you've loved the card I've made...

...as always, if you make anything, or been inspired by anything that you've seen here on my blog ~ then please, let me know by tagging me on social media or leaving a comment here and I will be right over to take a look!

Don't forget that every week, one lucky random participant has the chance to win a $25 gift voucher from Simon Says Stamp and you can join in up to 5 times, which means you could have 5 chances to win. You have until Monday 8am Ohio time. 1pm UK time, 2 pm CET to join in and good luck....


Thank you so much for taking the time to stop by today ~ stay safe and keep well.
Love Emma xxx

Recipe for project:


Distress Ink: Walnut Stain
Distress Oxide Ink: Frayed Burlap, Salvaged Patina
Distress Paints: Crackling Campfire, Rusty Hinge, Black Soot and Ground Espresso 
Distress Spray Stain: Ground Espresso, Speckled Egg, Frayed Burlap and Antique Linen
Oxide Spray: Salvaged Patina and Speckled Egg
Embossing Glazes: Speckled Egg, Walnut Stain, Antique Linen, Prize Ribbon, Hickory Smoke, Salvaged Patina

Thursday, 8 July 2021

Guess Who?

Hello there...

Hope you're all having a wonderful week and your creative juices are flowing and talking about those juices, I'm back today to share one of my makes for the recent Stampers Anonymous stamp releases by Tim Holtz and if you did miss the recent YouTube live launch of these amazing designs, then just pop over to Tim’s blog HERE for the replay!

If you haven't seen the releases yet, then where have you been?!?! There are five sets in the release, plus four new stencils and these can all be bought individually at Simon Says Stamp but you can also purchase an "I WANT IT ALL" bundle which includes a free set of Tim's new larger sized Ranger Archival Inks! This is on reserve at the moment, but will be with you sooner than later!

So back to my card and this is the one you've all been asking to see and I'm so thankful for all the lovely messages you've sent about it ~ you really do make my day and I appreciate them all!
This is an 'Emma sized card" which is slightly larger than average and the black card blank, that I created measures approx. 18 x 15cm.

BACKGROUND

For this I used a panel of Mixed Media Heavystock card and I inked this using a combination of Distress Sprays and Oxide Sprays which I've listed below and spritzed each individual colour onto the panel. I always use my splatter box when inking with sprays, otherwise I think I'd have a very colourful table....

DISTRESS SPRAY STAINS: Speckled Egg, Ground Espresso, Vintage Photo, Crackling Campfire

DISTRESS OXIDE SPRAYS: Salvaged Patina, Tumbled Glass

After spraying the inks, I then spritzed a light misting of water over the top, creating runs and drips before heat drying the panel thoroughly. I love that Salvaged Patina run on the top section!

Moving on, I inked up the gears stamp from the Observations set with clear embossing ink and stamped along the bottom of the panel. I then sprinkled gold embossing powder over the top, tapped away the excess and heat embossed the powder until molten.
At this stage, I also added some background stamping using Black Soot Archival Ink ~ the Office Stamp in the top left corner and the "T" in the bottom right. 
Both stamps are from the Correspondence stamp set. I also added a small ephemera piece in the top left hand corner, 2/6. (I'm not sure which set this piece is from but it's definitely in one of them somewhere, lol). I also added the little stitches which I had left over from a previous project and are die cut from the Sizzix Media Marks Thinlits die set.
I inked the edges of the panel with Walnut Stain Distress Ink, before machine stitching the corners with black cotton thread, leaving some of the strands to hang loosely.

I matted the finished panel onto silver metallic kraft stash, followed by a panel of co-ordinating card from the cool kraft stack ~ both are sanded for more of a distressed feel and each time I left a border around the edge before mounting the layers onto the card blank.

On the side of the card, you'll notice I've got a tag popping out from the edge.

This was actually a scrap that I had left over from a previous project and is only the top portion of the tag which I slipped underneath the card layers when I attached them to the card blank and from memory, I used the faux enamel technique.

To do this, I dragged the Speckled Egg Distress ink pad over the tag surface, just allowing the ink to touch where it touches. I then sprinkled a combination of Speckled Egg, Walnut Stain and Salvaged Patina Embossing Glazes over the top of the ink, tapped away the excess and heat embossed. Once the embossing was cool, I then inked with Walnut Stain and Crackling Campfire Distress Ink and it created this gorgeous rusty patina to the tag.

With the tag in place, I added some twine through the hole reinforcer and then attached two Machinery Heads with Matte Collage Medium, which I altered with a combination of Ground Espresso and Crackling Campfire Distress Paints to create the rusty tones.

For the final layer on the card I added a panel across the centre. This is slightly wider than the main panel and inked with the same colours. I cut this panel into two pieces, one slightly wider than the other and added some stamping on the smaller panel using the numbers from the Inquisitive set. I inked these with Frayed Burlap Oxide Ink and then spritzed the stamping with a light misting of water, allowed them to slightly wick and then heat dried the surface to create this blurry look to the stamped image. I then layered both of the inked panels, adding the stamped numbers below the larger one, onto silver metallic kraft stash before attaching the panel to my card front.

With the background ready, let's move onto the main stars of the show...

INQUISITVE CHARACTERS

To begin with I stamped all three of the larger sized characters onto watercolour card in Black Soot Archival Ink.

I then stamped a second image of each character but this time I used clear embossing powder to emboss the top hats and I stamped the bowler hat in Ground Espresso Archival Ink but did not emboss this one as I didn't want this to be shiny.

I coloured the characters using a combination of Distress Inks and Polychromos pencils and once I was happy, I fussy cut around the entire outline of each one of them, and on the second stamped set of images, just the hats and shirts. I then layered the hats and shirts over the top of the full image using foam pads to add some height and dimension.
Setting these to one side, I stamped the bullseye. I used my stamp platform and stamped the image in Barn Door Archival Ink. Without removing the stamp, I inked it up one more time but used Black Soot Archival and over-stamped the red bullseye with the black to create a deeper shade of red. I added a few flicks of Frayed Burlap Distress Ink across the surface and heat dried the card.

I used a circle die to cut the bullseye and then matted this onto a circle of silver metallic kraft stash, that I cut with one of Tim's older dies ~ the Stitched Circles. To add a little more of a vintage touch to the silver, I inked the surface with Rust and Pitch Black Alcohol Inks.
Across the centre of the bullseye, I added a target and this was stamped with Black Soot Archival Ink using stamps from the Mini Glitch set. To complete, I added some white pen work to highlight the target before attaching the bowler hat gentleman onto the centre using foam pads.

Mount the bullseye onto the centre of the horizontal panel with foam pads and attach the other two characters either side. To complete this section, I added a star adornment onto the bowler hat which I painted with Candied Apple Distress Paint.
We're nearly there and all that's left was for me to stamp the sentiment ~ Guess Who? using Barn Door Archival Ink, stamped onto a scrap of card inked with Old Paper and Frayed Burlap inks and cut into a banner shape, with an inverted 'v' in one end. I then stitched the edge of the sentiment and attached it to my card, adding a pin for the final, finishing detail.
 So that's my card complete and I hope you love the card and tutorial! As always, if you make anything inspired by what you see on my blog ~ then just let me know and I would love to see your beautiful makes and will pop by to say hello!

Thank you so much for taking the time to stop by today ~ stay safe and keep well.
Love Emma xxx

Recipe for project:

Sizzix: Stitched Circles from my stash
Distress Inks: Walnut Stain, Crackling Campfire, Speckled Egg
Distress Spray Stain: Speckled Egg, Ground Espresso, Vintage Photo, Crackling Campfire
Oxide Sprays: Salvaged Patina, Tumbled Glass
Embossing Glaze: Speckled Egg, Walnut Stain, Salvaged Patina
Distress Paint: Candied Apple
Alcohol Inks: Pitch Black, Rust
Tim Holtz Idea-ology: Machinery Heads, Star Adornment

Powered By Blogger

Total Pageviews