Showing posts with label AALL & Create. Show all posts

Monday, 7 August 2023

Get The Party Started...

Happy Monday friends...

As always, a brand new week means the start of a new Simon Says Stamp Monday Challenge and this week, we are ready to party because our theme is called HAPPY BIRTHDAY and here on the SSS Monday Challenge Blog, we are celebrating 13 years of wonderful makes and inspiration.

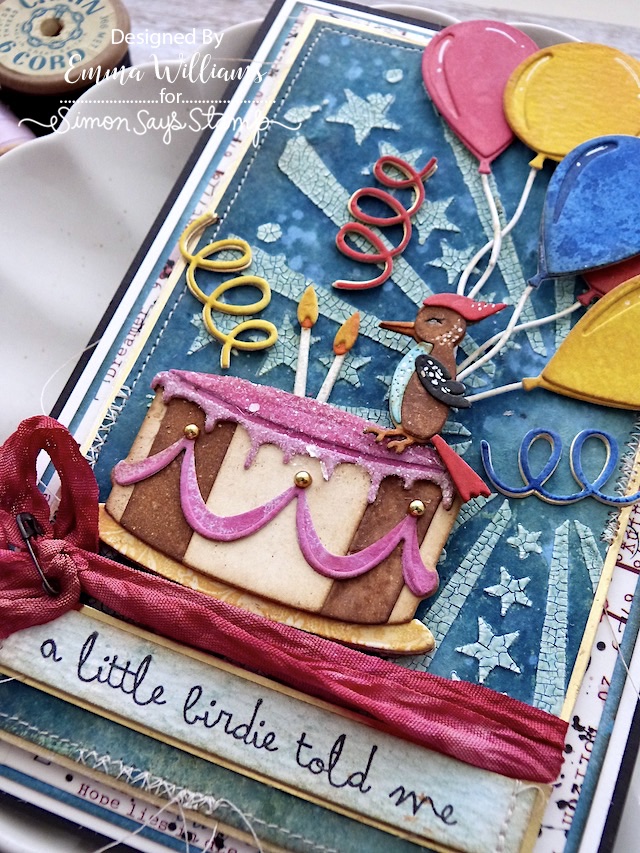
The DT are also showcasing AALL & Create products within their makes and I used their Stars and Rays Stencil combined with Tim Holtz and Sizzix products, to make a bold and bright birthday card, which I think you might agree is a slight departure for me but I thought it fit the scene and what's a party without some happy colours.

So let's get started, because a little birdie has told me, it's time to turn up the music and PARTAAAY....


To start with I made a black card blank that measures 18 x 11.5cm. I then cut a panel of white card and adhered a border of AALL & Create Twine Washi Tape around the edge to create a decorative border. I matted this onto a panel of blue card, followed by ivory card and mounted the layers onto my card blank.

BACKGROUND

I'll begin with the background and for this I cut a panel of Mixed Media Heavystock which I coloured using a combination of Distress Spray Stains and Oxide Sprays in the following colours;

DISTRESS STAINS: Uncharted Mariner, Old Paper, Speckled Egg

OXIDE SPRAYS: Speckled Egg

After misting the panel with water, I applied the sprays one by one, building up the colour and creating the perfect blend for my background. 

I made sure the card was thoroughly dry before laying the AALL & Create Stars and Rays stencil over the top and applying Distress Crackle Paste. I only used a section of the stencil for this particular project.

Remove the stencil and then whilst the paste is still wet, sprinkle Speckled Egg Distress Glaze over the top. Tap away the excess and set to one side for the paste to set and then once, that has happened and the crackles have appeared, it's time to heat set the glaze until molten and shiny.

I inked around the edges of the panel before machine stitching a border and then matted it onto a piece of gold metallic kraft card.

I wrapped some crinkle ribbon around the bottom section of my card layers and I dyed this with a combination of Antique Linen and Lumberjack Plaid to create the beautiful shade of red. This was secured with a knot and an idea-ology Mini Pin.

Using foam pads, I mounted these layers onto my card blank and we're now ready to decorate the card and start the party...

WOODY WOODPECKER

The little birdie is cut using the Cozy Winter die set and after colouring each die cut layer with Distress Watercolour Pencils, I assembled him and then added white pen detail.

CAKE & BALLOONS

To begin the party celebrations, using Mixed Media Heavystock card, I cut the cake, candles, swirls and the balloons using the Celebrate Colorize die set by Tim Holtz and Sizzix.

Each piece was inked using Distress Inks and Blending Tools in the following colours:

CAKE: Brushed Corduroy, Antique Linen, Kitsch Flamingo, Picked Raspberry and the plate from stamped leftover scraps in my scrap box

CANDLES: Antique Linen, Spiced Marmalade, Mustard Seed

BALLOONS: Prize Ribbon, Lumberjack Plaid, Mustard Seed, Wild Honey

SWIRLS: Prize Ribbon, Lumberjack Plaid, Mustard Seed

I assembled all my inked layers to create each piece and layered each of the swirls over gold metallic cardstock to add a shadow.

For the cake, I wanted to add some glitter to the pink frosting on the top and all that I did was apply some Glossy Accents over the frosting, and then sprinkled Rock Candy Glitter over the wet medium. Allow to dry and then add gold metallic droplets to the cake as decoration.

ASSEMBLING THE SCENE

Taking the cake, I placed foam pads on the back and then stuck it just above the ribbon that I wrapped around the card, placing it on the left hand side and adding the candles and the plate.

I then attached Woody to sit on the cake, adding the balloons to look as if he's holding them behind his back...

...and finished with the swirls, that can be seen all around the arrangement.

SENTIMENT

Finally, I added the sentiment. This is from the Stampers Anonymous Crazy Talk stamp set by Tim and I stamped it in Black Soot Archival Ink onto a piece of card that I inked with Speckled Egg Distress Spray Stain. I matted the sentiment strip onto gold metallic kraft card and then attached it to my card, placing it below the ribbon strip, using foam pads to secure it  into place.

So, that's my card ready for this week's party and I hope you've loved the ideas and inspiration.

As always, if you make anything, or if you've been inspired by anything that you've seen here on my blog ~ then please, let me know by tagging me on social media or leaving a comment here and I will be right over to take a look!

Don't forget that every week, one lucky random participant has the chance to win a $50 gift voucher from Simon Says Stamp and you can join in up to 5 times, which means you could have 5 chances to winYou have until next Monday at 8am Ohio time. 1pm UK time, 2 pm CET to join in and good luck....


Thank you so much for taking the time to stop by today ~ Love Emma xxx

Recipe for project:

Tim Holtz/Stampers Anonymous: Crazy Talk
Distress Spray Stain: Speckled Egg, Old Paper, Uncharted Mariner, Lumberjack Plaid
Distress Inks: Walnut Stain, Lumberjack Plaid, Prize Ribbon, Mustard Seed, Wild Honey, Picked Raspberry, Brushed Corduroy, Antique Linen, Kitsch Flamingo
Distress Glaze: Speckled Egg
Tim Holtz idea-ology: Mini Pins, Metallic Droplets

Monday, 3 October 2022

Walk Like An Egyptian...

Happy Monday friends and welcome to the first week of Simon Says Stamp Monday Challenges in October!

This week our theme is called STITCH IT and the DT are showcasing the products of AALL & CREATE within their projects. If you'd like to join us and play along, then we would love to see how you interpret the challenge theme, whether you choose to stitch onto cards, journal pages, make books or actually sew something using material, the choices are endless and it's going to be a fun challenge.

For my project, I created a card which was inspired by my love of Ancient Egypt, something I was fascinated by at school and to this day, I still study and love including one particular person ~ the Queen of Egypt, Nefertiti, wife of Pharaoh Akhenaten and worshipper of the sun disc.

So with this in mind, and using two stamps from AALL & CREATE, which I combined with a few products from Tim Holtz and Sizzix, I started to make this card come to life.

So let's get started...

To begin with I started by making the tag that is the background to this make.

TAG BACKGROUND

I used a size 8 Mixed Media Heavystock Tag and started by adding the colour using Distress Spray Stains and Oxide Sprays.

I misted water onto my tag, placed it in a splatter box and spritzed the following colours onto the surface:

DISTRESS SPRAY STAINS: Ground Espresso, Speckled Egg, Tumbled Glass, Frayed Burlap

OXIDE SPRAYS: Speckled Egg

Once I was happy with the inked background, I heat dried the tag thoroughly, inked the edges with Walnut Stain Distress Ink and then moved onto the stamping. 

I wiped the surface with an anti static bag before I used the Shattering stamp, inked with Versamark Ink to stamp onto the tag. I re-inked the stamp and then twisted and moved the stamp around to form the design over the entire tag.

I then sprinkled gold embossing powder over the top of the stamped areas, tapped away the excess and heat embossed the powder until molten.

In the top right hand corner, I used the file numbers from Tim's Mini Glitch stamp set and stamped these in Black Soot Archival Ink.

To complete the tag, I machine stitched a border around the edge, leaving loose thread hanging all around the edge.

BACKGROUND LAYERS

I took a panel of black card that I edged with Tim Holtz Halloween Distress Crayons, Iron Gate and Decayed, which created this dusty, vintage look to the surface. I machine stitched this panel and then used foam pads to attach it onto my background of card, which has a border of Tim's Design Tape running around the edge. This numerical tape is from the Halloween set. This forms the matting and layering behind the tag, but don't attach that tag just yet....

Now for the star of this show...

NEFERTITI

I stamped the image onto watercolour card, using Black Soot Archival Ink and then coloured it with the amazing new Watercolour Distress Pencils. If you haven't tried these yet, then you must as they are beautiful to use and have so many uses other than just water-colouring.

I used a water brush and built up my colours, adding shading with the pencils to create light and dark. I then added some white pen work, before fussy cutting around the outline of the image.

I added a small gem in the centre of the headdress and placed this to one side whilst I created the sun that will will sit behind her.

SUN

For this I used the sun from Tim Holtz's Circle Play die by Sizzix. I cut the sun three times from Mixed Media Heavystock card before layering them, and sticking them together to create one substantial die cut. I then applied the embossing dabber to the surface and sprinkled with gold embossing powder. I used Seth Apter's Weathered Gold by Wow which I bought from SSS but unfortunately isn't available any more but you can use any gold powder in your stash.

I repeated this process three times to create an enamelled finish to the sun die cut...

...and then placed the sun behind Nefertiti. 

Using cleverly hidden foam pads to add dimension to this piece, I attached the sun and Nefertiti to my tag.


I then stamped the name tag onto black card, embossing it with gold embossing powder and cut it into a banner shape, with an inverted 'v' at one end before stitching it onto my tag, in the bottom left hand corner.

Now I can attach the tag to the matted background layers and we're nearly there...

All that's left is to attach my "eye of Horus" to the top of my tag, placing it over the reinforcer hole. I used a Creepy Eye, that I inked with Mushroom Alcohol Ink to knock back the whiteness and placed it onto my tag with Matte Collage Medium.

So that's my card finished and I hope you love this as much I loved making it...it was a fun project to work on and really did appeal to my love of Ancient Egypt.

As always, if you make anything, or if you've been inspired by anything that you've seen here on my blog ~ then please, let me know by tagging me on social media or leaving a comment here and I will be right over to take a look and if sometimes I miss it ~ just keep nudging me!

Don't forget that every week, one lucky random participant has the chance to win a $25 gift voucher from Simon Says Stamp and you can join in up to 5 times, which means you could have 5 chances to winYou have until next Monday at 8am Ohio time. 1pm UK time, 2 pm CET to join in and good luck....


Thank you so much for taking the time to stop by today...Love Emma xxx

Recipe for project:

AALL & CREATE: Shattering, Nefertiti
Stampers Anonymous: Mini Glitch
Sizzix/Tim Holtz: Circle Play
Distress Spray StainsGround Espresso, Speckled Egg, Tumbled Glass, Frayed Burlap
Distress Oxide Spray: Speckled Egg
Distress Crayons: Decayed, Iron Gate
Distress Ink: Walnut Stain
From my own stash: Weathered Gold Embossing Powder

Monday, 7 March 2022

HOPE IS NEVER LOST

Hello friends!

I hope you all had a safe and happy weekend and you're ready for a brand new Simon Says Stamp Monday Challenge.

This week, we are asking you to ADD SOME GREEN to your projects and if you want to play along with our fun theme, then we can't wait to see what you create. The DT are also showcasing the fabulous AALL & Create products within their makes, something you don't have to do but if you want to, then there are plenty of wonderful designs to choose from, here at SSS!

For my make, I chose to create a Mini Etcetera Tag which is dedicated to the people of Ukraine! I don't think there is anyone who hasn't shed a tear over the images that we're seeing, it's been horrendous to watch at times and my heart goes out to all those who are affected by this conflict. I think we all hope for peace and an end to this war!

So let's get started, and here's how I created this week's make!

To begin with I cut a panel of watercolour card the same size as my Mini Etcetera tag.

I then lightly spritzed the surface with water, before adding colour using Distress Spray Stains and Oxide Sprays. I started with Speckled Egg and Tumbled Glass Spray Stains and a touch of Speckled Egg Oxide Spray, as a base and once happy, I heat dried the cardstock. I then smooshed Rusty Hinge and Crackling Campfire Distress inks onto my glass media mat, spritzed these with water and picked up the inks around the edge of my tag to create rusty pockets of colour.

Once the inked card was dry, I machine stitched a border around the edge and then inked the edges with Walnut Stain Distress Ink.

Now for adding some layers to the background and for this I used AALL & Create Washi Tape. I chose the Twine Washi Tape because in amongst the design, it also has the words Courage and Positivity which I wanted to include on my make.

I tore pieces of the tape, and then just adhered them across my inked cardstock, building up layer upon layer and ensuring the two words are standing out. I added Matte Collage Medium over the top of the tape, to seal it.

To knock back the whiteness of the tape, I scribbled a small amount of Walnut Distress Crayon over the surface, blending out the colour with my fingertip and a semi dry baby wipe.

I then added some zig zag machine stitching along the joins of the tape and once that was complete, I adhered the card onto my etcetera tag surface using Matte Collage Medium, cutting the hole away and adding the hole reinforcer piece which I painted with Walnut Stain and Antique Linen Distress Paint.

At this stage, I also added a ledge for my bird to stand on. You can just see this poking out from the undergrowth and I used a Bracket Etcetera Trim, slightly wider than the tag itself and covered it with the same inked card as I used on the background, die cut using the Decorative Trims Thinlits die set. I then attached the trim to my tag.

Setting the tag to one side, I then moved onto the gorgeous bird and of course, this bird is one of the new Sizzix Chapter 1 dies from Tim Holtz.

BIRD

The die is called Bird and Egg and I used the bird only. I cut the base layer of my bird from black kraft stash, the white of the eye from white card and for the body and wings, I used inked Mixed Media Heavystock card, coloured with Distress Spray Stains.

COLOURS USED:

Body: Brushed Corduroy, Gathered Twigs, Ground Espresso, Walnut Stain, Frayed Burlap and Antique Linen Spray Stains

Wings: Ground Espresso, Walnut Stain, Frayed Burlap and Antique Linen Distress Spray Stains; Speckled Egg Oxide Spray

I assembled my bird, layer by layer and then used foam pads to attach it to my tag, placing it to stand on the ledge.

FOLIAGE AND FLOWERS

With the bird complete, I moved onto adding some green and this was achieved by the foliage that the bird is standing in.

I inked more Mixed Media Heavystock card with the following colours:

Bundled Sage, Shabby Shutters, Rustic Wilderness, Speckled Egg and Peeled Paint Distress Spray Stains

I then used the Festive Bouquet Thinlits die set to cut two different types of foliage.

Once I had enough foliage, I arranged it in a swathe around my birdie and added tiny clumps of moss in between the layers.

Now we come to the spray of flowers and of course, these are in the colours of the Ukrainian flag.

I used Bouquet Findings and spritzed one set with Prize Ribbon and a second set with Mustard Seed Spray Stains. I dried the flowers thoroughly before attaching them one by one in amongst my foliage.

We're nearly there and all that's left is to add my message.

I cut the word HOPE from metallic kraft stash, cutting three separate layers and adhering these to form letters the thickness of chipboard. I then cut a further layer of black card to create the drop shadow behind the gold lettering.

I then attached the die cut letters to my tag, and added a metallic sticker, (cutting away the word 'hope' from the sticker) beneath it to complete the message that HOPE IS NEVER LOST!

To complete the tag, I threaded rope through the hole, and attached a Thought Token to one of the end of the rope...

...and finally, attached a rusty machinery head in the top right hand corner.

My project is complete and all we can do at the moment is hang on to the fact that HOPE IS NEVER LOST!

As always, if you make anything, or if you've been inspired by anything that you've seen here on my blog ~ then please, let me know by tagging me on social media or leaving a comment here and I will be right over to take a look!

Don't forget that every week, one lucky random participant has the chance to win a $25 gift voucher from Simon Says Stamp and you can join in up to 5 times, which means you could have 5 chances to winYou have until next Monday at 8am Ohio time. 1pm UK time, 2 pm CET to join in and good luck....


Thank you so much for taking the time to stop by today ~ stay safe and keep well.
Love Emma xxx

Recipe for project:

AALL & Create: Twine Washi Tape
Tim Holtz for Stampers Anonymous: Mini Etcetera Tag, Bracket Etcetera Trim
Distress Spray Stains: Prize Ribbon, Mustard Seed, Tumbled Glass, Bundled Sage, Shabby Shutters, Rustic Wilderness, Speckled Egg,  Peeled Paint, Brushed Corduroy, Gathered Twigs, Ground Espresso, Walnut Stain, Frayed Burlap and Antique Linen
Distress Ink: Walnut Stain, Crackling Campfire, Rusty Hinge, 
Distress Oxide Sprays: Speckled Egg
Distress Crayon: Walnut Stain
Powered By Blogger

Total Pageviews