Showing posts with label stencils. Show all posts

Monday, 4 May 2026

More Than A Woman...

Happy Monday and for all those Star Wars fans out there ~ Happy Star Wars Day and May the 4th be with you!

So, as we begin a brand new week, it's time for the Simon Says Stamp Monday Challenge and this week, our theme is called Mother's Day/Feminine and we would love for you to join us and play along. The DT are also showcasing some of the amazing products from our very own Simon Says Stamp...

Now I'm not really a pink girl which is the first thing you might associate with Mother's Day and feminine projects but I do love all things blue...so, for this make, I chose to use soft pastel blues and combined this with yellow, which was perfect for my background that uses a SSS stencil in readiness for the layers of Tim Holtz goodness to be added.

So, let's get started and it's time to share all the details of how I made this week's project!

TAG

To begin with I used a Size 8 Mixed Media Heavystock tag and began by creating my background jusign the Friendly Blossoms Stencil. This stencil is a layering stencil and comes in three parts and for my background, and because I'm using a tag which is slightly smaller in size than the stencil design, I used parts of the stencil.

I began by laying one of the larger blossoms over the top right hand corner. I then inked through the stencil using Speckled Egg and Stormy Sky Oxide Inks.

After flipping the stencil, I repeated the design in the bottom left hand corner using the same inks.

I then added another of the blossoms, one of the smaller sizes to the bottom right hand corner.

I went on to stencil the leaves into the spaces between the blossoms using Bundled Sage and Rustic Wilderness Oxide Inks.

Finally, I added the centres of the blossoms using Wild Honey and Fossilised Amber Oxides and the veins to the leaves were stencilled in Peeled Paint.

With the background complete, I inked the edges of the tag with a combination of Old Paper, Frayed Burlap and Walnut Stain Distress Inks, starting with the lightest colour and blending towards the centre and then reducing the ink each time, and applying the darkest colour to the edges.

I flicked some Walnut Stain Distress Ink across the surface of the tag, heat dried the ink and then flicked some white acrylic paint to add a few splatters and then added some stamped text in Black Soot Archival ink, using the script stamp from Tiny Toadstools.

Across the bottom of the tag, I added a border strip, which I think is from the Halloween Wallpaper pack that I had in my stash but don't quote me on that one, lol!

I added a machine stitched border around the edge and a cello sticker to the bottom right corner before mounting my tag onto a piece of burlap cardstock from my stash.

PHOTO BOOTH

We're now ready to embellish the tag and tell the story...

I chose this Photo Booth image because I thought it worked so well with the background and after trimming the photo down, I then added some rips and tears before colour tinting the image with Distress Crayons.

I added the date from the Specimen Remnant Rub Pack and then machine stitched the photo onto a piece of felt that I cut with pinking shears before placing a small piece of a Cello Sticker to the photo.

I matted the layered image onto some kraft cardstock and then mounted this onto the left hand side of my tag using foam pads,

I attached a ticket ephemera stub to the right of the photo and added the Handle With Care label, a stamp from the Stampers Anonymous Eccentric Stamp Set by Tim. I stamped this using Fired Brick Archival Ink and then fussy cut around the border before adhering to my tag.

I finally added the little roll of fabric. This is a Stitched Scrap that I rolled around a skewer and then secured the ends at the back. I then attached this to my tag with a Mini Pin and clipped a Tiny Clip to the top right of the image.

Finally, I added a small Specimen Remnant Rub No.1411 to just beneath the photo.

FLORALS

The florals are all die cut using a combination of dies. The leaves are from Brushstrokes 2 and the flowers from the Vault Side Order Floristry Die.

Both are cut from card inked with the following Distress Inks:

Leaves: Peeled Paint, Bundled Sage and Rustic Wilderness

Flowers: Fossilised Amber, Wild Honey

With my pieces die cut, I then arranged them onto the tag, placing them on either side of the photograph and shaping the leaves and petals to add some dimension.

FINISHING DETAILS

We're nearly there and all that's left are those all important finishing details....

I added some gold die cut stars that I had on my desk, which were left over from a previous project. I placed 3 of these around the focal point and then added some gold gems in the centres.

Finally, I attached a Clippings Sticker, 'her mother's heart' to the tag, placing it beneath the foliage on the right hand side...

...and completed the tag with some ribbon that I dyed with Scattered Straw and Antique Linen Distress Spray Stain and then threaded through the hole at the top of the tag.

That's my tag complete and my project for this week finished....

As always, if you make anything, or if you've been inspired by anything that you've seen here on my blog ~ then please, let me know by tagging me on social media or leaving a comment here and I will be right over to take a look!

Don't forget that every week, one lucky random participant has the chance to win a $25 gift voucher from Simon Says Stamp and you can join in up to 5 times, which means you could have 5 chances to win. You have until next Monday at 8am Ohio time. 1pm UK time, 2 pm CET to join in and good luck....


Thank you so much for taking the time to stop by today...
Love Emma xxx

Recipe for project:

Simon Says Stamp: Friendly Blossoms Stencil
Tim Holtz/Stampers Anonymous: Eccentric, Tiny Toadstools
Distress Ink: Walnut Stain, Frayed Burlap, Old Paper
Oxide Ink: Wild Honey, Fossilised Amber, Speckled Egg, Stormy Sky, Bundled Sage, Peeled Paint, Rustic Wilderness
Distress Spray Stain: Scattered Straw, Antique Linen
Distress Crayon: Colours of your choice for the vintage photo
Burlap from my own stash

Friday, 25 April 2025

Simon Says Stamp You Are My Favorite Blog Hop Day 1

Hello everyone and welcome to Day 1 of the You Are My Favorite Blog Hop!

I'm so excited to be joining this hop, and you might have arrived here from Emily Midgett’s blog, but if not, and you want to catch up with everyone who is participating in this hop, then don't worry because you can head back to the beginning, by clicking HERE and if you would like to see the entire product release , then pop on over to HERE.

For my card and gift tag make, I was inspired by the colours of Spring and made my projects using the products that I was sent from the release, which included the Receding Squares Stencil for the background, Inside Greetings 1 stamp set and the Squovals die set. I combined these with an older die set, Swing Blossoms as I wanted a focal point for this card set.

So let's get started and here's how I created my projects for this fun blog hop...

To begin with I made the card bases from Tim Holtz Heavystock Kraft Card using the Squovals die set. For the card is used the largest die in the set and for the tag, I used the die to cut a card base measuring, 9.5 x 6.5cm. Each card needs two separate die cuts to form 1 card blank.

Taking the two larger die cuts, I scored a horizontal line, 2cm from the top edge and folded along the scoreline. After placing red line tape onto the 2cm fold, I then attached the second die cut shape to form my card. Repeat this to make the smaller tag.

We're now ready to make the individual pieces.

CARD

When complete this card fits into the A2 Paper Bag envelopes.

LAYERS AND BACKGROUND

Using the dies in descending order, I took the next size down in the die set and cut a panel of Mixed Media Heavystock card and after inking the edges with Frayed Burlap Distress Ink, I machine stitched a border around the outside of the panel.

I then took the next size down to cut a panel of green Kraft stash card. I sanded the edges of the Kraft card, to reveal the core and then adhered this to my larger stitched panel. Finally, I used the next size of down of the dies, to cut a second panel of the Mixed Media Heavystock card. 

To create the background, I chose to use the Receding Squares Stencil. This stencil is designed to create the look of *clue in the title*, Receding Squares but for my project, I used the stencil to create a slightly different design to my panel, I wanted more white space on my background ~ so, I created straight lines, instead of the Receding Squares.

I inked the design through the stencil using Blending Brushes to apply, Salvaged Patina and Twisted Citron oxide inks. Once I was happy, I removed the stencil and then flipped it over, lined it up with the previous line of stencilling and then proceeded to ink through the design to create a continuous, horizontal pattern. After removing the stencil, I inked around the edges of panel with Frayed Burlap Distress Ink, added a few splatters of ink and then machine stitched a border.

I then laid the stencil back over the inked design and using a black fine line pen, I outlined each of the tiny squares through the stencil. Flip the stencil over again and then repeat.

I matted this inked panel onto the green Kraft card and then layered this over the larger panels of card. Mount the layers onto the front of the die cut Squoval card blank using foam pads.

The base is now ready for the sentiment and decoration.

DIE CUT SENTIMENT

For the sentiment, I used the 6.8 x 3.8cm die to cut a piece of the green Kraft stash card, followed by another piece of the Mixed Media Heavystock.

I used exactly the same technique of inking through the stencil to create the background on the smaller die cut piece that I will use for the sentiment but this time I didn't add the black lines around the inking.

Instead, I inked one of the sentiments in the Inside Greetings 1 stamp set, "You Are The Best" using Black Soot Archival Ink, and stamped the sentiment onto the inked panel before matting this onto the green card. I mounted the sentiment onto the card front using foam pads to add dimension.

We're nearly there and all that's left is to make the flowers inspired by cherry blossom and attach these to the card front, together with some tiny details.

FLOWERS

I used the Blossom Swing die set to make these beautiful tiny die cut flowers.

I cut multiple pieces of Mixed Media Heavystock card using the die and then inked the stems using Peeled Paint, Shabby Shutters and Bundled Sage Oxide Inks, applied with Blending Brushes.

I then inked the flower heads using Spun Sugar, and added darker centreswith Picked Raspberry and a touch of Spiced Marmalade.

I shaped and attached each of the flower heads onto the main stems using Simon's Precision Glue and then attached them to my card front. To create the arrangement, I snipped into the die cut to create tiny pieces that can fill in.

DETAILS

For the finishing touches, I added a No 4725 rub on from a Tim Holtz Remnant Rub pack that I have in my stash, but you can also use numbers from the Specimen Remnant Rub set...

...and to complete the card, I added tiny pearls to the centres of each of the flowers and then attached a Mini Clip to the top left hand corner.

GIFT TAG

The gift tag is created in exactly the same way as the card, I just used smaller dies from the Squoval set and a different sentiment from the Inside Greetings 1 stamp set.


I then attached the flowers to the top left hand corner to complete the tag...

...before using Black Soot Archival Ink to stamp another sentiment, "thanks for everything' inside.

Simon Says Stamp is giving away a $25 coupon to every stop on the blog hop from the blog comment section! So, this means you can leave a comment here and on every stop along the way to increase your chances. Winners will be notified and they will be posted on the Simon Says Stamp blog on Wednesday, 30th April and all winners will need to contact/email Simon Says Stamp to claim their prize. 

Also, don't forget that you have until the 27th April at 11:59 EDT or whilst stocks last, to grab yourselves the exclusive Sunny Fern Emboss and Cut Folder which will be automatically added to your card it if contains $30 or more of You Are My Favorite release products.

Thank you so much for stopping by today and don't forget to go and check out Day 2 of the hop tomorrow!!!

See you soon, love Emma x


HOP ORDER


CLICK HERE to shop all products used to make this card

Tim Holtz Oxide Inks: Salvaged Patina, Twisted Citron, Spun Sugar, Picked Raspberry, Spiced Marmalade, Peeled Paint, Shabby Shutters, Bundled Sage
Twine from my own stash

Now, it's time to hop to the next stop...Mindy Eggen

Monday, 5 February 2024

Cup Of Love...

Hello everyone...

Hope you've all had a wonderful weekend and as always on a Monday, we have a brand new Simon Says Stamp Monday Challenge and this week, we want you to HAVE FUN WITH STENCILS. As always on the first week of the month, the DT are showcasing STAMPERIA in their makes.

For my makes, I was actually inspired by the Stamperia Stencil, that I chose to use. The stencil is called Coffee and Chocolate Daily News and I thought with Valentine's Day just around the corner, I would use the stencil as my background and combine it with Tim Holtz, Sizzix and Ranger Ink products to create a trio of gift holders ~ a pillow box, a small bag for a gift card and an envelope, all made using the new Distress Colour, Scorched Timber.

So let's begin and here's how I made this week's projects!

For these makes, I used the Vault Pillow Box and Bag and Collector Thinlits Dies to die cut and create the bases from Mixed Media Heavystock card for the pillow box and bag, and Black Heavystock Card for the envelope. For the pillow box and the bag you need to cut two of each of the shapes to make one of each piece.

I'll also take you through how I made the cups and the backgrounds before sharing the details of each individual make later in this post.

BACKGROUND

For the background, I used a piece of Mixed Media Heavystock card cut to the same size as the stencil. I applied Grit Paste through the stencil and after carefully removing the stencil, I allowed the paste to dry before applying the sprays.

Once the paste was touch dry and had set, I misted water over the surface and then spritzed with the following Distress Spray Stains:

Scorched Timber, Crackling Campfire and Antique Linen

I always apply one colour at a time, heat dry and then move onto the next colour, adding a mist of water in between to blend the sprays.

Once I was happy with the blend, I heat dried the piece thoroughly and set this to one side whilst I moved onto the next stage....the cups and saucers.

In the photos below, you can see how I cut the large, stencilled background panel into smaller background panels that I’ll use on the pillow box, and also on the envelope and bag.

PAPERCUT CAFE CUPS AND SAUCERS

Now for the cups and saucers, and I used two colour palettes ~ teal and red. I cut two panels of Mixed Media Heavystock and spritzed each one with the following colours of Distress Spray Stain, making sure that there are various shades of the colour, (dark and light), so that I can build up the layers once I die cut the pieces:

TEAL/AQUA ~ Peacock Feathers, Cracked Pistachio, Antique Linen

RED ~ LumberJack Plaid, Barn Door (this inky card is also used for the hearts)

For all three makes, I used the Tim Holtz Papercut Cafe Die Set from Sizzix and cut five cups and three saucers, all various shapes ~ four cups in teal, 3 saucers in teal and one cup in red. 

TOP TIP: Place adhesive sheets on the back of the card to help you build your layers easier.

After I assembled each of the cups, layering the due cut pieces over one another, I went on to cut my plumes of steam. This again uses the Papercut Cafe die set and I cut each piece from white Distress Watercolour Card. I then pounced the Embossing Dabber over the top of each of the assembled steam plumes before sprinkling cream embossing powder over the top. Tap away the excess powder and then heat emboss until molten.

I then ran Pumice Stone Distress Crayon around the edge, blending out the colour with my fingertip.

HEARTS

Moving on to the hearts and I used the Tim Holtz/Sizzix LoveBirds die set to cut all the hearts from the inky red card that I used for the red cup. I used the smallest and middle sized hearts for these makes and once cut, inked the edges with Walnut Stain Distress Ink.

I now have all the pieces ready to make my three projects.

PILLOW BOX

Taking the pillow box die cut from earlier, I spritzed both pieces with a combination of the Scorched Timber, Crackling Campfire and Antique Linen Distress Spray Stains and blended the colours with a light misting of water.

After heat drying each of the die cuts, I folded along the score lines and then joined the pieces together by applying strong adhesive tape onto each of the tabs that run down the sides of the die cuts. Fold along the curved scoreline to form your domed box.

To add the embellishments and cover the box front, I would collapse the top and bottom flaps, and take them down to use the box flat ~ this will be so much easier.

Taking the large background panel that I created earlier, I cut a section of this panel that will fit the front of my box. I used the section that has the coffee stain, which I placed on the left hand side.

I wanted to accentuate the stain from the rest of the embossing so for this, I used Statue Foundry Wax that I painted over the area I was concentrating on and then heat set the wax until it become molten.

After machine stitching around the edges, I attached the small panel to the front of my box.

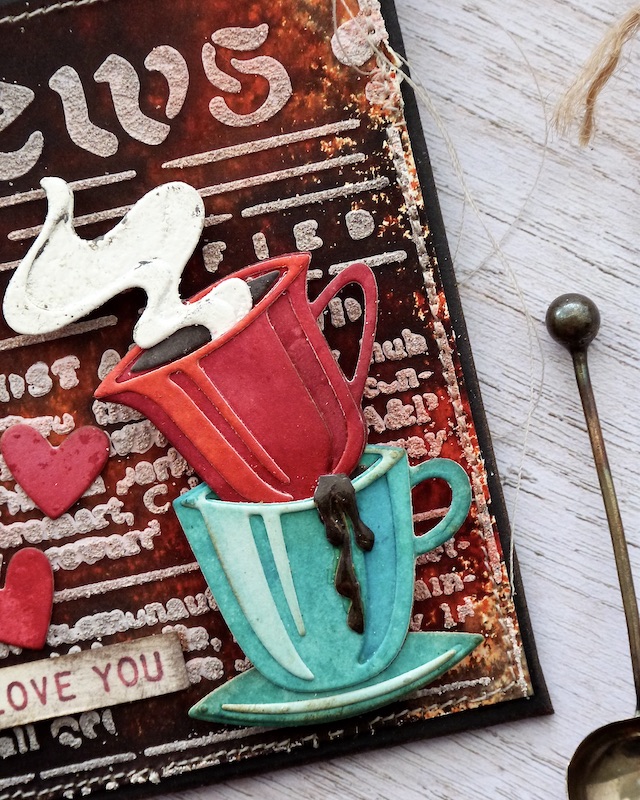
Using two of Papercut Cafe cups, I placed one inside the other and attached these to the saucer, before I then adhered my cups to the front of my box, using foam pads to build up the one side. This will enable the cups to lie flat ~ I didn't want to follow the curves of the box.

I placed the steam plume inside the cups, and added two hearts ~ one small and one medium size.

I then attached three more hearts to the box, placing them in the top right hand corner.

For the sentiment, 'in my heart", I used the Tiny Text Stampers Anonymous stamp set. I stamped the sentiment onto Mixed Heavystock card, using a combination of Black Soot Archival Ink and Barn Door Archival Ink and then cut the wording down to size.

After inking the edges of the sentiment, I attached them to my box.

Finally I added some Mummy Cloth beneath the saucer. This was dyed with Frayed Burlap Distress Spray Stain and then I shredded the cloth before sticking it to complete my make.

ENVELOPE

The envelope is cut from black cardstock and as with the pillow box, I took the embossed panel that I made earlier and cut a piece to fit the front of the envelope.

For this envelope, I chose the section that shows the word "news" running along the top.

After cutting my panel, I machine stitched and inked around the edges before attaching the panel to my envelope front.

As a fastener for the envelope, I used an eyelet and punched a hole in the flap using a Crop-A- Dile tool and then placed and fastened the eyelet into position before threading twine through the hole and attaching a heart adornment to the end of the twine.

In the centre of the heart adornment, you will notice that it's red and for this, all I did was use Lumberjack Plaid Distress Paint and painted it directly onto the red heart to accentuate it.

With my envelope ready, I can now decorate it and used two cups ~ one red, one teal, a saucer and a steam plume. I assembled my cups, placing them inside one another and attached with foam pads to the front of my envelope.

On this cup, I added a small drip....

For this I used an older Tim Holtz/Sizzix die from my stash ~ Candlelight Colorize and using the drip die that is in the set, I cut the tiny drip from brown card.

After shaping the die cut and cutting it down to fit my cup, I attached it and then added some glossy accents over the top and allowed for the medium to dry.

Finally, I added some of the smaller red hearts around the cups and to complete this envelope, I used the Tiny Text stamp set, and stamped "Love You" using the same colours as before, inked the edges of the sentiment strip and placed this in the bottom left hand corner.

BAG

To add colour to the bag, it really follows the same techniques as the pillow box and I used the same colours of Distress Spray Stain. I then assembled the bag, by sticking the two tabs together and once again, I cut a piece from the larger embossed panel, inked the edges and attached it to the front of my bag.

I added the cup, saucer and the steam plume before tucking a heart into the cup and adding a couple more to the background.

I complete the make with some shredded Mummy Cloth underneath the saucer and then...

...flip the bag over and I placed a metallic sticker on the back, "I LOVE US".

So that's my projects all finished and I hope you love what I've made and it will give you some inspiration for your Valentine's makes...

As always, if you make anything, or if you've been inspired by anything that you've seen here on my blog ~ then please, let me know by tagging me on social media or leaving a comment here and I will be right over to take a look!

Don't forget that every week, one lucky random participant has the chance to win a $25 gift voucher from Simon Says Stamp and you can join in up to 5 times, which means you could have 5 chances to win. You have until next Monday at 8am Ohio time. 1pm UK time, 2 pm CET to join in and good luck....


Thank you so much for taking the time to stop by today...see you all again very soon!

Love Emma xx


Recipe for project:

Tim Holtz for Stampers Anonymous: Tiny Text
Tim Holtz for Sizzix: Papercut Cafe, Lovebirds, Vault Pillow Box and Bag, Collector Thinlits, Tim Holtz/Sizzix Big Shot Foldaway, Candle Light Colorize Die Set from my stash
Distress Spray Stain: Antique Linen, Crackling Campfire, Scorched Timber, Peacock Feathers, Cracked Pistachio, LumberJack Plaid, Barn Door, Frayed Burlap
Distress Inks: Walnut Stain
Powered By Blogger

Total Pageviews