Showing posts with label Distress Inks. Show all posts

Monday, 31 August 2026

Autumn Serenade....

Happy Monday...

As we begin a new week, it's time for another Simon Says Stamp Monday Challenge and this week, we challenge you to GET IN SHAPE and create anything but a square or rectangular project.

With this in mind, I went to my favourite shape, a circle and used products from Sizzix and Tim Holtz to make a card to celebrate the start of Autumn/Fall. I also used a product that I bought a while ago but haven't used until today, the Sizzix Stamp and Spin Accessory Tool, which is so much fun and I can highly recommend if you love pattern building.

So, let's get started, it's time to get into shape....


CARD BLANK

To begin with I created my card blank, and cut two circles of black card, 16.5cm in diameter. I used a WR Makers Circle Cutter that I bought a while back and is still available to buy from stockists, but you can also cut these circles freehand by drawing around a circular object.

I scored a line across the top section of one piece of card, approx 5cm from the top, folded along the scoreline and then, applied adhesive to the area above the scoreline before attaching this piece to the second circle to form my card blank.

LAYERS

To form the base for my final layer, I cut further circles of card. I began with the largest, a circle of Kraft card which I machine stitched to add a border around the edge.

I then cut a 14.5cm circle of black card, followed by a layer of cream card, inked with Walnut Stain Distress Ink. Each layer is reduced in size by 0.5cm to form a border.

Once I had my card base, it was time to create the wreath design and central focal point...

BACKGROUND

For the background, I used the Sizzix Stamp and Spin Accessory Tool to create my circular wreath.

As I mentioned at the beginning if you circles and you love pattern building, then this tool is a must but, and please be aware of this, you do need to use this product in conjunction with the Sizzix Stamp and Stencil Tool ~ it will not work without.

I began by using a piece of Distress Watercolour card which I placed inside the Stamp and Stencil Tool. For the background, I used stamps from the Stampers Anonymous Leaf Print 2 and Floral Outlines Stamp sets, both by Tim Holtz. I positioned one of the smaller leaf print stamps onto the Stamp and Spin Tool, and inked this with Antique Linen Distress Ink. The finished card panel, is approx 14cm, so be aware to keep the stamping within this diameter.

Stamp the first image onto the watercolour card, and then re-ink the stamp and spin the tool, repeating the stamped image to form the circle.

The reason I stamped the image with a pale ink, is because it is giving you the basic shape for the wreath and acts as a guide for when I add the second layer of leaves.

After selecting some of the stamps from the Floral Elements stamp set and using one stamp at a time, I positioned the chosen stamps onto the stamp and spin tool but this time, I stamped the images using various autumnal colours of Distress Inks, inking up the stamps and then spritzing with a light mist of water and stamping the image onto the card, spinning the tool to create the wreath.

Once I was happy with background, I used the largest of the SSS Basic Shape Circles Die Set to die cut the card shape and machine stitched a border around the edge.

You now have the background and place this to one side to create the next layer.

Using the standalone Stamp and Stencil Tool and the same leaf image from the Leaf Print 2 stamp set, stamp 8 leaves onto Distress Watercolour Card.

To create the watercolour effect, I used the following Mini Distress Inks:

Peeled Paint, Crackling Campfire, Seedless Preserves, Rusty Hinge, Wild Honey

I applied the inks to the stamps and then misted the ink with water, before stamping them onto the card.

I then used the SSS Leaf Print 2 Co-ordinating Die set to die cut each image.

After lightly inking the edges of each leaf with Old Paper Distress Ink, I added foam pads to the back and attached them onto my background, using the paler stamped outline, that I did at the beginning as a guide as to where to place them.

CENTRAL LAYERS

For the central layers, I used a combination of Basic Circle Shapes and Stitched Circles to cut and build up my card layers, which I attached with foam pads to the centre of the wreath. The card layers comprise of gold metallic Kraft card, a layer of green Kraft card and watercolour card, inked with Antique Linen Distress Ink.

I then added my Funky Insect, the beetle, which I attached to the centre of the circles, placing it over the top of some frayed Mummy Cloth and a small off cut of a Mica Tile from my own stash.

For the tutorial of how I used Distress Embossing Glaze and the colours that are needed to create this funky insect, just click HERE.

For the finishing touches, I used a remnant rub, no.761, taken from the Specimen Remnant Rub set and added this to the leaf in the centre, at the bottom of the circle....

....and finally, I attached some Hardware Heads around the outside edge of the layered circles, which I altered with Crackling Campfire, Black Soot and Antiqued Bronze Distress Paints, to create more of a rusty finish to the metal.

So that's my project complete and I hope you love the tips and techniques I've used to create it.


As always, if you make anything, or if you've been inspired by anything that you've seen here on my blog ~ then please, let me know by tagging me on social media or leaving a comment here and I will be right over to take a look!

Don't forget that every week, one lucky random participant has the chance to win a $25 gift voucher from Simon Says Stamp and you can join in up to 5 times, which means you could have 5 chances to win. You have until next Monday at 8am Ohio time. 1pm UK time, 2 pm CET to join in and good luck....


Thank you so much for taking the time to stop by today...
Love Emma xxx

Recipe for project:

SSS/Tim Holtz Stamps and Dies Bundles: Leaf Prints 2
Stampers Anonymous: Floral Elements
Distress Ink: Walnut Stain, Peeled Paint, Crackling Campfire, Seedless Preserves, Rusty Hinge, Wild Honey
Distress Paints: Crackling Campfire, Black Soot and Antiqued Bronze
Mica Tile

Saturday, 11 October 2025

Simon Says Stamp Sugar and Spice Blog Hop ~ Day 2

Hello everyone and welcome to Day 2 of the Sugar and Spice Simon Says Stamp Blog Hop!

I'm so excited to be joining this hop, and you might have arrived here from Lisa Addesa's blog, but if not, and you want to catch up with everyone who is participating in this hop, then don't worry because you can head back to the beginning, by clicking HERE and if you would like to see the entire product release , then pop on over to HERE.


For my card, I used the beautiful Narrow Holly Cluster die set and the Christmas Stamps and Dies Label Slides to create a vintage style Christmas card, which I hope you love.

So, here's how I created this project...


To begin with I made a 18.5 x 14cm (7¼" x 5.5") card base from Tim Holtz's Heavystock Kraft card.

I matted a layer of Midnight Green card over the top, cutting it slightly smaller than the card blank.

BACKGROUND

Moving onto the background and I began by cutting a panel of Mixed Media Heavystock card, 16.5 x 11cm and inked up the Sparkles stamp from the Stampers Anonymous Sparkles and Christmas stamp set using Frayed Burlap Archival Ink and stamped the design in the centre of the panel.

To add more layering to the background, I then stamped again, this time with Vintage Photo Archival Ink, using the music score stamp from the Department Store Stamp Set. I didn't want a solid stamped image, just hints of the score here and there, so with this in mind I rolled the stamp across the surface, just catching the cardstock where it touches.

I inked the card using Old Paper Distress Ink, and Walnut Stain Distress Ink around the edges, before adding splatters of Frayed Burlap Distress Ink and Gold Acrylic Paint, across the surface.

Once dry, I used the SA/Tim Holtz Post Card stamp set to stamp the Post Card wording at the top of the panel in Black Soot Archival Ink.

I added a frame of Design Tape around the edge of the stamped panel and then machine stitched a border around the outside.
With the background complete, I matted it onto gold metallic cardstock, followed by a layer of red Kraft card from the Warm Kraft Stash by Tim, each time leaving a narrow border of the previous card layer showing. 

In the top right hand corner of the card panel, I added some Ephemera and a postmark. This piece is from the 2025 Christmas Ephemera pack, and I attached it with Matte Collage Medium. I then added the postmark ~ I used a Christmas Remnant Rub from my stash, which is now sadly retired but you can use the postmarks from the Holiday Postmarks stamp set.

Set this to one side to work on the die cutting.

HOLLY CLUSTER

The background is now ready for the Narrow Holly Cluster die.
I cut all my pieces, including extra singular leaves, from using Watercolor Cardstock and then inked the leaves and stem with Peeled Paint, Rustic Wilderness, Forest Moss Distess Inks before adding Candied Berries and Lumberjack Plaid DI to the berries.


After inking the edges with Walnut Stain Distress Ink, I attached the cluster by placing it across my stamped card panel, adding some shape and dimension, so that it doesn't sit flat to the card itself.


I then added some of the extra singular die cut holly leaves and the extra berries, tucking these pieces into the branch and layering others over the top of the previous lease to add more dimension.

Finally, I applied Glossy Accents to the berries, before adding some all important sparkle and frosting to the cluster. I used the Ranger Ink Snowflakes glitter which contains glitter and Mica Flakes which I adhered into place with Glossy Accents.

SENTIMENT

Moving onto the sentiment and I used the Stamps and Dies Label Slides Christmas Set to create this. I cut the largest label slide and then stamped the sentiment, Season's Greetings onto the centre of the slide, using Fired Brick Archival Ink.

I inked the edges with Walnut Stain Distress Ink and then attached some Christmas Jute String, so that I can wrap this around my background card panels, securing the ends at the back of the cardstock.

I then mounted the completed layered panels onto the front of my card blank using foam pads.

FINISHING DETAILS

I tied some more of the Jute Twine into a bow and attached this on the left hand side of the label slide, before attaching a Holiday Bell in the centre using a tiny safety pin. The bell was painted with Lumberjack Plaid Distress Paint, applying it directly onto the metal surface.
I added some pieces of Cello Sticker Tape on both sides of the panels....

...and to complete the card, I stamped the No.5 (from the Correspondence stamp set) in the bottom left hand corner and placed some Metallic Droplets around the cluster.

Simon Says Stamp is giving away a $25 coupon to every stop on the blog hop from the blog comment section! So, this means you can leave a comment here and on every stop along the way to increase your chances. Winners will be notified and they will be posted on the Simon Says Stamp blog on Wednesday, 15 October and all winners will need to contact/email Simon Says Stamp to claim their prize. 

Also, don't forget that you have until the 12th October at 11:59 EDT or whilst stocks last, to grab yourselves the exclusive and not yer release Warm Thoughts stamp set which will be automatically added to your cart.

Thank you so much for stopping by today and see you soon, love Emma x


HOP ORDER


Click HERE to shop for products

Monday, 23 December 2024

The Second Star to the Right ~ Happy Christmas

Hello everyone, and Happy Christmas Eve, Eve!

Today is the last Simon Says Stamp Monday Challenge of 2024, because the DT are having a two week break over Christmas, but we will be back on the 6th Jan. This week's challenge is all about being COLD & FROSTY and whatever you choose to make, you have 2 weeks to join us, and play along.

For my make, I chose to make some favour boxes for the Christmas table and embraced the cold and frosty theme using old and new Sizzix dies by Tim Holtz, before adding a touch of vintage sparkle with Mica Flakes and Rock Candy Glitter.


So, let's get started and let's make some favour boxes, just in time for Christmas...

To make these boxes, I used the Sizzix Curio Box die set by Tim Holtz and cut the top and bottom from White Mixed Media Heavystock card before assembling them.

FROSTY THE SNOWMAN

BOX

We'll start with the snowman box and for this I cut panels of woodgrain card that will fit the sides and top of the box. I actually used Tim's Grey Woodgrain cardstock which I have stockpiled in my stash but if you haven't got any of this, then you can use the white woodgrain card and ink the surface with Lost Shadow Distress Ink to create the same look.

After inking the edges with Pumice Stone Distress Ink, I adhered the side panels to the box. For a touch of added sparkle, I brushed some Sparkle Paste over the surface. You can see the subtle twinkle in the photo below.

Taking the top panel, I machine stitched a border around the edge before I adhered the panel to the top of the box.

I then applied some Grit Paste through the Speckles Layering Stencil to create the look of snow and allowed this to dry, whilst I moved onto my die cut elements.

SNOWFLAKE

For both of these makes, I used dies from the Vault Winter Wishes die set by Tim and on this particular make, I used the Snowman, and the Snowflake, which is where we'll begin.

I cut 6 separate snowflakes from Mixed Media Heavystock card and then I layered and adhered three of those pieces together to form two snowflakes. After applying a coat of Speckled Egg Distress Paint over the surface of each die cut snowflake, I dried them with a heat tool before using my Distress Embossing Dabber which I applied very lightly over random areas of each piece. I then sprinkled White Embossing Powder over the top, tapping away the excess before heat embossing the powder until molten. You will see that I have left some of the painted areas untouched, so that it creates a two tone look.

With both snowflakes embossed, I layered them over one another using foam pads, slightly offsetting the top one. I then attached the snowflake to the box, again using foam pads for some extra dimension.

ICY BASE

For the base, I used a die that is included in an older die set, Oliver the Bunny. I cut the base from Watercolour card that I spritzed very lightly with a combination of Weathered Wood, Speckled Egg and Faded Jeans. I then smeared some Glossy Accents across the base and sprinkled it with Rock Candy Glitter for a touch of sparkle before attaching it to my box using foam pads.

SHRUB THE SNOWMAN

Moving onto little Shrub the Snowman and once again, this die is included in the Winter Wishes die set and for this little man, I cut all the pieces from Watercolour Card before adding the colour and assembling him.

SCARF: Cut from plaid Backdrops paper

HAT: Lumberjack Plaid Distress Ink

NOSE: Spiced Marmalade and Crackling Campfire

ARMS: Gathered Twigs

Once he was assembled, I placed him onto my box.

I added some greenery around the base, cut from card inked with Peeled Paint Distress Ink and then I added the Mica Flakes. I used Glossy Accents for these, as I think it helps to keep the sparkle once dry and after I applied the Glossy Accents to the areas on the base, and also on the surface of the snowflake, I sprinkled the Mica Flakes over the top and allowed to dry.

Finally, I added some snowy touches to Shrub using Snowfall Grit Paste.

WISH

To complete the box, I added the word "Wish". This is a die in the Holiday Classic Die Set and I cut multiple layers, 4 in total from from gold metallic kraft stash card. After I'd layered the pieces to form one substantial die cut, I wanted to give it more of a vintage feel and knock back the bright gold ~ so, for this I applied some Black Soot Distress Paint over the surface, allowed it to go slightly tacky but not dry and then wiped away the excess paint with a paper towel. I then dry brushed the surface with Burnt Sienna Acrylic Paint, before setting this to one side to dry.

...and once it was dry, I attached it to the centre of my snowflake, adding a metallic droplet as a finishing touch.

To complete the box, I added some Cello Stickers around the edges...

...and then a silver metallic droplet to the top and bottom side panels.

As an added surprise, I also created a hidden message on the inside of the box...

ICE SKATES MERRY CHRISTMAS

BOX

For this box, I used panels of Mixed Media Heavystock card that I inked with the following colours of Distress Spray Stain and Oxide Spray:

DISTRESS SPRAY STAIN: Speckled Egg, Uncharted Mariner, Walnut Stain

OXIDE SPRAY: Speckled Egg

I misted the cardstock with water before applying the spritzes. I then gave the surface another spritz of water to blend the colours before heat drying the cardstock and cutting it into panels that will fit the sides and top of the box.

I wanted to add some texture to those side panels, and for this I used the texture fade embossing folder in the Celebrate Sidekick Die and Texture Fade Set and ran these pieces through my die cutting machine. I attached each panel with Matte Collage Medium before applying a coat of Sparkle Paste over the surface.

Taking the top panel, I used clear Versamark ink to stamp some little starbursts from the Christmastime 3 stamp set. I then sprinkled gold embossing powder over the top, and heat embossed until molten.

Along the bottom of the panel, I stamped the wording "Merry Christmas', which is also taken from the same stamp set, and this time heat embossed it using white powder.

I machine stitched the onto a piece of felt, which I cut using pinking shears and then adhered the completed layers to the top of my box.

Finally, I added the ruler ephemera piece across the bottom of the panel.

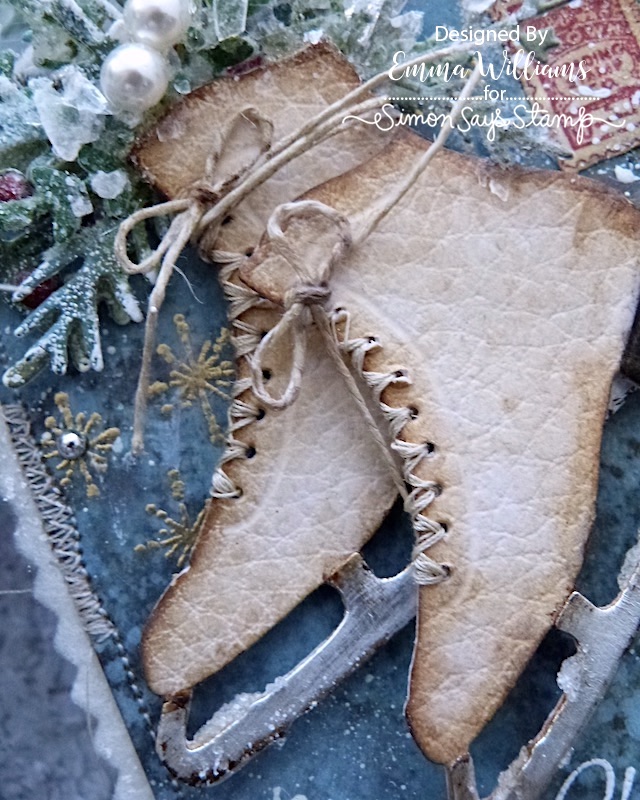
ICE SKATES

Using Cracked Leather Cardstock and the die from the Winter Wishes die set, I cut the main part of the skate and then cut the heel from black kraft card and the blade from silver metallic kraft card. 

I then inked the leather cardstock with Walnut Stain Distress Ink, and sanded the heel and blades before I assembled the skates, completing them by using a needle to thread cotton through the holes and create the laces. Once I'd threaded these, I cut two separate pieces of twine, tied them into small bows and adhered  these in position on the boots.

I attached my ice skates to the box using foam pads and slightly offset them from one another. To complete the boots, I added some hints of Snowfall Grit Paste to the blades.

GREENERY

Using the Sizzix Vault Festive Wreath die set by Tim Holtz, I cut the card which I coloured using the following colours of Distress Spray Stain:

  • Greenery: Iced Spruce, Evergreen Bough, Peeled Paint and Rustic Wilderness

Once all the pieces were cut, I wanted to add some extra frosty sparkle to each of these pieces and for this I used white embossing powder. I just gently dab the ends of each piece into a clear embossing ink pad, and then sprinkle the white powder over the top, tapping away the excess. After heat embossing the powder, I take one piece at a time and begin to build up the foliage at the top of the skates.

To complete the arrangement, I used a brush to very gently apply touches of Glossy Accents over the tips before sprinkling Rock Candy Glitter and Mica Flakes over the finished piece, tapping away excess glitter before allowing it to dry. I then added two of the smallest sized baubles.

FINISHING DETAILS

We're nearly there and all that's left is to add the finishing touches....

I placed some silver metallic droplets in the centres of the stamped starbursts on the background.

A few of those cello stickers around the edges of the box....

...and I finished the piece by adding some crinkle ribbon from my own stash, dyed with Speckled Egg and Antique Linen Distress sprays and then just threaded through a punched hole in the top of the box. I then pinned some Holiday Bells, that I altered with Black Soot and Crackling Campfire Paint for a rusty, vintage effect.

So that's my make for this week's challenge complete and I hope you love what I've created and the techniques I've used and as always, if you are inspired by any ideas or any of my makes, then please remember to tag me on any of my socials ~ Facebook, X or Instagram ~ or even leave a message here on my blog and I will pop over to take a look!

Don't forget that every week, one lucky random participant has the chance to win a $25 gift voucher from Simon Says Stamp and you can join in up to 5 times, which means you could have 5 chances to win. You have until next Monday at 8am Ohio time. 1pm UK time, 2 pm CET to join in and good luck....


Before I go, I just wanted to wish everyone a magical Christmas and a very happy and healthy new year! 

As many of you know, this year was quite a year for me. In my wildest dreams I never thought that 2024 would unfold in the way it did and this festive season is going to be so emotional, because there will be two very special people missing but I just wanted to say thank you to everyone who got me through the last 7 months ~ your love, friendship and support have meant the world to me.

Thank you so much for taking the time to stop by today, and thank you Mum and Dad for EVERYTHING...this creative journey would never have been possible without you!
✨❤️ ✨


See you next year everyone...love Emma xxx

Recipe for project:

Distress Spray Stain: Speckled Egg, Iced Spruce, Evergreen Bough, Peeled Paint and Rustic Wilderness
Distress Oxide: Speckled Egg
Distress Paint: Speckled Egg, Black Soot, Crackling Campfire
Distress Inks: Walnut Stain, Lumberjack Plaid, Gathered Twigs, Spiced Marmalade and Crackling Campfire
Powered By Blogger

Total Pageviews