Showing posts with label distress marker pens. Show all posts

Monday, 18 May 2020

What's Up Pussycat?

Hello friends...

Thank you for all your visits to last week's post, all your lovely comments and sweet words mean so much to me and I appreciate every single one of them!

Today, we are starting a brand new SSS Monday Challenge and this week our theme is called We're All A-Buzz and we hope you'll join us and play along with our fun theme.

For my project this week, I decided to have some fun and used a few inking and stamping techniques to create a one layer card using everyone's favourite Snarky Cat Stamp set from Tim Holtz and Stampers Anonymous and combined them with a few older, and much loved stamp sets to build a little scene which has definitely sent this little pussycat into a buzz!!
So, let's get started because the new challenge has begun and I would like to introduce you to Mr Scaredy Cat!


To begin with I started by creating some layers for my main image and cut a card base from brown pearlised card measuring, 20 x 16cm in size. I then cut a piece of blackout card, slightly smaller in size and sanded the edges to reveal the kraft layer before mounting it onto my card. 

Moving onto my scene and I cut a panel of Distress Watercolour Card, 16 x 12.5cm and after choosing my favourite cat of the set, I began by stamping him, or her onto the card panel using Black Soot Archival Ink onto the smooth side of the card. After re-inking the stamp, I then stamped the image again onto a post-it note to create a mask, fussy cut around the outline of the cat and then placed the mask/post-it note over the top of the image stamped onto the card panel. Using the Tiny Toadstools stamp set, I inked up two of the toadstool images and with the mask in place, I stamped these either side of the cat. Remove the mask and hey presto ~ the toadstools will appear behind the cat and I can start building the scene.

I watercolored the toadstools and the cat using Distress Marker Pens and a water brush and then gave it a blast of heat to make sure it's dry. When it came to the grassy verge, I slightly elongated it on either side, just scribbling a few more lines to look like the grass and then added some shades of green. 
At this stage, you can apply a layer of Distress Glaze over the top of the stamped area to protect the images which I do recommend but I will admit, I didn't do this ~ I just replaced the mask over the cat and then using a blending tool, loaded with Stormy Sky Distress Ink, I carefully inked around the sky. Now that I have my base layer of colour, and with the mask still in place, I then applied some Tumbled Glass and Stormy Sky Oxide Inks to my glass mat, spritzed with water and then dipped my card into it, picking up the colour on the blue sky area of the card panel.

Just build up the colour to however deep or light you want it to appear and once happy, I would just give it a blast of heat to set it

Now for the base ground area and I created this exactly the same as I created the sky ~ I used a combination of Distress Inks, starting by blending Frayed Burlap and Pumice Stone over the entire area, then adding some more layers of Pumice Stone and Old Paper Oxide Inks over the top.

I inked around the edges of card with Hickory Smoke Distress Ink and then machine stitched a border around the outside, leaving strands of cotton loose and hanging down.
I added some shading to the scene, adding shadows and highlights where needed and then taking the little splatter stamp from the Tiny Toadstools set, I inked it with Frayed Burlap Oxide Ink and stamped some texture onto the ground, creating dimension and creating a little path for the pussycat to follow.

To complete the scene, I stamped the 'what if?' quote from the Crazy Talk Stamp Set and placed this just beneath the toadstools on the left. To complete the quote, I added a Small Talk sticker below ~ "never give up".
Matt the completed scene onto silver metallic kraft card, followed by a panel of Fog coloured cardstock, each time leaving a border around the outside. For the final layer of card, I cut a panel of kraft card and then using one of the Mini Media Marks stamps, I stamped some the little circles in white ink to create a pattern that you can just see around the outside. I machine stitched another border and then matted my layers onto the stamped kraft card.
To complete the artwork, I added two index clips to either side and placed Hardware Heads onto them clips. Each metal piece is altered with a little Distress Paint, Evergreen Bough, Picket Fence and a touch of Rusty Hinge before sliding them onto the panel, giving the appearance that the panel is clipped into place. I then mounted the finished scene onto my covered card base using foam tape to create some dimension.
Now to add those important little finishing details...

...I took the bees from the Entomology set and stamped five onto watercolour card. I then watercolored them with the Distress Marker Pens before cutting them using the dies from the corresponding Sizzix Die Set.

After shaping the wings, lifting them slightly to give the appearance the bees are flying around the pussycat, I attached them, by their bodies only onto the panel ~ placing them to swarm around him.
Now with all those bees buzzing around, you can understand that this little pussycat is slightly worried, and because of it, I gave him a few beads of sweat that are flying off him. These are cut from silver metallic kraft card using the Media Marks Die Set and then attached with Matte Collage Medium.
I also added a few stitches, again cut using the Media Marks Die Set but this time cut from blackout card. I added these to the top, and bottom left hand corners and one in the bottom right corner.

Finally, I stamped a label, complete with number and added this to the top right hand corner, stitching it so that it appears to be attached to the panel and then placed a Mini Pin onto the label.
So, that's my card finished and I hope this has bought a smile to your faces, it was definitely a fun piece to create and I loved bringing this little scene to life and telling the story of this cat, who is slightly perplexed at what might happen next....

Don't forget, if you would like to see more inspiration from my talented teamies over on the challenge blog and every week, one lucky random participant has the chance to win a $25 gift voucher from Simon Says Stamp and you can join in up to 5 times, which means you could have 5 chances to win. You have until Monday 8am Ohio time. 1pm UK time, 2 pm CET to join in and good luck....


Thank you so much for taking the time to stop by today ~ stay safe and well, and see you again soon, love Emma xxx

Recipe for project:

Monday, 4 May 2020

Beyond The Sea...

Hello friends! Hope you're all safe and well and welcome to the brand new Simon Says Stamp Monday Challenge...

I can't believe that we're in May already ~ lockdown life sure goes quickly!!! But as we head into another creative week, our theme is all about Spritz and Splatter, and the DT are also showcasing PaperArtsy products within their projects!

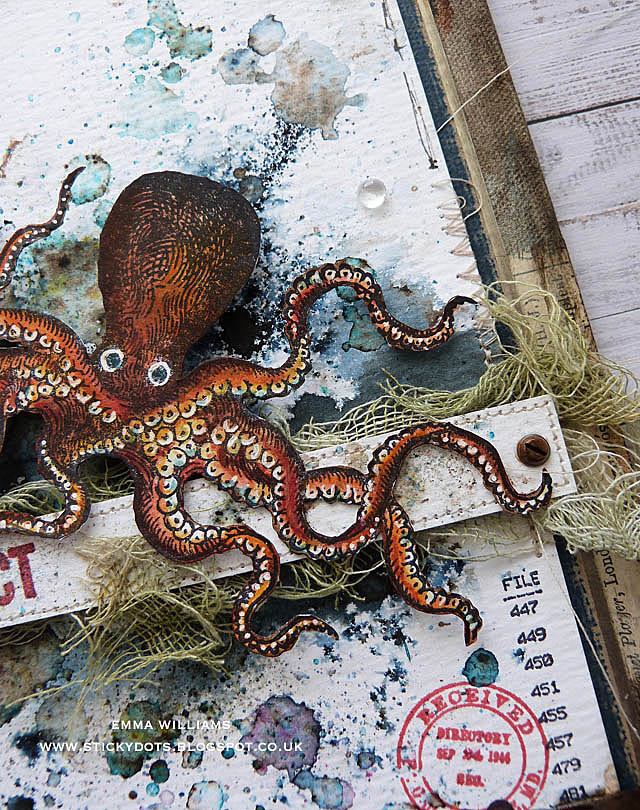
With the challenge theme in mind, I instantly thought about water and decided to go under the sea and used PaperArtsy Infusions to build up the background, combining these with some new, and older Tim Holtz stamps.

So, let's get started because it's time to share all the details of how I created my life beyond the sea...


To begin with I started with the background and cut a panel of Distress Watercolor card, 19.5 x 15cm which I then misted very lightly with water. I then started using my Infusions ~ these are water soluble particles with a dye colour pigment and all you need to do is use the smallest amount, less is more! So, taking In The Navy, I sprinkled the particles onto the dampened card, concentrating on the central area and then added a little more water over the top so that the colour starts to pool and intensify.

Between each layer, I tend to heat dry and once the first layer was dry, I then spritzed droplets of water across the card, and added some more of the Infusions ~ The Sage and Violet Storms. If you feel there's too much colour, just dab some away with a towel but I just kept going until I achieved the desired effect of a watery world, under the sea.

I wanted to maintain some white space around the colour, so...I directed any of the droplets or the infusions towards the centre, but allowed some to just spray out from that area.
To add some layers of interest to the background, I used the Field Notes and the Mini Glitch stamp set and stamped wording, numbers and imagery onto the top left...
...and the bottom right hand corners. I used Barn Door and Black Soot Archival Inks to stamp.
Finally, I added some machine stitching to the edges of the panel, leaving some loose strands of thread hanging.

So, I now have the background and after heat setting the inks, I matted it onto dark blue classic kraft card and a layer of silver metallic card, lightly sanding each of the card layers.

I then matted my layers onto a canvas panel, 22.5 x 18cm. I coloured this panel using Ground Espresso and Black Soot Distress Paints, added some torn book paper to give more of a vintage feel to the background and then applied Walnut Stain Distress Crayon around the edges.
After stamping the octopus onto watercolour card, I then fussy cut around the outline before watercoloring it with Distress Marker Pens and a water brush. To complete the octopus, I added some white highlights with a Posca Pen.
Using an offcut of watercolour card ~ this had a smattering of the infusions on the strip and it just worked so well ~ I stamped the wording Shipment Collect from the Field Notes stamp set onto the strip in Barn Door, overstamped with Black Soot Archival Ink.
I machine stitched a border around the edge of the strip and then mounted it across my panel, over a layer of Mummy Cloth that I arranged so that it would show above and below the strip. I then attached a Hardware Head to either side of the strip before placing my Octopus onto the panel, using foam pads to add some height and definition.
Around the edge of the panel and to look as if the scene has been riveted onto the background, I embossed some silver metallic kraft stash with the Foundry 3D Folder and then cut the embossed card into small strips. Taking four strips, I wrapped these around the edges of the canvas and attached them to my panel. I then added some Machinery Heads and some Hardware Heads to each of the metal sections.
To create the rusty look to the metal, I used a combination of Distress Paints ~ Ground Espresso, Rusty Hinge, Vintage Photo and Black Soot and just built up the colour onto each piece and the metal hardware, creating the look of rust.

We're nearly there and all that's left is the details....

...I added some Clippings Stickers to create a quote, " The color of the sea, where only the imagination can go".
And to complete the scene I added some of the smallest size of Melange Pebbles to look like bubbles.

So, that's it from me for today and I hope you love this project and all the techniques I've used to create this underwater scene ~ it was so much fun to create!
As you may know the lovely Heidi, and all the people working behind the scenes at the Simon Says Stamp Store are running on limited operations ~ they are still accepting orders but due to the current Coronavirus (Covid-19) situation, shipping times are going to be slightly longer than usual!

But due to the outbreak we have made the very difficult decision to suspend the $50 vouchers for now but we know that many people are staying safe at home and we would love it if you would continue to enter the challenges and have fun! We are all in this together!


Thank you so much for taking the time to stop by today and see you again soon. 

Stay safe everyone and take care of yourselves and your loved ones...


....love, care, believe ~ Emma
xxx


Recipe for project:

PaperArtsy Infusions: In The Navy, The Sage, Violet Storms

Saturday, 7 March 2020

Lucky To Know You Simon Says Stamp Blog Hop ~ Day 2

Hello friends and Happy Saturday!

Today, is the second day of the Simon Says Stamp Lucky To Know You Blog Hop and I'm really excited to be joining so many talented designers as one of the stops on this exciting hop! You can see the fabulous new release in full by just popping over to Simon Says Stamp and if you've been hopping along, you'll have arrived here from the talented Vicky's blog but if you've just popped by and want to join us from the very beginning, just hop over on the Simon Says Stamp's Blog.

For my card, I chose to use the adorable Spring Gnomes set and combine it with the Faberge Egg Die perfect for Easter and Spring celebrations.
So, let's get started and here's how I created this...
To begin with I cut a 15 x 18.5cm card blank from white card and placed it in front of me with the fold at the top.

I then cut a panel of kraft card, slightly smaller in size than the card blank and using the solid heart and the heart outline stamps from the Spring Gnomes set, I stamped a pattern over the entire background of my card using Hero Arts Unicorn White Ink.
After machine stitching a border around the edge, I matted the card panel onto blue card and then wrapped some twine around the centre of the panels before mounting them onto the front of my card blank.
Now to move onto the next layer and for this layer I took a piece of watercolour card and created two panels, 11.5 x 15cm and 11.5 x 8cm. I then applied some Distress Inks to my glass mat and used Tim Holtz's wrinkle free technique to add colour. The colours I chose to use in this order, were Antique Linen Distress Ink, Pumice Stone Distress Ink, Old Paper Oxide Ink, Scattered Straw Oxide Ink and finally, Scattered Straw Distress Ink. I applied each colour separately to my mat, spritzed the ink with water and then dipped the card in and out of the inks, drying the layers in between and adding more colour if I felt I needed it. Once I was happy, I heat dried the card thoroughly and inked the edges with Walnut Stain Distress Ink.

Taking the larger panel, I machine stitched a border around the edge, before matting it onto a further piece of the blue card and then mounting it centrally onto my card panel.
I then took the smaller panel and using the solid heart stamp that was used previously to create the background, I inked this with Scattered Straw Distress Ink and stamped the pattern over the small panel. Heat dry to set and then once again, machine stitched a border around the outside before matting it onto gold metallic kraft stash, a white panel of card cut using the Tim Holtz Stitched Rectangle Die from my own stash, followed by a layer of hessian. I then attached foam pads to the back of the layers and mounted it onto my card blank.
I now have all my layers ready for the egg...
To create the egg, I coloured a piece of watercolour card in exactly the same way as I coloured the background panels but this time I substituted the Scattered Straw coloured inks for Tumbled Glass.

Once I was happy with the colour, I used the solid egg shape from the Faberge Egg die set, to cut my blue card. I then splattered the card with a light coverage of white paint to create the little speckles.

Taking the second die in the Faberge Egg die set, I cut the decorative layer from white pearl card. I then snipped away the Happy Easter wording, (you can save this for another day and another card, nothing is wasted) before layering it onto my blue egg using Matte Collage Medium to adhere it into place.

I mounted the egg onto the card front using foam pads.
After stamping the Easter Bunny Gnome onto watercolour card, I then watercolored him with Distress Marker Pens before fussy cutting around the outline of the image. To add some interest and texture to the image, I added some small dots of Tonic Studios Nuvo Crystal Drops to the body. Allow for these to dry.
Cut a strip of inked blue watercolour card that was used for the egg and ink up the Spring Greetings message in clear embossing ink. Stamp the message onto the banner strip and heat emboss with Ultra Fine Gold Embossing Powder until molten.
After cutting an inverted 'v' into either end of the banner, I attached it using foam pads, across the centre of my egg, shaping it to create movement and form a wave. I then placed the Easter Bunny Gnome to the left of the banner.
Finally, I dyed some of the small Bouquet Findings flowers using Spun Sugar Distress Spray Stain and once the flowers were dry, I arranged these around the gnome, adding some die cut foliage, cut from green card using the Funky Florals 3 die set from Tim Holtz.
To complete my card, I added four pearls, one to each corner of the smallest background layer.
I hope you've enjoyed the creative process behind this fun card project and loved the ideas and techniques that will hopefully inspire you with some ideas of your own ~ it's been so much fun to share this with you!

HOP ORDER

ALL THE HOP DETAILS

Simon Says Stamp is giving away a $25 coupon to every stop on the blog hop! This means you can leave a comment here and on every stop along the way to increase your chances. Winners will be posted on the Simon Says Stamp blog on Wednesday, 11th March and all winners will need to contact/email Simon Says Stamp to claim their prize. Also, last but by no means least ~ we are also running a special surprise promotion in conjunction with this hop and you can claim one free gift of your choice! The offer is valid until 8th March at 11:59 EST, or while supplies last and the codes to claim your gift, are: FLF584 or WLY777


Thanks so much for hopping by today, hope to see you again soon!
Emma xx


RECIPE FOR CARD:
Simon Says Stamp Lucky To Know You Release: Spring Gnomes, Faberge Egg
Powered By Blogger

Total Pageviews