Showing posts with label distress paints. Show all posts

Monday, 20 April 2026

The Great Discovery...

Hello everyone...

Another week has flown by and as always on a Monday, it's time to share a brand new Simon Says Stamp Monday Challenge.

This week, our theme is all about USING MORE THAN ONE STENCIL and we hope you will join us and play along with this fun challenge.

For my make, I used Tim Holtz Layering Stencils to create a background to my tag which is all about a journey of discovery and once you find what you're looking for, you hold on to it and "do what you love".

So, let's get started and it's time to share all the details of how I made this week's project!

For this make, I used a Stampers Anonymous Size 8 Etcetera Tag and a size 8 Mixed Media Heavystock Tag.

TAG BACKGROUND

I began with my background and for this I used the Size 8 Mixed Media tag. I misted the tag with a light spritz of water and than added the colour using Distress Spray Stains, Oxide Sprays and Mica Sprays in the following colours:

DISTRESS SPRAY STAINS: Ground Espresso, Chipped Sapphire, Speckled Egg

OXIDE SPRAYS: Tumbled Glass

MICA SPRAY: Crooked Broomsticks

I applied the Distress Spray Stains first, and after another spritz of water to blend the colour, I heat dried the surface before adding splatters of Tumbled Glass Oxide Sprays and finally a light misting of the Mica Spray.

Once the surface is completely dry, I moved onto the stencilling and adding some detail to that background.

STENCILS

The stencils I used for the background were the from the following sets:

Mini Layering Stencil Set 33Mini Layering Stencil Set 48

I began with the Digits from set 48 and applied Translucent Texture Paste through the stencil, placing the stencil down the right hand side of the tag.

Once I removed the stencil, I sprinkled silver embossing powder over the paste, tapping away the excess. When the paste is set, I then heat embossed the powder, moving the heat gun over the area quickly to stop the paste from bubbling.

With the powder molten, I then moved onto adding more stencilling. Unfortunately, some of this is covered by the embellishments, but it is there...I promise! 😉

I added some more Translucent Paste through the Halftone Stencil, placing this along the bottom edge of the tag....

...and to finish this piece, I used the Halftone stencil once again, and this time I applied Lost Shadow Oxide Ink through it and completed the tag with some Walnut Stain Distress Ink which I applied through the Stitches Stencil from set 33.

After machine stitching a border around the outside edge, I attached my tag to the Etcetera Tag using Matte Collage Medium.

EMBELLISHMENTS

We can now start to bring this piece to life and I began by building a ledge for the young boy to stand on.

For this I used a Pinked Etcetera Trim and a Junk Drawer Baseboard piece.

I used the Decorative Trims die set to cut an offcut of some paper from one of Tim's paper pads and then adhered this to my trim with Matte Collage Medium. After applying Walnut Stain Distress Crayon to create more of a worn vintage feel to the paper, I attached the trim across the bottom section of the tag.

I then attached a Junk Drawer Baseboard over the top before adding a ScrewHead to either side of the baseboard piece.

For the focal point which tells the story of the little boy who discovers doing what he loves...I used a Paper Doll, a second Junk Drawer Baseboard piece, a Salvaged Heart and the pointy finger from the idea-ology Figure Stands pack.

I then attached the target from the Junk Drawer pack, placing it on the right hand side using foam pads to add dimension.

Taking the paper doll, I colour tinted this with Distress Crayons and then attached him to the left hand side, so that he leans agains the target.

Now for the Salvaged Heart and using one of the larger pieces, I decided to make this look rusty and used the following Distress Paints and Foundry Waxes to create this look.

Foundry Wax: Sterling and Statue

Distress Paint: Black Soot, Antique Bronze, Crackling Campfire, Salvaged Patina

I layered my paints first, and then once I had the right rusty colour tone, I applied a light coverage of the waxes over the top, heat setting each wax in between applications. Once I was happy with the colour, I attached my heart to my tag.

I then used one of my all time favourite pieces from Tim's idea-ology range ~ a Figure Head. I chose the pointy finger and painted this with Distress Paints, using the same colours as I used on the heart for the stand and then using Barn Door on the finger itself. When the paint becomes tacky, and nearly dry, I removed some of it to create the chippy paint look. I attached the finger to the stand and then attached the piece to my tag, sitting it on the ledge.

I completed the ledge by adding some moss.

DISCOVER

For the word 'Discover', I used the Sizzix Handwritten Love die set by Tim Holtz and cut three separate layers of the word before adhering them together to form one solid piece that resembles the thickness of chipboard.

I then applied some clear embossing ink over the top, sprinkled with gold embossing powder and heat embossed this until molten. After repeating this another couple of times to create the enamelled effect on the word, I attached the word to the heart.

We're nearly there and all that's left is the finishing details....

FINISHING DETAILS

I added a number snippet down the left hand side...

...before adding a Thought Token to the top right hand corner. The though token is painted using Barn Door and Black Soot Distress Paint, before I highlighted the words with Picket Fence Distress Crayon.

I attached the token by hammering a nail tack through the hole.


All that's left is to thread some rope through the hole in the tag and that completes my project for this week.

As always, if you make anything, or if you've been inspired by anything that you've seen here on my blog ~ then please, let me know by tagging me on social media or leaving a comment here and I will be right over to take a look!

Don't forget that every week, one lucky random participant has the chance to win a $25 gift voucher from Simon Says Stamp and you can join in up to 5 times, which means you could have 5 chances to winYou have until next Monday at 8am Ohio time. 1pm UK time, 2 pm CET to join in and good luck....


Thank you so much for taking the time to stop by today...
Love Emma xxx

Recipe for project:

Distress InkWalnut Stain
Oxide Ink: Lost Shadow
Distress Spray Stain: Speckled Egg, Chipped Sapphire, Ground Espresso
Oxide Spray Stain: Tumbled Glass
Distress Paint: Black Soot, Antique Bronze, Salvaged Patina, Crackling Campfire, Barn Door
Distress Crayon, Picket Fence and colours of your choice for the paper doll

Monday, 14 February 2022

High Society...

Happy Monday friends...

Hope you all had a great weekend and enjoyed Tim's latest YouTube Live! Wasn't it just the best kept secret and such a wonderful surprise to see all those brand new inks and glazes! Thank you for all the lovely comments about my makes, I will be sharing step by steps of many of the makes that I'm working on, so please do keep checking back here, or over on Instagram!

In the meantime, it's Monday and that means we have a brand new Simon Says Stamp Monday Challenge and this week our theme is all about, FOOD & DRINK!

Now, I always like to think outside the box and I've done many food and drink projects over the years, so this time I wanted to take a different route and I decided to make a vintage style tag that features a very dapper gentleman who is out to dinner and has a table reserved at the Grand Hotel Continental!

So let's get started, it's time to pull up a chair to see how I created this week's make!

To begin with I used a small etcetera tag, flipped it upside down so the narrow part is at the bottom and then applied Humidor Design Tape around the edge of the tag itself.

I then took a piece of paper from the Backdrops Vol 2, this particular one has the Grand Hotel Continental as the heading.

After trimming the paper down to size, I machine stitched around the outside to create a border and then ripped and tore the edges to add more of a vintage feel.

I adhered the paper onto the tag with Matte Collage Medium and added some more tears where necessary.

Around the edges of the tag, I added some crackle paste and once this was dry, I then ran my Walnut Stain Distress Crayon over the top of the paste, blending it into the cracks with a brush.

Now to form the ledge that sits across the tag, I used a Pinked Etcetera Trim that is slightly longer in length than the tag itself but I like that it overhangs. I then used the Decorative Thinlits Die set to cut a piece of paper from the Backdrops pack ~ I believe this is from Backdrops Vol 1 and adhered it to my trim.

I attached the trim across the bottom section of the tag and then I added a metal embossed strip. This is actually an older Impresslits Embossing Folder that I have in my stash! It's called the Lattice Trim and once again, if you have don't own it ~ you could use any metal offcuts from Tim's Texture Fades. I just liked this design and it was sitting in my "bits and pieces, offcuts box".

I cut the trim from silver metallic kraft card, and then applied Black Soot Distress Paint over the top, wiped away the excess and once dry, attached this to my tag.

On the centre of the etcetera trim, I attached a Junk Drawer Baseboard Layer and applied a little Grit Paste around the edges to age it. Once the paste was dry, I covered it with Distress Paints, Black Soot and Ground Espresso.

To complete the trim, I added a Drawer Pull, with two Hardware Heads attached to either side and added the wording "Reserved" in the window which is from the Clipping Sticker Book.

Finally, I added some metal hardware to either side of my trim and undereath the ledge, I added a Specimen Remnant Rub ~ Orders Attended To Day or Night.

Now my tag is ready for the star of the show and you might recognise this dapper gent from Halloween!! Yep, this is the count but rather than going down the vampire route, I dressed him up using a few accessories from other die sets. If you don't own these dies, then there are plenty of others from Tim that can be used...so just play around and as Tim always says ~ YOU DO YOU!

Using Mixed Media Heavystock card and black kraft card, I die cut and assembled The Count but didn't use the cape...that's the only difference with this make.

But now he need's to be turned into the dapper gent and for this I used the bowler hat and monocle from The Gent Thinlits Die Set...

...and the umbrella from The Park Thinlits Die Set. These are the perfect size accessories for this gent and are die cut from black and red cardstock for the hat, and black and metallic kraft card for the umbrella.

As a backdrop to the count, I used a label taken from the Urban Layers Ephemera pack and adhered this directly onto the tag using Matte Collage Medium.

Attach the count with foam pads, placing him on the right hand side of the label.

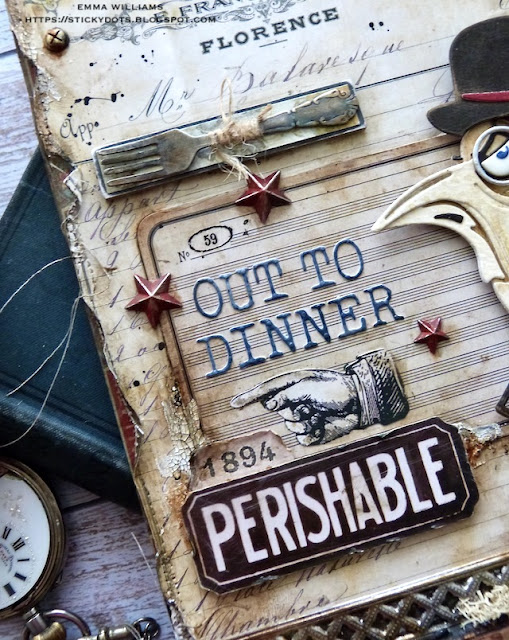
For the "Out To Dinner" wording, I used the Alphanumeric Tiny Type Upper Thinlits die set and cut the letters from blue card and attached them to the Urban Layers Piece.

Underneath the label I added a 'pointy finger" which is from the Christmas Ephemera pack and also placed a Perishable Urban Layer onto foam pads and attached this directly beneath. I added a touch more Crackle Paste around the edges of the label and once that was dry and inked, I attached my count using foam pads.

I placed some Star Adornments onto the label, which I painted red using Candied Apple Distress Paint and attached these with Matte Collage Medium.

Just above the label, I added a fork which is one of the pieces from the idea-ology Silverware Adornments pack. I placed this onto a piece of mountboard that I covered with an offcuts of the Backdrops paper and just aged the metal finish of the fork by using Distress Paints ~ Salvaged Patina, Tarnished Brass, Black Soot and Picket Fence.

We're nearly there and all that's left is to add some more metal hardware down the side ~ I used Hardware Heads and created a rusty finished around each of them.

...and with that final detail, my dapper city gent is ready for dinner!

As always, if you make anything, or if you've been inspired by anything that you've seen here on my blog ~ then please, let me know by tagging me on social media or leaving a comment here and I will be right over to take a look!

Don't forget that every week, one lucky random participant has the chance to win a $25 gift voucher from Simon Says Stamp and you can join in up to 5 times, which means you could have 5 chances to winYou have until next Monday at 8am Ohio time. 1pm UK time, 2 pm CET to join in and good luck....


Thank you so much for taking the time to stop by today ~ stay safe and keep well.
Love Emma xxx

Recipe for project:

Tim Holtz for Stampers Anonymous: Small Etcetera Tag, Pinked Etcetera Trims
Distress Paints: Candied Apple, Salvaged Patina, Tarnished Brass, Black Soot and Picket Fence.
Distress Crayon: Walnut Stain

Wednesday, 22 December 2021

A Merry Christmas and A Happy New Year...

Hello friends...

Today, I'm sharing my final Christmas idea-ology make that I created for Tim Holtz's YouTube Live Launch! If you didn't see the LIVE or like me, you just want to watch the replay again, and again...then you can catch up with it HERE!

This project was created using the quite a few of the new Christmas products from Tim and included the fabulous new Vignette Plaque, which measures 8" square and is the perfect base for so many different projects ~ I know I'll definitely be stocking up on these!
So let's begin and I'm just going to take you through a few of the techniques I've used starting with the plaque, which I flipped over so that I could use it as a shadow box but you can use it the other way too, which Tim had done and wow, that project is amazing ~ so definitely take a look!
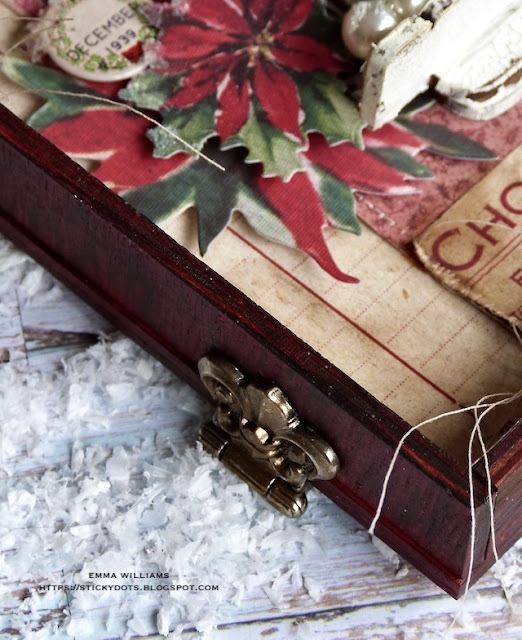
So with the box flipped over, I painted the back and sides of the plaque with a combination of Candied Apple, Aged Mahogany and Black Soot Distress Paint. I started with Candied Apple and then dried the painted surface before adding a dry brushing of Black Soot and the Aged Mahogany over the top. This helps to knock back the brightness of the red and gave me the vintage look I wanted.

On either side of the box, I added Hinges ~ these aren't functional but just decoration to create the look of a hinge.
I lined the box with papers from the Christmas Backdrops set and cut these into panels, stitched a border around the edge of each and after adding a few rips and tears, I attached them to the plaque with Matte Collage Medium. I always add a coat of the medium over the top of the papers to seal them and I also ran Walnut Stain Distress Crayon around the edges, so that it creates an aged look to the papers. 

What I love about these papers is the fact they all work so well together and you don't need to use a full sheet, just use panels and splice them together as I've done here. Even the Chocolate Phalier Douell panel is cut down from the papers and then collaged.


The focal point is the framed sections and I layered a Baseboard Frame over the top of a Vignette Frame that I painted with Speckled Egg Distress Paint and this creates depth to the piece.
In the centre of the aperture of the baseboard frame, I used foam pads to attach a Christmas Layers piece, with the message, A Merry Christmas and A Happy New Year and used Frosted Crystal Embossing Powder over the top of this to create some texture.

I added a star to the top of the frame, which I covered with Holiday Sparkle glitter and for even more sparkle, I applied some Glossy Accents and sprinkled Mica Flakes over the top.

Underneath I added some Vignette Trims to form a ledge ~ I used the Scalloped and Bracket Trims and applied Crackle Paste to the surface.
I then attached the gorgeous little girl and her furry companion to the centre of the ledge, which I colour tinted with Distress Crayons and again attached with foam pads.
In her hand, I placed a small Woodland Tree. I coloured this with Peeled Paint Distress Spray Stain and then frosted the tips with glitter. After removing the wooden base from the tree, I attached it so it looked as if she was holding it.
On either side of the ledge, I broke a metal fence in two, which I inked with Rust and Pitch Black Alcohol Inks to create a rusty finish to the metal before I attached each piece with Matte Collage Medium.
To complete the fence, I tied some rusty alcohol inked Tiny Bells onto the right hand fence.
Around her feet, I added some Grit Paste and some Bauble Findings. I then dusted them with a sprinkling of Rock Candy Distress Glitter and Mica Flakes.

I finished the piece with the gorgeous poinsettias from the Worn Wallpaper Scraps and placed these to cascade around the frame, using different heights of foam behind each piece to create dimension and depth...

...before I added the Mini Flair button and some Mirrored Stars onto the background.
Finally, I painted a Christmas Word Plaque with Candied Apple Distress Paint and attached this along the bottom of my plaque. I added small Hardware Heads to the plaque and then surrounded it with pine cones from my garden and some Mica Flakes...
...before I added a Hardware Pull at the top of the panel and a stitched scrap which I attached at the top of the frame and then added a Mini Pin.
So that completes my final project of 2021 and I hope you've enjoyed reading all about this project. As always, if you make anything, or been inspired by anything that you've seen here on my blog ~ then please, let me know by tagging me on social media or leaving a comment here and I will be right over to take a look!

 Thanks so much for taking the time to stop by today and from the bottom of my heart ~ THANK YOU for all the love you've shown my projects and blog over the last year ~ it's not been the easiest of years for so many of us but I'm sure crafting has kept a few of us sane whilst we were in lockdown.

Happy Christmas everyone ~ stay safe, keep well and here's to a happy and healthy new year.
See you in 2022!
Love Emma xxx

Powered By Blogger

Total Pageviews