Showing posts with label vignette panel. Show all posts

Tuesday, 20 May 2025

Make This Journey Your Own...

Hello friends...

Hope you've had a great start to the week, and the sun is shining wherever you are!

You might remember that last month, I shared a cool technique of how to create rust effects on metal. If you missed this post, then just click HERE to take a look. At the time, I hinted that these gears were for another project that was in the pipeline and today, I'm just popping by to share that project and hope you love what I've made.

The inspiration behind this make was all about individual people and the stories that can be told by just looking at a photo and with this in mind, I found some of my favourite images from Tim Holtz's Photobooth packs and I sat down, and just created this piece, which I hope you love!


So, let's get started and I invite you on this journey...


VIGNETTE DISPLAY PANEL

I used papers from both the 8" x 8" and 12" x 12" Correspondence Paper Stashes that Tim recently bought back from the Vault for a limited time only. These are now so hard to find but if you didn't manage to get your hands on them, then there are plenty of other papers in the idea-ology range to choose from.

I covered the sides of a Vignette Display panel on the outside, and on the inside with a selection of papers from the 12" pack and I also added a Design Trim Tape onto the front edges of the panel.

ETCETERA DISPLAY PANEL

Moving on to the inside, and because of the design of this piece, I didn't want the full depth of this panel ~ so, I used a Etcetera Panel and raised this slightly by using the 'waste' frames, the frame that sits around the Etcetera Tiles to hold them together whilst in the pack. I always hold onto these, as they make perfect frames for projects ~ so, don't throw them away.

I applied a coat of Black Soot Distress paint to the surface of the square Etcetera Panel and once dry, I then applied the same Design Tape Trim as I used on the Vignette Panel, and I placed this around the edges.
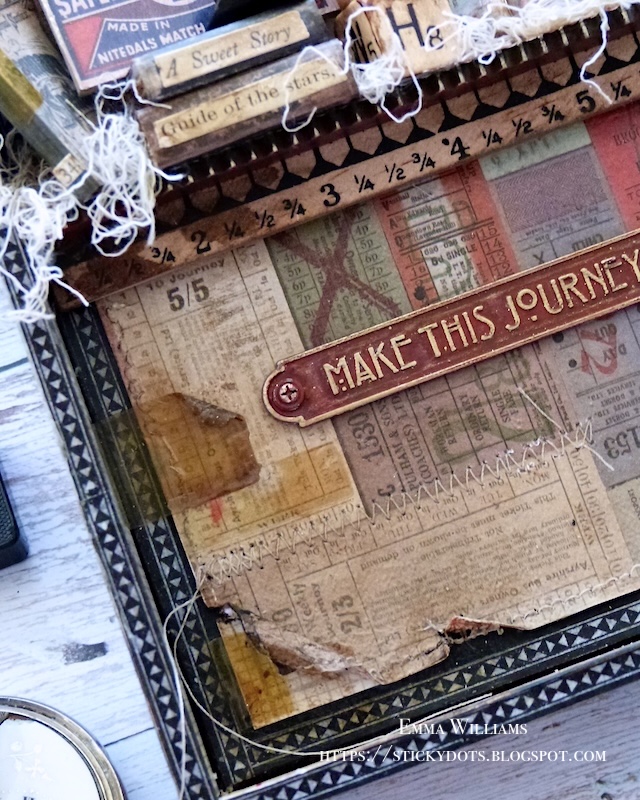
I then took a piece of the ticket design paper from the 8" x 8" Correspondence pack and after adding some rips and tears around the edges, I machine stitched a border and also added some stitching detail around the tickets.

I mounted the paper onto my panel using Matte collage Medium to adhere it into position...

...and used a combination of Vintage Photo and Black Soot Distress Crayons to add the colour and vintage touches to the ripped edges before hammering some Nail Tacks into the corners of the panel. I altered these Nail Tacks with the same colours of Distress Paint as I used on the gears.

To complete the background, I added some Cello Tape Stickers.

GEARS and PHOTO FRAMES

As I mentioned at the beginning of this post, I am using all those rusty gears and I arranged these down the right hand side of the box. 

Then, I took my selection of vintage photos, colour tinted the photos that are purely black and white using Distress Crayons and a waterbrush before I cut them using a circle die, so that they would fit behind the circular Baseboard Frames.

I attached these photo frames, to my gear arrangement and added some Screwheads to the centres of some of the gears. You can see the dimension in the photo below.

To complete the arrangement, I placed three Stars Adornments, painted with Candied Apple Distress Paint.

SHELF

Now to bring this piece to life, I wanted to add a shelf of trinkets, and for this I used a Pinked Etcetera Trim and a Ruler Piece. I attached the two piece to form a 'L' shape and this then forms the ledge which I attached to my background.

You can see that the ledge runs from the left hand side and the gears and the photo frames all fit perfectly cascading around the end of the shelf, on the right hand side.

I filled my shelf with some tiny books that I made using the covers from the Halloween Ephemera Pack, a Junk Drawer Baseboard piece, and the hat without the stand, from the Figure Stands Adornments...

...I also added the pointy finger from the Figure Stands Adornments. Both the hat and the pointy finger figure stand are painted using Distress Paints. I completed the arrangement with a Thought  Token, "Go, See, Explore", complete with a Swivel Clasp hanging from it. All the pieces are placed over a bed of Mummy cloth fibres, that I shredded and dyed with Frayed Burlap Distress Spray Stain.

I also added a couple of older idea-ology pieces including a light bulb and an Alpha Dice, with the letters T and H!

We're nearly there and all that's left is the large Word Plaque, Make This Journey Your Own, that I painted with Candied Apple Distress Paint. I then highlighted with wording with Gilded Foundry Wax. I applied the wax with my finger to accelerate the quote and then heat set it with a heat tool.

I finished the panel with a knob from the Mini Hardware Set, and once again I painted this with Candied Apple Distress Paint and adhered into position on the top of the panel using Matte Collage Medium. I then tied some twine around the neck.

So that's my make complete and I'm so happy with how this piece turned out and hope you will be inspired to create something similar and remember if you don't want to use these photos, it will be perfect to use family photos to personalise your make!

Thank you so much for taking the time to stop by today....
Love Emma xxx


Click below for your one stop shop at Simon Says Stamp

SHOP HERE:

Recipe for project:

Distress Paint for painting idea-ology pieces and gears including Black Soot, Candied Apple
Distress Spray Stain: Frayed Burlap
Distress CrayonsBlack Soot, Vintage Photo

Wednesday, 16 October 2024

Hello everyone, welcome to the Witch Market and an update...

Hello everyone...it's been a while since I was last here and many of you have very kindly been sending messages to ask if I was ok and I thought now was the time to take this opportunity to update you all. If you follow me on social media, you probably already know the reasons why I've been absent from my blog, and why I've taken a break over on the Simon Says Stamp Monday Challenge but for those who don’t follow me, I thought I'd drop by, say hello and just fill you in on what's been happening since my last post in May.

So, here we go, and this isn't the easiest post I've ever written, I don’t usually share personal things on here, but I wanted to share this and hope you don’t mind reading it…

In May, my Mum suffered a Haemorrhagic Stroke and from the very beginning, the medics told us that we should hope for the best, but prepare for the worst. My Mum was a fighter though, she always had been and she wasn't prepared to leave us without one last fight of her life. And that’s what she did, she fought so hard and so bravely, but after 9 days, my Dad and I had to say goodbye and that was the hardest thing to do, because this beautiful woman, who had a smile that would light up a room and a sense of humour that would brighten our day, was everything to us ~ she wasn't just my Mum, she was my best friend, a beloved wife and a very special lady to everyone who knew her.

For the next 9 weeks, Dad and I tried to get used to life without Mum...it was hard, and it was definitely the most difficult time we had ever faced but no matter what we were going through, we had each other, and that was how we coped with the heartbreak.

But at the end of July, after spending a lovely day together, my Dad started to feel unwell and he was rushed to hospital. After a very long 5 hours, hoping and praying that I’d be able to take him home, my wonderful Dad, my hero, passed away and once again, I had to say goodbye. In the space of 9 weeks, my world had fallen apart….

These last five months have been extremely painful and I can't tell you how much I miss both of them, it's more than words could ever describe but they are always in my heart, by my side and they will never be forgotten because every night, they are both shining bright in the sky!

So, as I begin to slowly ease myself back into a world of creativity, I wanted to say thank you to everyone who has sent messages, cards, flowers and just been there for me during these last months. I especially want to say thank you to Tim, Mario, Paula, ❤️❤️❤️ and everyone at Simon Says Stamp. ❤️ You have all been so caring, and so supportive and it really has meant so much to me as I've tried to move forward and cope with all the chaos that comes with this huge loss.

*******

…and now, to the second half of this post, and if you follow me on Instagram or Facebook, you will have seen a few of the makes I've created for Tim's recent Halloween Sizzix, Ranger Ink and Christmas Stampers Anonymous releases.

I also shared this piece that I was creating for the Halloween idea-ology Live Launch. I'd actually already made this project just before Dad passed away but unfortunately, it wasn't quite finished in time for Tim's YouTube Live. But for those who haven’t seen it on my socials, it’s now time to welcome you to the Witch Market....


This post is really to show you around the make, it’s not a tutorial but I wanted to share some of the close up details with you and the products I’ve used. If you do have any questions though, then please don't hesitate to message me.

Products used in this post are available at Simon Says Stamp

*************

To create this piece, I began by choosing the Square Vignette Panel as a base, using the inside to create the appearance of a box. I painted the entire box, inside and out with Black Soot Distress Paint and then adhered Design Tape Trim around the four edges of the panel.

To add texture to the sides, I used the spider's web die in the Sizzix Vaults Fright Night Thinlits set. The web is cut from black card and I just snipped into the die cut to create sections and pieces which I then attached directly onto the box using Matte Collage Medium. Once dry, I just gently rubbed some Sterling Foundry Wax over the raised areas to accentuate the detail before I heat set the wax, using a low setting on my heat tool.

To add even more texture, I used Black Opaque Distress Texture Paste to create a gnarly, vintage effect, and once that was dry, I again used the Foundry Wax to highlight the details. To complete the box, I added some Hitch Fasteners to the top of the panel, and a Machinery Head on either side.

As we begin to walk around the market, you'll notice that I covered the back of the panel with the brand new Halloween Large Collage Strips. These are a favourite of mine and I love that you can use the strips just as they come out of the pack or like I did on this piece, where I cut them into sections so that they all fit perfectly. It’s a bit like a jigsaw and you will need to place some horizontally, and some vertically.

Inside the box, you can see that I built up the main central focal point by layering an Etcetera Facade, (with the circular piece in the centre removed), over the top of the smaller rectangular Etcetera Panel. Both of these pieces are covered with gorgeous papers from the Halloween Backdrops pack and on the centre of the Etcetera Panel, I also attached the black and white circular layer, which is from the Halloween Layers and Paper Dolls pack. You can just see this through the aperture and creates the perfect backdrop for the witches.

Now to add those Halloween Tiny Lights to create that perfect purple glow behind the witches. I attached the lights by drilling a hole through the back of the vignette panel, and continued drilling through the Etcetera Panel which I had fixed into position using Matte Collage Medium.

I then used hot glue to attach the lights to the back of the Facade, placing them around the edge of the circle. With these firmly attached, I used the risers that come in the facade pack, placed these on the back of this piece, and adhered this into position.

On either side of the facade, I used a Bat Web Etcetera Trim. Each trim is painted with Black Soot Distress Paint and then attached ~ one on the left, one on the right.. Once again, I added Black Opaque Distress Paste to each trim for added texture and accentuated this detail with Sterling Foundry Wax.

To complete this focal point, I used Spanish Moss and Mummy Cloth that I dyed with Frayed Burlap and Antique Linen Distress Sprays and tucked this in around the edge of the facade.
Now to move onto the witches...

To create support for the witches and to add some more depth to that central area, I attached "wooden planks". These realistic planks are from the Baseboards pack, and are perfect for adding to a window, or an opening to create a spooky effect.

I added two of these planks to form a cross, which as I mentioned, also doubles as the support needed for the witches heads to rest upon.
I actually used a combination of two Halloween Paper Dolls ~ one is the woman and child, and the other is the older lady, who sits on the right. I then added the eye mask and the witches hats, both of which are from the Halloween Sticker Book, before surrounding them with floral layers on either side.
At this stage, I also added the spider, painted with Distress Paint, and the Shake Well Before Using Label which I adhered directly onto the Facade. I also added the No.13 Remnant Rub, rubbed onto one of the Cello Sticker onto the left hand side, and finally some Screwheads.
Tucked into each side of the panel, and nestled amongst the floral display are some Drippy Candles and all that I did with these to add that orange glow is dab some Stickles Glitter Glue to each of the wicks.
To ensure that the figures look as if they are grounded and their feet aren't floating in mid air, I added an Etcetera Trim across the bottom section of the facade. I painted the trim with Black Soot Distress Paint, and attached it with Matte Collage Medium before adding moss, some Boneyard Findings and Mummy Cloth around their feet.
You'll also notice that I added a key from the Gothic Gates set. This key, which I altered with Distress Paints to create a rusty effect, hangs down on a chain which is attached to a Nail Tack, hammered into the facade.
Now to add some details and on either side of this panel, I attached the gothic gates which I made to look rusty using Transluscent Grit Paste and Distress Paints. I then added a spider along the very bottom, just crawling out of the gate....
...and on the opposite side, I attached a lock, which hangs from this open gate. Once again, Distress paints did their job of creating the look of a patina on the metal.
Now, no Witch Market is complete without bottles full of potions, poison and other elixirs, and this market is no exception because these three witches have been busy and as the 31st October draws near, they are obviously working their magic ~ ready and waiting to cast a spell or two....
I used a combination of Corked Vials and Tiny Corked Vials for this. You can read all about how I alter these clear glass vials on a previous post, and you can also see more of this technique HERE.

Once all my tiny vials were ready and all the little Curator labels were attached to the fronts, I just positioned them across the bottom of the panel, adding moss in and around each bottle.
Finally, I added the Witch Market sticker onto one of the "wooden planks" and used Nail Tacks to attach this to the bottom edge of the panel.
Thanks so much for stopping by today and I hope to be back full time with you very soon but before I go, this post is dedicated to my parents because without them, and without their encouragement to dip my toe into the craft world ~ I wouldn't be here! My Mum bought me my very first kit because she believed that I'd be quite good at making something!

So, with this in mind ~ I hope I made you both so proud of me and I hope you'll always be looking down to see the next part of my journey!
Love you both and shine bright!
xxx

Thursday, 19 January 2023

Are We Nearly There Yet?

Hello friends...

Hope you are all having a great week so far and for all those Tim Holtz Addicts who have probably already bought the new Sizzix Everyday 2023 collection ~ I hope you're having fun with it!

I'm here today to share one of my Sizzix makes that I created for Tim's Live, which you can see and catch up with HERE and I can't thank you enough for all the messages and the love you've shown both of my makes. Your support has been phenomenal and I really do appreciate every single word.

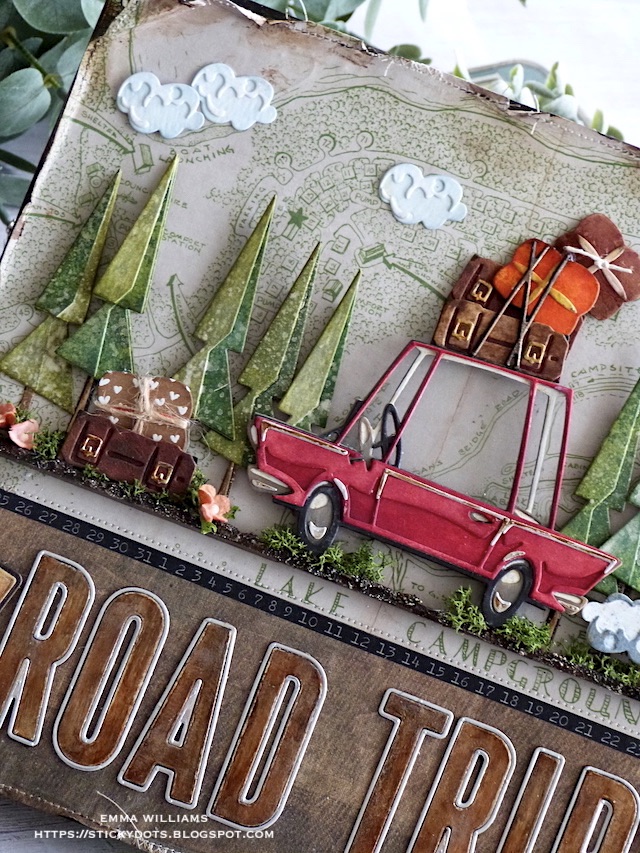
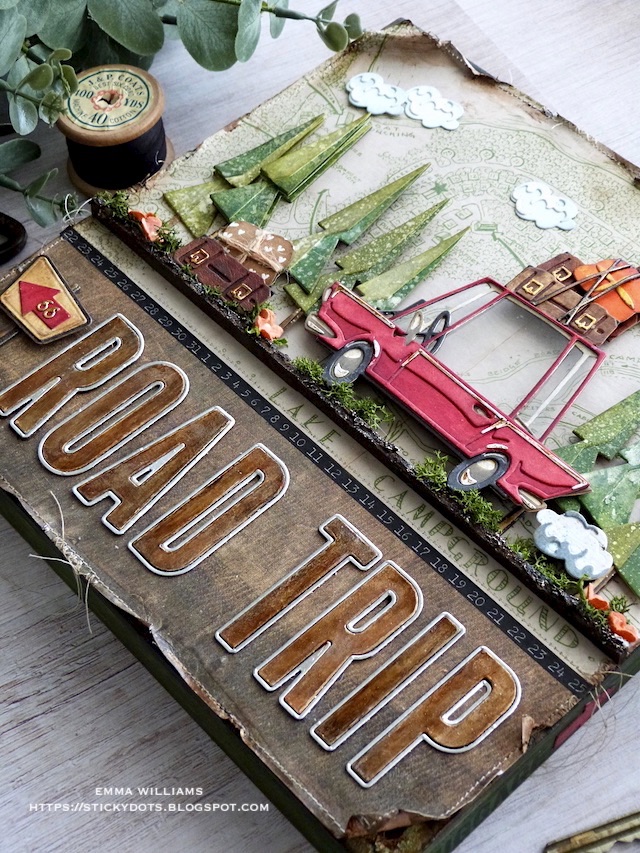
Now back to this project and I'm going to take you through how I made my Road Trip Display Panel, inspired by holidays and vacations that as a little girl, I took with my parents. The memories of those trips are so clear ~ they'd pack up the car to full capacity and we'd hit the road for what seemed like an eternity, before finally arriving at the campsite which we'd call home for the next 1 or 2 weeks! Fun times and happy days...

So let's get started and here we go, it's time for this adventure to begin...

PANEL

For this make I used a square Vignette Display Panel which measures 9" x 9" and I will be using the flat side of the panel for this make.

To begin with I used Rustic Wilderness Distress Paint to paint the sides of the panel. I also painted a border of colour around the outside of the panel itself.

Once dry, I then dry brushed Black Soot Distress paint over the surface ~ this just knocks back the intensity of the colour and creates more depth and not such a solid finish.

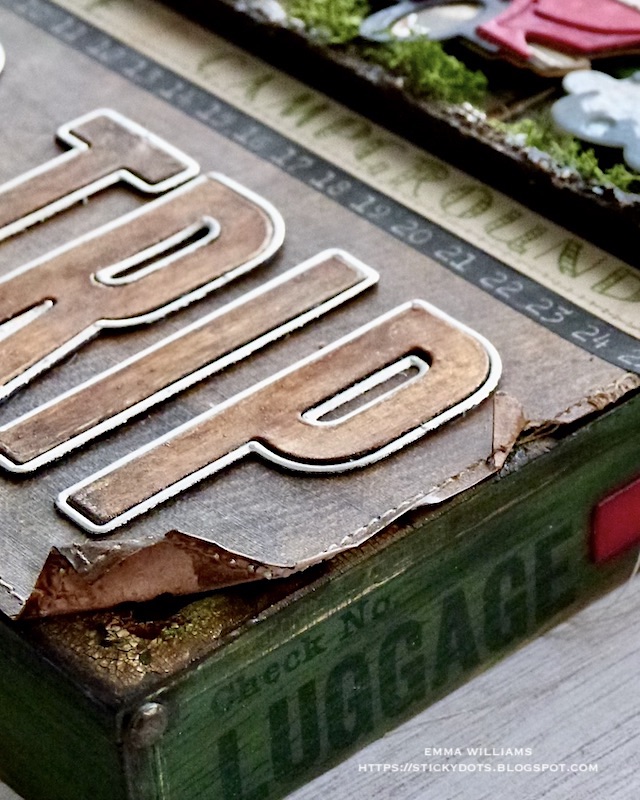
With the sides painted and dry, I then used the 'Luggage' stamp from the Eccentric stamp set by Tim, to stamp the wording on the left and right hand sides of the panel, stamping in the top corner on the left, bottom corner on the right.

To complete the sides, I cut three of the solid arrows taken from the Postale Thinlits Die Set, (one of these will be used later in the make), and cut these from cardstock, painted with Candied Apple Distress Paint. I adhered two of the arrows to the sides on my panel.

Moving onto the front of the panel, I started by applying Crackle Paste to the corners and once the crackles have appeared and the paste is dry, I applied Distress Crayons over the top ~ Rustic Wilderness, Gathered Twigs and Black Soot, blending the colour with a damp paint brush so that it works it's way into those cracks.

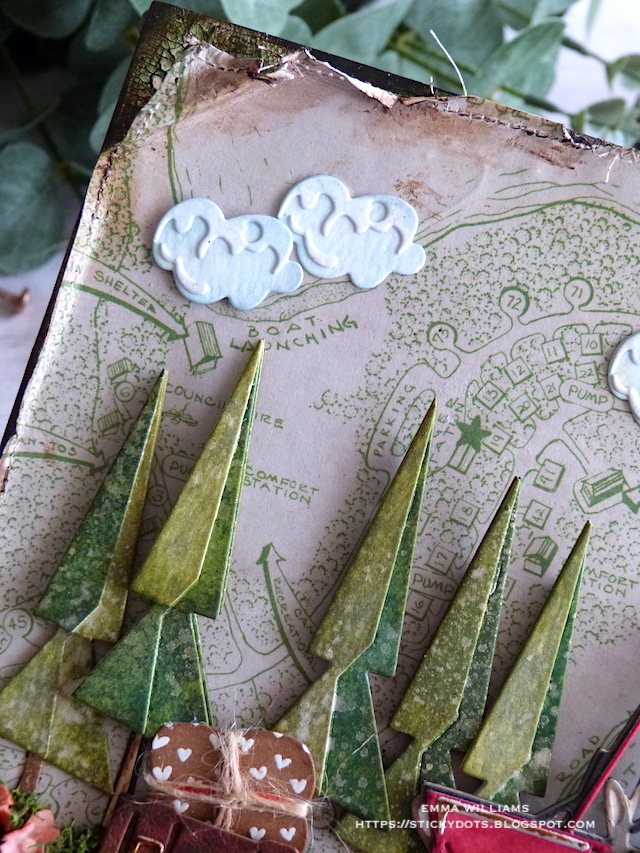
Now for the papers and I used a combination from Backdrops Vol 1 and Vol 3. I cut the Campsite background paper to fit across the top section of my panel and then cut the grungy brown paper to sit underneath. After machine stitching a border around each panel, I then ripped and tore the edges to create texture and add more of a vintage feel to the papers. 

I inked the edges of the paper and then adhered to the panel with Matte Collage Medium, folding back the corners to reveal the crackle.

To complete the panel, I just added a strip of Design Tape Trim to neaten the joins of the paper...

...and then placed a Numbers Snippet in the top right hand corner.

Finally, I added Hardware Heads to the sides of the panel.

ROAD TRIP DIES

Now to start die cutting and using the amazing Road Trip Colorize set, we'll begin with the car, which I wanted bright red as this was the colour of the little mini we used to be in.

I used a combination of card stock, including Mixed Media Heavystock which was inked with a combination of Lumberjack Plaid and Candied Apple Distress Spray Stains and then for the interiors, I used Neutral Kraft card stock in black and grey, finishing with silver metallic kraft stock for the trims.

I also hand cut a panel of acetate the same shape as the car so that I could create windows in the car. This is fixed between the layers of the die cuts, and adhered with matte collage medium.

After assembling and layering all the pieces to create my car, I moved onto the trees.

To give more dimension to the trees, I cut multiple layers and then built them up with foam pads. I made 8 trees for this particular project and the trees themselves are once again cut from Mixed Media Heavystock card which is inked with various shades of green distress spray stains; Rustic Wilderness, Shabby Shutters, Peeled Paint and Bundled Sage. Once my trees were layered and assembled, I lightly flicked Decayed Mica Stain across the the die cuts before setting them to one side to dry.

We now have our car, and trees ready and can move onto the luggage. I cut all my luggage pieces from leftover cardstock that I had in my scraps box including some inked cracked leather card stock which really did help to create the look of leather cases. These scraps are always in a box on my desk, and they are ideal for projects like this where you might need them, so if you're like me and never throw anything away...now's the time to use it up!

I also added some twine around some of the cases to add texture.

BUILDING THE SCENE

To build the scene, I attached two of the straight edged Etcetera Trims from the Bat Web Trims pack after applying some Transparent Grit Paste along what will become the front edge, I allowed them to dry before painting them with a combination of Black Soot and Walnut Stain Distress Paints. I then adhered these trims across the width of my panel, placing them just above the paper join.

With the trims in place, I attached the trees, from left to right of the panel, followed by the car using foam pads to add some height and dimension. I then arranged two cases in front of the trees and the remaining four suitcases and bags to the top of the car, allowing the top one to appear as if it's about to tumble and then placed the straps which I die cut from black card, over the top.


You can see the dimension the foam pads give this piece in the photo below.

To complete the scene, I added some moss along the ledge and some Bouquet Findings which I coloured with Saltwater Taffy Distress Spray Stain. These flowers come attached as a bunch but just go in with your scissors to cut off individual pieces which you can then place onto your projects.

To complete the scene, I cut the 'clouds' using the die from the Road Trip set, and once each of the four clouds were layered, I attached these to my panel, three became fluffy clouds...

....but the fourth is the puff of smoke from the exhaust.

ALPHANUMERIC BULLETIN

We're nearly there and all that's left is the bottom section to create the ROAD TRIP wording.

I used the Alphanumeric Bulletin thinlits die set ~ the letters in this die set are big and create such an impact to any project. They really are a feature and a must-have for your die collection.

I cut the letters three times from black card, and then a final layer from silver metallic kraft card, keeping the outer shadow layer to use later. I adhered each letter over the top of one another before layering the gold layer over the top.

Using a paint brush, I applied Black Soot Distress Paint over the surface of the letters, allowing it to go slightly tacky before wiping away the excess. I then applied a layer of Ground Espresso and Crackling Campfire Distress Paints to create the rusty colour that is on the lettering. Finally, I applied a dry brushed layer of Antiqued Bronze over the top. This will bring back that metallic finish to the lettering but it won't be shiny, shiny.


Once I'd adhered the lettering to the bottom section, I added the silver shadow section around each one and stuck this into place.

Finally, the road sign which is from the Road Trip set...

I cut the pieces from Mixed Media Heavystock and inked them to the colour I wanted to create a wooden sign post. I then layered them and attached them to my panel, placing the sign in the bottom left hand corner. To complete it, I added the arrow we cut at the beginning and then used a tiny die cut "66" onto the arrow. These were cut from gold metallic card, using the tiny numbers in the Specimen die set.

Thank you Paula, Tim and Mario for inviting me back to make some projects with this amazing die collection and thank you everyone for taking the time to stop by today ~ stay safe and keep well.
Love Emma xxx


Recipe for project:


Tim Holtz for Stampers Anonymous: EccentricBat Web Trims
Distress Spray Stain: Rustic Wilderness, Shabby Shutters, Peeled Paint and Bundled Sage, Saltwater Taffy, Lumberjack Plaid, Candied Apple, Speckled Egg, Tumbled Glass
Distress Crayons: Rustic Wilderness, Gathered Twigs, Black Soot
Distress Inks:Walnut Stain
Distress Paint: Black Soot, Candied Apple, Rustic Wilderness, Antiqued Bronze, Ground Espresso, Crackling Campfire
Powered By Blogger

Total Pageviews