Showing posts with label colorize. Show all posts

Thursday, 19 January 2023

Are We Nearly There Yet?

Hello friends...

Hope you are all having a great week so far and for all those Tim Holtz Addicts who have probably already bought the new Sizzix Everyday 2023 collection ~ I hope you're having fun with it!

I'm here today to share one of my Sizzix makes that I created for Tim's Live, which you can see and catch up with HERE and I can't thank you enough for all the messages and the love you've shown both of my makes. Your support has been phenomenal and I really do appreciate every single word.

Now back to this project and I'm going to take you through how I made my Road Trip Display Panel, inspired by holidays and vacations that as a little girl, I took with my parents. The memories of those trips are so clear ~ they'd pack up the car to full capacity and we'd hit the road for what seemed like an eternity, before finally arriving at the campsite which we'd call home for the next 1 or 2 weeks! Fun times and happy days...

So let's get started and here we go, it's time for this adventure to begin...

PANEL

For this make I used a square Vignette Display Panel which measures 9" x 9" and I will be using the flat side of the panel for this make.

To begin with I used Rustic Wilderness Distress Paint to paint the sides of the panel. I also painted a border of colour around the outside of the panel itself.

Once dry, I then dry brushed Black Soot Distress paint over the surface ~ this just knocks back the intensity of the colour and creates more depth and not such a solid finish.

With the sides painted and dry, I then used the 'Luggage' stamp from the Eccentric stamp set by Tim, to stamp the wording on the left and right hand sides of the panel, stamping in the top corner on the left, bottom corner on the right.

To complete the sides, I cut three of the solid arrows taken from the Postale Thinlits Die Set, (one of these will be used later in the make), and cut these from cardstock, painted with Candied Apple Distress Paint. I adhered two of the arrows to the sides on my panel.

Moving onto the front of the panel, I started by applying Crackle Paste to the corners and once the crackles have appeared and the paste is dry, I applied Distress Crayons over the top ~ Rustic Wilderness, Gathered Twigs and Black Soot, blending the colour with a damp paint brush so that it works it's way into those cracks.

Now for the papers and I used a combination from Backdrops Vol 1 and Vol 3. I cut the Campsite background paper to fit across the top section of my panel and then cut the grungy brown paper to sit underneath. After machine stitching a border around each panel, I then ripped and tore the edges to create texture and add more of a vintage feel to the papers. 

I inked the edges of the paper and then adhered to the panel with Matte Collage Medium, folding back the corners to reveal the crackle.

To complete the panel, I just added a strip of Design Tape Trim to neaten the joins of the paper...

...and then placed a Numbers Snippet in the top right hand corner.

Finally, I added Hardware Heads to the sides of the panel.

ROAD TRIP DIES

Now to start die cutting and using the amazing Road Trip Colorize set, we'll begin with the car, which I wanted bright red as this was the colour of the little mini we used to be in.

I used a combination of card stock, including Mixed Media Heavystock which was inked with a combination of Lumberjack Plaid and Candied Apple Distress Spray Stains and then for the interiors, I used Neutral Kraft card stock in black and grey, finishing with silver metallic kraft stock for the trims.

I also hand cut a panel of acetate the same shape as the car so that I could create windows in the car. This is fixed between the layers of the die cuts, and adhered with matte collage medium.

After assembling and layering all the pieces to create my car, I moved onto the trees.

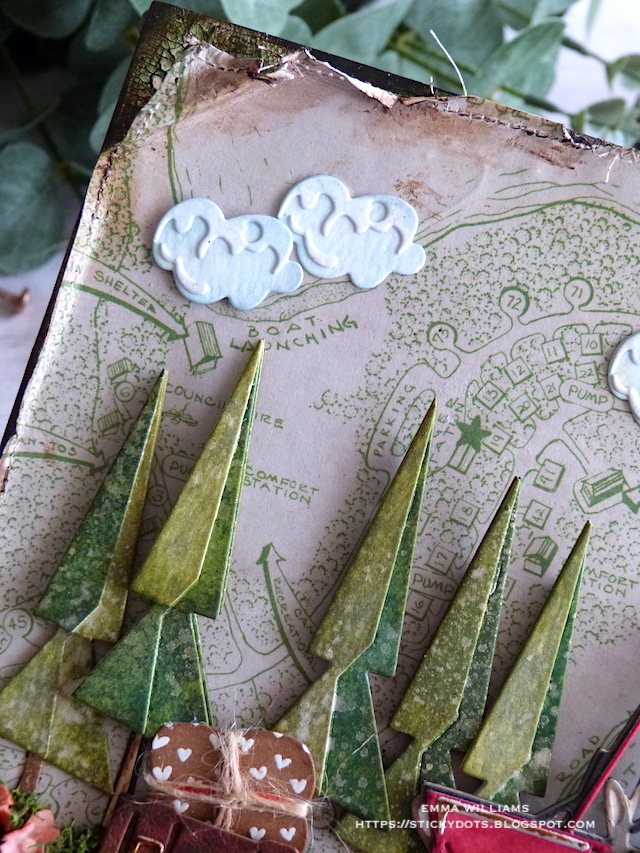
To give more dimension to the trees, I cut multiple layers and then built them up with foam pads. I made 8 trees for this particular project and the trees themselves are once again cut from Mixed Media Heavystock card which is inked with various shades of green distress spray stains; Rustic Wilderness, Shabby Shutters, Peeled Paint and Bundled Sage. Once my trees were layered and assembled, I lightly flicked Decayed Mica Stain across the the die cuts before setting them to one side to dry.

We now have our car, and trees ready and can move onto the luggage. I cut all my luggage pieces from leftover cardstock that I had in my scraps box including some inked cracked leather card stock which really did help to create the look of leather cases. These scraps are always in a box on my desk, and they are ideal for projects like this where you might need them, so if you're like me and never throw anything away...now's the time to use it up!

I also added some twine around some of the cases to add texture.

BUILDING THE SCENE

To build the scene, I attached two of the straight edged Etcetera Trims from the Bat Web Trims pack after applying some Transparent Grit Paste along what will become the front edge, I allowed them to dry before painting them with a combination of Black Soot and Walnut Stain Distress Paints. I then adhered these trims across the width of my panel, placing them just above the paper join.

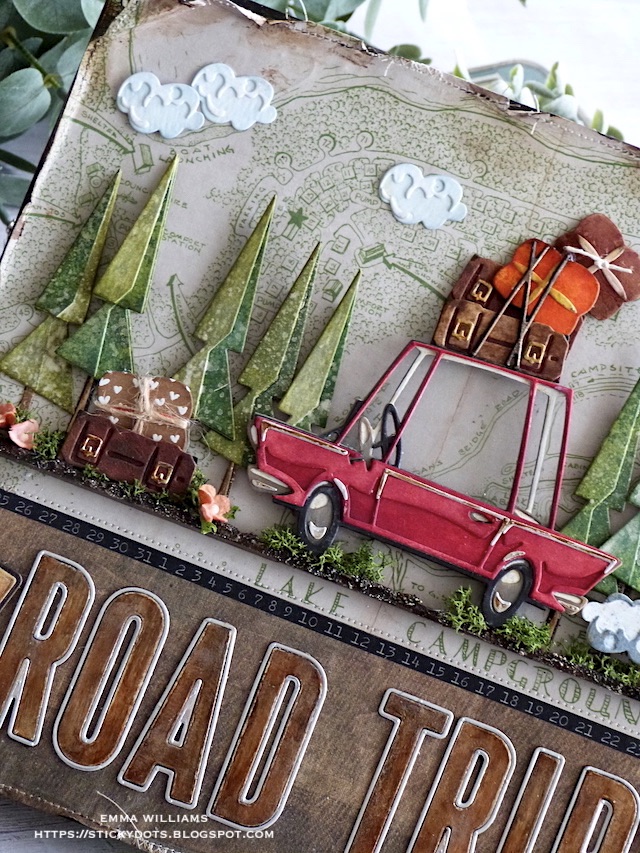
With the trims in place, I attached the trees, from left to right of the panel, followed by the car using foam pads to add some height and dimension. I then arranged two cases in front of the trees and the remaining four suitcases and bags to the top of the car, allowing the top one to appear as if it's about to tumble and then placed the straps which I die cut from black card, over the top.


You can see the dimension the foam pads give this piece in the photo below.

To complete the scene, I added some moss along the ledge and some Bouquet Findings which I coloured with Saltwater Taffy Distress Spray Stain. These flowers come attached as a bunch but just go in with your scissors to cut off individual pieces which you can then place onto your projects.

To complete the scene, I cut the 'clouds' using the die from the Road Trip set, and once each of the four clouds were layered, I attached these to my panel, three became fluffy clouds...

....but the fourth is the puff of smoke from the exhaust.

ALPHANUMERIC BULLETIN

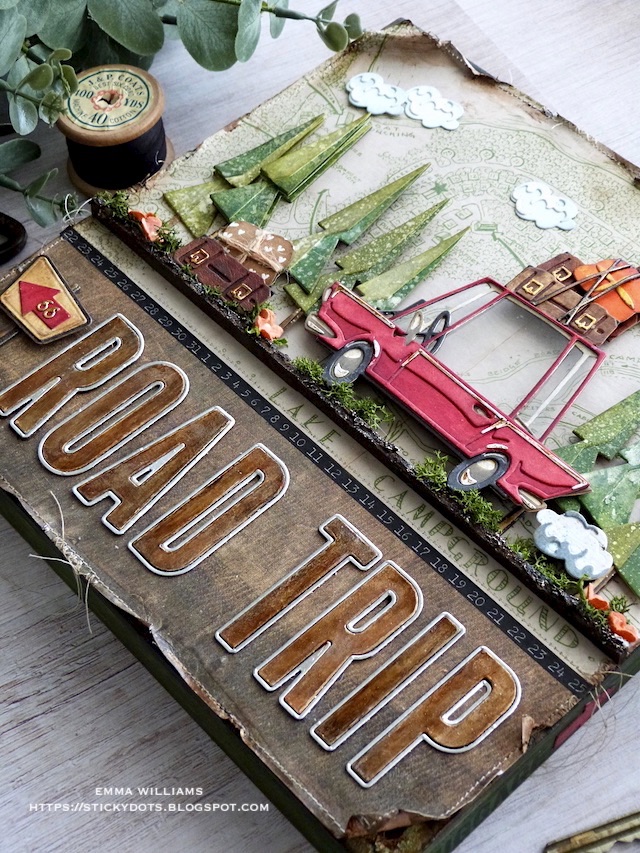
We're nearly there and all that's left is the bottom section to create the ROAD TRIP wording.

I used the Alphanumeric Bulletin thinlits die set ~ the letters in this die set are big and create such an impact to any project. They really are a feature and a must-have for your die collection.

I cut the letters three times from black card, and then a final layer from silver metallic kraft card, keeping the outer shadow layer to use later. I adhered each letter over the top of one another before layering the gold layer over the top.

Using a paint brush, I applied Black Soot Distress Paint over the surface of the letters, allowing it to go slightly tacky before wiping away the excess. I then applied a layer of Ground Espresso and Crackling Campfire Distress Paints to create the rusty colour that is on the lettering. Finally, I applied a dry brushed layer of Antiqued Bronze over the top. This will bring back that metallic finish to the lettering but it won't be shiny, shiny.


Once I'd adhered the lettering to the bottom section, I added the silver shadow section around each one and stuck this into place.

Finally, the road sign which is from the Road Trip set...

I cut the pieces from Mixed Media Heavystock and inked them to the colour I wanted to create a wooden sign post. I then layered them and attached them to my panel, placing the sign in the bottom left hand corner. To complete it, I added the arrow we cut at the beginning and then used a tiny die cut "66" onto the arrow. These were cut from gold metallic card, using the tiny numbers in the Specimen die set.

Thank you Paula, Tim and Mario for inviting me back to make some projects with this amazing die collection and thank you everyone for taking the time to stop by today ~ stay safe and keep well.
Love Emma xxx


Recipe for project:


Tim Holtz for Stampers Anonymous: EccentricBat Web Trims
Distress Spray Stain: Rustic Wilderness, Shabby Shutters, Peeled Paint and Bundled Sage, Saltwater Taffy, Lumberjack Plaid, Candied Apple, Speckled Egg, Tumbled Glass
Distress Crayons: Rustic Wilderness, Gathered Twigs, Black Soot
Distress Inks:Walnut Stain
Distress Paint: Black Soot, Candied Apple, Rustic Wilderness, Antiqued Bronze, Ground Espresso, Crackling Campfire

Monday, 16 January 2023

King For A Day...

Hello friends...

By now, many of you will have seen the latest YouTube Live from Tim Holtz for the release of the Sizzix Everyday 2023 collection! I'm sure you'll agree with me that this release is one of the best ever ~ so much to love and so many eclectic dies, there really is something for everyone and thank you so much for all the messages and lovely comments I've received since Saturday about the projects I made! You've all made my day with your kind words and all that hard work that goes into my makes is so worthwhile ~ THANK YOU!

So back to today, and as always on a Monday we have a brand new Simon Says Stamp Monday Challenge and this week our theme is all about 4 LEGGED ANIMALS and for my project, I created a tag featuring one of my favourite dies from recent years, Harrison the Lion and combined him with a few of the newer 2023 dies.

So let's get started, it's time to pull up a chair to see how I created this week's make!

To begin with I used a Mini Etcetera tag as my surface and turned the tag upside down, so the narrowest part was at the bottom.

BACKGROUND

For the background, I cut a panel of Distress Watercolor Card the same size as the tag. I spritzed the card with a light misting of water and then applied Distress Spray Stain and Oxide Sprays:

Speckled Egg, Tumbled Glass, Antique Linen, Speckled Egg Oxide Spray

After another spritz of water, and once I was happy with the blend, I heat dried the surface and stamped some text onto the background. I used the 

To add a little more depth to the background, I applied Frayed Burlap Distress Ink onto my glass mat, spritzed the ink with water and then dipped the card into the inky droplets. I heat dried the card once more and then inked around the edges with Walnut Stain Distress Ink before machine stitching a border around the edge.

Now to add some layers and texture to the background and started by adding the text using the Botanic Collage Stamp Set, inked with Black Soot Archival Ink.

I then applied Grit Paste through the Hocus Pocus Layering Stencil. Allow the panel to dry before adhering it to the tag using Matte Collage Medium. To complete the background, I applied a Labeled Remnant Rub, No. 5726, to the top right hand corner.

We now have the surface ready to decorate...

PODIUM

...starting with the podium that Harrison is proudly sitting on and this comes from one of the new dies, Celebrate Colorize and actually started life as the birthday cake.

After cutting all my pieces from from the following cardstock:

Light Grey Woodgrain Card

Metallic Kraft Cardstock

Mixed Media Heavystock Card inked with Prize Ribbon Distress Spray Stain

I layered and assembled each of the pieces and then added gold metallic droplets.

HARRISON

We have the podium ready and next stop is to die cut and assemble Harrison. I cut all my pieces from watercolour card and then using various shades of brown Distress Ink and a touch of Aged Mahogany, I inked each piece individually ~ I find this helps to control the shading that is needed for all the different layers. To blend the colours. I spritzed water over the top of each piece and then dried them.

With all my pieces in front of me, I added Harrison's eyes and little pink ears to complete him.

Now because Harrison is the king for a day, I decided he needed a few little additions and began with the little bow tie, which I cut from card inked with Lumberjack Plaid Distress Ink and used one of the dies in the Tailored Thinlits Die Set from the new release and attached it around Harrison's neck. 

Now for the crowning glory ~ his crown.

There are crown dies out there but I didn't have one, so thought of how I could make it and after looking at a few dies, I came up with this idea using one die from the Abstract Elements die set and the icing die from the Celebrate Colorize. I cut each piece and then layered the scalloped die shape over the top of the icing die shape, which I turned around so the points were facing upwards. I then trimmed away any excess to create the crown before adding some gems.

I placed the crown on top of Harrison's head ~ it was the perfect fit for the King of the Jungle!

BANNER STRIP

To make the banner that sits across the bottom of the tag, I cut a strip of watercolor card, and inked it to match the background. I then layered it onto metallic kraft cardstock, followed by a layer of brown card each time leaving a border around the edge. After cutting an inverted 'v' into either end, I mounted the banner across my tag using foam pads.

I cut each of the letters for the "King For A Day" sentiment from black kraft card using the Alphanumeric Label Thinlits Die and then adhered them to the banner.

BUILDING THE SCENE

We're now ready to bring this together and I used foam pads to attach the podium to sit on the top edge of the banner strip before showing Harrison to his seat.

I then added some fluffy clouds around him, which I had left over from a previous make using the Road Trip Colorize Die Set but if you don't have this, you might have other cloud dies in your stash or, you can easily cut out cloud shapes.

I completed my scene by adding some Mummy Cloth to either side of the podium to ground it and adding some Hardware Heads to banner.

So that's my project for this week and hope you love and feel inspired by my make which mixes dies that you probably have in your stash, with some of the newer dies.

As always, if you make anything, or if you've been inspired by anything that you've seen here on my blog ~ then please, let me know by tagging me on social media or leaving a comment here and I will be right over to take a look!

Don't forget that every week, one lucky random participant has the chance to win a $25 gift voucher from Simon Says Stamp and you can join in up to 5 times, which means you could have 5 chances to winYou have until next Monday at 8am Ohio time. 1pm UK time, 2 pm CET to join in and good luck....


Thank you so much for taking the time to stop by today ~ stay safe and keep well.
Love Emma xxx

Recipe for project:

Distress Spray Stain: Prize Ribbon, Lumberjack Plaid, Speckled Egg, Tumbled Glass
Distress Oxide Spray: Speckled Egg
Distress Inks: Frayed Burlap, Vintage Photo, Ground Espresso, Brushed Corduroy, Gathered Twigs, Kitsch Flamingo

Monday, 15 August 2022

Alas, I Knew Him Well...

Hello friends...

I hope you've all had a wonderful weekend and even though here in the UK we are having another heatwave, it doesn't stop the crafty inspiration from coming thick and fast, and with a brand new Seasonal Distress release from Tim Holtz, there is just so much goodness to go around and so many amazing new products to try. If you’d like to catch up with Tim's YouTube Live and see the latest release and plenty of demos, then just click HERE!

So, back to today and this week's Monday challenge at Simon Says Stamp where we ask you to have some FUN WITH STENCILS! There are so many stencils available now, I think you’ll be spoilt for choice but as always, I turned to my favourite brand and used Tim's layering stencils from Stampers Anonymous to create a Halloween card that also uses some of those beautiful new Mica Sprays that I mentioned a minute ago and I combined these with Tim's brand new Halloween release from Sizzix...

So let's get started and here's how I made my card inspired by Shakespeare's Hamlet and a project which works alongside the make that I created for Tim's recent Sizzix Halloween LIVE. You can see that make HERE and alas, I think we knew him well!

To begin with we'll start with the background...

BACKGROUNDS

I used many layers for this card but the main layers are stencilled and embossed and this is how I achieved the effect, starting with the larger base layer.

I cut a panel of SSS black card 11 x 18cm and placed the Floral Layering Stencil in the top right hand corner. I then applied a layer of Translucent Grit Paste through it, applying a design in that corner only. After removing the stencil, I immediately sprinkled gold embossing powder over the top.

I then repeated the application of Translucent Grit Paste through the stencil, but this time in the bottom left hand corner and along the bottom edge of the card. Again sprinkle the gold embossing powder over the top and set the card to one side for approx. 30 mins before heat embossing the powder until it melts and becomes shiny. Do NOT OVERHEAT THE PASTE, it's not a disaster if you do but it will create small air pockets and bubbles, not a smooth finish.

To complete this layer, I spritzed the background very lightly, with the Mica Sprays; Burning Embers, Iron Gate and Decayed, together with a light coverage of Black Soot Distress Spray Stain. I allowed the sprays to dry naturally before I matted onto gold metallic kraft card and then my black card blank.

First layers ready, and we can move onto the next panel.

This is the smaller panel which features the gothic script and I used the stencil from the Mini Layering set 49. I used exactly the same technique as on the previous floral background but this time I applied the paste through the entire stencil before adding the gold powder over the top.

Once my panel was heat embossed and I'd spritzed the background with the same Mica Sprays, (minus the Burning Embers) and Black Soot Distress Spray Stain as before, I machine stitched a border around the outside and then matted the layer onto gold metallic kraft card, followed by a layer of black kraft stock.

Using foam pads, I mounted my layers onto the centre of my covered card blank.

SPENCER

Now it's time to introduce you to Spencer, or should I say Yorick! 

Spencer is one of Tim's Colorize dies and is super easy to die cut and assemble. To begin with you need to cut the base layer from black card, and then ink some Mixed Media Heavystock card with Distress Spray Stains ready to die cut the remaining layers. I used Antique Linen, Old Paper, Pumice Stone. Cut and assemble all the layers before placing Spencer to one side.

FEATHERY

For the feather, I used Tim's Feathery die to die cut one feather from Mixed Media Heavystock. After spritzing the die cut with Black Soot Distress Spray Stain, I heat dried the surface and then used the same Mica Spray colours as I used for the backgrounds and just added a very light misting over the die cut feather. I allowed for the inks to dry and then layered this over the top of a second layer, cut from gold metallic kraft card and attached the layers by stitching down the centre of the feather.

QUOTE

For the quote, I used the Alphanumeric Label Die Set and cut the letters from gold metallic kraft card, to create the famous line from Hamlet, "I Knew Him Well".

I attached each letter onto a further strip of the gold card before applying a layer of Black Soot Distress Paint over the top. Wipe away any excess paint with a soft cloth.

Matt the quote strip onto black kraft card, and then attach with foam pads, placing it across the card front.

To complete the strip, I added a Hardware Head either side and altered them with Distress Paints ~ Black Soot and Crackling Campfire, to create a rusty effect.

I then placed two Index Clips on either side of the card, aligning them with the quote strip.

BUILDING THE SCENE

Attach Spencer and the Feathery die cuts to the card front, using foam pads for height and place them to sit on the quote strip, adding some Mummy Cloth, dyed with Pumice Stone Distress Spray Stain and placing it underneath the die cuts to ground them.

I finished the arrangement with a scroll. This was just an offcut of paper that I had and I rolled it around a pencil before tying it with some twine. I then inked the edges for an aged look before attaching it with hot glue and adding a Halloween clippings sticker, '369', which I attached to the twine.

We're nearly there and all that's left is the bats...

I used the bat die from Otis and cut three sets of bats from black card, each bat has two layers. I then layered the bats, shaping the wings so they appear to fly and spritz with the Mica Sprays.

Once dry, attach the bats to complete the card, two in the top left corner....

...one in the bottom right!

So, that's it from me for today and I hope you love my make...

As always, if you make anything, or if you've been inspired by anything that you've seen here on my blog ~ then please, let me know by tagging me on social media or leaving a comment here and I will be right over to take a look and if sometimes I miss it ~ just keep nudging me!

Don't forget that every week, one lucky random participant has the chance to win a $25 gift voucher from Simon Says Stamp and you can join in up to 5 times, which means you could have 5 chances to winYou have until next Monday at 8am Ohio time. 1pm UK time, 2 pm CET to join in and good luck....


Thank you so much for taking the time to stop by today ~ stay safe and keep well.
Love Emma xxx

Powered By Blogger

Total Pageviews