Hello friends...
Hope you are all having a great week so far and for all those Tim Holtz Addicts who have probably already bought the new Sizzix Everyday 2023 collection ~ I hope you're having fun with it!
I'm here today to share one of my Sizzix makes that I created for Tim's Live, which you can see and catch up with HERE and I can't thank you enough for all the messages and the love you've shown both of my makes. Your support has been phenomenal and I really do appreciate every single word.
Now back to this project and I'm going to take you through how I made my Road Trip Display Panel, inspired by holidays and vacations that as a little girl, I took with my parents. The memories of those trips are so clear ~ they'd pack up the car to full capacity and we'd hit the road for what seemed like an eternity, before finally arriving at the campsite which we'd call home for the next 1 or 2 weeks! Fun times and happy days...
PANEL
For this make I used a square Vignette Display Panel which measures 9" x 9" and I will be using the flat side of the panel for this make.
To begin with I used Rustic Wilderness Distress Paint to paint the sides of the panel. I also painted a border of colour around the outside of the panel itself.
Once dry, I then dry brushed Black Soot Distress paint over the surface ~ this just knocks back the intensity of the colour and creates more depth and not such a solid finish.
With the sides painted and dry, I then used the 'Luggage' stamp from the Eccentric stamp set by Tim, to stamp the wording on the left and right hand sides of the panel, stamping in the top corner on the left, bottom corner on the right.
To complete the sides, I cut three of the solid arrows taken from the Postale Thinlits Die Set, (one of these will be used later in the make), and cut these from cardstock, painted with Candied Apple Distress Paint. I adhered two of the arrows to the sides on my panel.
Moving onto the front of the panel, I started by applying Crackle Paste to the corners and once the crackles have appeared and the paste is dry, I applied Distress Crayons over the top ~ Rustic Wilderness, Gathered Twigs and Black Soot, blending the colour with a damp paint brush so that it works it's way into those cracks.
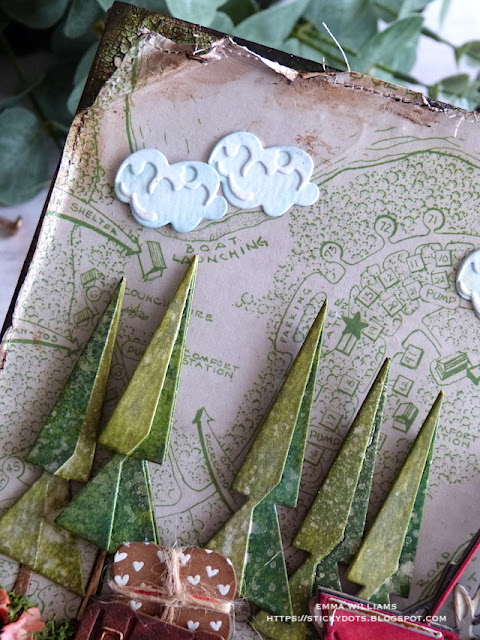
Now for the papers and I used a combination from Backdrops Vol 1 and Vol 3. I cut the Campsite background paper to fit across the top section of my panel and then cut the grungy brown paper to sit underneath. After machine stitching a border around each panel, I then ripped and tore the edges to create texture and add more of a vintage feel to the papers.
I inked the edges of the paper and then adhered to the panel with Matte Collage Medium, folding back the corners to reveal the crackle.
To complete the panel, I just added a strip of Design Tape Trim to neaten the joins of the paper...
Finally, I added Hardware Heads to the sides of the panel.
ROAD TRIP DIES
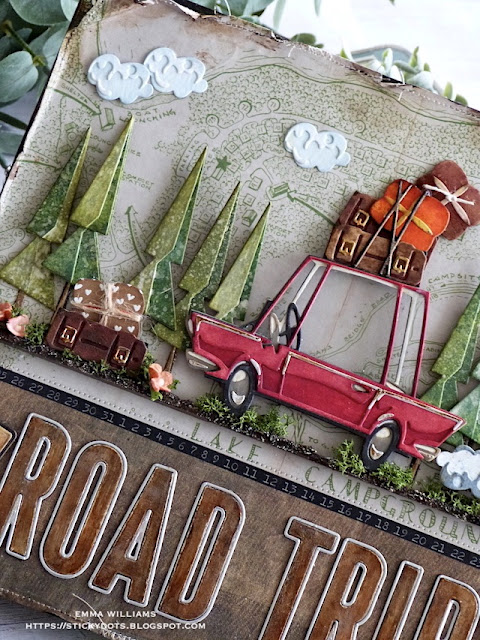
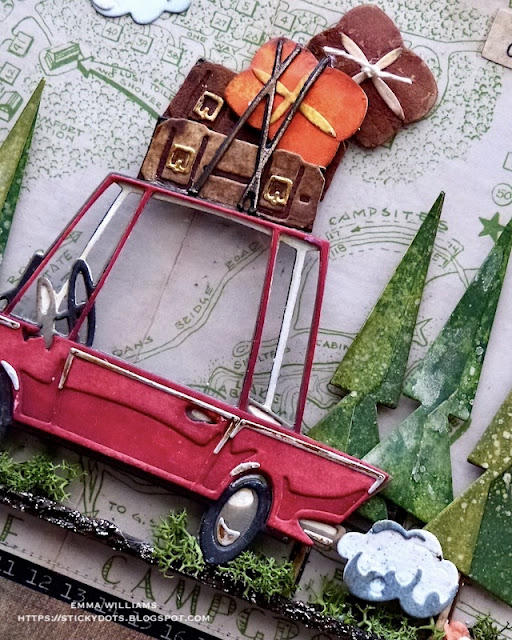
Now to start die cutting and using the amazing Road Trip Colorize set, we'll begin with the car, which I wanted bright red as this was the colour of the little mini we used to be in.
I used a combination of card stock, including Mixed Media Heavystock which was inked with a combination of Lumberjack Plaid and Candied Apple Distress Spray Stains and then for the interiors, I used Neutral Kraft card stock in black and grey, finishing with silver metallic kraft stock for the trims.
I also hand cut a panel of acetate the same shape as the car so that I could create windows in the car. This is fixed between the layers of the die cuts, and adhered with matte collage medium.
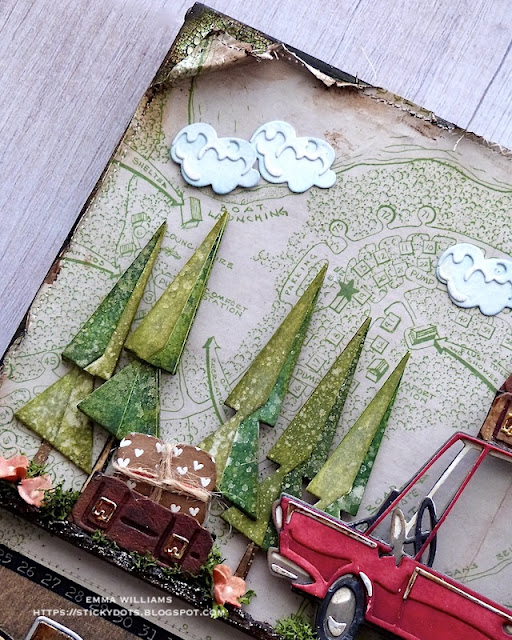
After assembling and layering all the pieces to create my car, I moved onto the trees.
To give more dimension to the trees, I cut multiple layers and then built them up with foam pads. I made 8 trees for this particular project and the trees themselves are once again cut from Mixed Media Heavystock card which is inked with various shades of green distress spray stains; Rustic Wilderness, Shabby Shutters, Peeled Paint and Bundled Sage. Once my trees were layered and assembled, I lightly flicked Decayed Mica Stain across the the die cuts before setting them to one side to dry.
We now have our car, and trees ready and can move onto the luggage. I cut all my luggage pieces from leftover cardstock that I had in my scraps box including some inked cracked leather card stock which really did help to create the look of leather cases. These scraps are always in a box on my desk, and they are ideal for projects like this where you might need them, so if you're like me and never throw anything away...now's the time to use it up!
I also added some twine around some of the cases to add texture.
BUILDING THE SCENE
To build the scene, I attached two of the straight edged Etcetera Trims from the Bat Web Trims pack after applying some Transparent Grit Paste along what will become the front edge, I allowed them to dry before painting them with a combination of Black Soot and Walnut Stain Distress Paints. I then adhered these trims across the width of my panel, placing them just above the paper join.
With the trims in place, I attached the trees, from left to right of the panel, followed by the car using foam pads to add some height and dimension. I then arranged two cases in front of the trees and the remaining four suitcases and bags to the top of the car, allowing the top one to appear as if it's about to tumble and then placed the straps which I die cut from black card, over the top.
To complete the scene, I added some moss along the ledge and some Bouquet Findings which I coloured with Saltwater Taffy Distress Spray Stain. These flowers come attached as a bunch but just go in with your scissors to cut off individual pieces which you can then place onto your projects.
To complete the scene, I cut the 'clouds' using the die from the Road Trip set, and once each of the four clouds were layered, I attached these to my panel, three became fluffy clouds...
ALPHANUMERIC BULLETIN
We're nearly there and all that's left is the bottom section to create the ROAD TRIP wording.
I used the Alphanumeric Bulletin thinlits die set ~ the letters in this die set are big and create such an impact to any project. They really are a feature and a must-have for your die collection.
I cut the letters three times from black card, and then a final layer from silver metallic kraft card, keeping the outer shadow layer to use later. I adhered each letter over the top of one another before layering the gold layer over the top.
Using a paint brush, I applied Black Soot Distress Paint over the surface of the letters, allowing it to go slightly tacky before wiping away the excess. I then applied a layer of Ground Espresso and Crackling Campfire Distress Paints to create the rusty colour that is on the lettering. Finally, I applied a dry brushed layer of Antiqued Bronze over the top. This will bring back that metallic finish to the lettering but it won't be shiny, shiny.
Finally, the road sign which is from the Road Trip set...
I cut the pieces from Mixed Media Heavystock and inked them to the colour I wanted to create a wooden sign post. I then layered them and attached them to my panel, placing the sign in the bottom left hand corner. To complete it, I added the arrow we cut at the beginning and then used a tiny die cut "66" onto the arrow. These were cut from gold metallic card, using the tiny numbers in the Specimen die set.


This is adorable!
ReplyDeleteLove it! As all your creations, amazing! 👏🏼
ReplyDeleteWhat fun reliving past memories. Such a fun project, loved how Tim demonstrated the vehicle going down the road...LOL.
ReplyDelete