
Happy Monday friends...
As we head into a new week, it's time for the brand new Simon Says Stamp Monday Challenge but before I share all the details, I just wanted to say a very big thank you to everyone who contacted me about my idea-ology projects! I was blown away by your response and I'm thrilled you loved them so much ~ it's the feedback from you, that always makes the hard work that goes into these makes, so worthwhile! So from the bottom of my heart...thank you, and for those who haven't caught up with Tim's LIVE, then just click here for the replay and for all the amazing makes from the makers.
Now, back to today and the new Monday challenge which this week is all about ~ MIXED MEDIA!
I will admit that my first plan was to go down the paint, collage and ink route but then I was so inspired by Tim's new Halloween idea-ology products that I decided to create an assemblage piece that uses many different techniques and mediums. So let me introduce you to Dr Lane, the creepy doctor who seems to have a few skeletons in his closet....


TAG
We'll start with the background and I used a Mini Etcetera Tag, which I twisted round to create a horizontal base. I made this project, so that the tag will be freestanding, (click on the photo below to enlarge the image) and can be displayed on a shelf, and you can read all about how I created the stand using Etcetera Trims, a little further down this post.

I prepped the tag by applying a layer of black gesso over the surface and once dry, I sanded the back the paint to reveal the core of the tag. I then used two designs from the Halloween Backdrops Papers and cut the main panel down to size so that it would fit down the centre of the tag, and cut two smaller panels which I will adhere either side.
I used Matte Collage Medium to attach the side panels and applied some Halloween Design Tape down either side to give me a nice neat finish. I then ripped and distressed the edges of the central panel before machine stitching down either side. Adhere the central panel into position and apply a coat of Matte Collage Medium over the surface to seal the papers.

Taking my Gathered Twigs Distress Crayon, I ran this around the edges of the papers and then blended out the colour to create an aged look to the edges.
On the left hand side of the tag, I used one of the hinges from the new Clippings Sticker Book and wrapped this around the edge of the tag. I then added three small Hardware Heads, which I altered with a little Rust, Pitch Black and Mushroom Alcohol Inks.

I also added two Hardware Heads on the opposite side and punched a small hole through the tag.

To complete the tag, I added a shelf that will sit across the central panel to hold all the tiny curiosities.

For this I used the largest sized Pinked Etcetera Trim that I painted with Black Soot Distress Paint. I then attached the trim to the tag, using Matte Collage Medium and allowed for the glue to dry and the shelf to be set in place.
After a few light flicks of Black Soot Distress Paint, the tag is now ready for the embellishments...
BOTTLES
To make this a little easier to follow, I'll break it down into sections and we'll start with the bottles...

I have featured tutorials for these bottles many times on my blog but it always helps to recap and it's such an easy process. I used a combination of the Tiny Corked Vials and Corked Vials and applied a layer of Matte Collage Medium over the surface of the glass.
After allowing it to dry thoroughly, I then applied Translucent Crackle Paint over the top.
As soon as you see those cracks and the medium is dry to the touch, I then dropped alcohol inks over the surface of the bottles. I used Sage, Mushroom, Rust, Espresso and dripped each of the individual colours onto the bottles to create the different glass effects.
The bottles are now ready to have their labels added and I used Curator Snippets Ephemera pieces, applying each label with Matte Collage Medium, adding a few tears and creases and then rubbing some Walnut Stain Crayon over the top to age them.
Cut a length of twine and after spritzing it with Walnut Stain Distress Spray Stain, I wrapped it around the necks of each bottle. For the corks, I actually burnt these by holding them over a naked flame ~ please be careful when you do this, as they do tend to catch fire quite quickly and I don't want to cause any accidents. You literally need to show them the flame and blow it out quickly.
Pop the corks into the bottles, and seal them with collage medium.

SKULLS
Now for the skulls and I used a combination of this year's larger skulls and the smaller ones from last year.
I used my finger to add a fine layer of Grit Paste over the skulls to create more of a lumpy bumpy texture and then once it was dry, I rubbed the Black Soot Crayon over the surface, blending it out so it still shows the original colour in places.

BOOKS
I made a whole library of these books ready for Halloween, and this was one of the books that I had leftover from my LIVE make.
To build this book, you will need either old book pages, or you can use some of Tim's idea-ology papers ~ I do tend to use book pages, because they are easier to manipulate when building the pages, but the choice is yours and both work ok!
Taking the book covers from the Halloween Ephemera Pack, I scored the book to create the back and front and a spine and folded along the scorelines. I then cut my book pages to size ~ for this you will need to measure the front cover, width and height and then double the measurement to give you the pages that fit inside the book cover.

Once you've cut enough pages to fill the book and you do want to make sure it's really full, then fold each of them in half and then start adhering them inside the cover. I used Matte Collage Medium.
When the pages are all fixed into place and the secure, I scuffed the edges of the book pages, and then dipped my finger into some paint, and with the book closed, I rubbed the paint along the scuffed edges to add that gorgeous look of an old book.
I tied some twine around the book and added a Clippings Sticker to the spine to complete it.

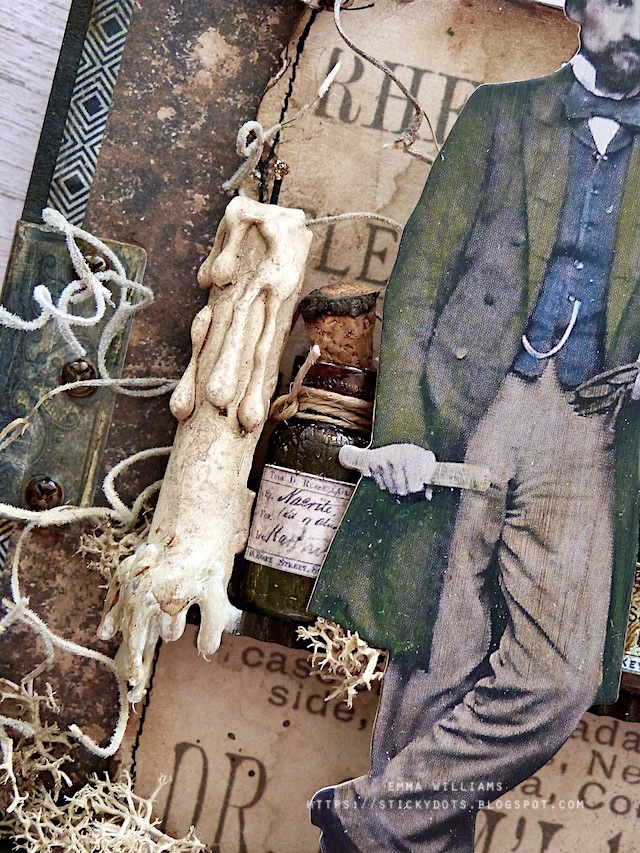
We now have the bottles, the skulls and book, but I now have to introduce you to the Doctor...
PAPER DOLL
I LOVE this image, you might remember it from a previous project a couple of years ago....HERE and I decided he was perfect for this make and he's one of many who are returning as a Paper Doll Cast Member for 2022!

I applied a coat of clear gesso to the paper doll, and once dry, I colour tinted the image with Distress Crayons. You can choose your colours, but as a guide, I used Peeled Paint for his coat, Faded Jeans for his waistcoat, Gathered Twigs for trousers and hair and then his face and hands were coloured with pens that I have in my stash and are the perfect skin colour tones.

CANDLE
We're nearly there and just need to make that drippy candle come to life...
I used the largest sized candle and hot glued it onto my shelf.
I then took the hot glue gun and dripped the glue around the base of the candle, dripping it off the shelf. You don't need a lot of glue at first, and just small controlled drips, then you can start building and adding as much as you want. Once the glue has hardened, I painted the hot glue drips with Antique Linen Distress Paint, allowed it to dry and then stippled some Frayed Burlap Paint over the top. On the candle wick I added some Stickles Copper Glitter Glue and then allowed it all to dry.

ASSEMBLING
Right we're ready to start assembling the piece and I started by attaching the bottles, leaving a space for my Doctor.

I actually placed an acetate bracket onto the back of the paper doll figure so that it will add 'invisible' support from behind to the figure and then I attached him to my tag.

Place the book and skulls onto the shelf and finally I added some moss and boneyard findings into the arrangement.
We're nearly there and all that's left are is the base that I added to the bottom of the tag.
To complete the scene, I added a Halloween Baseboard piece, "WARNING MAY BE HABIT FORMING", and attached it to the tag with foam pads and also adhered two bats from the Halloween Ephemera pack onto the background.

ENTOMOLOGY CHARM
The final touch was the charm hanging from the side of the tag and for this I used a padlock from the Lock and Keys Adornments, which I altered with some Black Soot, Crackling Campfire and Ground Espresso Distress Paint and then I adhered a beetle from the Entomology Adornments set, and attach this onto the lock.

I altered the beetle with some alcohol inks ~ Villainous and Pitch Black and then attached the finished charm to a swivel clasp which I clipped to the tag.
BASE
Once again, I used two Pinked Etcetera Trims and cut them to size to fit along the base of the tag. After painting them with Black Soot Distress Paint, I attached them along the bottom of the tag to form the base. You will need to be patient while these take hold and probably add something to hold them in place whilst they dry, just to make sure it remained upright and in position.

With my base ready, I just added some more moss and that's my tag complete and ready to add to my display for Halloween.
As always, if you make anything, or if you've been inspired by anything that you've seen here on my blog ~ then please, let me know by tagging me on social media or leaving a comment here and I will be right over to take a look and if sometimes I miss it ~ just keep nudging me!
Don't forget that every week, one lucky random participant has the chance to win a $25 gift voucher from Simon Says Stamp and you can join in up to 5 times, which means you could have 5 chances to win. You have until next Monday at 8am Ohio time. 1pm UK time, 2 pm CET to join in and good luck....


Recipe for project:


WOW, thank you for the walk through of all the fabulous details...great project.
ReplyDelete