Showing posts with label gadget gears. Show all posts

Tuesday, 20 May 2025

Make This Journey Your Own...

Hello friends...

Hope you've had a great start to the week, and the sun is shining wherever you are!

You might remember that last month, I shared a cool technique of how to create rust effects on metal. If you missed this post, then just click HERE to take a look. At the time, I hinted that these gears were for another project that was in the pipeline and today, I'm just popping by to share that project and hope you love what I've made.

The inspiration behind this make was all about individual people and the stories that can be told by just looking at a photo and with this in mind, I found some of my favourite images from Tim Holtz's Photobooth packs and I sat down, and just created this piece, which I hope you love!


So, let's get started and I invite you on this journey...


VIGNETTE DISPLAY PANEL

I used papers from both the 8" x 8" and 12" x 12" Correspondence Paper Stashes that Tim recently bought back from the Vault for a limited time only. These are now so hard to find but if you didn't manage to get your hands on them, then there are plenty of other papers in the idea-ology range to choose from.

I covered the sides of a Vignette Display panel on the outside, and on the inside with a selection of papers from the 12" pack and I also added a Design Trim Tape onto the front edges of the panel.

ETCETERA DISPLAY PANEL

Moving on to the inside, and because of the design of this piece, I didn't want the full depth of this panel ~ so, I used a Etcetera Panel and raised this slightly by using the 'waste' frames, the frame that sits around the Etcetera Tiles to hold them together whilst in the pack. I always hold onto these, as they make perfect frames for projects ~ so, don't throw them away.

I applied a coat of Black Soot Distress paint to the surface of the square Etcetera Panel and once dry, I then applied the same Design Tape Trim as I used on the Vignette Panel, and I placed this around the edges.
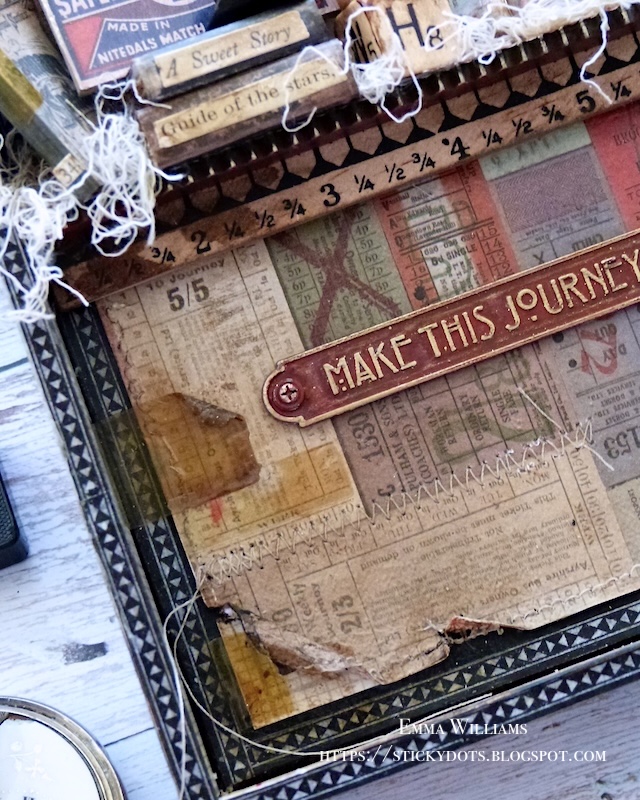
I then took a piece of the ticket design paper from the 8" x 8" Correspondence pack and after adding some rips and tears around the edges, I machine stitched a border and also added some stitching detail around the tickets.

I mounted the paper onto my panel using Matte collage Medium to adhere it into position...

...and used a combination of Vintage Photo and Black Soot Distress Crayons to add the colour and vintage touches to the ripped edges before hammering some Nail Tacks into the corners of the panel. I altered these Nail Tacks with the same colours of Distress Paint as I used on the gears.

To complete the background, I added some Cello Tape Stickers.

GEARS and PHOTO FRAMES

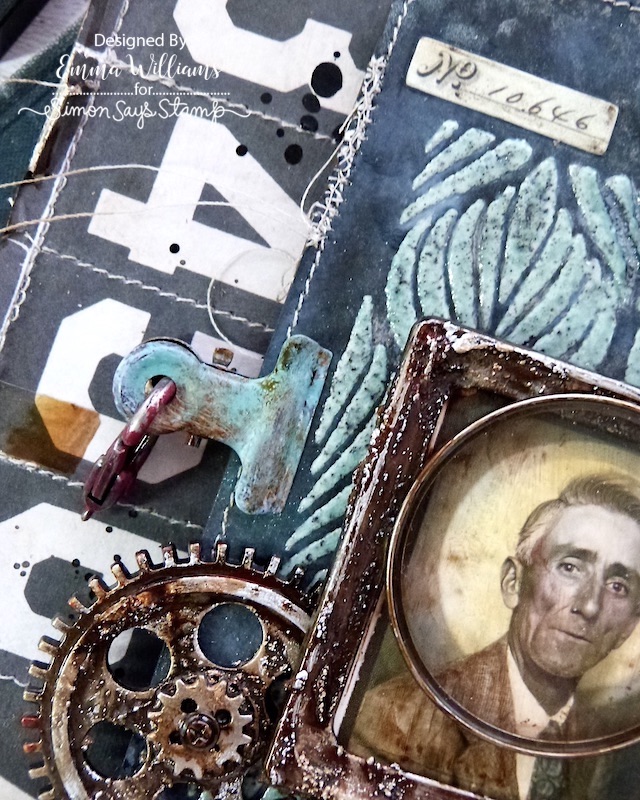
As I mentioned at the beginning of this post, I am using all those rusty gears and I arranged these down the right hand side of the box. 

Then, I took my selection of vintage photos, colour tinted the photos that are purely black and white using Distress Crayons and a waterbrush before I cut them using a circle die, so that they would fit behind the circular Baseboard Frames.

I attached these photo frames, to my gear arrangement and added some Screwheads to the centres of some of the gears. You can see the dimension in the photo below.

To complete the arrangement, I placed three Stars Adornments, painted with Candied Apple Distress Paint.

SHELF

Now to bring this piece to life, I wanted to add a shelf of trinkets, and for this I used a Pinked Etcetera Trim and a Ruler Piece. I attached the two piece to form a 'L' shape and this then forms the ledge which I attached to my background.

You can see that the ledge runs from the left hand side and the gears and the photo frames all fit perfectly cascading around the end of the shelf, on the right hand side.

I filled my shelf with some tiny books that I made using the covers from the Halloween Ephemera Pack, a Junk Drawer Baseboard piece, and the hat without the stand, from the Figure Stands Adornments...

...I also added the pointy finger from the Figure Stands Adornments. Both the hat and the pointy finger figure stand are painted using Distress Paints. I completed the arrangement with a Thought  Token, "Go, See, Explore", complete with a Swivel Clasp hanging from it. All the pieces are placed over a bed of Mummy cloth fibres, that I shredded and dyed with Frayed Burlap Distress Spray Stain.

I also added a couple of older idea-ology pieces including a light bulb and an Alpha Dice, with the letters T and H!

We're nearly there and all that's left is the large Word Plaque, Make This Journey Your Own, that I painted with Candied Apple Distress Paint. I then highlighted with wording with Gilded Foundry Wax. I applied the wax with my finger to accelerate the quote and then heat set it with a heat tool.

I finished the panel with a knob from the Mini Hardware Set, and once again I painted this with Candied Apple Distress Paint and adhered into position on the top of the panel using Matte Collage Medium. I then tied some twine around the neck.

So that's my make complete and I'm so happy with how this piece turned out and hope you will be inspired to create something similar and remember if you don't want to use these photos, it will be perfect to use family photos to personalise your make!

Thank you so much for taking the time to stop by today....
Love Emma xxx


Click below for your one stop shop at Simon Says Stamp

SHOP HERE:

Recipe for project:

Distress Paint for painting idea-ology pieces and gears including Black Soot, Candied Apple
Distress Spray Stain: Frayed Burlap
Distress Crayons: Black Soot, Vintage Photo

Thursday, 24 April 2025

Creating Rust Effects with Tim Holtz Distress Products

Hello friends and Happy Thursday!

This week is flying by again, where do the days go? But today, I'm stopping by to say hello and share a mini tutorial of a technique that I have had so many requests for and as I sat in my craft room creating another project that will be shared at a later date, I thought this was the perfect time to share the details of how I create rust effects using Tim Holtz Distress products. 

I don't think I will never tire of the magic of Tim’s Distress products and how they can take the ordinary, to the extraordinary, and even beyond! 

So let's get started and here's how I use Ranger Ink Distress Paints, Foundry Wax and Paste to turn pewter into rust....


1.  Supplies: Distress Paint, Foundry Wax, Black Opaque Texture Paste and a few of your favourite idea-ology metal embellishments. I’m using Industrial Gears, Sprocket Gears and Gadget Gears.
Apply Black Opaque Texture Paste to the metal idea-ology pieces and allow to set and harden.

3.  Always shake your bottle of Statue Foundry Wax Foundry Wax to mix, and then squeeze a small amount onto your mat. Use either a brush or your fingertip to apply the wax to the metal. If you need more wax, just repeat but always make sure you place the cap back onto the bottle between applications.

4.  Set the wax with a heat tool until it becomes molten and shiny.

5.  Repeat the process using Sterling Foundry Wax but this time you don’t need to add so much, just a few highlights here and there, ensuring the previous layer of Statue Foundry Wax can still be seen in areas. Heat emboss to set.

6.  Use a dry brush, (or you can use your fingertip if you don’t mind getting messy), to apply Crackling Campfire Distress Paint to the surface of the metal. Dry the paint thoroughly between each application.

7.  Using a clean brush, apply Black Soot Distress Paint, followed by Salvaged Patina. If you need to add more of any one colour, to help build up the intensity, just repeat the process until you’re happy.

8.  Finally, apply Mined Foundry Wax to accentuate the texture created on the metal. You don’t need a solid coverage, just the lightest of touches. Heat set the final layer.

9.  If necessary, use a dry brush to apply more paint to highlight areas and add some more rusty, crusty goodness to complete the technique.

My gears are now transformed from the original pewter finish to a rusty metal, and are ready to use on a future project…

Thanks so much for stopping by today and I hope you've enjoyed the tricks and techniques to create rust effects.

Don't forget that you can click below to shop for all the products I've used in this tutorial...
SHOP HERE:
See you soon, Emma xxx

Monday, 13 January 2025

Full of Wonder

Hello everyone and welcome to a brand new week on the Simon Says Stamp Monday Challenge Blog.

This week our theme is called ADD SOME TEXTURE and however you choose to create this texture, the DT can't wait to see your makes and projects.

For my make, I chose to feature Tim Holtz idea-ology as the main focal point and I created texture by adding multiple layers using tags, Texture Paste, stitched details and metal to name just a few things that bring this piece to life.

So, let's get started and here's how I created my piece ~ Full of Wonder!


ETCETERA PANEL

To begin with I used the larger size of the Rectangle Etcetera Panel and I applied a coat of Black Soot Distress Paint around the edges of the panel. Once the paint was dry, I then applied a good layer of Crackle Paste and allowed for this to dry, and for all that crusty goodness to appear.

When the crackles were ready, I ran a combination of Walnut Stain and Pumice Stone Distress Crayons to accentuate the cracks and crazing before I blended out any harshness of colour with a semi dry wet wipe.

The panel is now ready to add the next layer and for this I chose paper from the Backdrops Volume 3 paper pack and cut a piece slightly smaller than the Etcetera Panel. I then machine stitched around the outside edge of the paper and in between each of the numbered sections, following the lines that are printed on the paper.

After adding some rips and tears around the edges, I adhered the paper to the panel using Matte Collage Medium.

TAG

We're now ready to create the next layer, the tag and to begin with I used a Stampers Anonymous Etcetera Tag and a Mixed Media Heavystock Tag.

Taking the Heavystock tag, I placed the Mini sized Deco Feather Layering Stencil from Set 60 and applied Translucent Texture Paste through the design. After removing the stencil, and working quickly, I sprinkled Speckled Egg Distress Glaze over the top, tapped away the excess and set aside for the paste to dry. Dependent on weather, it usually takes about 30mins and once it is dry, I then carefully heat embossed the glaze until it was molten.

I then added the colour, and for this I used Distress Spray Stains and Oxide Sprays in the following colours:

DISTRESS SPRAY STAINS: Speckled Egg, Black Soot, Pumice Stone

DISTRESS OXIDE SPRAYS: Speckled Egg

I misted the tag with water, before spraying the stains, gave another mist of water over the top and let the colours blend together before setting to one side to dry. You can also carefully heat dry the stains.

After inking the edges with Walnut Stain Distress Ink, I added a machine stitched border and adhered the tag to the Size 8 Etcetera Tag before attaching the layered tag to the centre of the Etcetera Panel using foam pads.

To cover the hole at the top of the tag, I used a Machinery Head which I altered with Candied Apple Distress Paint. To complete the tag, I added an Ephemera Numbers Strip to the top left of the tag, and aged it with a little Gathered Twigs Distress ink.

METAL GEARS

Now we can start bringing this piece to life and I began by altering the metal industrial gears and sprockets and applied a touches of Translucent Grit Paste to the surface to add texture. After allowing the paste to dry, I used the following paints to add colour, and combined them with some Foundry Wax that I added at the end:

DISTRESS PAINT: Crackling Campfire, Black Soot

ALCHEMY PAINT: Prima Marketing Art Alchemy Burnt Sienna Liquid Acrylic Paint from my stash (sadly no longer available from SSS)

Foundry Wax: Distress Foundry Wax Kit 2

I apply each paint layer by layer to build up the colour, starting with the palest and then ending with just a light touch of Black Soot. Once the paint was dry, I then applied the Foundry Wax, Sterling and Statue are always my 'go-to' colours for this process.

I applied a light coverage of the wax, and I don't apply this as a block coverage all over the metal ~ you only need a touch here and there. To set the wax, use a heat tool.

At this stage, if you need to add any more colours of paint...just use a fine paintbrush to add details.

WORD PLAQUE, OPTICAL LENS and PHOTOFRAME

The word plaque and the Photo frame are both altered in exactly the same way as the gears, using the same combination of mediums and to complete this band, I added a Hardware Head to each side, attaching with a dab of Collage Medium...

...you will see that I added some more of the Translucent grit paste to the frame before applying the paint.

Behind the frame I placed a Photomatic Vintage Photo, which I colour tinted using Distress Crayons and a water brush.

At this stage, I used the same paints to alter an Optical Lens which will be sitting over the top of the frame. I added some red cotton to the handle for extra detail.

BUILDING UP THE LAYERS

To build up the central area, I began by adding the ruler pieces. I snap these tiny rulers into smaller pieces, leaving the ends jagged. I then altered the colour to more of a vintage feel by swiping Gathered Twigs Distress Ink across the surface. Wipe away any excess with a baby wipe and blend the ink over the wood.

I then attached the rulers to my piece, placing one directly across the tag itself and two further pieces underneath the tag.

I then layered all my gears, attaching them with Matte Collage Medium, and added the Word Plaque.

Finally, I added the photo frame and the Optical Lens which I attached over the top.


As the finishing detail for this tag, I added the Ephemera Piece, W.P. Collins across the bottom. This piece is from the Field Notes Ephemera Pack.

DETAILS

We're nearly there and all that's left is the details...

I attached screw heads to the centres of some of the gears, painted to match the gears themselves...

...and I also added some to the rulers, which I painted red with Candied Apple Distress Paint.

I placed a Mini Stencil Chip, No.7 to the right hand side of the tag, and again added a screw head to this piece.


On the opposite side I clipped a Hinge Clip into position. This clip was in my stash, but I had altered it with Salvaged Patina, Antiqued Bronze and Black Soot distress Paints.

I then hung a Hook Clasp from the clip. My clasp actually broke, so I couldn't hang the chain but I quite like the way it looks, so I just went with it, and left it as it was.

To complete this make, I added the word "Workroom" from the Labeled Remnant Rubs to the top left corner....

...and on either side in the bottom right and left hand corners, I hammered a nail tack into position, altering these with the same combination of paints as I used on the metal work.

So that's my make for this week's challenge complete and I hope the ideas and techniques have inspired you to create some texture on your projects. 

As always, if you make anything, or if you've been inspired by anything that you've seen here on my blog ~ then please, let me know by tagging me on social media or leaving a comment here and I will be right over to take a look!

Don't forget that every week, one lucky random participant has the chance to win a $25 gift voucher from Simon Says Stamp and you can join in up to 5 times, which means you could have 5 chances to win. You have until next Monday at 8am Ohio time. 1pm UK time, 2 pm CET to join in and good luck....


Thank you so much for taking the time to stop by today...
Love Emma xxx

Recipe for project:

Tim Holtz/Stampers Anonymous: Etcetera Panel, Size 8 Etcetera Tag, Layering Stencil 60
Distress Paint: Candied Apple, Black Soot, Crackling Campfire, Salvaged Patina, Antiqued Bronze
Distress Ink: Walnut Stain, Gathered Twigs
Distress Spray Stains: Black Soot, Speckled Egg, Pumice Stone
Distress Oxide Sprays: Speckled Egg
Mediums:Matte Collage Medium, Foam Pads, Translucent Grit Paste

****These are not affiliate links****
Powered By Blogger

Total Pageviews