Showing posts with label Tim Holtz Sizzix Everyday 2023. Show all posts

Monday, 7 August 2023

Get The Party Started...

Happy Monday friends...

As always, a brand new week means the start of a new Simon Says Stamp Monday Challenge and this week, we are ready to party because our theme is called HAPPY BIRTHDAY and here on the SSS Monday Challenge Blog, we are celebrating 13 years of wonderful makes and inspiration.

The DT are also showcasing AALL & Create products within their makes and I used their Stars and Rays Stencil combined with Tim Holtz and Sizzix products, to make a bold and bright birthday card, which I think you might agree is a slight departure for me but I thought it fit the scene and what's a party without some happy colours.

So let's get started, because a little birdie has told me, it's time to turn up the music and PARTAAAY....


To start with I made a black card blank that measures 18 x 11.5cm. I then cut a panel of white card and adhered a border of AALL & Create Twine Washi Tape around the edge to create a decorative border. I matted this onto a panel of blue card, followed by ivory card and mounted the layers onto my card blank.

BACKGROUND

I'll begin with the background and for this I cut a panel of Mixed Media Heavystock which I coloured using a combination of Distress Spray Stains and Oxide Sprays in the following colours;

DISTRESS STAINS: Uncharted Mariner, Old Paper, Speckled Egg

OXIDE SPRAYS: Speckled Egg

After misting the panel with water, I applied the sprays one by one, building up the colour and creating the perfect blend for my background. 

I made sure the card was thoroughly dry before laying the AALL & Create Stars and Rays stencil over the top and applying Distress Crackle Paste. I only used a section of the stencil for this particular project.

Remove the stencil and then whilst the paste is still wet, sprinkle Speckled Egg Distress Glaze over the top. Tap away the excess and set to one side for the paste to set and then once, that has happened and the crackles have appeared, it's time to heat set the glaze until molten and shiny.

I inked around the edges of the panel before machine stitching a border and then matted it onto a piece of gold metallic kraft card.

I wrapped some crinkle ribbon around the bottom section of my card layers and I dyed this with a combination of Antique Linen and Lumberjack Plaid to create the beautiful shade of red. This was secured with a knot and an idea-ology Mini Pin.

Using foam pads, I mounted these layers onto my card blank and we're now ready to decorate the card and start the party...

WOODY WOODPECKER

The little birdie is cut using the Cozy Winter die set and after colouring each die cut layer with Distress Watercolour Pencils, I assembled him and then added white pen detail.

CAKE & BALLOONS

To begin the party celebrations, using Mixed Media Heavystock card, I cut the cake, candles, swirls and the balloons using the Celebrate Colorize die set by Tim Holtz and Sizzix.

Each piece was inked using Distress Inks and Blending Tools in the following colours:

CAKE: Brushed Corduroy, Antique Linen, Kitsch Flamingo, Picked Raspberry and the plate from stamped leftover scraps in my scrap box

CANDLES: Antique Linen, Spiced Marmalade, Mustard Seed

BALLOONS: Prize Ribbon, Lumberjack Plaid, Mustard Seed, Wild Honey

SWIRLS: Prize Ribbon, Lumberjack Plaid, Mustard Seed

I assembled all my inked layers to create each piece and layered each of the swirls over gold metallic cardstock to add a shadow.

For the cake, I wanted to add some glitter to the pink frosting on the top and all that I did was apply some Glossy Accents over the frosting, and then sprinkled Rock Candy Glitter over the wet medium. Allow to dry and then add gold metallic droplets to the cake as decoration.

ASSEMBLING THE SCENE

Taking the cake, I placed foam pads on the back and then stuck it just above the ribbon that I wrapped around the card, placing it on the left hand side and adding the candles and the plate.

I then attached Woody to sit on the cake, adding the balloons to look as if he's holding them behind his back...

...and finished with the swirls, that can be seen all around the arrangement.

SENTIMENT

Finally, I added the sentiment. This is from the Stampers Anonymous Crazy Talk stamp set by Tim and I stamped it in Black Soot Archival Ink onto a piece of card that I inked with Speckled Egg Distress Spray Stain. I matted the sentiment strip onto gold metallic kraft card and then attached it to my card, placing it below the ribbon strip, using foam pads to secure it  into place.
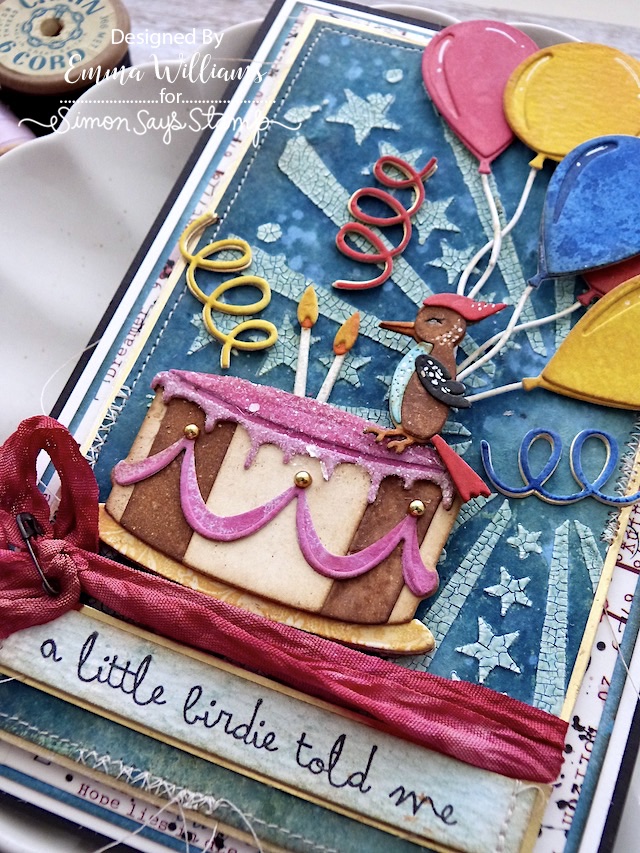
So, that's my card ready for this week's party and I hope you've loved the ideas and inspiration.

As always, if you make anything, or if you've been inspired by anything that you've seen here on my blog ~ then please, let me know by tagging me on social media or leaving a comment here and I will be right over to take a look!

Don't forget that every week, one lucky random participant has the chance to win a $50 gift voucher from Simon Says Stamp and you can join in up to 5 times, which means you could have 5 chances to win. You have until next Monday at 8am Ohio time. 1pm UK time, 2 pm CET to join in and good luck....


Thank you so much for taking the time to stop by today ~ Love Emma xxx

Recipe for project:

Tim Holtz/Stampers Anonymous: Crazy Talk
Distress Spray Stain: Speckled Egg, Old Paper, Uncharted Mariner, Lumberjack Plaid
Distress Inks: Walnut Stain, Lumberjack Plaid, Prize Ribbon, Mustard Seed, Wild Honey, Picked Raspberry, Brushed Corduroy, Antique Linen, Kitsch Flamingo
Distress Glaze: Speckled Egg
Tim Holtz idea-ology: Mini Pins, Metallic Droplets

Monday, 24 April 2023

We're All Mad Here....

Hello everyone...

It’s the start of a bran node week and to celebrate, I'm actually going to be sharing two posts and my first post is something that I made using the Sizzix 2023 Everyday die collection by Tim Holtz. This project is actually a make that I started to think about as soon as I got my dies way back at the beginning of the year, and today, I finally get to share it. 

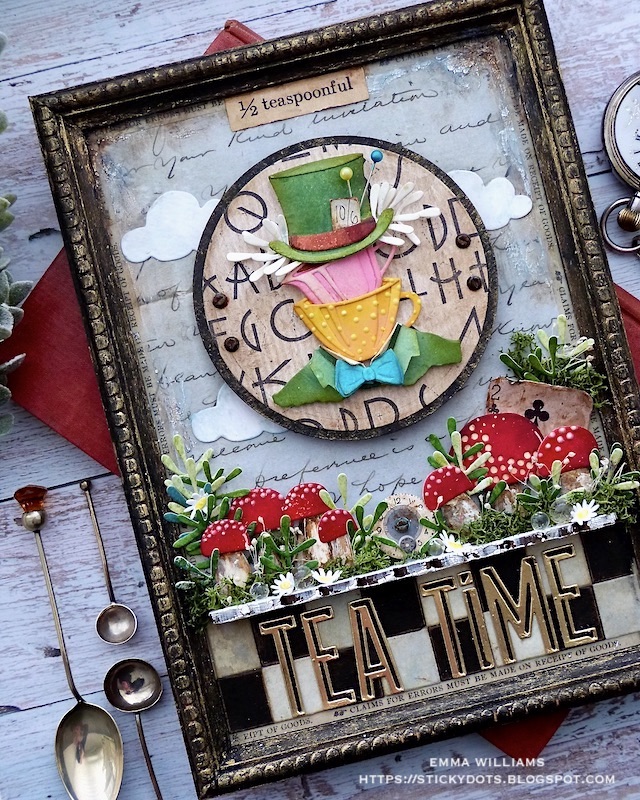
Now some of you already know that I’m a big fan of the Tim Burton version of Alice In Wonderland, and I LOVE the Mad Hatter character that Johnny Depp portrayed but this particular make was inspired by the whimsical and colourful world of the Disney version of Alice, and of course in this version, the Mad Hatter has white hair and a green hat and jacket. So with this in mind, I thought about how I could recreate the tea party scene from the movie, and after a little play, I decided to use the Abstract Elements Thinlits die set to create many of the elements on this project, including the Mad Hatter's hair, the toadstools and the foliage, and once I’d combined this die with Alpha Emporium, Papercut Cafe and the Tailored die sets, my version of the Mad Hatter's Tea Party came to life.

So let’s get crafting because it's time for tea and you definitely don't want to be late....

I used one of Tim's idea-ology Framed Panels for this make ~ they are now sadly discontinued but I had some in my stash. If you don't have this frame, then no worries because any frame or canvas will work, or you can create these ideas on a card or vignette box.

FRAME

This frame comes in two separate pieces, the back panel and the frame itself and I began by painting the frame and the edges of the panel, with Black Soot Distress Paint.

Once dry, I lightly sanded the pieces and then applied a light coverage of Gilded Foundry Wax over the top of the beading to accentuate it. Heat set the wax with a heat tool.

Once I was happy with the frame, I cut a panel of paper from the Backdrops Vol 5 pack and adhered this to the back panel with Matte Collage Medium. 
I then used Design Tape Trim around the edges, so that once my wooden frame goes over the top, you can see a border of the trim tape.
I fixed the wooden frame into position using Matte Collage Medium and then clamped the two pieces together with bulldog clips until it was completely dry and the adhesive had set.

BACKGROUND

With the frame completed, I moved onto my background and started by adding the checkerboard across the bottom section of the frame.

For this I used the smallest die in the Stacked Squares Thinlit set and cut the tiles from black kraft card, sanded around the edges and Mixed Media cardstock that I had inked with a combination of Antique Linen, Old Paper and Lost Shadow. Ink each square with Walnut Stain Distress ink and then attach them with matte collage medium, placing them alternatively across the bottom section of the frame.
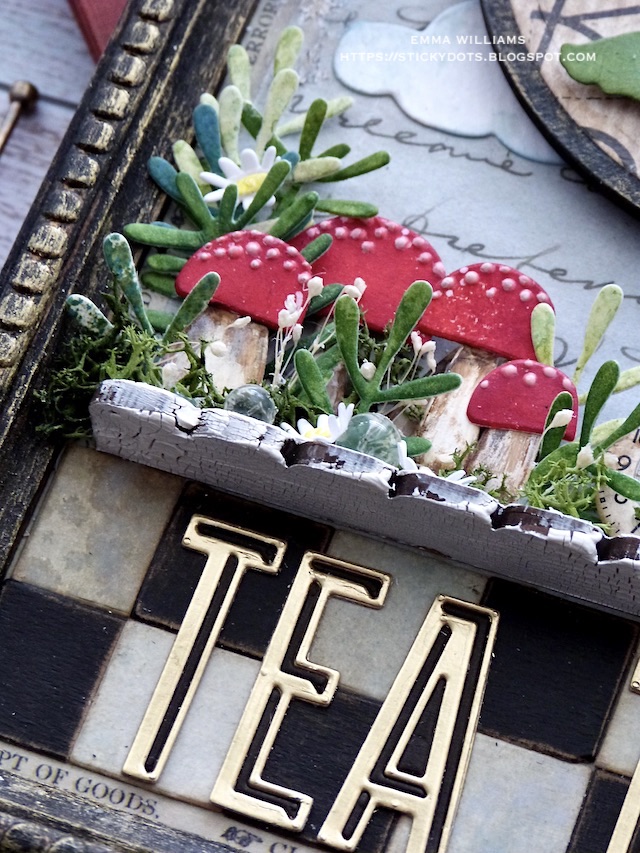
Above the checkerboard I attached a Scalloped Etcetera Trim. I added Crackle Paste to the trim, top and bottom and then once the medium was dry and the crackles had appeared, I attached the trim to create a ledge, directly onto the background using Matte Collage Medium to secure it into place.
Around the top section of the frame, I applied crackle paste, just adding it around the edges and once again, allowed this to dry before colouring the paste with a combination of Speckled Egg, Walnut Stain, Gathered Twigs and Black Soot Distress Crayons, blending out any harsh line of colour using a damp paint brush.
Finally, I added some clouds to the background and for these I used the Christmas Cutouts Die Set to cut three clouds from watercolour card. I added a light wash of Speckled Egg Distress Ink over the top and then attached the three pieces to my background with Matte Collage Medium. TIP: If you don't have a cloud die, then clouds are really easy to cut by hand. Just draw a shape in pencil, onto the card and cut with scissors before rubbing out the pencil line.

We're now ready to create the trip to wonderland.....

TOADSTOOLS AND FOLIAGE

For this I used dies from Abstract Elements and panels of Mixed Media Heavystock card coloured with Distress Spray Stains.
Toadstools: Candied Apple, Aged Mahogany
Greenery: Bundled Sage, Peeled Paint, Mowed Lawn and Shabby Shutters
Stalks: Lost Shadow, Frayed Burlap, Pumice Stone

Below are the dies that are in the Abstract Elements Die Set and to make the toadstools, I used four sizes of the domed shapes (all on the right hand side of the photo), including the largest dome that has the cut out dots, (the yellow shape on the right of the photo below). These will create the toadstool caps and are combined with the teardrop shapes that I used as stalks.

Cut a selection of the shapes and assemble the toadstools. On the the three sizes of the smaller toadstools, I added the white dots using Vintage Nuvo Drops in Chalk and once these are dry, I attached all of the different sized toadstools along the ledge, adding foam pads to the backs of some to create different dimensions.

Dotted in and around the toadstools is some greenery, again cut using the Abstract Elements dies and I chose to cut these pieces from various shades of inked green card. Attach the greenery, together with moss, placing some tiny idea-ology Bubbles and die cut daisies along the ledge. These tiny flowers are from the Bunny Games die set.
On the right hand side of the arrangement, I added a playing card. This piece is from the Junk Drawer Baseboards set and I just peeled away some of the layers to cut down on the thickness of the playing card, so that I could position it behind my toadstools. Ink this piece to make it look more grungy and vintage before tucking into behind the arrangement.

In the centre of the arrangement on this ledge, I placed a tiny clock. This is from the Mini Flair set and I just grunged it up with a little Walnut Stain and Black Soot Distress Crayon.

ALPHA TEA TIME

Cut the lettering once from gold metallic kraft card, and a second time from black kraft card.
Attach the gold lettering over the top of the checkerboard and then inlay each letter using the black die cut pieces. (Keep the remaining pieces to use on another project).

The ledge and background is now finished and it's time to move onto the star of the show, the Mad Hatter himself.

CIRCLE

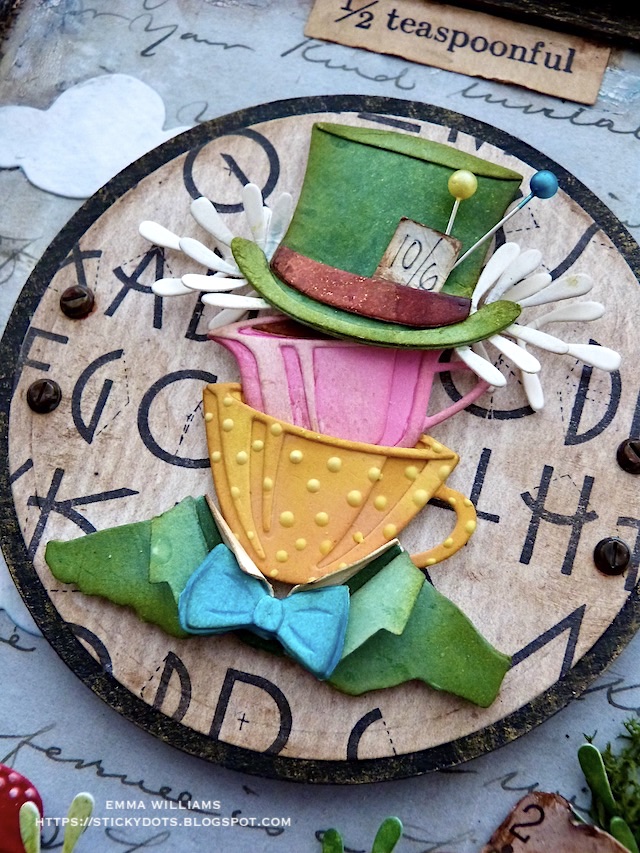
The circle that sits behind the Mad Hatter, is actually the waste from a previous project and comprises of the cut out from one of the Etcetera Facades, which I painted black and then I layered a circular panel of Backdrops Vol 4 paper over the top, applying a coat of Matte Collage Medium over the surface to seal it. This piece is stamped using the alpha typography stamp from The Inspector. If you don't have the Facades, then a die cut circle of mountboard will do equally as well.

After applying Walnut Stain Distress Crayon around the edge, I attached the completed circle using foam pads.
PAPERCUT CAFE

Cut all the layers to create two teacups. I used Mixed Media Heavystock and inked each of the elements using Kitsch Flamingo and Fossillized Amber, Wild Honey and Mustard Seed. Assemble the teacups, ink the edges with Walnut Stain and attach them to the centre of the circle with foam pads. Add small dots to the yellow teacup using more of the Vintage Nuvo Drops.

MAD HATTER

The Mad Hatter is cut using from the Tailored Die Set and each piece is coloured with a blending tool and Oxide Inks.
Hat and Jacket: Mowed Lawn, Rustic Wilderness
Band: Vintage Photo
Bow Tie: Broken China

After I assembled the Tailored die cut pieces, I attached two dressmaking pins from my stash into the hat and then added the 10/6 label, (a tiny square of inked card and a handwritten price tag), which I tucked into the hat band.

I attached the pieces top and bottom of the two teacups using foam pads to add height.
For the mad, wild hair, I used the leaf sprig from the Abstract Elements die set and cut four pieces from white card. I then trimmed them down slightly and placed them on either side of the top hat.
We're nearly there and all that's left is the finishing details....

I added Hardware Heads to either side of the circle, and painted them for that vintage touch, using a combination of Black Soot and Crackling Campfire.
Finally, I adhered the 1/2 teaspoonful snippets ephemera piece along the top of my frame.
I really hope you love this make because it's been such a fun piece to work on. As always, I'd love to se if you've been inspired by my trip to Wonderland and if you do make anything, then please tag me on social media and I will be right over to take a look because I love seeing them all!
Thanks for stopping by and I'll be back later today with my regular Monday post for Simon Says STamp.
See you soon and take care...love Emma xx


RECIPE FOR MAKE

Distress Spray Stain: Candied Apple, Aged Mahogany, Bundled Sage, Peeled Paint, Mowed Lawn and Shabby Shutters
Distress Paint: Black Soot, Crackling Campfire
Distress Inks: Walnut Stain
Oxide Inks: Mowed Lawn, Peacock Feathers, Wild Honey, Mustard Seed, Fossilized Amber, Kitsch Flamingo, Vintage Photo

Monday, 13 March 2023

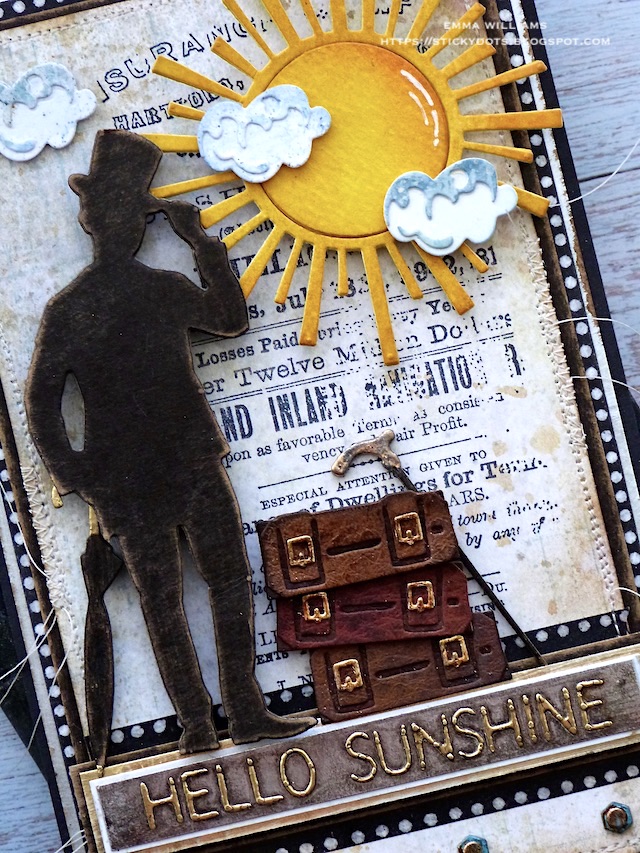
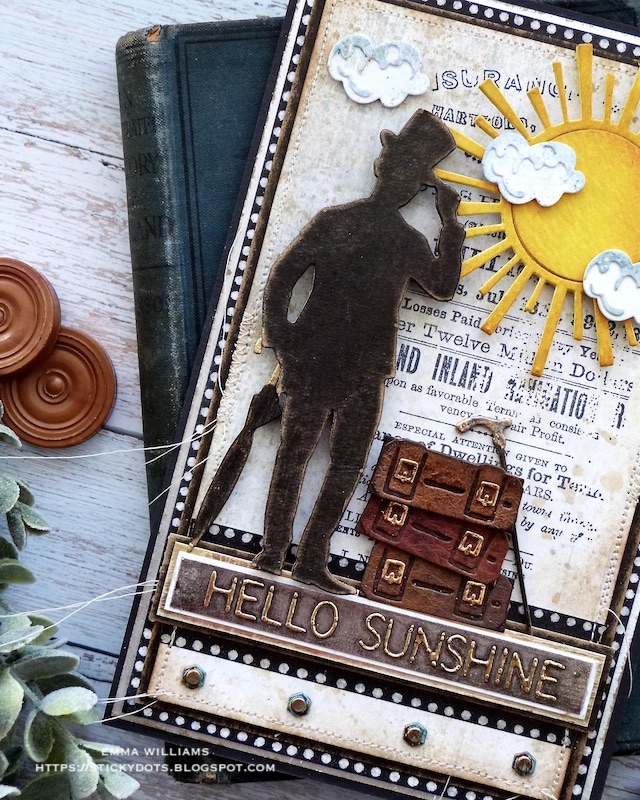
Hello Sunshine

Hey everyone...

Hope you all had a great weekend and you're now ready for the week ahead and as always on a Monday, there is a brand new Simon Says Stamp Monday Challenge. This week our theme is called Whatever The Weather, which at the moment seems so appropriate, because what is happening to our weather?! Here in the UK, there is no sign of spring and we've just experienced some more snow, it's still bitterly cold and winter is still hanging on in there!! It's crazy....

But when it's cold outside, it gives us all a good excuse to spend some time creating and we hope you'll join us and play along with our challenge theme!

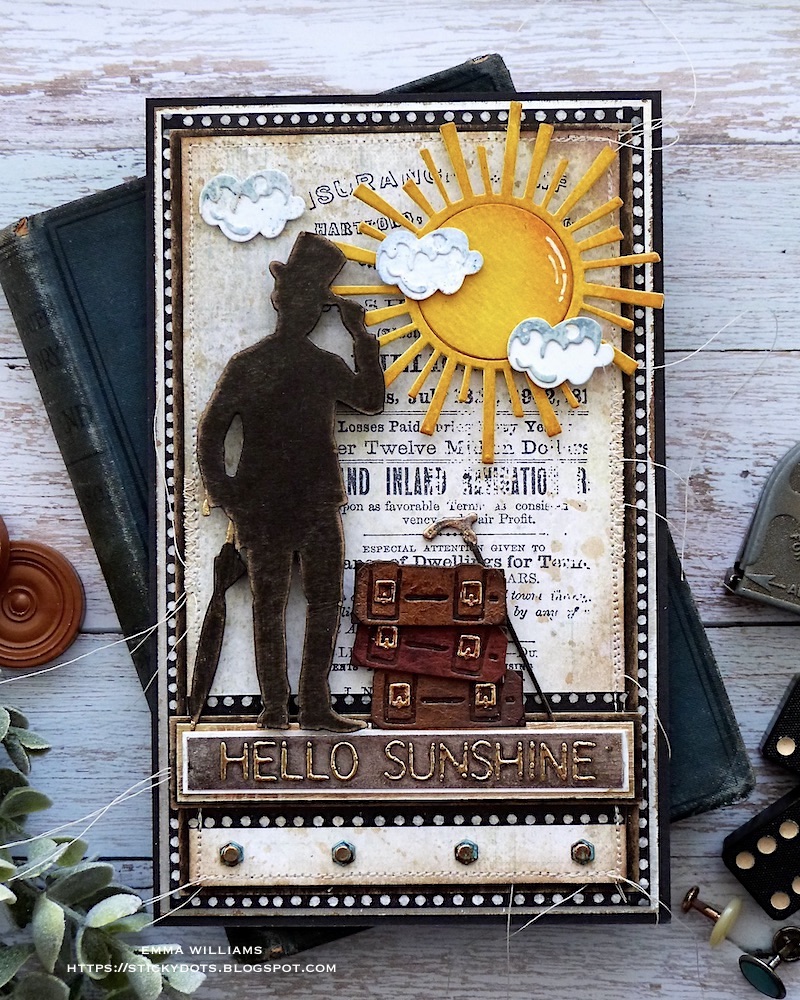
For my make, I chose to make a card all about those warmer days that I hope are just around the corner, and I used a combination of old and new dies from the 2023 Sizzix Everyday collection by Tim Holtz to create my scene that is packed full of sunshine...

So, here we go...it's time for some die cutting fun!

To begin with I made my card blank from black card, which measures 12.5 x 20cm before I moved onto the background and the layers.


BACKGROUND

I cut a panel of watercolour card, 10.5 x 18cm and spritzed the surface with a light misting of water before spritzing the card with a combination of Lost Shadow, Old Paper and Pumice Stone Distress Spray Stains, together with Lost Shadow Oxide Spray.

After allowing the colours to blend, I heat dried the card panel. I then dipped the card into some inky pools of Frayed Burlap Oxide Ink, heat dried the panel and then inked the edges with Walnut Stain Distress Ink.

Using Black Soot Archival Ink, I inked up the text stamp from The Professor 2 stamp set, and stamped on the right hand side of the panel.

To add more layers, I used the graph lines stamp from Glitch 1 and stamped this using Speckled Egg Oxide Ink. It's a very faint layer, that you can hardly see on the camera, but it is there and just adds to the background.

I machine stitched a border around the outside of the panel before matting it onto black kraft card, sanded with the sanding disks.

These disks are a game changer, if you haven't tried them yet then you MUST. You just attach them to your blending tool and they are good to go and really do the job.

I cut a piece of white card slightly larger than the background panel and applied the dotted Design Tape Trim around the edge to form a border before I layered the background panel onto this piece of card, followed by a final layer of silver metallic, again sanded back with the sanding disks.

Mount the layers onto the card blank.

QUOTE PLAQUE

Along the bottom section of my card, I added a quote plaque ~ "Hello Sunshine".

To make this I cut a strip of silver metallic kraft card, and sanded it lightly. I then die cut my sentiment from gold metallic kraft card, using the Label Alphanumeric die set.

Adhere the letters to the silver strip and then apply a light coverage of black soot Distress Paint over the top. Wipe away the paint from the gold lettering and allow it to dry on the silver.

Matt the sentiment strip onto a piece of cream card, followed by black kraft card before attaching across the bottom section using foam pads.

I then applied some more of the dotted design tape trim, above and below the plaque.

We're now ready to create the scene and we'll start by creating some sunshine...

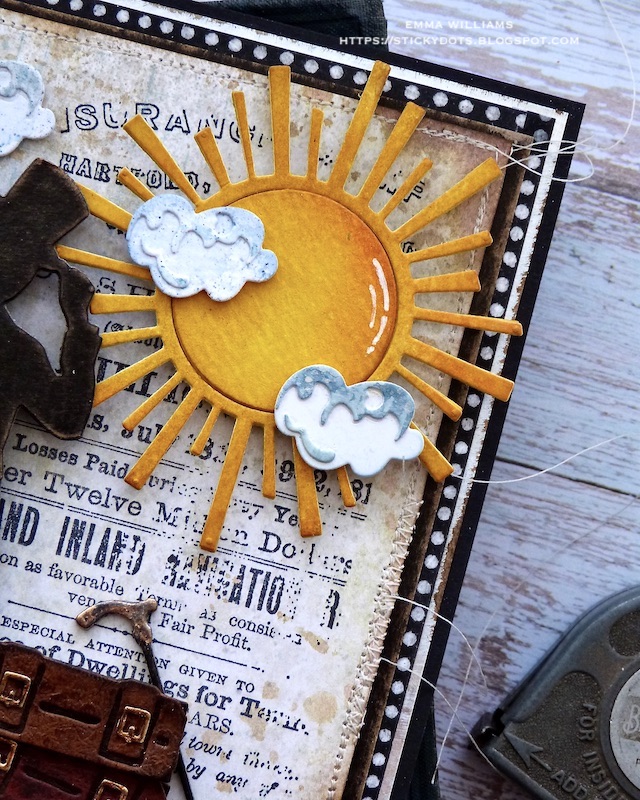
SUN

I coloured some watercolour card using Mustard Seed and Fossilized Amber Distress Spray Stains and once dry, I used the sun from the Circle Play die set and cut the image. After adding some shading with Wild Honey Distress Ink, I inked the edges with Walnut Stain Distress Ink.

This particular die, cuts two sections, the rays and an inner circle and because I wanted to attach the sun to my background using foam pads, I cut and attached a second, slightly larger circle than the die cut circle to the back of the sun before adhering the completed die cut to my background, placing it in the top right hand corner.

GENTLEMAN SILHOUETTE

Die cut three layers of black kraft card using one of the three silhouette images from the Gentleman Thinlits Die Set and layer each die cut piece over the top of one another to make a one thick, substantial piece. Repeat this to make the umbrella and walking stick.

Taking the umbrella and the walking stick, I wanted to add a gold handle to each and created this effect by pressing just the handle section into the pad of clear embossing ink and then sprinkling gold embossing powder over the top. Heat emboss to create the gold handle.

Sand the edges of the die cuts with the sanding disk, and then taking the gentleman and his umbrella, attach to the card front using foam pads, adhering him to the left of the sun and standing on the sentiment plaque.

You can see how much dimension the foam pads create on this make in the photos below.

SUITCASES

Now for the suitcases, and for these I used the die from the Road Trip Colorize set.

I cut my suitcase pieces from Distress Cracked Leather Cardstock that I had coloured with a combination of Aged Mahogany and Black Soot Distress Spray Stains.

I layered each of the die cut pieces to create the suitcases, adding the gold buckle trims cut from metallic kraft stock card.

Attach the suitcases to the right of the gentleman using foam pads, and lean the walking stick against the pile of cases.

DETAILS

We're nearly there and all that's left is to add the finishing touches, starting with the clouds...

Once again I used the Road Trip colorize die to make my clouds, cutting the sections from inky blue cardstock that I had in my 'leftover' box.

I layered each section to create the three clouds that I attached at the top of my card.

Finally, I attached four Hardware Heads beneath the sentiment plaque using Matte Collage Medium to secure them in place. These are altered with Salvaged Patina, Antiqued Bronze and Black Soot Distress Paint to create the patina effect to the metal.

So, that's my card finished and this week's project complete. I hope you love the card I've made and the ideas I've shared ~ it was a fun piece to make and now all we can hope for is we see a little of that sunshine very soon.

As always, if you make anything, or if you've been inspired by anything that you've seen here on my blog ~ then please, let me know by tagging me on social media or leaving a comment here and I will be right over to take a look!

Don't forget that every week, one lucky random participant has the chance to win a $25 gift voucher from Simon Says Stamp and you can join in up to 5 times, which means you could have 5 chances to win. You have until next Monday at 8am Ohio time. 1pm UK time, 2 pm CET to join in and good luck....


Thank you so much for taking the time to stop by today ~ stay safe and keep well.
Love Emma xxx

Recipe for project:

Tim Holtz for Stampers Anonymous: Glitch 1, The Professor 2
Distress Spray Stain: Old Paper, Frayed Burlap, Lost Shadow, Pumice Stone, Fossilized Amber, Mustard Seed, Aged Mahogany
Distress Oxide Spray: Lost Shadow
Distress Paint: Salvaged Patina, Antiqued Bronze, black Soot
Distress Oxide Ink: Speckled Egg, Frayed Burlap
Distress Inks: Walnut Stain, Wild Honey
Tim Holtz Idea-ology: Hardware Heads, Design Tape Trims
Powered By Blogger

Total Pageviews