Hello everyone...it's been a while since I was last here and many of you have very kindly been sending messages to ask if I was ok and I thought now was the time to take this opportunity to update you all. If you follow me on social media, you probably already know the reasons why I've been absent from my blog, and why I've taken a break over on the Simon Says Stamp Monday Challenge but for those who don’t follow me, I thought I'd drop by, say hello and just fill you in on what's been happening since my last post in May.
So, here we go, and this isn't the easiest post I've ever written, I don’t usually share personal things on here, but I wanted to share this and hope you don’t mind reading it…
In May, my Mum suffered a Haemorrhagic Stroke and from the very beginning, the medics told us that we should hope for the best, but prepare for the worst. My Mum was a fighter though, she always had been and she wasn't prepared to leave us without one last fight of her life. And that’s what she did, she fought so hard and so bravely, but after 9 days, my Dad and I had to say goodbye and that was the hardest thing to do, because this beautiful woman, who had a smile that would light up a room and a sense of humour that would brighten our day, was everything to us ~ she wasn't just my Mum, she was my best friend, a beloved wife and a very special lady to everyone who knew her.
For the next 9 weeks, Dad and I tried to get used to life without Mum...it was hard, and it was definitely the most difficult time we had ever faced but no matter what we were going through, we had each other, and that was how we coped with the heartbreak.
But at the end of July, after spending a lovely day together, my Dad started to feel unwell and he was rushed to hospital. After a very long 5 hours, hoping and praying that I’d be able to take him home, my wonderful Dad, my hero, passed away and once again, I had to say goodbye. In the space of 9 weeks, my world had fallen apart….
These last five months have been extremely painful and I can't tell you how much I miss both of them, it's more than words could ever describe but they are always in my heart, by my side and they will never be forgotten because every night, they are both shining bright in the sky!
So, as I begin to slowly ease myself back into a world of creativity, I wanted to say thank you to everyone who has sent messages, cards, flowers and just been there for me during these last months. I especially want to say thank you to Tim, Mario, Paula, ❤️❤️❤️ and everyone at Simon Says Stamp. ❤️ You have all been so caring, and so supportive and it really has meant so much to me as I've tried to move forward and cope with all the chaos that comes with this huge loss.
*******
…and now, to the second half of this post, and if you follow me on Instagram or Facebook, you will have seen a few of the makes I've created for Tim's recent Halloween Sizzix, Ranger Ink and Christmas Stampers Anonymous releases.
I also shared this piece that I was creating for the Halloween idea-ology Live Launch. I'd actually already made this project just before Dad passed away but unfortunately, it wasn't quite finished in time for Tim's YouTube Live. But for those who haven’t seen it on my socials, it’s now time to welcome you to the Witch Market....
This post is really to show you around the make, it’s not a tutorial but I wanted to share some of the close up details with you and the products I’ve used. If you do have any questions though, then please don't hesitate to message me.
Products used in this post are available at Simon Says Stamp
*************
To create this piece, I began by choosing the Square Vignette Panel as a base, using the inside to create the appearance of a box. I painted the entire box, inside and out with Black Soot Distress Paint and then adhered Design Tape Trim around the four edges of the panel.

To add texture to the sides, I used the spider's web die in the Sizzix Vaults Fright Night Thinlits set. The web is cut from black card and I just snipped into the die cut to create sections and pieces which I then attached directly onto the box using Matte Collage Medium. Once dry, I just gently rubbed some Sterling Foundry Wax over the raised areas to accentuate the detail before I heat set the wax, using a low setting on my heat tool.
To add even more texture, I used Black Opaque Distress Texture Paste to create a gnarly, vintage effect, and once that was dry, I again used the Foundry Wax to highlight the details. To complete the box, I added some Hitch Fasteners to the top of the panel, and a Machinery Head on either side.
As we begin to walk around the market, you'll notice that I covered the back of the panel with the brand new Halloween Large Collage Strips. These are a favourite of mine and I love that you can use the strips just as they come out of the pack or like I did on this piece, where I cut them into sections so that they all fit perfectly. It’s a bit like a jigsaw and you will need to place some horizontally, and some vertically.
Inside the box, you can see that I built up the main central focal point by layering an Etcetera Facade, (with the circular piece in the centre removed), over the top of the smaller rectangular Etcetera Panel. Both of these pieces are covered with gorgeous papers from the Halloween Backdrops pack and on the centre of the Etcetera Panel, I also attached the black and white circular layer, which is from the Halloween Layers and Paper Dolls pack. You can just see this through the aperture and creates the perfect backdrop for the witches.
Now to add those Halloween Tiny Lights to create that perfect purple glow behind the witches. I attached the lights by drilling a hole through the back of the vignette panel, and continued drilling through the Etcetera Panel which I had fixed into position using Matte Collage Medium.
I then used hot glue to attach the lights to the back of the Facade, placing them around the edge of the circle. With these firmly attached, I used the risers that come in the facade pack, placed these on the back of this piece, and adhered this into position.
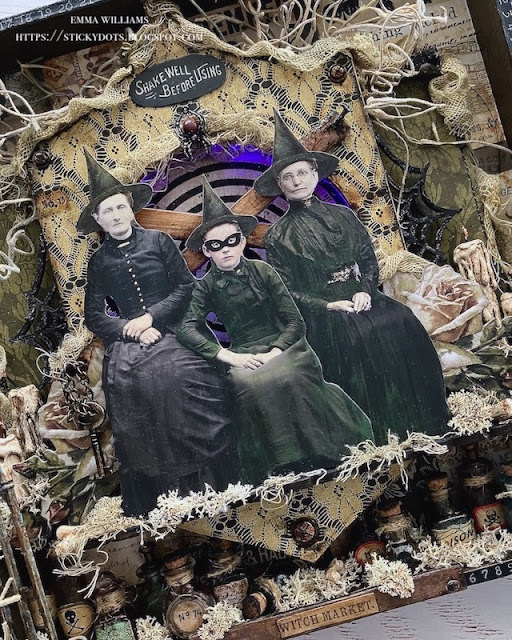
On either side of the facade, I used a Bat Web Etcetera Trim. Each trim is painted with Black Soot Distress Paint and then attached ~ one on the left, one on the right.. Once again, I added Black Opaque Distress Paste to each trim for added texture and accentuated this detail with Sterling Foundry Wax.
To complete this focal point, I used Spanish Moss and
Mummy Cloth that I dyed with Frayed Burlap and Antique Linen Distress Sprays and tucked this in around the edge of the facade.
Now to move onto the witches...
To create support for the witches and to add some more depth to that central area, I attached "wooden planks". These realistic planks are from the
Baseboards pack, and are perfect for adding to a window, or an opening to create a spooky effect.
I added two of these planks to form a cross, which as I mentioned, also doubles as the support needed for the witches heads to rest upon.

I actually used a combination of two
Halloween Paper Dolls ~ one is the woman and child, and the other is the older lady, who sits on the right. I then added the eye mask and the witches hats, both of which are from the
Halloween Sticker Book, before surrounding them with
floral layers on either side.
Tucked into each side of the panel, and nestled amongst the floral display are some
Drippy Candles and all that I did with these to add that orange glow is dab some
Stickles Glitter Glue to each of the wicks.
To ensure that the figures look as if they are grounded and their feet aren't floating in mid air, I added an
Etcetera Trim across the bottom section of the facade. I painted the trim with Black Soot Distress Paint, and attached it with Matte Collage Medium before adding moss, some Boneyard Findings and Mummy Cloth around their feet.
You'll also notice that I added a key from the
Gothic Gates set. This key, which I altered with Distress Paints to create a rusty effect, hangs down on a chain which is attached to a Nail Tack, hammered into the facade.
Now to add some details and on either side of this panel, I attached the
gothic gates which I made to look rusty using Transluscent Grit Paste and Distress Paints. I then added a spider along the very bottom, just crawling out of the gate....
...and on the opposite side, I attached a lock, which hangs from this open gate. Once again, Distress paints did their job of creating the look of a patina on the metal.
Now, no Witch Market is complete without bottles full of potions, poison and other elixirs, and this market is no exception because these three witches have been busy and as the 31st October draws near, they are obviously working their magic ~ ready and waiting to cast a spell or two....
I used a combination of
Corked Vials and
Tiny Corked Vials for this. You can read all about how I alter these clear glass vials on a
previous post, and you can also see more of this technique
HERE.
Once all my tiny vials were ready and all the little
Curator labels were attached to the fronts, I just positioned them across the bottom of the panel, adding moss in and around each bottle.
Finally, I added the Witch Market sticker onto one of the "wooden planks" and used Nail Tacks to attach this to the bottom edge of the panel.
Thanks so much for stopping by today and I hope to be back full time with you very soon but before I go, this post is dedicated to my parents because without them, and without their encouragement to dip my toe into the craft world ~ I wouldn't be here! My Mum bought me my very first kit because she believed that I'd be quite good at making something!
So, with this in mind ~ I hope I made you both so proud of me and I hope you'll always be looking down to see the next part of my journey!
Love you both and shine bright!
xxx


