Showing posts with label Marvy Le Plume. Show all posts

Friday, 26 March 2010

Untamed...Part 3

It was promised a couple of weeks ago but sometimes, good things come to those who wait and finally ~ here she is....in all her glory ~ my favourite of the three cards I made using this Gorjuss image from Funky Kits ... and also the one with the most work... *smiles* what can I say ~ I like to give myself a challenge.

This card is a crafting journey and brings together everything that I love most about making cards ~ the beautiful image made by using rubber stamps, that can make each and every card unique. My beloved distress ink pads by my crafting hero, Tim Holtz, the punches from Martha Stewart that have become invaluable to me when making a card. The backing papers that I love to touch and look at and sometimes can never quite bring myself to use them and finally, the fact that I get to work with such wonderful products and new techniques, that make every day a joy and make my fingers very messy and covered in ink!!!

SO, WHAT DID I USE?
COLOURING MEDIUMS: PROMARKERS, MARVY LE PLUME WATERCOLOUR PENS
DISTRESS INKS: BLACK SOOT, FADED JEANS, ANTIQUE LINEN
GREETING PLAQUE: CRAFTWORK CARDS
STAMP: GORJUSS UNTAMED BY SUGAR NELLIE AT FUNKY KITS
PAPERS: K & COMPANY
BUTTERFLY PUNCH: MARTHA STEWART
GLITTER: DISTRESS STICKLES ~ ANTIQUE LINEN, FADED JEANS

Thursday, 11 March 2010

Untamed...Part 2

As promised and I'm sure eagerly awaited by some ~ here she is...my favourite girl ~ "Untamed", part 2 and I really hope she was worth the wait... *smiles*. At the moment, I really can't get enough of the Gorjuss images and over the next few weeks, I will definitely be featuring some more, including something rather special, that I'm very, very excited about.

The techniques on the card are much the same as before but this time instead of pink tones...I used these gorgeous tones of blues and aqua, which I felt really lent themselves to the distressed look of the image but still captured a cuteness and adorable feel of the little girl.

SO, WHAT DID I USE?

RUBBER STAMPS: Sugar Nellie ~ Untamed, Paula Pascual for Personal Impressions ~ Greeting 
INKS: Distress Inks ~ Broken China/Black Soot, Memento
COLOURING MEDIUM: Promarkers, Marvy le Plume
PAPERS: Brenda Pinnick ~ Sucerie
DIES: Spellbinders ~ Labels Four
PUNCHES: Martha Stewart ~ Border punch, leaf frond

Ribbon, Flowers, Card Candy

Tuesday, 9 March 2010

Untamed...Part 1

Last year, I came across an illustrator called Suzanne Woolcott and instantly fell in love with her images. So, when I found that these images were available as rubber stamps and papercrafting materials, I was in my element and I don't think it's any secret how much I love Suzanne Woolcott's illustrations and how much I love working with them.  So, this particular card is the first of three that I've made, using the same Gorjuss, "Untamed" image but trying to make each one, just that little bit different.

For this one, I wanted to keep it fairly tonal and of course, that tone is one of my favourite colours...pink! To begin with, I stamped the image onto a piece of white card, that I'd die cut using the large oval scallop die from Spellbinders. I used distress inks around the edge and coloured in the image, using Promarkers and Marvy le Plume watercolour pens. I matted a piece of backing paper onto square cardstock and then layered the stamped image over it. I used Martha Stewart's butterfly stamp and punch, to create all the little butterflies and adhered these onto the card, slightly lifting the wings, to give the look of them, fluttering around. The leaf fronds, using another Martha Stewart punch, were punched from white card stock and then I dragged a Brilliance Dew Drop ink pad over the surface to give me the co-ordinated colour that I wanted and then flittered it with glitter. Finally I added a silk flower in the corner, with a small button in it's centre.

Sunday, 7 March 2010

She's a lady...

I hope everybody's had a wonderful weekend and to end this beautiful sunny day, I thought I'd share another creation.

And today, it's something a little bit different to my recent cards, quite simple in it's beautiful monochromatic tones but very elegant and stylish. I bought this Hero Arts stamp quite a while ago, it might even have been one of my very first rubber stamp purchases but I think it's a beautiful image and it's such a joy to work with.

Using a black Stazon ink pad, I stamped the image onto cream card, which I'd previously punched with a decorative corner punch and then coloured it in, keeping the colours quite subtle and muted, using grey Marvy le Plume watercolour pens. I embossed some black DL cardstock, to give an Art Deco feel to the card and then using some silver mirri card, I matted and layered the image onto it and then adhered this to the embossed card stock. To complete the card, I added a few diamante gems to the corners and a black satin ribbon, run down the side of the card.

Thursday, 28 January 2010

Foxy

Another of my much loved craft bargains...how could any girl, possibly resist not buying this beautiful stamp and all for a fraction of the original price? To put it simply ~ I am in love with this whole range of stamps, they are a must for crafters who love to work with wonderful pieces of artwork in their card designs!

And as in previous posts where I've used rubber stamped images...once again, together with the use of some stunning backing papers from K&Company, in two of my favourite colours which look amazing when put together, some Distress Ink on the edges of the main image which I handstamped and coloured in using a mixture of Promarkers and Marvy Le Plume pens...the addition of a cute die cut flower, card candy and ribbons ~ it all goes to show, that some very simple elements combined with a lovely rubber stamped image, make what can become such a charming card.


Saturday, 23 January 2010

Gorgeous Gorjuss

This January, there has been so many great bargains in the end of year sales and I've found some amazing finds in the world of craft ~ especially a wonderful range of stamps by Sugar Nellie. I love the extent of the designs that are on sale here and it's given me the opportunity to make some amazing cards. The first of which is this one featuring the designs of Suzanne Woolcott and her Gorjuss range.

I particularly love this one, called ~ "A Little Birdie Told Me..."

On this card, I first of all handstamped the image, using a VersaFine ink pad in black, onto a piece of white card that I die cut on the Cuttlebug. I used Faded Jeans, Antique Linen and Black Soot Distress Inks on the edges of the die cut mat and then spritzed it with a water mister to reduce the intensity of the inks. Once the card is dry, I then coloured in the image, using a combination of Promarkers and Marvy le Plume pens.

The coloured design is then, layered using foam pads, on some beautiful backing papers from Brenda Pinnick's Sucerie range of papers, which I ripped and tore and then used some more Distress Ink on the edges to give the aged look. The beautiful textured paper flowers are from DCWV and as my final touch, a small adhesive pearl is added, together with a greeting plaque ...and voila!!! The first of my cards using my bargain buys.

Monday, 21 December 2009

The final cards have all been delivered...

And I hope that everyone who I've sent a card to this year, has loved what they've received, just as much as I've loved making each and every single one of them.

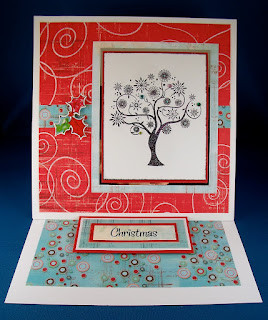
All these cards were made using the same method ... rubber stamping. But by using different ink pads, embossing powders and techniques, it shows just how versatile a rubber stamp can be.


He knows when you've been good or bad...


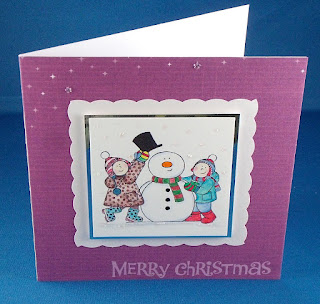
Snowman by Jolly Nation

Hand painting an image can make each individual card look so different. On this card, I co-ordinated the colours in the image to the background papers to make it a fun looking, contemporary card!


The Holly & The Ivy


Bejewelled Tree ~ The Easel Card
So, all that's left for me to do, as I stay warm and cosy inside, listen to Christmas songs playing, whilst watching the snow fall to the ground once more, is ... wish you all a very happy Christmas and hope that you all have a wonderful 2010!

Happy Christmas, everyone!!! ~xo

Thursday, 17 December 2009

Belle of the Ball

Just trimming off an inch from the side of the card, can give a very different look to what can be an ordinary rectangular card shape. Put that together with some beautiful backing papers ~ you already have the makings of a simple but elegant looking card. But the real fun comes from making the main image on this particular card and if you've never tried shrink plastic, then you must!

This image comes from The Crafthouse Press. It will come plain for you to colour it in, with whatever colours you decide to choose. You can use most pens or coloured pencils on shrink plastic, anything from my beloved Sakura metallic gel pens to Marvy Le Plume markers but the trick is, not to colour it in too dark or too heavy, because when you shrink it down, it becomes more intensified.

Once the image is coloured in, then comes the fun... I usually use a heat gun to shrink the image down and at first you might think it's all going horribly wrong but I assure you, the more you heat, the image WILL flatten out! Once it's shrunk down completely, just put a stamp block on top to flatten it completely and voilà, you have your perfect little image to use as you want. If you want to use it as a charm, I suggest punching a hole into the plastic before you shrink it down but on this card, I used silicone glue to attach it to my background. A final touch of some ribbon and a greeting plaque was added and I hope you like the final result!


Powered By Blogger

Total Pageviews