Showing posts with label Hero Arts. Show all posts

Monday, 31 July 2017

Sweet Treats...

Hello friends...

Hope you've all had a good weekend and you're ready for the brand new week and a brand new Simon Says Stamp Monday Challenge! This week our theme is all about "FOOD AND/OR DRINK" which I think is probably self explanatory...we want you to create projects all about this subject and we can't wait to see what you create!

For my project this week I was inspired by visits to my grandparents when I was younger! After a long car journey from our house to theirs, my Nana would always have some treats waiting for me in the kitchen pantry...whether that was one of her speciality Victoria sponge cakes or whether it was cookies and sweets, she had always stocked up for our visit! So, with this in mind, I decided to recreate my own little tribute to Nana's kitchen pantry, with a trio of treat jars and created this project using Tim Holtz's Mini Mason Jars, which would be wonderful as decoration in a kitchen or create the perfect gift for someone.


To begin with, I took all three jars that come in the packaging and gave them a good wash because I'll be using them for food products. I removed the original lids from each bottle and these will be replaced with the lids from the Photo Clip Kit. Then, using Distress Paints in Bundled Sage, Tumbled Glass and Victorian Velvet, I painted the lids and added three coats to mine which gave it a really good coverage. I then used the Sanding Tool to remove some of the paint around the edges to create a more worn look.

For two of the jars, I added two of the knobs from the Mini Hardware Findings set and for the third lid, I added the Photo Clips Kit pieces ~ all of these are so easy to attach to your jars, Tim really has done all the hard work for us!
With my jars ready to decorate, I started my creating the artwork for the main one, which has the photo clip piece attached to the lid.
To begin with, I cut a piece of canvas paper from my own stash to approx, 7 x 9cm. I applied some Antique Linen Distress Paint directly to the surface and blended small amounts of Pumice Stone and gesso over the top. I then just thought of this as a mini canvas or an ATC and applied small amounts of torn Tissue Tape and stamped randomly using the Newsprint Stamp.

I then added some Ephemera pieces attaching them with Collage Medium before machine stitching around the outside and mounting it onto some Black Soot kraft core card.

For the teacups, I used the Mini TeaTime dies (you will need the Base Tray for these dies) and cut three cups from Memoranda Paper Stash which I adhered to thin pieces of chipboard. I inked the edges and then stacked the tea cups inside one another before attaching them over a bed of sisal fibres using foam pads.

I added a Clippings Sticker to my arrangement, a tiny butterfly from the Snippets pack and a couple of sequins before attaching the mini artwork to my jar using the hinge clip which I 'vintaged up' with a little paint.
To complete my jar, I made a little worn tag. I cut the tag shape myself and then inked the surface with Frayed Burlap and Walnut Stain before spritzing with water and heat drying. I then stamped the tea pot from the Tiny Things 2017 stamp set and added the wording 'tea' using the Hero Arts Typewriter stamps.

To attach my tag, I dyed some crinkle ribbon using Tumbled Glass and Antique Linen Distress Spray Stains and tied the ribbon around the neck of my jar, adding a spoon from the Silverware Adornments, the tag and a little heart from the Treasures Adornments and key.
For the remaining two jars, I created small tags for each of them and tied them onto the knobs with twine.
I then tied a piece of ribbon around the neck of the jar and added a Typed Token to this jar....
...and an Enameled Tag complete with Remnant Rub to the third and final jar!
I hope you've loved my little trip down memory lane and enjoyed the creative process behind this project, it was such a fun project to create and now, all that's left is to eat, drink and enjoy the memories that this project has bought back!

As always, if you do need any further inspiration, then look no further than our blog to see all the wonderful creations from all the very talented Design Team members and every week, one lucky random participant has the chance to win a $50 gift voucher from Simon Says StampYou have until Monday 8am Ohio time. 1pm UK time, 2 pm CET to join in and good luck....


Thank you so much for stopping by today and see you again very soon!
Love Emma xxx


Monday, 27 July 2015

Not Your Regular Paper ~ Simon Says Stamp Monday Challenge

Hey everyone and welcome to a brand new Simon Says Stamp Monday Challenge!

This week, the challenge is called ~ NOT YOUR REGULAR PAPER and we really hope you'll play along with us!

From speciality stamping paper to glitter, corrugated to extra heavy mixed media or tissue ~ there are plenty of wonderful papers out there and we challenge you to use something other than regular patterned paper or cardstock and inspire us with the world of papers available!

For my project, I chose to create a journal page combining a quote from my favourite actress and style icon, Audrey Hepburn and one of the most wonderful cities in the world, Paris and on these pages, I used two types of paper that I don't often think about using ~ vellum and glitter!

To begin with I took my Dylusions journal and I applied a small amount of Stormy Sky and Tarnished Brass Distress Paint to the pages. I spritzed the paint with water and then moved the book around to allow the paint to run and create a dripped effect. I then heat dried the paint and added some tissue tape across the centre of the pages as a base for me to work on (it doesn't matter which design of tissue tape you use, as they are all gorgeous and will work equally as well) and also added some to the left hand page, in the top corner. Next, I applied Texture Paste with a palette knife through the Gothic Layering Stencil, adding it to random areas of my page. 
Once the paste is dry, I then spritzed the layered and textured background with Stormy Sky and Tarnished Brass Distress Spray Stain.

I love the effect this gave me and the two colours of Distress combined created just the colours I wanted for a French shabby chic feel to my pages.

For the final layer of interest and texture, I mixed some micro beads and glass glitter into some Matte gel and applied them onto the background, together with some ripped pieces of cheesecloth before stamping the Paris postmark directly onto the paper.
Whilst the pages are thoroughly drying, I started to create the elements for the layers and began by distressing the edges of pocket cards and ephemera pieces. I then used some of the gorgeous deco paper, (not my regular paper!!!) and die cut a gorgeous glittery Eiffel Tower using Tim's die. 
At this point I also die cut the picture wheel from white card and painted it with Distress Paints to create a more vintage feel.

I layered all my elements onto the background and added the Eiffel Tower as the crowning glory.
I then attached a border Industrious sticker to the opposite page and used the stickers to create the word, Paris. 
Below that I then stamped the rest of the quote using Hero Arts stamps and added a couple of sprocket gears to the pages.

For the finishing touch I added some punched butterflies, punched from the Wallflower Vellum paper stash and I layered each butterfly to create the look of them fluttering before attaching them to the page.
Finally, I flicked watered down Gesso over the pages and set them aside to dry.
 
I really hope you've enjoyed how I created these pages and how I incorporated two papers that I don't used often enough but will definitely be revisiting again soon!
As always, if you need any further inspiration for this challenge, then you need look no further than our blog to see all the wonderful creations from all the very talented Design Team members and every week, one lucky random participant has the chance to win a $50 gift voucher from Simon Says Stamp. Good luck....


Thank you so much for all your visits today and hope you all have a great week ahead
See you again soon...love Emma xx

Products used:

Tim Holtz Dies: Picture Wheel, Eiffel Tower
Tim Holtz Stamps: Paris Postmark
Tim Holtz Punch: Butterfly
Distress Spray Stain: Stormy Sky, Tarnished Brass
Tim Holtz Layering Stencil: Gothic
Finnabair Art Ingredients: Silver Micro BeadsSoft Matte GelCopper Glass Glitter

Monday, 13 April 2015

In The Middle ~ Simon Says Stamp Monday Challenge

Hey everyone!

Hope you all had a fabulous weather and the sun shone where you are! Can you believe we're starting another brand new week? This year is absolutely flying by at lightning speed but the start of a new week means that we have a fun new challenge starting over on the Simon Says Stamp Monday Challenge Blog and this week is called ~ In The Middle!

If you're inspired by being "in the middle" then we would love to see what you create! Are you stuck in the middle of creative chaos? Will your focal point be in the middle of your project? Or will you journal about being in the middle of something? Whatever you decide, we hope you'll join us!!

For my project, I couldn't resist using those crazy birds from the Bird Crazy stamp set by Tim Holtz and of course, there's always one that will stand out in the middle of a crowd and look how this cutie has made sure she's the centre of attention!!!
So, here's what I did to create my card:

To begin with I created a kraft card blank, 21 x 15cm. I then used the Torn Notebook On The Edge die to create a decorative edge along the opening. Apply a small amount of Picket Fence Distress Paint around the edge.

Cut a piece of Resist Paper to size and ink with Squeezed Lemonade Distress Ink. Rip and tear the edges before matting it onto a piece of black card, followed by white card. Wrap a piece of Crinkle Ribbon, dyed with Cracked Pistachio Distress Stain around the centre of the card and secure at the back. Mount the layers of card onto the front of your card blank.
Next, I took a piece of watercolour card and cut it to size, approx 16 x 12cm. I then stamped the outer two birds directly onto my card using Archival Ink. To create the little group of birdies, I used the masking technique and for this, I used two Post-It notes and stamped the same two birds that I'd previously stamped onto the notes. Cut out each of the Post It note bird and then layer them over the top of the images stamped onto your watercolour card. Now take your third bird stamp and ink up with Archival Ink and stamp this bird into the middle of the group. Remove the masks but keep them for later, and you will now see that the middle bird is in the centre of the group but behind the other two, giving perspective to the image. At this point I stamped this image onto a third postage note and then cut this bird out.

I watercolored the image using Distress Marker Pens, blending the colours with a water brush to give shading and definition to the image. When all your artwork is completely dry, place all three masks over the top of the stamped images and then place the Rays Layering Stencil over the top of the watercolour card. Using a combination of Mustard Seed and Squeezed Lemonade Distress Ink, blend the inks through the stencil to create a background. Remove the stencil and then ink the edges of the card with Pumice Stone Distress Ink before drawing a line around the edge with a black Fude Ball. 
To complete the image, I needed something to make this bird stand out and for that, I used the hat from the Simon Says Stamp Make A Splash stamp and die set and simply stamped the hat onto a further piece of watercolour card, coloured it in with Distress Marker Pens and die cut the image before popping it into pride of place!
Matt the stamped image onto your covered card blank.

For the wording, I used the Hero Arts Alphabet stamps to stamp out each individual letter onto white card, to create the message. I then cut the wording up into separate words, inked around the edges of each piece and attached them to my card.
Cut and dye a further piece of crinkle ribbon using Cracked Pistachio Distress Stain and tie the ribbon into a scruffy bow. Attach the bow on the right hand side of the card.

Apply some Picket Fence Distress Paint to the back of a Monocle and before the paint has completely dried and using a dry cloth, buff away a small amount of the paint. Add a Remnant Rub to the front and then attach with a pin to your bow. Finally add a Sprocket Gear to the centre of the bow.
And that completes my Crazy Birds card.
I really hope you've enjoyed how this tutorial and that you love this card as much as I loved making it. Those birds never fail to make me giggle whenever I see them!

If you need any further inspiration for this challenge, then you need look no further than our blog to see all the wonderful creations from all the very talented Design Team members and every week, one lucky random participant has the chance to win a $50 gift voucher from Simon Says Stamp. Good luck....


Thank you so much for all your visits today and hope you all have a great week ahead
See you again soon...love Emma xx


Products used:

Tim Holtz Stamps: Bird Crazy
Simon Says Stamp Stamps: Make A Splash
Distress Paint: Picket Fence
Distress Stain: Cracked Pistachio
Layering Stencil: Rays

Monday, 30 March 2015

Easter Surprise ~ Pastels Simon Says Stamp Monday Challenge

Hello everyone!

Hope you've all had a wonderful weekend and yes, can you believe that another week has flown by and here we are at Monday again!?! But the great thing about Monday's is that it means the start of a brand new challenge over on the Simon Says Stamp Monday Challenge blog and this week it's all about PASTELS!

From soft shabby chic colours to white washing with gesso, or maybe you might be inspired by Easter to even using actual pastels ~ whatever you choose, we challenge you to be inspired by the softer side of the colour wheel!

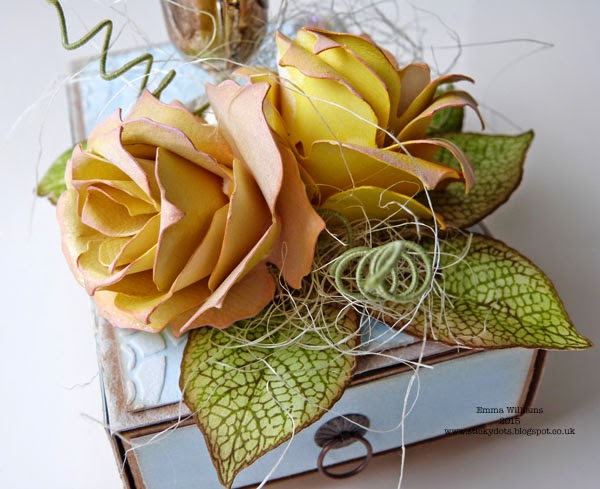
My project for this week was inspired by Easter and of course, no Easter table would be complete without a handmade decoration to adorn each place setting!! So, I created a small matchbox style box which I filled with Easter Eggs ready for the celebrations.
To begin with, I made my 12 x 8cm matchbox from kraft card. To be honest, any shape or style of box will be perfect for this project and if you don't want to spend time making your own matchbox, then why not use an empty, discarded matchbox or there are various dies on the market which create similar style boxes, including the Tim Holtz Matchbox Die.

For the next stage, I cut pieces of Manila card that would fit the top and sides of my box and covered the card with a layer of Picket Fence Distress Paint. By adding a layer of white paint to the surface of the Manila card, it allows the true blue colour of the next layer to shine. Once the paint is completely dry apply a layer of Tumbled Glass Distress Paint, mixed with a little Picket Fence to give a perfect pastel blue colour. Heat dry the paint.

Place the Lace Layering Stencil over the top of the pieces of card and using a palette knife, apply Texture Paste through the stencil. Set aside to dry before inking the edges of the card with Frayed Burlap Distress Ink and then attaching each piece to your box.
Attach two ring fasteners to either side of the draw section and then line the inside of the drawer with white card.

To create the roses, I used the Jumbo Tattered Pinecone die to die cut two pieces of white card. I then coloured the card with Scattered Straw Distress Ink before adding a blush of Spun Sugar to the edges to create the look of a perfect rose. Make up the pinecone, (instructions are included in the die) and then shape the petals.
For the leaves, I applied some Mowed Lawn and Peeled Paint Distress Stain to my craft sheet, before swiping a piece of card through the ink to colour it. 
I then used Tim's Leaf Stamps from the Daydream stamp set and inked them with Wendy Vecchi's Leaf Green Archival Ink and stamped the leaves directly onto the coloured card. 
I cut out each individual leaf before inking the edges with Gathered Twigs Distress Ink. I then arranged and attached my leaves and roses to the top of the box, added some wire coils and some fibres.
For the final touch, I used one of the gorgeous Trophy Cups that I altered with Alcohol Ink before adding a Vial label to the front, complete with Remnant Rub. I added some dried moss into the top of the cup, die cut a piece of inked card using one of the dies from the Labels set and then stamped out the message using the Hero Arts Printer's Alphabet stamps. 
Attach the message to the cup with a memo pin, adding a small piece of Linen Ribbon and then attach to the top of your box.
I wanted to add some little legs to my box and searched everywhere to find some and in the end, I decided to use the small cork stoppers that come in the tops of the Corked Vials. I had some that I had taken out and hadn't used and these were ideal ~ you can just see them in the photo!
 
Finally, add a small crystal and all that's left to do is fill the box with yummy chocolate eggs....
...which completes my little Easter Egg box!
I really hope you've enjoyed how I created this project and if you need any further inspiration for this challenge, then you need look no further than our blog to see all the wonderful creations from all the very talented Design Team members and every week, one lucky random participant has the chance to win a $50 gift voucher from Simon Says Stamp. Good luck....


Thank you so much for all your visits today and hope you all have a great week ahead
See you again soon...love Emma xx


Products used:

Tim Holtz Stamps: Daydream
Distress Stain: Mowed Lawn, Peeled Paint
Distress Paint: Tumbled Glass, Picket Fence
Alcohol Ink: Gold Mixative, Pitch Black
Dried moss and fibres from a local florist

Monday, 15 September 2014

Rock The Technique ~ Simon Says Stamp Monday Challenge

Hello everyone...

...and welcome to a fun new challenge over on the Simon Says Stamp Monday Challenge Blog. This week, it's all about technique! We want you to ROCK THE TECHNIQUE and show us your stamping skills and whatever you choose, we can't wait to see the finished projects!

For my piece, I decided to make a pocket tag card and used the resist technique to create the background. I absolutely love this technique and combined with the Flower Loop stamp from Hero Arts, it just created the most wonderful backdrop to my embellishments.

...and this is how I made it!

To begin with, I took a piece of black card, 4.25" x 5.5". I inked up the Hero Arts Looped Flower with clear embossing ink and then stamped directly onto the card. Apply clear embossing powder over the top of the wet ink and heat emboss until it becomes molten and shiny.

I applied a coat of Peacock Feathers Distress Paint over the top of the embossed card, using a damp piece of kitchen towel to wipe away the paint from the embossed areas. I then added a second coat of paint, again wiping away the excess before adding a final thin layer of Picket Fence Distress Paint over the top.

Once the card was dry, I mounted it onto my pocket which I made from 2 pieces of kraft card stuck together and then, applied Tissue Tape around the edges.
I added some Tissue Tape and a Industrious Border strip across the front of the pocket and then used the Tattered Florals die to create some hand crafted die cut roses, using Squeezed Lemonade Distress Ink as my colour palette. I added the roses to my pocket, layering them over the top of a piece of Trellis Frameworks die, die cut from chipboard and painted with Distress Paints. For the leaves, I inked up some card using Peeled Paint and Shabby Shutters Distress Ink and then die cut the Tattered Leaves and Garden Greens foliage from the card. I then slightly crumpled the larger leaves before unfolding them and inking the edges. I attached these to my flower arrangement and added die cut chipboard twigs, painted with Gathered Twigs Distress Paint.
For the butterfly, I used the Mini Movers and Shapers die to die cut a piece of Grungepaper. I painted the Grungepaper with the same paints as I used on the background before adding a layer of Rock Candy Crackle Paint over the top. Once the crackles have appeared and the paint is dry, I applied some Picket Fence Distress Paint and let it seep into the crackles. I attached the butterfly to my pocket, placing a Game Spinner on the centre of it's body.

As a finishing touch I stamped the quote onto a piece of inked Manila card, distressed the edges before crumpling it up to give an aged look to the card. I attached this with a Memo Pin to my flower cluster.
For the tag, I used a Size 8 Manila tag and swooshed it through some Broken China and Peacock Feathers Distress Stains that I had applied to my craft sheet and then misted with water. I distressed the edges of the tag, before inking them with Walnut Stain Distress Ink and stamping one of my favourite Tim Holtz quote stamps directly onto the background with black Archival Ink. 
I used a Distress Marker to colour the shadow on the wording and added some Tissue Tape and a border strip, then mounted it onto kraft card and added a crinkle bow to the top, hand dyed using Squeezed Lemonade Distress Stain. 
You can now add the tag to the pocket for the hidden surprise and message of love....
 
I really hope you've enjoyed how I created this project and as always, if you're looking for some more great ideas and inspiration, then you need to look no further than the blog to see all the wonderful creations from my very talented Design Team members and every week, one lucky random participant has the chance to win a $50 gift voucher from Simon Says Stamp. Good luck....

Thank you so much for all your visits today!
See you again soon...love Emma xx


Products used:
Grungepaper


Powered By Blogger

Total Pageviews