Showing posts with label gilding flakes. Show all posts

Monday, 21 November 2022

Gold Rush

Hello friends and Happy Monday!

Hope you all had a great weekend and as we head into another week, it's time for the brand new Simon Says Stamp Monday Challenge to begin.

This week our theme is all about FUN WITH FOIL and all you have to do is create something that uses some kind of foiling ~ whether that is using hot foil plates or just adding metallic card, there's so much to choose from to make your projects shine and we would love to see them all!

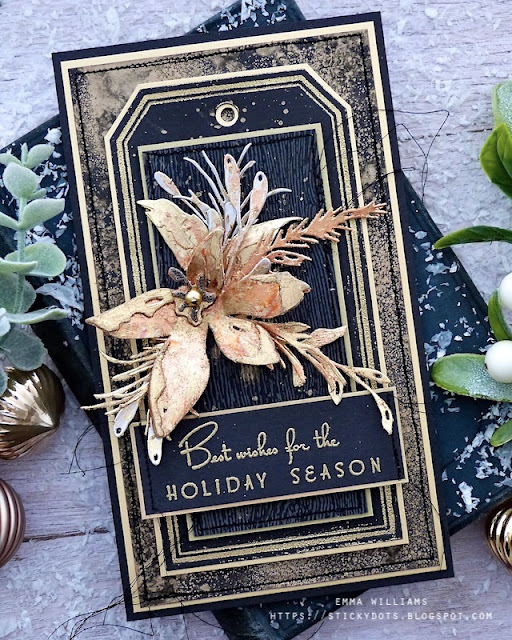
For my make, I chose to use Metallic Flakes from Prima Marketing and combined these with the gorgeous new poinsettia in the Sizzix Brushstroke 3 Thinlits Die Set by Tim Holtz to create a focal point for my 1920's Hollywood glamour inspired Christmas card.

So let's get started, and I hope you enjoy how I created this card...

To begin with I made a card blank to measure 11 x 19cm before adding my base layers and for these I cut a panel of black card, 10 x 18cm and spritzed the surface with Decayed Mica Spray before heat drying it thoroughly and adding a machine stitched border around the outside. I then mounted the panel onto a piece of gold brushed metal cardstock. I then mounted the panels onto my card blank.

TAG AND LAYERS

Now to start building up the layers for my card and the first layer is created using the largest sized die in the Framed Tags Thinlits Die Set by Tim Holtz.

This is such a clever concept and really does create a beautiful effect and apart from the die, all you need is a brayer, embossing ink and gold embossing to create the debossed double border that you can see around the edge of the tag.

...and the best thing about it, it's so simple to do!

I began by inking the brayer with Simon Says Stamp clear embossing ink and then gently rolled the brayer over the surface of the die with the cutting edge. Place a panel of black card over the inked die and then place into your die cutting plate sandwich and die cut your tag.

Carefully remove the die cut tag from the die and then sprinkle the inked debossed tag with gold embossing powder. Tap away the excess and then heat emboss until the powder become shiny and molten. Flick Decayed Mica Stain across the surface of the tag and allow to dry.

I matted the tag onto a further piece of brushed gold card before mounting it centrally, onto the front of my card blank.

For my next layer, I used a piece of Distress Woodgrain card, 6 x 12.5cm and machine stitch a border around the outside before mounting the panel onto pearl card.

Mount the panel onto the card front using foam pads.

SENTIMENT

I cut a panel of the black card, 8.5 x 3cm and I inked up the sentiment, "Best Wishes For The Holiday Season" from the Stampers Anonymous ChristmasTime 3 stamp set in clear embossing ink and stamped the sentiment onto the centre of the card panel.

I then sprinkled with gold embossing powder, tapping away the excess and heat embossed the powder until molten.

After machine stitching the sides of the panel, I matted it onto gold cardstock and then mounted the sentiment strip onto my card blank using foam pads.

BRUSHSTROKE FLOWER

To create the poinsettia arrangement, I began by cutting the flower. I added a layer of an adhesive sheet to the back of a panel of Mixed Media Heavystock card and cut the flower and it's layers, twice.

With my die cut pieces in front of me, I removed the backing sheets from each piece and applied Metallic Flakes over the surface of each of the die cut layers. Rub the excess flakes away, before removing any of the remaining flakes with a brush. I then assembled the flower by attaching and adhering all the tiny layers using Matte Collage Medium.

Once the flower is dry, I then ran my Gathered Twigs Crayon over the layers to give them shading and definition.

In the centre of the poinsettia, I added a gold Metallic Droplet.

For the foliage, I cut a selection of the pieces from gold and silver metallic kraft card.

I wanted to add the same flakes to these pieces but not add a complete coverage, so for this I used Prima Marketing Gilding Glue and roughly applied the glue with a brush to the surface of each piece of foliage.

The glue is ready to use once it's dry but tacky and at this point I applied the flakes, again rubbing away the excess and buffing any remaining flakes away from the surface.

I now have all my pieces ready, and just needed to arrange them onto my card just above the sentiment strip. I shaped and adhered each piece to add height and dimension.

In the centre of the poinsettia, I added a Metallic Droplet.

So that's my card finished and I hope you love this week's inspiration and the piece I've created.

As always, if you make anything, or if you've been inspired by anything that you've seen here on my blog ~ then please, let me know by tagging me on social media or leaving a comment here and I will be right over to take a look and if sometimes I miss it ~ just keep nudging me!

Don't forget that every week, one lucky random participant has the chance to win a $25 gift voucher from Simon Says Stamp and you can join in up to 5 times, which means you could have 5 chances to winYou have until next Monday at 8am Ohio time. 1pm UK time, 2 pm CET to join in and good luck....


Thank you so much for taking the time to stop by today ~ stay safe and keep well.
Love Emma xxx


Friday, 31 May 2013

Dream A Little Dream...

Hello everyone and happy Friday!!
Just a quick post to let you all know that there is a new challenge started over at the Sarah Hurley Challenge Blog and the theme for this month's challenge is:
ALL THAT GLITTERS IS GOLD

Now, I will admit I'm not a glittery person so this was a tough one for me but I thought and thought and finally decided on gold Cosmic Shimmer spray and gilding flakes and here's a little sneaky peek of what I made and if you click HERE you will be whisked over to the blog to see the tag in full. As always, I hope you like it!

The stamps I used are available HERE from Sarah's shop and I stamped the image onto watercolour card, then coloured it with Distress Marker Pens.

We would love for you to join in with our challenge and if you need some more inspiration, then just head over to Sarah's challenge blog to see all my lovely DT members little works of art!

Okey dokey time for me to go and see if Mr Mojo is visiting and I'll see you all again tomorrow with a Craftwork Cards share!! Thank you so much for stopping by today!
Bye for now and have a fabulous day...love Emma xxx


Sunday, 12 August 2012

Moonlight Serenade...

Happy Sunday!!

Hope you've all had a FAB weekend and, for those of you who have smiled, cried and screamed at the TV over the last fortnight, I hope you're now ready to sit down and watch tonight's closing ceremony of the Olympics!! I can't believe how fast it's gone but I think one thing is for sure...we can all be very proud of being British!! Team GB have been a credit to our little island...

In the meantime, I promised you some more Clarity shares from last weekend's show but yesterday, wasn't a great day here at Chez Williams' and I got slightly waylaid but to make up for it...I'm sharing two today and I really hope you like them!!
This card, is actually my favourite of the bunch...I wanted to create a Disney type feel to the card project and I just adore those little mice and that's why I chose to not put any embellishments onto this because...it was all about them!!!


When I started this one, I had the idea but really didn't think how long it would take me to hand paint all those doves...I was there for ages!! lol. But I think the overall effect was worth it....

Okey dokey, it's time for me to fly and get myself a position on the sofa, ready for tonight's big event!!

Fingers crossed, there will be no further dramas to keep my from popping back with my last Clarity share and I'll hopefully see you all tomorrow!
Bye for now...Love Emma xxx

P.S. BIG WAVE TO ALL MY NEW FOLLOWERS! THANK YOU...and looking forward to getting to know you all! x

Thursday, 28 April 2011

Keep Calm and Carry On

So, here we are at last...the eve of Kate and William's big day and London is buzzing with excitement about the Royal Wedding!! Will you all be watching? I can't wait to find out what Kate's dress looks like and which designer she chose to make it!! Regent Street and The Mall have the Union Jack flags flying high and it looks absolutely spectacular...this is why I love the city that I live in!! You can take London from the girl but you could never take the girl out of London...lol

And in honour of this Royal occasion, I thought it would be fitting to make a card to celebrate the big day...Kate, this one's for you, just in case you're looking!! hehe... I think the message probably says it all! :)

I really love the shabby chic look incorporating the Union Jack, that is popular in interior design at the moment and thought with this card, it would be nice to recreate that look but with papers, etc...hope you like what I made?


What Did I Use?
Keep Calm and Carry On Stamp: Kirsty Wiseman stamped onto Bazzill Card and embossed
Embossed Dots/Union Jack Backing Card: Kanban
UTEE melted in the Melt Pot and embossed with a Prince of Wales feather stamp
Vintage Ribbon: Creative Expressions (dyed using Brushed Corduroy Distress Ink)
Heart chipboard shape which I covered with gilding flakes
Flowers: Die cut using Tim's Tattered Florals Alterations Die & sprayed with Rich Gold Cosmic Shimmer
Tim Holtz Tissue Tape
and last but not least...the piece de resistance...
A very special button, fit for a King or Queen that I've been saving for a special occasion in my crafty stash and attached to the vintage ribbon bow!

Whatever you might be doing tomorrow, I hope you all have a fabulous time and enjoy the day.
Thanks for stopping by to look at what I make and for all your lovely comments.
See you on Saturday!
Love Emma
xxx


Powered By Blogger

Total Pageviews