Hello friends and Happy Monday!
Hope you all had a great weekend and as we head into another week, it's time for the brand new Simon Says Stamp Monday Challenge to begin.
This week our theme is all about FUN WITH FOIL and all you have to do is create something that uses some kind of foiling ~ whether that is using hot foil plates or just adding metallic card, there's so much to choose from to make your projects shine and we would love to see them all!
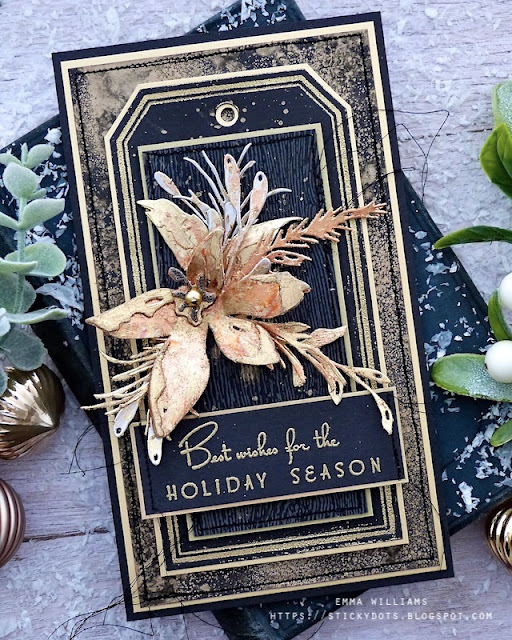
For my make, I chose to use Metallic Flakes from Prima Marketing and combined these with the gorgeous new poinsettia in the Sizzix Brushstroke 3 Thinlits Die Set by Tim Holtz to create a focal point for my 1920's Hollywood glamour inspired Christmas card.
TAG AND LAYERS
Now to start building up the layers for my card and the first layer is created using the largest sized die in the Framed Tags Thinlits Die Set by Tim Holtz.
This is such a clever concept and really does create a beautiful effect and apart from the die, all you need is a brayer, embossing ink and gold embossing to create the debossed double border that you can see around the edge of the tag.
...and the best thing about it, it's so simple to do!
I began by inking the brayer with Simon Says Stamp clear embossing ink and then gently rolled the brayer over the surface of the die with the cutting edge. Place a panel of black card over the inked die and then place into your die cutting plate sandwich and die cut your tag.
Carefully remove the die cut tag from the die and then sprinkle the inked debossed tag with gold embossing powder. Tap away the excess and then heat emboss until the powder become shiny and molten. Flick Decayed Mica Stain across the surface of the tag and allow to dry.
I matted the tag onto a further piece of brushed gold card before mounting it centrally, onto the front of my card blank.
For my next layer, I used a piece of Distress Woodgrain card, 6 x 12.5cm and machine stitch a border around the outside before mounting the panel onto pearl card.
Mount the panel onto the card front using foam pads.
SENTIMENT
I cut a panel of the black card, 8.5 x 3cm and I inked up the sentiment, "Best Wishes For The Holiday Season" from the Stampers Anonymous ChristmasTime 3 stamp set in clear embossing ink and stamped the sentiment onto the centre of the card panel.
I then sprinkled with gold embossing powder, tapping away the excess and heat embossed the powder until molten.
After machine stitching the sides of the panel, I matted it onto gold cardstock and then mounted the sentiment strip onto my card blank using foam pads.
BRUSHSTROKE FLOWER
To create the poinsettia arrangement, I began by cutting the flower. I added a layer of an adhesive sheet to the back of a panel of Mixed Media Heavystock card and cut the flower and it's layers, twice.
With my die cut pieces in front of me, I removed the backing sheets from each piece and applied Metallic Flakes over the surface of each of the die cut layers. Rub the excess flakes away, before removing any of the remaining flakes with a brush. I then assembled the flower by attaching and adhering all the tiny layers using Matte Collage Medium.
Once the flower is dry, I then ran my Gathered Twigs Crayon over the layers to give them shading and definition.
In the centre of the poinsettia, I added a gold Metallic Droplet.
For the foliage, I cut a selection of the pieces from gold and silver metallic kraft card.
I wanted to add the same flakes to these pieces but not add a complete coverage, so for this I used Prima Marketing Gilding Glue and roughly applied the glue with a brush to the surface of each piece of foliage.
The glue is ready to use once it's dry but tacky and at this point I applied the flakes, again rubbing away the excess and buffing any remaining flakes away from the surface.
I now have all my pieces ready, and just needed to arrange them onto my card just above the sentiment strip. I shaped and adhered each piece to add height and dimension.
In the centre of the poinsettia, I added a Metallic Droplet.
So that's my card finished and I hope you love this week's inspiration and the piece I've created.
As always, if you make anything, or if you've been inspired by anything that you've seen here on my blog ~ then please, let me know by tagging me on social media or leaving a comment here and I will be right over to take a look and if sometimes I miss it ~ just keep nudging me!
Don't forget that every week, one lucky random participant has the chance to win a $25 gift voucher from Simon Says Stamp and you can join in up to 5 times, which means you could have 5 chances to win. You have until next Monday at 8am Ohio time. 1pm UK time, 2 pm CET to join in and good luck....
Recipe for project:


Absolutely gorgeous!
ReplyDeleteJust so elegant!
ReplyDeleteFabulously elegant design! This must be truly stunning in person with all of the shine you added to all of the details! Thank you so much for sharing and inspiring!
ReplyDelete