Showing posts with label etcetera tag. Show all posts

Monday, 1 September 2025

Countdown to Autumn...

Hello everyone and HAPPY STAMPtember...

As we celebrate the start of this exciting month, it's time for a brand new Simon Says Stamp Monday Challenge and this week we are showcasing the wonderful products of our very own Simon Says Stamp brand and the theme is called STAMP IT! So, however you choose to use stamps, we can't wait to see what you create and hope you'll join us and play along!

For my make, I started the countdown for my favourite time of year ~ AUTUMN and I chose to use Tim Holtz's Nature's Wonder stamp set together with the Simon Says Stamp co-ordinating die set. I love that these dies cut the images perfectly and there's no more fussy cutting which is definitely something to celebrate!

So, let's get started because it's time to share how I created my tag...

To begin with I used two Etcetera Tags which I layered ~ the Mini Etcetera Tag and the Size 8 Etcetera Tag.

CREATING THE BACKGROUNDS

I started with the larger tag, and began by applying Design Tape around each of the four edges. I then cut  a piece of decorative paper from the Halloween Backdrops pack and added rips and tears to the edges. I machine stitched a border and then adhered the paper to the tag with Matte Collage Medium, adding more tears and curling the corners to create a gnarly, vintage feel to the piece.

After applying a coat of Collage Medium to the surface of the paper, I then took my Walnut Stain Distress Crayon and used this to add colour to the rips and tears. I also added a small Cello Sticker Tape to the edge on the right hand side of the tag.

Moving on to the smaller, Size 8 tag I created my own background. For this I used a Size 8 Mixed Media Heavystock tag and the Numeric Mini Layering Stencil. I placed the stencil so the numbers would be in the centre of the tag and then applied Translucent Grit Paste through the stencil.

Remove the stencil and whilst the paste is still wet, I sprinkled Pumice Stone Distress Glaze over the top, tapping away the excess and then setting it to one side to dry.

Once the paste is touch dry, (or near enough) I then heat embossed the glaze until molten and created a faux enamel effect. Remember to not settle on one area for too long as you only want to melt the glaze and not create bubbles in the paste.

To add colour to the tag, I used a combination of Distress Spray Stains and Oxide Sprays:

Distress Spray: Black Soot, Frayed Burlap, Speckled Egg, Antique Linen

Oxide Spray: Speckled Egg

After misting the tag with water, I layered the sprays until I was happy and then allowed the tag to dry. The stencilled area will resist the colour, and if there is any residual ink, just wipe it away once the tag is dry.

To complete this, I machine stitched a border and then attached it to my Etcetera Tag with Collage Medium, before mounting this tag onto the centre of the larger tag, again using the medium to adhere it.

I added some flicks of Antique Linen 

LEAVES

Now to create the leaves for this piece and create those beautiful colours of Autumn.

As mentioned, I used Tim's Nature's Wonder stamp set by Stampers Anonymous and the co-ordinating die set by SSS.

I stamped each of my leaves onto watercolour card using Black Soot Archival Ink and then watercolored them with a selection of Distress Watercolour Pencils in Aged Mahogany, Crushed Olive, Peeled Paint, Crackling Campfire, Carved Pumpkin.

Once happy, I then used the co-ordinating dies to die cut each of the stamped leaves and then inked the edges with Walnut Stain Distress Ink. I used a total of 8 leaves for this make and shaped each of themes that this will create dimension on the finished piece.

PHOTO BOOTH IMAGE

With the leaves ready, I colour tinted the PhotoBooth image using Distress Crayons and a water brush. I chose this particular photo as I wanted someone wearing a coat and smiling ~ someone who looks as if they're embracing the season. I also wanted to keep the colours that I used to colour tint, quite warm, so chose similar colours to the ones I used on the leaves and added a blue background.

I added some rips and tiny tears to the edges of the photo, and then attached a piece of idea-ology Cello Sticker Tape to the left hand side before machine stitching some detail onto the photo.

I attached the photo to a piece of felt that I cut with Pinking Shears from my own stash, and then mounted the felt onto a piece of mountboard. The mount board will create a stable base once the photo is stuck into place.

To complete the photo, I added the Oct 18 remnant rub from the Labeled set.

LAYERING THE LEAVES AND MOUNTING THE PHOTO

It's now time to create the focal point to this piece and I attached the photo into position with foam pads. I then arranged the leaves to cascade across the tag, by placing these on either side of the image. 

I then tucked in some pieces of Spanish Moss, that I have in my stash but can be found in floristry departments. The moss creates more interest and texture to this arrangement which I love.

FINISHING DETAILS

We're nearly there and all that's left is those tiny details that add so much more to a piece than you think.

Firstly, I clipped a Large Hinge Clip to the top. This clip was painted with a combination of the Lumberjack Plaid Distress Paint, Antiqued Bronze and Black Soot for a beautiful vintage finish. 

I added the 'Merchandise" ephemera piece which is taken from the Field Notes Snippets pack and attached this just below the Hinge Clip. I also attached a Machinery Head to cover the hole in the top of the smaller tag. I painted this piece with Lumberjack Plaid Distress paint for a chippy vintage look.

Beneath the photo arrangement, I added a Theories Quote Chip, "Focus On The Good". I sanded the edges of the chip and then inked them with Walnut Stain Distress Ink before attaching it to my tag. On either side of the chip, I placed a Large Fastener. To add the dents and "dings" to the surface of the fastener, I used the Texture Hammer.

So, that's my make finished for this week and I hope you love the story behind this piece and all the tricks and techniques I've used to create the project.

As always, if you make anything, or if you've been inspired by anything that you've seen here on my blog ~ then please, let me know by tagging me on social media or leaving a comment here and I will be right over to take a look!

Don't forget that every week, one lucky random participant has the chance to win a $25 gift voucher from Simon Says Stamp and you can join in up to 5 times, which means you could have 5 chances to winYou have until next Monday at 8am Ohio time. 1pm UK time, 2 pm CET to join in and good luck....


Thank you so much for taking the time to stop by today!
Love Emma xxx

Monday, 21 July 2025

It's a Kind of Magic....

Hello everyone...

As we begin the new week, it's time for a brand new Simon Says Stamp Monday challenge and this week,  we are challenging you to MAKE YOUR OWN BACKGROUND!

So, with so many different ways of doing this, and whether you use inks, sprays, pastes or paints, you will be spoilt for choice and we can't wait to see how you will interpret this fun challenge theme.

For my background I chose to use Distress Spray Stains and Oxide Sprays, together with stamps and I just had so much fun building up those layers to create interest and texture ready for the focal point of those beautiful butterflies.

So, let's get started because it's time to share how I created my background...

For this make, I used a combination of Tim Holtz products and chose an idea-ology clipboard, a Size 8 Etcetera Tag and a size 8 Mixed Media Heavystock tag as my substrates.

BACKGROUNDS

The background on the tag and the clipboard are both created using the same colours of sprays, oxide sprays and inks. I chose the following:

DISTRESS SPRAY STAINS: Iced Spruce, Old Paper, Speckled Egg. Gathered Twigs

OXIDE SPRAYS: Old Paper

DISTRESS INKS: Uncharted Mariner, Scorched Timber

I began by cutting a panel of Mixed Media Heavystock card, and also used a size 8 Mixed Media Heavystock tag. I misted each of these surfaces with water and then started to apply my sprays, using the Distress Spray Stains first and only applying a light touch of Gathered Twigs, and then some light flicks of Old Paper Oxide. I applied a little more water to blend the colours and then allowed these to dry. You can also use a heat tool to dry the inks.

Once my surfaces were dry, I inked around the edges with Scorched Timber Distress Ink.

To add some more interest to my background, I used Black Soot Archival Ink to ink up the script stamp from the Stampers Anonymous Tiny Toadstools stamp set and added the script randomly onto my card panel and tag.

Set the panel to one side and taking the tag, I added some more stamping down the right hand side. I used one of the stamps from the SA Faded Type stamp set and inked this with clear ink, before applying gold embossing powder over the top. Tap away the excess and then heat emboss until molten.

Finally, I used Tim's Splatter Brush to add some white paint speckles and machine stitched a border around each piece to complete the backgrounds.

CLIPBOARD

We're now ready to start constructing this piece and to begin with I worked on the clipboard and after unscrewing the clip, I attached the inked card panel to the board using Matte Collage Medium.

I then stamped the Factory No.1896 down the left hand side of the board. This stamp is from the Eccentric stamp set.

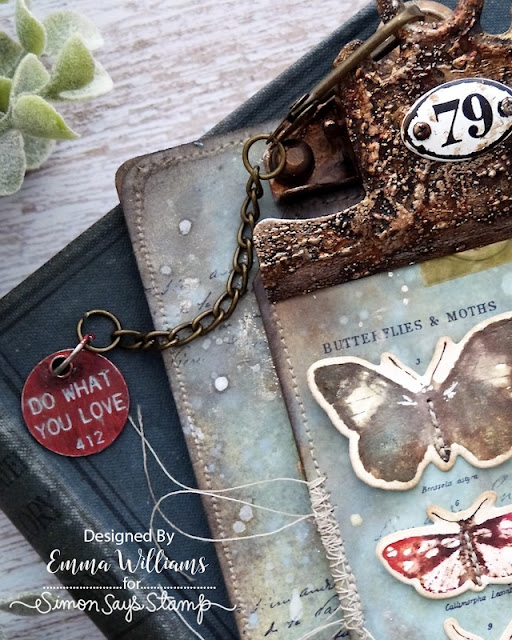
Taking the clip, I wanted to this to have a rusty, crusty appearance which is so easy to achieve and you can see a tutorial on how I do this by clicking HERE.

To alter this clip, I used exactly the same process as I used in my earlier post, but I omitted the Salvaged Patina Paint on this particular piece.

Once the clip was ready, I reattached it to my board and then attached the Mini Plaquette, No.79 to the centre of the clip.

TAG

Moving onto the tag, and to begin with I stamped the butterflies from the Papillon stamp set down the left hand side of the tag. This stamp set now has co-ordinating dies from Simon Says Stamp, so no more fussy cutting when we move onto the next step.

BUTTERFLIES

To create the butterflies, I re-stamped the image onto watercolour card using the brand new Mini Oxide Ink Pads and my stamp platform.

I inked the stamps directly with various colours from this release, including Crackling Campfire, Barn Door, Peacock Feathers, Bundled Sage, Scorched Timber, and Gathered Twigs. I personally find it easier to do one butterfly at time. I then lightly misted water over the inked stamps before stamping them onto the card.

If you feel you need more colour, then re-position your card on the platform and just go in with the ink pad.

Once I was happy with my butterflies, I used the Simon Says Stamp co-ordinating die set to die cut each one from the card.

I inked the edges of the die cuts with Frayed Burlap Distress Ink and then attached them to the tag, lifting the wings and not attaching these. I placed each image over the top of the previously stamped image on my tag, and this ensures I get the correct placement and also you can see the text from the stamp.

Before I attached my tag to the Etcetera Tag, I stitched the bodies of the butterflies to the tag.

With my tag complete, I attached it to the clipboard using Matte Collage Medium.

To complete the tag, I added a Curator Ephemera piece in the top right hand corner.

I also added a Quote Chip, 'A Little Magic Can Take You A Long Way", and once again, I placed a Cello Sticker tape over the chip.

Finally I added an Adornment Star and two hardware heads, all of which I painted with gold acrylic paint.

DETAILS

It's now time for all those tiny finishing details and I began by adding a Numbers Snippet to the right hand side of the clipboard, tucking it underneath the tag, and once again, I added a Cello Sticker Tape.

Finally, I attached a Swivel Clasp to the clip and from the chain, I hung an idea-ology Thought Token which I painted with Candied Apple Distress Paint. Once dry, I then scribbled Phantom Mist Distress Crayon over the token and wiped away the excess to reveal the wording.

So, that's my make complete and I hope you've loved the piece I've created and feel inspired by the techniques.

As always, if you make anything, or if you've been inspired by anything that you've seen here on my blog ~ then please, let me know by tagging me on social media or leaving a comment here and I will be right over to take a look!

Don't forget that every week, one lucky random participant has the chance to win a $25 gift voucher from Simon Says Stamp and you can join in up to 5 times, which means you could have 5 chances to winYou have until next Monday at 8am Ohio time. 1pm UK time, 2 pm CET to join in and good luck....


Thank you so much for taking the time to stop by today!
Love Emma xxx

Monday, 28 April 2025

We'll Meet Again....

Hello friends...

As we begin a new week, it's time for the next Simon Says Stamp Monday Challenge and this week, our theme is called WHATEVER THE WEATHER!

Now, I always like to try and think outside the box and for this project you might be thinking, 'what's that got to do with weather"? Well, the story behind this piece is all about a street party, and here in the UK, us Brits have always celebrated big occasions, such as a Royal Weddings, a Jubilee or a Coronation with a street party and 'whatever the weather', come rain or come shine, these parties always go ahead. But maybe the biggest street party in history was the celebration of victory in Europe in 1945 and with this in mind, and with the 80th Anniversary of VE Day on the 8th May, I chose to create a project celebrating this special occasion and hope you love the piece I've made using products from Tim Holtz.

So, whatever the weather, let's get started and here's how I created this tag!

PREPPING THE TAG

I used a Mini Etcetera Tag as my base and began by covering the edges with Tim Holtz Design Tape. The one that I used is an older design that I had in my stash, but you can use any available design for this purpose. 


I then cut a panel of paper from the Correspondence Paper Stash to fit the front of my panel, leaving a narrow border of the tape showing around the outside. You will notice that there is a different design at the bottom and this is because I cut the paper into two pieces, and the blue design is the reverse side of the Union Jack section.

After ripping and tearing the edges of the paper, I machine stitched a border around the outside of both my panels, and then inked the edges with Walnut Stain Distress Ink before attaching the separate panels to my tag using Matte Collage Medium. It doesn't matter about the join of the two papers at this stage as we will be hiding that with Etcetera Trims.

In the top left and right hand corners, I attached Screwheads which I painted with LumberJack Plaid Distress Paint.

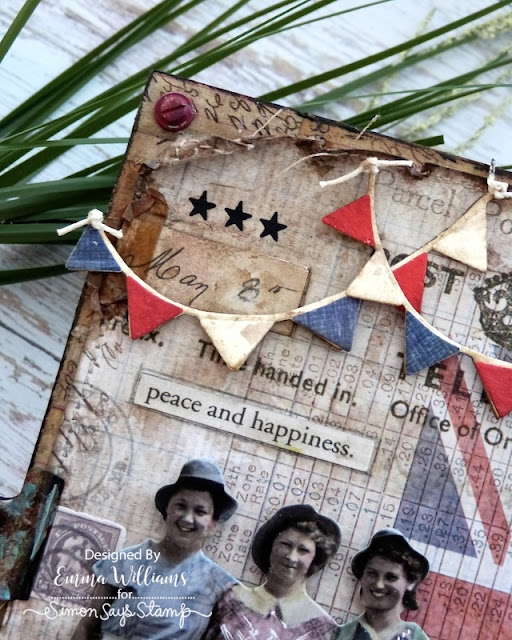
To complete the background, I used one of the Numbers Snippets which I attache to the top left hand corner. The date on this piece is actually May 12th but I snipped the year off and then altered the date to the 8th, so it would be the correct date. I adhered this into place with Matte Collage Medium, and added a Cello Sticker down the side.

Finally, I used the stars from the Labeled rub ons and placed these above the date.

...and I added some Black Soot Distress Paint splatters across the surface.

ETCETERA TRIMS

I used two of the medium lengths of Scalloped Trims, and using the matching dies that are available from Tim and Sizzix, I die cut and covered one side of each of these trims with some more of the papers from the Correspondence Stash.

Run the Walnut Stain Distress Crayon along the edge to make them appear more worn and shabby before attaching the trims to one another to form an 'L' shape which is going to become a ledge.

I then attached this ledge to my tag, hiding the join in the papers. With the ledge in place, I applied some Crackle Paste to the top section of the ledge, and also along the edge. Allow for this to dry before adding Pumice Stone Distress Crayon to accentuate the crackle. I always run the crayon over the surface and then use a baby wipe to blend it into the cracks.

I attached two Hardware Heads to either side of the ledge, and painted these with Lumberjack Plaid Distress Paint.

In the centre of the ledge, I placed an idea-ology Let's Celebrate Metallic Sticker.

SCENE

We're now ready to decorate the tag and we'll start with the scene.

For this I used a Paper Doll from the Poses set and I applied a coat of Clear Gesso to the surface. I allowed for this to dry before I used Distress Crayons to colour tint the image. I also added white highlights to the dresses to give a little more interest.

I mounted the Paper Doll onto the left hand side of my tag, using foam pads to add some dimension.

Now for the fun part and colouring those Red, White and Blue baubles. After selecting various sizes of the Baubles, I used the following Alcohol Inks to add colour; Denim, Red Pepper and Mushroom.

I placed the baubles in a small zip lock bag, or you can use a plastic container, and add a few drops of the alcohol ink. I then seal the bag and give them a shake to cover the baubles with ink. After I'd emptied them out onto a paper towel, I allowed them to dry before I attached them to my project using Glossy Accents and placing them along the length of the ledge.

I then added some moss clusters in between and some dried grasses from my stash.

Just above these ladies heads, I added a Clippings Sticker, "peace and happiness", and to their left, I attached an ephemera piece, a stamp from Field Notes Snippets.

1945 and VE DAY

For the year 1945, I used the Alphanumeric Label Die Set. This is from my stash, and is sadly unavailable at SSS but I'm sure most TH addicts probably have it their stash. I cut each number 3 times from gold metallic card, and layered them up and then cut a further layer from black Kraft card and attached the gold numbers to the black layer to create a drop shadow,

I attached the numbers down the centre of the Union Jack.

Underneath the ledge, I cut the words VE DAY using the Bold Alphanumeric Die Set. Once again I cut three layers from gold metallic Kraft card, followed by a fourth layer from black Kraft card. After attaching these letters to my tray, placing them underneath the ledge, I altered them with Distress Paints for more of a worn, vintage look to the lettering. I used Crackling Campfire and Black Soot, with a hint of Antiqued Bronze.

BUNTING

The bunting die is part of the Bunny Games Die Set, and I just cut this three times, once from Mixed Media Heavystock inked with Antique Linen, once from card stock inked with Candied Apple, and a third time from card stock inked with Faded Jeans. I repeated to make a second strip of bunting before I assembled each piece by adding the little flags to the solid die cut section. After inking the the edges of each die cut, I placed these across the top of the tag.

To complete the bunting, I tied pieces of string into tiny knots, and placed these on each end of the bunting rope.

DETAILS

We're nearly there and all that's left is the finishing touches...

I altered a Hinge Clip with Black Soot, Antiqued Bronze and Salvaged Patina Distress Paint and clipped this to the left hand side of the tag. I then attached some chain from my stash, and hung a Word Tag from the end.

I painted the "Hope' word tag with more of the Lumberjack Plaid paint before accentuating the letters using some gilding wax from my stash.

...and that's my make for this week complete and I hope you love this piece and the inspiration behind it!

As always, if you make anything, or if you've been inspired by anything that you've seen here on my blog ~ then please, let me know by tagging me on social media or leaving a comment here and I will be right over to take a look!

Don't forget that every week, one lucky random participant has the chance to win a $25 gift voucher from Simon Says Stamp and you can join in up to 5 times, which means you could have 5 chances to winYou have until next Monday at 8am Ohio time. 1pm UK time, 2 pm CET to join in and good luck....


Thank you so much for taking the time to stop by today...
Love Emma xxx

Recipe for project:

Tim Holtz/Stampers Anonymous: Size 8 Etcetera Tag, Scalloped Etcetera Trims
Sizzix: Alphanumeric Label Die Set, Bold Alphanumeric, Bunny Games
Distress Paint: Black Soot, Salvaged Patina, Crackling Campfire, Antiqued Bronze, Lumberjack Plaid
Distress Ink: Walnut Stain, Antique Linen
Alcohol Inks: Mushroom, Red Pepper, Denim
Distress Spray Stains: Faded Jeans, Candied Apple
Mediums: Matte Collage MediumFoam Pads, Glossy Accents
White Fine Line Pen

Moss, dried flowers and chain from my stash

****These are not affiliate links****
Powered By Blogger

Total Pageviews