Showing posts with label Tim Holtz Halloween 2022. Show all posts

Monday, 17 October 2022

Someone's Watching Me....

Hello everyone and Happy Monday...

This week's brand new Simon Says Stamp Monday Challenge is all about one of my favourite times of the year ~ Halloween and we want you to create a project inspired by this spooktacular event.

Now as regular friends and followers of this blog already know, I've been in Halloween making mode since June and as we now count down the final days, I have two more projects to share and this is the first of them!

I thought for this week's make it would be fun to create a menu for those Halloween parties and get togethers because, let's face it...after two years of lockdowns and celebrating in bubbles, it's time to break open those elixir bottles and celebrate in style. So with this in mind, I chose to go back into Tim Holtz's vault and use the Sizzix Halloween Vault die to create my project for this week and of course, no Halloween scene is complete without a big moon in the background ~ I hope you love it!

Let's get started, it's time for some tricks and treats...

To begin with I used a 14.5 x 19cm black card blank, matted with a panel of black card that I spritzed with Iron Gate Mica Spray Stain. This just added a shimmer to the card, which I thought looked perfect behind the scene that I'm about to create.

CARD BACKGROUND and MOON

I'm continually asked about how I create the moons on the backgrounds of my cards and so for all those, who have been requesting it, this one's for you!

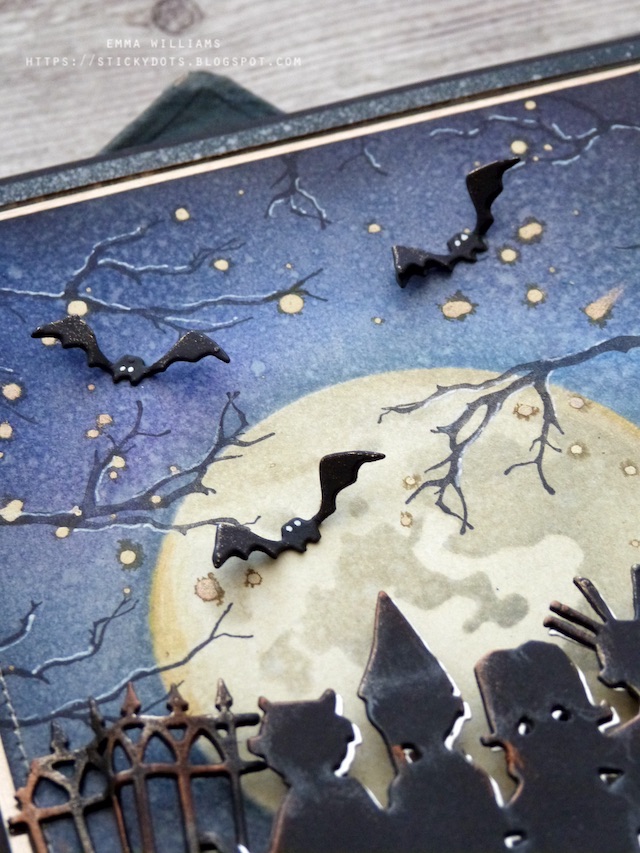
We begin by cutting a panel of Heavystock Mixed Media card, 12 x 16.5cm and placing the middle sized solid moon mask onto the centre of the card.

I then took the following Distress Inks; Prize Ribbon, Villainous Potion, Black Soot (you can choose any colour you want, it's entirely up to you) and using a blending tool, I blended the blue and purple inks, one by one, over the card surface. After removing the mask, I then spritzed a light misting of water over the top and heat dried the inky background, before I blended Black Soot ink around the edges of the card panel.

Now to create that big moon that's sitting in the centre of the card and using the corresponding moon mask, I inked the details using Hickory Smoke Distress Ink and a blending brush.

I then inked over the top of the moon with Antique Linen Distress Ink to add a glow.

For the branches, I used the stamp from the Mr Bones stamp set, and stamped these in Black Soot Archival ink, twisting the stamp around and stamping them so they come in from the edges.

I then accented them with a white gel pen before flicking Decayed Mica Stain across the surface of the background panel.

We now have the scene ready and after machine stitching a border around the outside, I matted it onto champagne coloured metallic kraft card, followed by black kraft stash card, both sanded around the edges, and then mounted the layers onto my card blank.

DIE CUTS

Moving onto the die cutting and for this, I used the Halloween 2021 Vault Die set. This set features some older dies, that were bought back in a slightly smaller size. I used three dies from this set, the Trick or Treaters, the gates and the bats and cut them all, twice from black card stock.

I layered the die cut pieces together to create thicker, more substantial die cuts and then taking the trick or treaters die cut, I wanted to add a deliberate outline and drop shadow behind this die cut by die cutting a further layer from silver metallic kraft card.

To add detail to this die cut, I took the Picket Fence Watercolour pencil and just shaded the shadowy areas. I then added a small amount of Mined Foundry Wax to the edges.
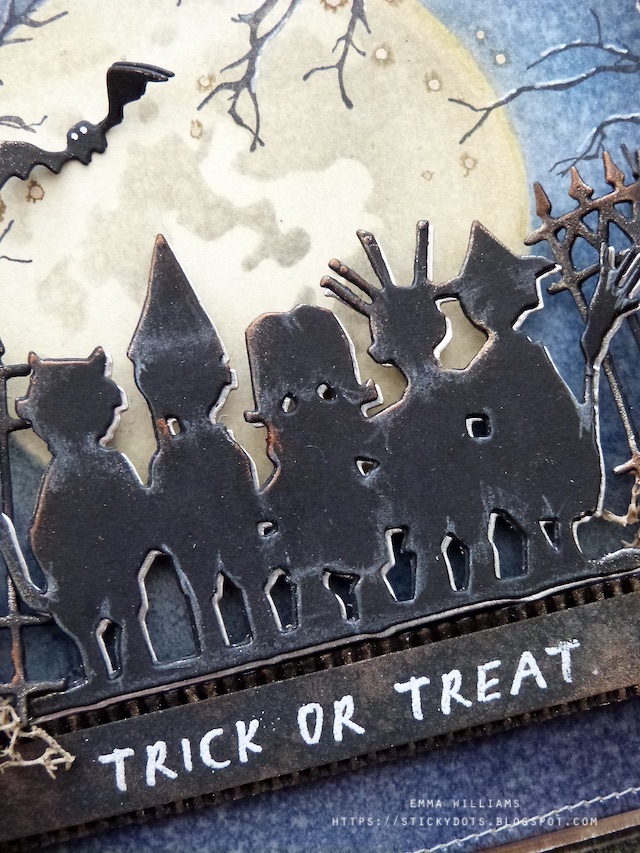
For the fence, once again I adhered the two die cut layers over the top of one another to create a thick die cut. I blended some Mined and Sterling Foundry Wax over the die cut itself and heat set the wax before bending and crumpling the die cut, to make the fence appear all twisted and broken down.

I attached the fence to either side of my card, placing glue on the flat part, allowing the bent areas to have more dimension and stick up.

I then attached my trick or treaters into place using two depths of foam pads to add even more height.

Around the scene, I added some flying bats that I'd cut from the black card and edged with Foundry Wax before adhering them onto my night sky and adding the white pen work.
SENTIMENT

To create a solid grounding for the die cuts, I used the sentiment and for this I cut a strip of black card, and once again, I spritzed it with Iron Gate Mica Stain. Heat dry the ink and then using Versamark Embossing Ink Pad, ink up the "Trick Or Treat" stamp from the Unravelled stamp set and stamp the sentiment in the centre of the strip. Sprinkle white embossing powder over the top, and heat emboss.

I mounted the strip onto a scrap of corrugated card, that I painted with Black Soot Distress Paint and then once dry, applied a smear of Foundry Wax over the surface to accentuate the corrugation.

I wrapped some cotton thread around either side of the strip and then mounted it underneath the die cut scene using foam pads.

To complete the strip, I attached two Hardware Heads which I 'rusted up' with a little Crackling Campfire and Black Soot Distress Paint.

FINAL DETAILS

Finally, I added some clumps of moss around the base of the fence...

...and on the side of my card, I attached a flash card from the Halloween Ephemera pack that I inked with Hickory Smoke Distress Ink.

All that's left to do is add the menu to the back and for this, I typed it and then printed it out onto some handmade paper before attaching it to my make.

So, that's it from me for this week and I have one final Halloween make that I'll be sharing with you all before the big day, so keep watching ~ because something wicked this way comes!

As always, if you make anything, or if you've been inspired by anything that you've seen here on my blog ~ then please, let me know by tagging me on social media or leaving a comment here and I will be right over to take a look and if sometimes I miss it ~ just keep nudging me!

Don't forget that every week, one lucky random participant has the chance to win a $25 gift voucher from Simon Says Stamp and you can join in up to 5 times, which means you could have 5 chances to winYou have until next Monday at 8am Ohio time. 1pm UK time, 2 pm CET to join in and good luck....


Thank you so much for taking the time to stop by today ~ stay safe and keep well.
Love Emma xxx

Monday, 12 September 2022

Toil & Trouble ~ the friendly ghosts!

Hello friends...

Well this time last week, I don't think any of us could imagine what lay ahead and what was to happen in the days that followed! It's been such an emotional time here in the UK, and things have happened very quickly, but as we mourn the loss our beloved Queen Elizabeth II and welcomed King Charles III to the throne, together with the new Prince and Princess of Wales, we have also been remembering our late Queen and all she did for our nation and around the world! We will miss you Ma'am, you were a Princess, a Queen and most of all an icon and you were loved by so many ~ may you rest in peace with your beloved Phillip.

***************

❤️


So, as we start this momentous new week, we begin with the brand new Simon Says Stamp Monday Challenge and this week, our theme is all about DIE CUTTING. There are so many companies that have a plethora of dies, so you'll definitely be spoilt for choice and all you need to decide is what you'll be making with them and hope you'll join us and play along.

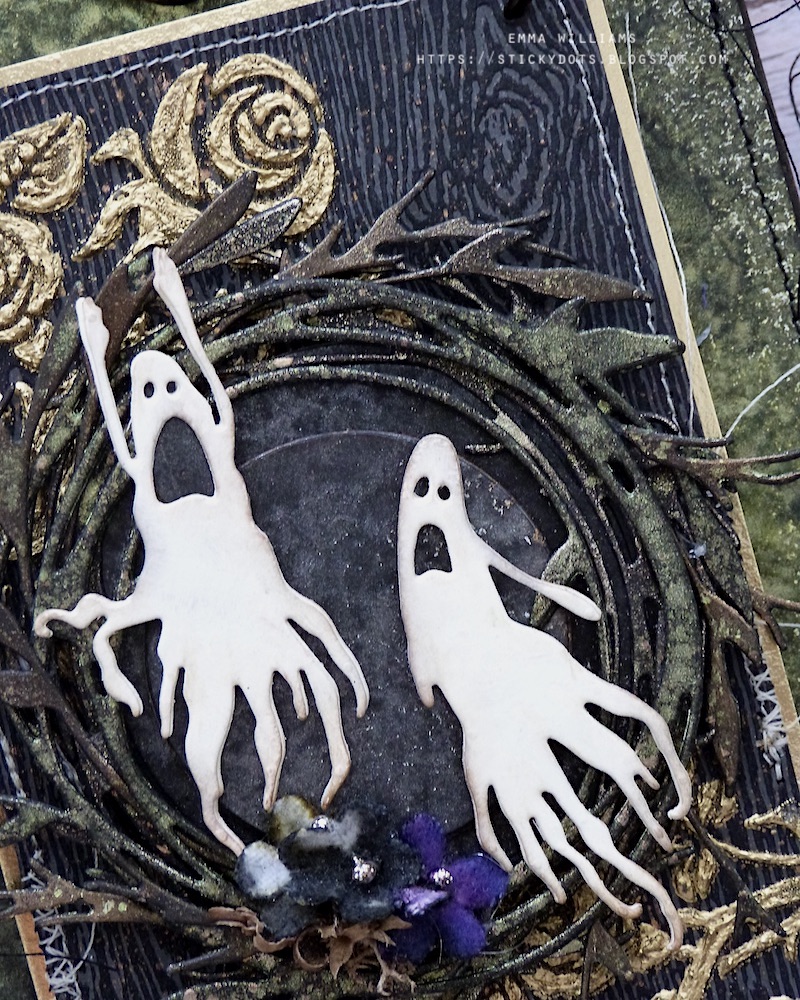
For my make, I chose to create a tag and I made this piece all about the two friendly mischievous ghosts ~ Toil and Trouble, and used the characters from Tim Holtz's Halloween Vault Series 2021 combined with the my much loved and well used Funky Wreath die set.


So let's get started, it's time to get your spook on and say hello to Toil & Trouble...

We'll begin with the tag and for this I used a Mini Etcetera Tag and I covered this with a combination of paper from the Halloween Backdrop set and an inky background of my own.

TAG BACKGROUND

I covered the top section and bottom section of the tag with the crackle paper from the Backdrop pack before cutting a panel of Mixed Media Heavystock card which would fit across the central section of the tag.

To colour the card stock, I used a combination of Black Soot Distress Spray and Wicked Elixir from the Halloween Mica Stain 4 set. I gave the card a good spritz of the black before applying the green shimmer over the top, and misting the surface with water to blend the inks and create my background. Once I'd heat dried the card panel, I inked the edges with Walnut Stain Distress Ink and then machine stitched a border around the outside before I adhered this panel to my tag.

LAYERED PANEL

For the layered panel that sits in the centre of the tag, I cut a piece of the gorgeous Black Woodgrain cardstock and placed the card in front of me so I could work on that enamelled backdrop.

I placed the Thorned mini stencil design onto my card panel and used a palette knife to apply Translucent Grit Paste through the stencil. Working quickly, after removing the stencil, I sprinkled gold embossing powder over the top and set this panel to one side to dry and once that's happened, I then gently heat embossed the powder until it became molten and enamelled.

I flicked a few splatters of Decayed Mica Stain across the surface, then machine stitched a border around this panel and layered it onto gold kraft card. 

MUMMY CLOTH WRAP

Around the tag itself, I wrapped a length of mummy cloth, coloured with a spritz of Villainous Potion and Walnut Stain Distress Spray Stain and then dried. I then tied this around the tag, leaving the ends to hang down the right hand side.

I then mounted the embossed/enamelled layered panel onto the centre of my tag, using foam pads.

WREATH

For the wreath, I coloured some black cardstock with Decayed and Wicked Elixir Mica Stain. I cut all my pieces using all the dies in the set, and assembled these to form the layered wreath, tucking all the extra little pieces of foliage into the wreath to make it more spiky and fluffy.

I mounted my wreath onto a circle of black card, spritzed with Iron Gate Mica Stain and then attached the wreath to my tag with foam pads. You can see the inked card circle in the photo below, behind the ghosts.

GHOSTS

As I mentioned the ghosts are from the Halloween Vault 2021 Series and I cut each ghost from Mixed Media Heavystock card. I did colour them with a light wash of Antique Linen and Frayed Burlap but the camera has washed out the colour, so that's really hard to see.

After inking the edges with Hickory Smoke Ink, I attached Toil and Trouble over the top of my wreath, again using foam pads to add height.

Just at the bottom of the wreath, I added some flowers. These are Bouquet Findings from Tim's idea-ology range and I coloured them with Black Soot and Villainous Potion Spray Stains before attaching them with a clump of moss along the bottom edge of the wreath.

We're nearly there and all that's left is the details...

DETAILS, DETAILS, DETAILS

I attached the Baseboard Quote Chip to the tag, placing it just beneath the wreath and adding a Hardware Head to either side, which I altered with a little Crackling Campfire and Black Soot Distress Paint for a rusty finish. I placed clumps of moss on either side of the quote chip.

There's a little die cut bat in the bottom left corner ~ this was cut from black card and layered over the top of silver kraft cardstock to create a shadow. I then attached it to my tag.

At the top of the tag, I placed the hole reinforcer piece. This is painted with Black Soot Distress Paint and then I applied a small amount of Gilded Foundry Wax to the edge. After I heat set the wax and attached the hole reinforcer piece, I added a Halloween Ephemera piece, the number 31, over the top.

Finally I completed my tag with a Nail Tack that I hammered into either side to the panel, in the top left and right hand corners.


So that's my project finished for this week and I hope you love what I've made...

As always, if you make anything, or if you've been inspired by anything that you've seen here on my blog ~ then please, let me know by tagging me on social media or leaving a comment here and I will be right over to take a look and if sometimes I miss it ~ just keep nudging me!

Don't forget that every week, one lucky random participant has the chance to win a $25 gift voucher from Simon Says Stamp and you can join in up to 5 times, which means you could have 5 chances to winYou have until next Monday at 8am Ohio time. 1pm UK time, 2 pm CET to join in and good luck....


Thank you so much for taking the time to stop by today...Love Emma xxx

Recipe for project:

Stampers Anonymous: Mini Etcetera TagMini Stencil Set 53
Distress Spray StainsBlack Soot, Villainous Potion
Distress Ink: Walnut Stain, Hickory Smoke, antique Linen, Frayed Burlap
Distress Paint: Black Soot
Halloween Mica Stain: Set 3Set 4

Monday, 29 August 2022

Skeleton Dance...

Hello friends...

It's time for the brand new Simon Says Stamp Monday Challenge and this week, we are asking you to MAKE YOUR OWN BACKGROUND! However you choose to do this, is entirely up to you but with so many inks, paints, pastes and sprays ~ you will be spoilt for choice and we can't wait to see what you create.

As Autumn approaches and my favourite time of year is just around the corner, I'm still very much in my Halloween groove of making and even though I have moved onto Christmas, 🤫...there's plenty of spooky projects to come!

So, with this in mind, I've stepped back in die cutting time to last year and used one of my favourite Tim Holtz dies, Mr Bones but combined him with a brand new stencil, Crest which is from the Stampers Anonymous Halloween release that Tim shared on his recent LIVE and used this to create my inky background.

It's time to jangle those bones and embrace the dead of night because Mr Bones is ready to party and you are invited to the skeleton dance!

To begin with I used a Size 8 Etcetera tag as a base and using Matte Collage Medium, I attached the smallest size of Pinked Etcetera Trim along the bottom edge of the tag, and painted the trim with Black Soot Distress Paint. This will elongate the length of the tag and also form a base for my fringing.

BACKGROUND

Moving onto the inky background, and I applied Translucent Crackle Paste through the Crest Mini Layering Stencil directly onto a Size 8 Heavystock Mixed Media Tag, placing the design down the left hand side. Set the tag to one side to dry and for those crackles to appear ~ don't be too impatient with this process, I've found depending on temperature, it could take a while, or it could happen quite quickly!

Once the paste is dry to touch and the cracks are visible, I then spritzed the entire tag with a combination of Distress Spray Stains ~ Walnut Stain, Crackling Campfire, Barn Door, Antique Linen and Frayed Burlap. I spritzed water over the top to blend the inks and then gently heat dried the tag, being careful not to overheat the pasted areas.

Once I was happy with the blend, I stamped some script onto the open areas of the tag, using the script stamp from Exquisite and then lightly splattered the tag with Decayed and Burning Ember Mica Spray Stains. If you haven't tried these colours yet...you need too because they are amazing and such a great combination on halloween projects.

After allowing the tag to dry, I inked the edges with Walnut Stain Distress Ink and then machine stitched a border around the outside.

Adhere the tag to the Etcetera Tag using Matte Collage Medium.

QUOTE CHIP, FRINGE and TINSEL

With the background ready, it's time for that glorious fringing and for this I used one of the new idea-ology products that Tim released for Halloween.

I cut a piece of fringing to fit across the bottom of the tag and then rolled the trim in my hands to create a ruffled appearance. After a spritz of Decayed Mica Spray Stain over the top, I attached the trim along the bottom of the tag, placing it over the join of the tag and etcetera trim.

Above the trim, I then placed some sparkle and once again, turned to the new idea-ology products, and cut a piece of Black Tinsel and attached this along the top of the trim.

On either side of the trim, I cut a boneyard finding in half and tucked them into the fringe, attaching them so they slightly stick out.

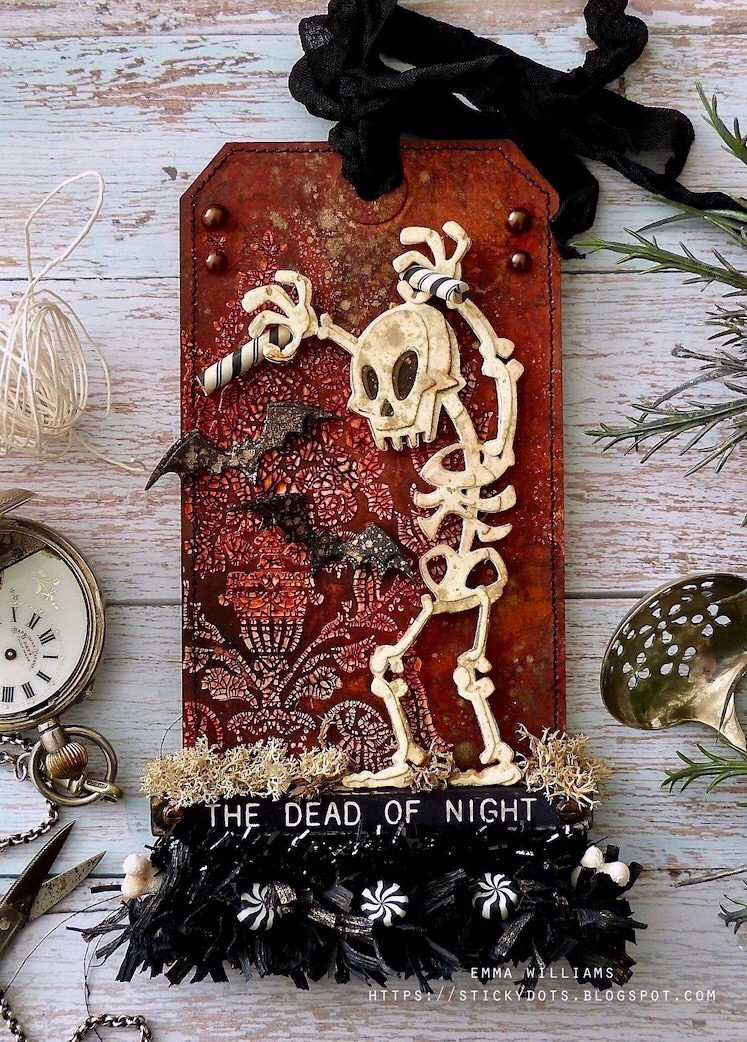
With my trim in place, I added a Quote Chip from the Halloween Baseboards pack, THE DEAD OF NIGHT and used foam pads to attach it to my tag, placing a hardware head on either side of the chip.

We're now ready for the star of the show....

MR BONES

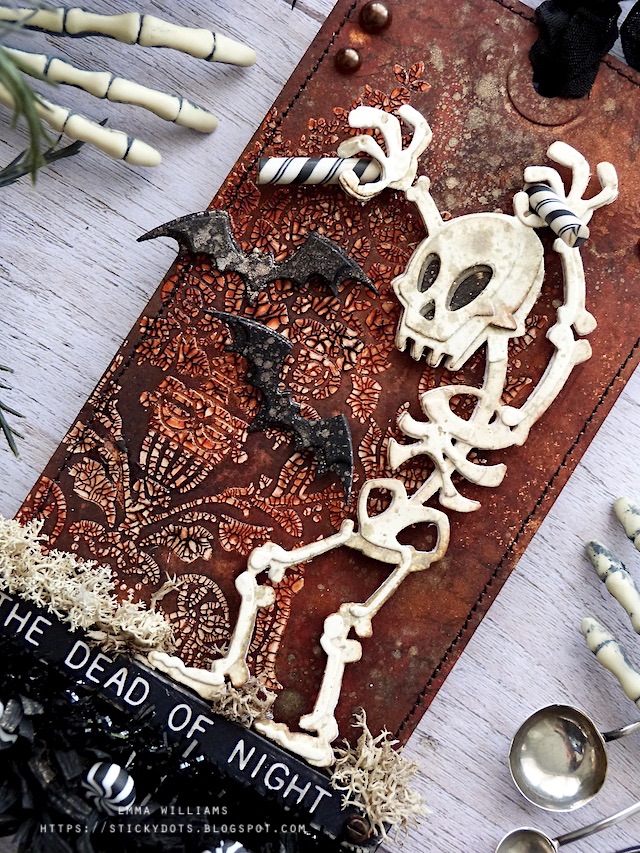
Now to assemble Mr Bones and once I'd die cut all the pieces and layers from Mixed Media Heavystock card, together with some black and grey kraft card, I inked each die cut piece and then layered him up to create my skeleton. 

Because I wanted him to be slightly lifted off the background, I did die cut an extra two solid layers, and adhered these to the back.

Placing Mr Bones into the splat box, I very lightly misted some Decayed Mica Stain over the surface and dabbed away any excess, heavy splatters.

So Mr Bones is now ready for the party and I attached him to the tag, placing foam pads on the back to add support. I then attached some moss along the top edge of the quote chip and around his feet.

Now no dance party is complete without guests, and these guests come in the shape of some bats who seem to be dancing with Mr Bones. The bats are die cut from black kraft card using the bat dies in Otis. I spritzed the black card with Decayed Mica Stain and then die cut, shaped and attached both of the bats to the tag.

CONFECTIONS

In each of Mr Bones hands, I placed a piece of Halloween Confection which I cut in half and altered slightly with some Gathered Twigs Crayon, which just knocks back the bright white areas of the candy. I then attached the candy by placing it in between his fingers, and using a small dab of Matte collage medium to hold it in place.

I also placed three pieces of the candy in amongst the fringing.

We're nearly there and all that's left is the finishing details...

FINISHING TOUCHES

I attached two pearl droplets on the top left and right of the tag...

...and finally I used some Crinkle Ribbon, or seam binding ribbon and spritzed this with Black Soot Distress Spray Stain before threading it through the hole in the top of the tag.

So that's my make finished for this week and I hope you love the inspiration behind this piece, and it's got you into the halloween party spirit!

As always, if you make anything, or if you've been inspired by anything that you've seen here on my blog ~ then please, let me know by tagging me on social media or leaving a comment here and I will be right over to take a look and if sometimes I miss it ~ just keep nudging me!

Don't forget that every week, one lucky random participant has the chance to win a $25 gift voucher from Simon Says Stamp and you can join in up to 5 times, which means you could have 5 chances to winYou have until next Monday at 8am Ohio time. 1pm UK time, 2 pm CET to join in and good luck....


Thank you so much for taking the time to stop by today ~ stay safe and keep well.
Love Emma xxx

Powered By Blogger

Total Pageviews