Showing posts with label alphanumeric dies. Show all posts

Monday, 20 February 2023

I ❤️ New York...

Hello everyone....

This week's brand new Simon Says Stamp Monday Challenge has begun and our theme is all about THINGS WITH WHEELS and if you'd love to join us and play along, then we can't wait to see what will inspire you and how you will interpret our fun theme!

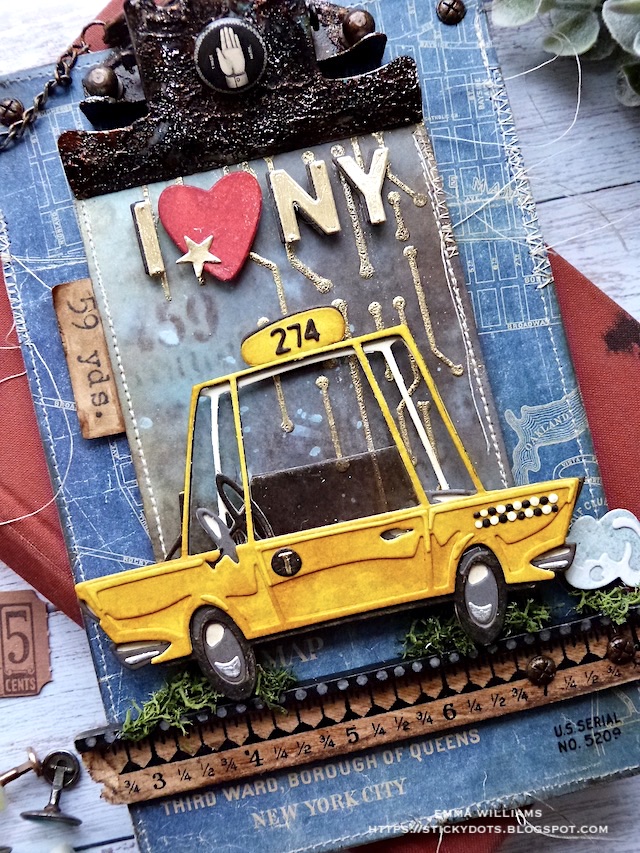
For my make, I chose to use the Road Trip Colorize Die, which is one of the brand new sets from the Tim Holtz/Sizzix Everyday release for 2023. For my previous project that I made using this die set, just click here but for this particular make, I was inspired by one of my favourite cities in the world, New York and together with the Alicia Key's song, Empire State Of Mind ~ I created this little yellow taxi cab to feature on my Mini Clipboard.

 So, jump aboard...it's time to share how I made this week's project!

CLIPBOARD

To begin I used the Tim Holtz Mini Clipboard as my base and after removing the clip from the board, which is really easy ~ all you need is a screwdriver and unscrew each of the fasteners, I applied a run of Design Tape Trim around the edge of the board, before choosing a piece of paper from Backdrops Vol 1. I used the New York City map, which of course is perfect as a backdrop for this piece and trimmed it to size before machine stitching a border around the outside. 

I adhered the panel of paper to my board using Matte Collage Medium and then sanded the edges with the brand new Sanding Disks by Tim. (These are a game changer and I highly recommend anyone who hasn't tried them yet...to try them NOW)

After applying a further coat of the medium over the surface of the paper, I ran my Walnut Stain Distress Crayon around the edge and then addd Hardware Heads to the top left and right hand corners of the clipboard.

CLIP

With the board finished, I moved onto the clip and I wanted a really rusty, gnarly feel to this piece of metal, so I decided to alter it and began by applying a layer of Translucent Grit Paste over the surface. After allowing it to dry, I then painted the entire clip with Black Soot Distress Paint. After allowing the paint to become a little tacky, I wiped away the excess before applying a dry brushing of Ground Espresso, Crackling Campfire and Antiqued Bronze over the top, layering each paint colour one by one, and drying them in between applications.

To accentuate the pasted areas, I used a small amount of Sterling Foundry Wax and applied it to the surface using my fingertip. You only want a hint of this, so just a light touch will do. Heat set the wax with a heat gun.

Finally, I added a Mini Flair Embellishment to the centre of the clip. This one features the hand, which is to represent hailing the cab.

Once I'd re-attached the clip to the board, I then attached a Swivel Clasp. I altered the metal with the same paints as I used on the clip itself.

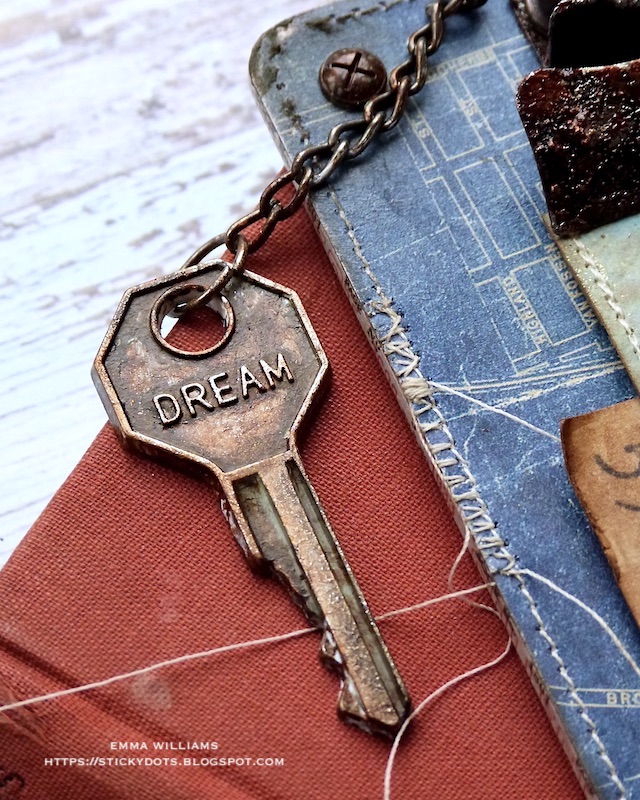
At the end of the clasp, I added my Word Key. I chose the key that has dream written on it, which is obviously representing the Alicia Key's song and the line, "where dreams are made of". I altered the metal clip with the same paints as before but then applied a small amount to gilding wax to accentuate the lettering. This is a wax that I have in my stash but you can find plenty of different metallic waxes at Simon Says Stamp.
INNER PANEL

To create the second layer to this piece, I cut a panel of Mixed Media Heavystock card and applied Ground Espresso, Speckled Egg, Frayed Burlap, and Tumbled Glass Spray Stains over the surface, which I'd already misted with water. I then applied some more water to blend the stains before dripping tiny amounts of Speckled Egg Oxide Spray over the top.

To add interest to the panel, I used some stencils, and started by applying Walnut Stain Distress Ink through the Script Mini Stencil from set 49, you can see the number on the left of the panel. Heat set the ink, before applying the next layer, and for this I used the Circuit Mini Layering Stencil from set 48. I began by applying Translucent Grit Paste through the stencil with a palette knife, directly onto my panel of inked card and after removing the stencil, I sprinkled gold embossing powder over the top. Set it to one side to dry, which will usually take approx 30 mins depending on your surroundings. Once I was happy to move on, I used a heat gun to emboss the gold powder until molten. Do not overheat the paste as it will bubble, it's better to apply heat in small areas and move on quickly.

After inking the edges and machine stitching a border, I attached the panel to my board using foam pads, before placing a Numbers Snippet, 59 Yards to the left hand side of the panel.

Across the board, I placed a ruler piece that I broke the end off. I inked the wood with Walnut Stain Distress Ink and attached it to my board, adding two Hardware Heads on the right hand side. I then took a straight edge trim from the Bat Webs Etcetera Trim Pack, painted it with Black Soot Distress Paint and once dry, added a Design Tape trim along the edge before attaching it along the top of the ruler piece to form the road.

Just beneath the ruler piece, in the bottom right hand corner, I added a Labeled Remnant Rub.

YELLOW TAXI CAB

Now we can start to build the scene and I began by making and assembling the cab, which is the car from the Road Trip Colorize Die Set...

I cut each layer using the dies, and if you need any help there are guidelines on the back of each die piece that you can follow.

The only difference with this make, is that I exchanged the blue layer for yellow and used a Mixed Media Heavystock card that I spritzed with Mustard Seed and Fossilized Amber Spray Stains.

With the car assembled, I added a piece of Mica sheet behind the die cut to form a window, you can use acetate for this if you don't have Mica. I wanted to create the look that the window is wound down, so I just added a piece that would fit half the window and attached it at the back of the die cut car.

Now to make that taxi cab look realistic and for this, I used some dies from the Abstract Elements set, which you can see below.

...and starting with the little black and white section on the back of the cab, I cut the small dots from black kraft card and mixed media heavy stock using the black die that is pictured in the centre of the photo above, the one next to the black scallop squiggle, and once cut I attached each piece alternately onto the cab.

For the tiny 'T', I used the smallest circle in the set and again cut this from black card, attached it to my car and then cut a gold letter 'T' using one of the dies in the Specimen Die Set. This fit perfectly inside the circle.

Now for the top part of the cab and once again I used one of the dies from the above set, the grey die that is on the right hand side, and cut a piece of matching yellow card. I then once again cut numbers using the Specimen Die Set and attached these to the small die cut piece.

I attached the cab to my board with foam pads to create dimension to the project and I placed the cab so that it sits on the ledge. To complete the cab, I cut the little exhaust puff that comes with the die set, and used card that I inked with Speckled Egg Distress Spray Stain, and a second layer of white cardstock. Attach the little puff behind the cab with more foam pads.

As the finishing touch, I attached small clumps of moss along the roadside using a hot glue gun to secure them into place.

ALPHANUMERICS
We're nearly there and all that's left is to create the I❤️NY logo at the top.

For this I used a combination of the letters from the Bold Alphanumeric Die Set, which I cut from gold metallic kraft card and the ❤️ from the Bunny Stitch Die Set, cut from red card.

I cut each individual letter three times and then layered them so they create the thickness of chipboard. I then cut a final layer from black card and placed this behind each letter to form a shadow.

Using foam pads, I placed these on the back of each letter and the heart before attaching them across the top of my project, placing them just below the clip.

Finally, I added a small die cut gold star, which I had on my desk from a previous project, and placed this  on the heart to complete this make.


I hope you love this week's project and the inspiration behind it, it's a piece that I really enjoyed making and I was so happy how the combination of dies, worked so well together to make that little taxi cab.

Don't forget that every week, one lucky random participant has the chance to win a $25 gift voucher from Simon Says Stamp and you can join in up to 5 times, which means you could have 5 chances to win. You have until next Monday at 8am Ohio time. 1pm UK time, 2 pm CET to join in and good luck....


Thank you so much for taking the time to stop by today ~ stay safe and keep well.
Love Emma xxx


RECIPE FOR PROJECT

Distress Spray Stain: Ground Espresso, Speckled Egg, Frayed Burlap, Tumbled Glass, Mustard Seed and Fossilized Amber
Distress Crayons: Walnut Stain
Distress Inks: Walnut Stain
Distress Paint: Black Soot, Antiqued Bronze, Ground Espresso, Crackling Campfire
Treasure Gold Gilding Wax, Mica Sheet from my own stash

Monday, 23 January 2023

Just The Two Of Us...

Hello friends...

Hope you're all well and having a great start to the week! As always, the start of a new week, means the start of a brand new Simon Says Stamp Monday Challenge and this week's challenge is called BEAUTIFUL BLOOMS and whether you choose stamps, dies, die cuts or papers ~ I'm sure you'll be spoilt for choice with all the amazing products that features flowers!

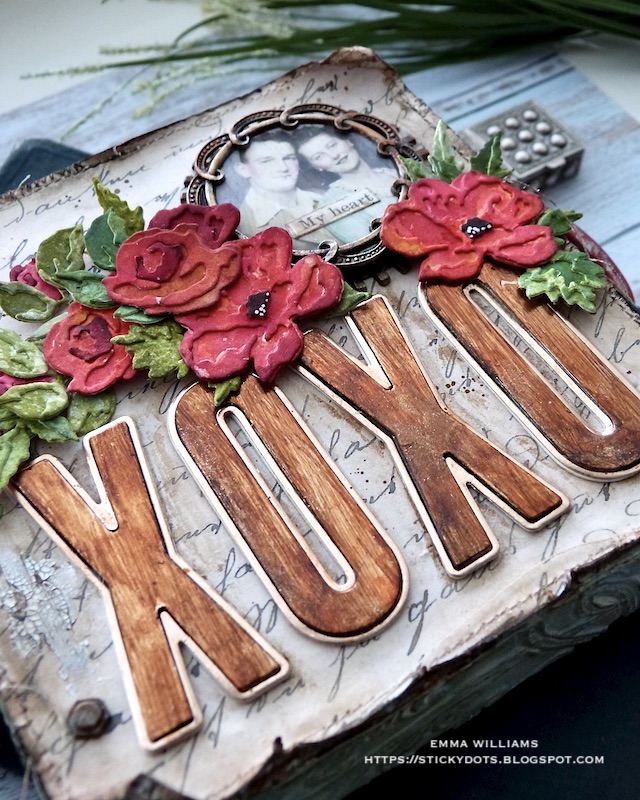
For my make, and with Valentine's Day just around the corner ~ I felt the love in the air and created a vintage style square vignette box that can be used as a home decor piece, telling the story of the couple in the photo booth image that I've used, and to bring this love story to life, I thought it would be perfect to make this piece using dies and an embossing folder from Sizzix and Tim Holtz, together with idea-ology products.

 So let's get started and here's how I created my beautiful blooms...

To begin with I used the medium sized idea-ology square vignette box which is from a set of 3.

COVERING THE BOX

I'll begin with the sides of the box and for this I used the beautiful new Embossing Folder from Tim, called Entangled and I embossed enough Mixed Media Heavystock card to cover all four sides of the box. Once I'd cut the panels to size, I then adhered them to the sides using Matte Collage Medium. Once dry, I painted each panel with Speckled Egg Distress Paint, wiping away the excess paint using a semi damp wipe, or you can use a soft cloth. I allowed for this to dry before applying a coat of the medium over the top of the painted side panels. Again I allowed for the medium to dry and then I took my Walnut Stain Distress Crayon, rubbed this over the side before blending the colour into the detail of the raised areas. Taking the soft cloth, remove any excess crayon.

Now for the front of the box and for this I started by applying some Crackle Paste around the edge of the front of the box. Allow for the paste to do it's thing before running the Walnut Stain Distress Crayon over the top to accentuate the crackles.


After cutting a panel of the script design paper from the Backdrops Vol 2 pack of background papers, I machine stitched a border around the outside edge before taking the edge of my scissors, and running them along the edge of the paper, to add small rips and tears. 

Once happy, I inked the edges with Walnut Stain Distress Ink and adhered the paper panel into position.

Because I wanted a vintage feel, I curled back and folded the corners of the paper to reveal the crackle that sits underneath.

At this stage, I also added some Crackle Paste to the background, applying it with a palette knife and as before, once the paste was dry, I used the Walnut Stain Crayon to accentuate the cracks that have appeared.

We now have the box ready and set this to one side to move onto the design....

XOXO ~ Bulletin Dies

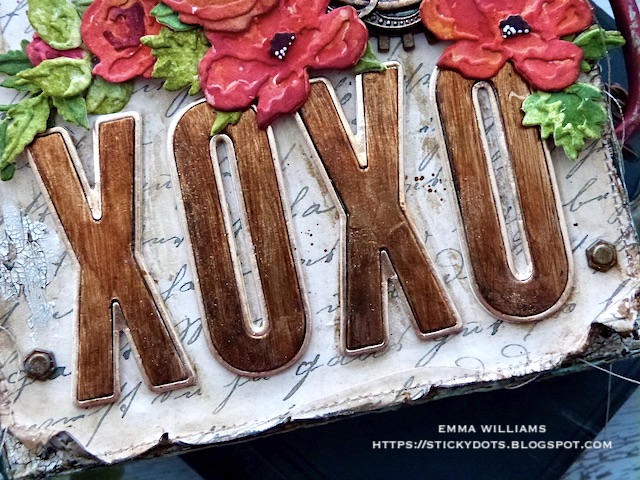
I wanted to make a real feature of the wording on this make, so I used the gorgeous new Bulletin Alphanumerics Die from the new Everyday 2023 collection. I cut four layers of the lettering and adhered these over the top of one another to form really thick die cut letters.

I then cut a final layer of gold metallic kraft card, keeping the shadow die cut for later, and adhered the gold layer over the top of the letters. To add the rusty, vintage tone to the gold metallic and knock back the shine a little, I used Distress Paints. I started with a layer of Black Soot, wiping away the excess and always drying between layers and then, one by one built up the colour using Crackling Campfire, Ground Espresso and Antiqued Bronze.

With my letters ready, I attached them to the box, aligning them with the bottom edge before adding the gold metallic shadow die cut around each of the letters.

FRAMED PHOTO

For the framed photo, I used the following:

Industrial Gears, the circular Deco Frame Adornment, a Photo Booth image and clippings sticker.

I started by cutting my photo into a circle. I used the Stacked Circles Dies for this but you can use any nesting die, punches or even cut by hand.

I colour tinted the photo using Distress Crayons and a water brush and then attached the photo to the centre of a Industrial Gear. I altered the colour of the gear using the same paints as I used on the die cut lettering.

I then layered the circular Deco Frame over the top, again altering the metal with the paints and then added a clipping sticker to the photo. The photo is attached with Matte Collage Medium to the top right hand corner of the box.

MINI BRUSHSTROKE FLOWERS

For this particular project, I wanted the image to be surrounded with red flowers, and greenery...so, I cut out two different flowers and a selection of foliage using the Mini Brushstroke Dies and then layered all my pieces to create the die cuts that I will be using.

I then water coloured each one individually using Distress Inks applied to my glass mat and picking up the colour with a water brush, or paint brush.

COLOURS USED;

Flowers: CracklingCampfire, Aged Mahogany, Kitsch Flamingo, Picked Raspberry, Wild Honey

Greenery: Peeled Paint, Shabby Shutters, Bundled Sage

Once each piece is ready, I added the centres to the larger flowers using black card and finished with some white pen details.

I adhered all my flowers into position using hot glue and foam pads which helps to create and add various heights and give a more realistic look to the layering.

To complete the front of my box, I added a Ephemera Snippets Number to the left hand side.

FINISHING DETAILS

As always, no project of mine feels complete without some Hardware Heads, so I added two of these to the either side of the panel, again these are painted to match the other metal on the make. 

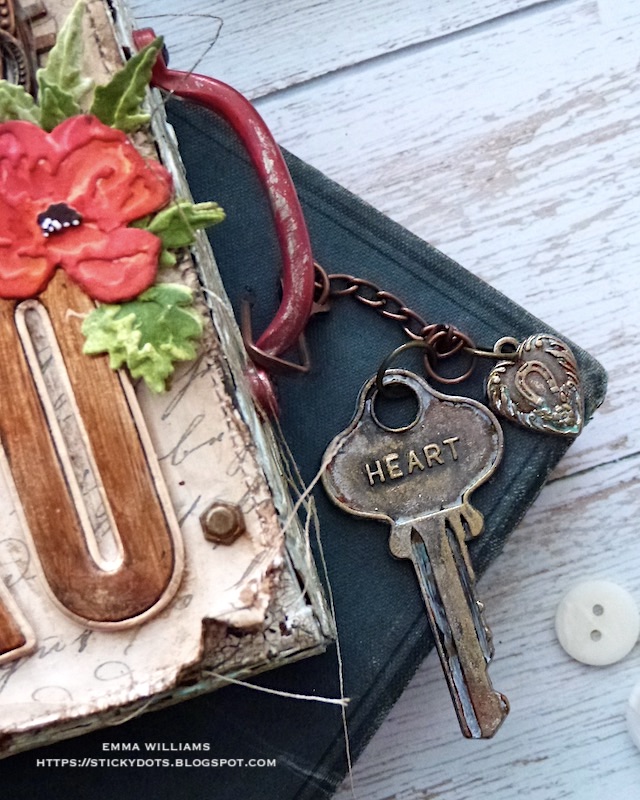
Finally, I added a handle which I painted red using Candied Apple Distress Paint and stuck to the side, placing hardware heads into the holes.

CHARMS

For one final touch to this make, I added a swivel clasp, that I clipped onto the handle. I then attached a Heart Adornment and a Word Key, complete with 'heart' written on it to the clasp ~ both of which I altered with the same paints as I've used throughout for all the metal.

That's it from me for today, and my project is complete! I hope you've loved the process and enjoyed looking at the piece I've made and the ideas I've given, which can be translated into scrapbook layouts, cards or you can use a photo of family members to make it more personal, the world is your oyster and you do you!

As always, if you make anything, or if you've been inspired by anything that you've seen here on my blog ~ then please, let me know by tagging me on social media or leaving a comment here and I will be right over to take a look!

Don't forget that every week, one lucky random participant has the chance to win a $25 gift voucher from Simon Says Stamp and you can join in up to 5 times, which means you could have 5 chances to win. You have until next Monday at 8am Ohio time. 1pm UK time, 2 pm CET to join in and good luck....


Thank you so much for taking the time to stop by today ~ stay safe and keep well.
Love Emma xxx

Recipe for project:

Distress Paints: Candied Apple, Speckled Egg, Crackling Campfire, Ground Espresso, Black Soot, Antiqued Bronze
Distress Inks: Crackling Campfire, Aged Mahogany, Kitsch Flamingo, Picked Raspberry, Wild Honey, Peeled Paint, Shabby Shutters, Bundled Sage Walnut Stain
Distress Crayon: Walnut Stain
Powered By Blogger

Total Pageviews