Hello friends...
How is everyone?
Today, it's time for me to invite you to the grand opening of my Christmas Department Store and hope you'll join me for a look around my make, that I created for the launch of the Tim Holtz Christmas idea-ology 2023.
So many of you have messaged me, asking "how did you make this project"? And "what do you need to replicate it"?, and thank you all for your patience ~ your support and love for this project really does mean the world to me. In this post, I'm going to explain the basic construction of the store, and briefly run through some of the other techniques that I used for to fill my store. I'm sure many of you have seen a lot of tutorials from me over the years explaining how I colour baubles, how I stain the trees and wrap the presents. If there is anything in particular you would like me to explain, then never hesitate to message me!
So here we go ~ it's time to step into Christmas

 |
| click to enlarge image |
BASE
To begin making the store, you will need the following:
If you don't want to make such a large piece, then you can use the smaller sizes of vignette box and trays, or maybe you might just be inspired by my ideas and make the shop front only ~ the choice is yours and as Tim says, YOU DO YOU!
So back to the project, and to begin with, I took one tray, flipped it over to have the solid side uppermost and I covered all four sides in the brick effect paper from the Christmas Backdrops 2023, adhering the paper with Matte Collage Medium.
EMBOSSED COBBLESTONES FLOOR
For what will become the floor of the project, I began by applying Design Tape around the four edges of the tray.

I then started to add the texture and used the Sizzix/Tim Holtz Cobblestones 3D Texture Fade to emboss panels of Mixed Media Heavystock. I cut my panels to fit the top of the tray, and adhered them into position with more of the collage medium. I then dry brushed the surface with Pumice Stone Distress Paint, just allowing the brush to connect with the embossed areas. Leave this to dry and then apply a coat of medium over the top to seal the paint. Allow to dry.
To accentuate the embossing, I took the Walnut Stain and Pumice Stone Distress Crayons and lightly scribbled over the surface before using my fingertip to blend the colour and move the pigment around. If needed, then you can also use a semi dry baby wipe which will help to blend the crayon.
On the front of the tray, I used one of the Baseboard pieces, "Christmas Goods For The Many" and I adhered this with the collage medium, adding a Hardware Head on either side.

Once happy with the colour, drill a small hole through the centre of the tray ~ this will be for the lights to be threaded through.
STORE FRONT
Moving onto the next part of the construction and this involves the second vignette tray. This tray sits upright on top of the previous tray and the inside of the tray faces the front. I painted the back and the sides with Rustic Wilderness Distress Paint and once dry, I sanded the edges of the tray to take it back to the bare wood, and then run my Walnut Stain Distress Crayon over the paint work to create a vintage finish. I then applied some design tape around the edges, before attaching some Hardware Heads to the corners.

On the back of the tray, I added the bells from the Christmas Layers and Paper Dolls pack. I used three different sized bells that I overlapped to create the effect they were grouped together. I adhered and sealed with Collage Medium, before adding some of the holly at the top and a label, taken from the Christmas Ephemera pack, which I placed underneath.

Moving onto the inside of the tray and I applied Christmas Design Tape to the four edges on the front of the tray.

I then covered the inside with papers from Christmas Backdrops 2023, which are once again adhered with collage medium, and I also sealed them with the medium. In the corners of the tray, I smeared some Crackle Paste, which I allowed to do it's thing and once the cracks had appeared, I used Walnut Stain Distress Crayon to make take the bright, shiny, newness of the papers and make them feel more vintage in their appearance.

We now have the vignette trays ready for the store front entrance....
STORE ENTRANCE AND WINDOWS
I painted the large square vignette box with more of the Rustic Wilderness Distress Paint, and once again once the paint was dry, I sanded back the wood for more of a vintage feel. I then covered the inside with of the box with a co-ordinating paper from Christmas Backdrops papers.
Inside the store, I created the shelves using Pinked Etcetera Trims painted with Walnut Stain Distress Paint. Once I'd dried the paint thoroughly, I fixed the shelves into position using Collage Medium and allowed these to set and become solid ~ you probably need to leave them overnight for the medium to do it's job.
With the box ready, I attached it to the inside of the second tray, placing it middle and again using collage medium. So that I could thread the lights through from the base tray, I drilled a hole through the square vignette box, so that this aligns with the hole in the first tray. Once you have the correct alignment, I threaded the Multi Coloured Tiny Lights through and I adhered the tray to the base.
I used Tiny Vials and Corked Vials to fill the store with tiny bottles of goodies. I used a combination of beads, confectionery and complete with their labels and then added a tiny Woodland Tree, spritzed with Rustic Wilderness Distress Spray Stain and placed in a thimble pot, which I painted with Candied Apple Distress Paint.
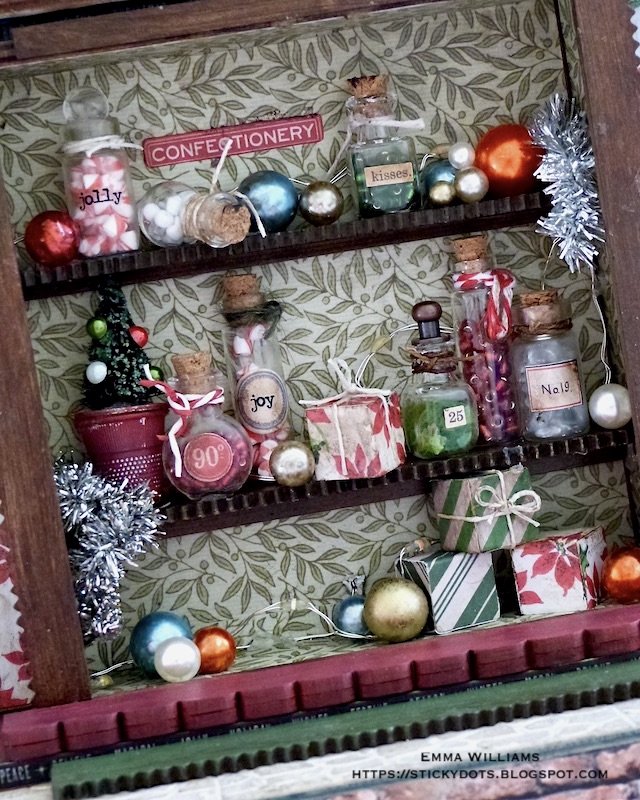
I also placed some tiny presents inside which are 1.5cm wooden blocks, bought from Amazon and just covered in papers from the Christmas Backdrops pack. I finish these by tying some twine around them and adding a small bow. There is also some tinsel and baubles inside, which I inked with various colours of Alcohol Inks.

Once all the shelves were filled, I arranged the light strand and attached them into position.

Now to fix the entrance and window onto the front of the box...
ENTRANCE DOOR AND WINDOW FRAME
I used strong red line adhesive tape to adhere my leaded window acetate panel from the Christmas Baseboards and Transparencies pack onto the back of the frame, which I sanded lightly and inked with Walnut Stain Distress Ink. I then added hints of Snowfall Grit Paste to each of the window panes and allowed this to dry to create the look of frosty windows.

To create more stability to the frame, I used two of the longest length of Pinked Etcetera Trims which I painted with Walnut Stain Distress Paint, and fixed these onto the left and right hand sides on the front of my square vignette box, placing the decorative edge so outermost. I also placed one to run across the top ~ this you will need to cut down to fit.
Attach the frame to the front of the box.

Over the top of the entrance I made a canopy and used Scalloped Etcetera Trims, painted with Lumberjack Plaid Distress Paint. I attached these to form a 'L' shape, then placed them on the top of the frame, allowing the trim to overlap the store front.

For the finishing touch, I drizzled some Glossy Accents over the top of the box and sprinkled Mica Flakes over the medium, tapping away the excess and leaving them to dry.
To complete the store front, I added the Co-Op Company Department Store sign which is from the Christmas Ephemera Pack and I mounted this onto a piece of mountboard and then attached it to the front using foam pads.

As you know, I always like to make sure the back of a project looks as good as the front and when it came to the trims, you could just paint them to match the rest of the box or as I've done, use a piece of Backdrops paper cut down to size and adhered directly onto the trims. The final touch is a combination of Grit Paste and Snowfall Grit Paste to add that snow kissed finish.

To complete the frontage, I added a step made from a Pinked Etcetera Trim, a tiny little doormat made from hessian and some wooden logs from my own stash, that I cut down to size....

...and then, I gave everything a frosty coverage using Snowfall Grit Paste and more Mica Flakes.

EMBELLISHMENTS
You now have your store front ready to fill with whatever idea-ology products you want and I will now show you around all the pieces that I added, starting with the left hand side...
I'll begin by introducing you to the Nutcracker who stands guard outside the store. This piece is painted with Distress Paints and then has a coverage of frosty Snowfall paste.

I painted a Holiday Bell with Candied Apple Distress Paint and hung this from the tray. I also added the 5 for 5¢ label, again from the Christmas Ephemera pack, which I placed on the back wall. Don't forget at each stage to add a dusting of snowfall to the elements to bring them to life.

Behind the nutcracker is one of the new Alpine Woodland Trees, which I LOVE!
All the trees are created by a resist technique that goes right the way back to when I first started using these trees. Before I add any colour, I dab the tips of the trees with white gesso and allow this to dry before then applying the Distress Spray Stains. The gesso will act as a resist and the tips of the trees will remain snowy white and creates a beautiful effect that can be glittered as I did with these or can be left untouched. I added Mica Flakes to this tree and then placed it in a barrel.
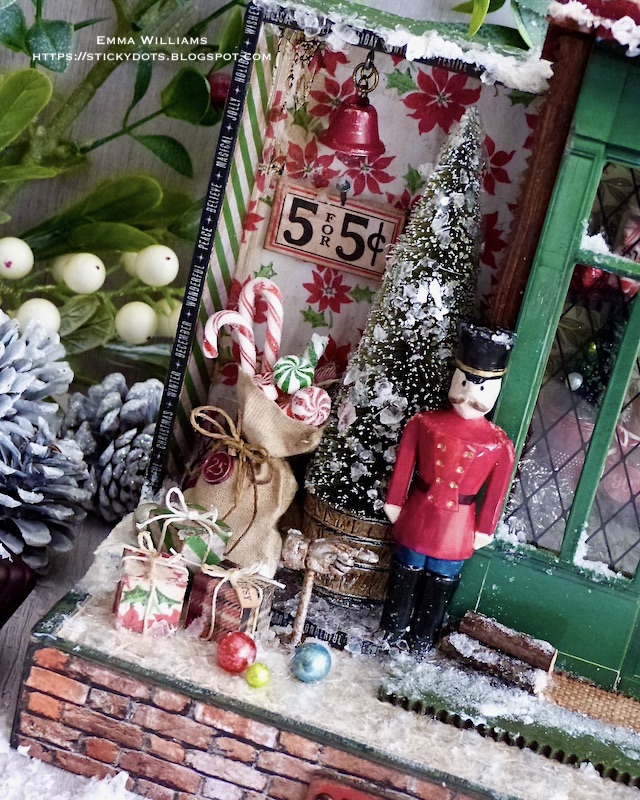
There's the little sack, full of Rock Candy coated confectionery and complete with a tiny no. 25 tag. This is something that I handmade using cotton calico and dyed with Frayed Burlap and Brushed Corduroy Distress Stains. It now sits in the corner, waiting for Santa to pick up.

To complete this side of the store, I added some more alcohol inked baubles, a few wrapped presents...

...and the pointy finger Figure Stand which is altered with a smear of Translucent Grit Paste and then coloured with Statue and Sterling Foundry Wax and a dribble of Mushroom Alcohol Ink over the top.

Over on the right hand side, I added a Gate and used the same technique to alter the metal as I used on the pointy finger. I hung the Christmas Ephemera sign from the a piece of chain and hooked this over the top.
I also placed another tree in the arrangement but this time popped it into an Urn, which is one of Tim's older idea-ology pieces and just altered this with a touch of Sterling Foundry Wax and next to that is a candle stand, complete with drippy candle and a touch of pine twine wrapped around the base.

I placed a barrel full of baubles next to the tree...

...and added another present, tied up with string.

I added the wreath to the back wall of the store, made from Pine Twine that I twisted into a circle. I then added the red velvet bow and then Holiday Greetings Banner that sits across the twine.

With everything in place, I added a sprinkling of Mica Flakes over the entire project....

...adn then all that's left is to turn on the lights and invite you in!

I hope you've enjoyed this walk through the store and loved looking at all the bits and pieces I used to make this piece come to life. It really was so much fun to make and hope you'll give it a go ~ I look forward to seeing all your versions of the Department Store and make sure you check out some of the masks that have already been made as they are stunning!

See you all again very soon and thanks so much for popping in...