Showing posts with label valentines. Show all posts

Monday, 9 February 2026

Love Letters...

 Hello and Happy Monday everyone...

This week's Simon Says Stamp Monday Challenge is all about SPRITZ AND SPLATTER and whether you use spritzes and sprays to make a background, or choose stamps and stencils, we hope you'll join us and play along.

For my make, I created a fun and slightly alternative Valentine piece and used Distress Spray Stains and Oxide Sprays to create a spritzed background, with some added splatters along the way. As you'll probably have noticed by now, the star of my project is The Count and I'm going to show you how he isn't just for Halloween, because even The Count can use his 'Love-O-Meter" to check if he thinks that love could be in the air....

So, let's get started, it's time to create....

ETCETERA PANEL

For this make, I used the smaller of the two sizes from the Stampers Anonymous Rectangular Etcetera Panel pack and I covered the edges with some older Tim Holtz Design Tape that I still have in my stash.

I then moved onto the background and for this I cut a panel of Mixed Media Heavystock card slightly smaller than the Etcetera Panel and spritzed it with a light misting of water. I then used the following colours of sprays to make the background:

DISTRESS SPRAY STAINS: Vintage Photo, Rusty Hinge, Crackling Campfire, Ground Espresso

DISTRESS OXIDE SPRAYS: Speckled Egg

Once the cardstock is thoroughly dry, I then used the alpha stamp from The Inspector Stamp Set and stamped this with Versamark Clear Embossing Ink, four separate times so that I covered the entire background. After sprinkling Gold Embossing Powder over the inked areas, I heated the powder until molten.


Once I'd inked the edges with Walnut Stain Distress ink, I machine stitched a border around the outside and then adhered the card panel to my Etcetera Panel.

ETCETERA FACADE AND TRIMS

For the next layer, I used an Etcetera Facade and painted this with Scorched Timber Distress Paint. Once it was dry, I then used the Shattered Stamp inked with clear embossing ink, and stamped the design onto the facade before applying gold embossing powder and heat embossing the powder until molten.

I then attached the risers that are in the pack to the back of the facade and placed the facade onto my panel, slightly overlapping the top edge.

On the top section of the facade, I added a bat. This was die cut from metallic kraft stash using the bat die from The Count die set and I created dimension to the die cut by cutting it several times and layering the pieces over the top of one another. 

I then adhered it into position and added the no.14 in Roman Numerals using more gold cardstock and cutting the numbers with the Tiny Type Alphanumeric Die set by Tim and Sizzix. I always add self adhesive sheets to the back of my card when I’m die cutting small or intricate pieces… 

Underneath the facade, I added a Web Trim and Scalloped Etcetera Trim. Once again, I painted these with Scorched Timber Distress Paint and once they were dry, I layered the Scalloped Trim over the top of the Web Trim, before attaching them to my panel, placing them just below the facade.

To create the "Love At First Bite" quote, I used the Tiny Type Alphanumeric Die Set again, and cut the letters using more of the gold metallic Kraft stash. I then adhered each letter to the scalloped trim. 

To complete the trim, I added some Hardware Heads and painted these with Black Soot, Crackling Campfire and Antique Bronze Distress Paint.

THE COUNT

We're now ready to create the count using the die set from Sizzix/Tim Holtz.

Ink colours and cardstock used:

FACE: Distress Watercolour Card, inked with Antique Linen Distress Ink and edged with Frayed Burlap. I also used Polychromos Pencils for added highlights and shadows

WAISTCOAT and CAPE LINING: Distress Watercolour Card, inked with Lumberjack Plaid Distress Ink

SUIT and CAPE: Black Kraft cardstock from the NeutralsKraft Stock Stack

EYE and SHIRT: White Heavystock Card

Once I had all my card layers die cut and coloured, I started layering each piece and building the character to create The Count.

"LOVE-O-METER" and LOVE NOTE

Next to The Count, I added the love-o-meter and used the stamp and co-ordinating die from The Inspector bundle to stamp the gauge image from this set. I began by stamping the first image in black ink (this will form the outer rim of this piece) and then applied Rusty Hinge Distress Glaze Embossing Powder over the top. Die cut this section with both of the circular dies to form a frame. Now die cut the smaller dials from the central piece that you've cut, again using the co-ordinating dies from the set.

Now stamp the image a second time, and die cut this section with the smaller circular die. I then cut a plain piece of card using the larger circle die in this set, and attached both of the stamped pieces to this die cut to form my gauge. Attach the smaller die cut dials using foam pads.

I coloured my gauge using Polychoromos Pencils and Antique Linen Distress Spray.

On the end of one of the hands, I placed a small die cut heart that I have in my offcuts box.

LOVE LETTER

The love letter is cut from Mixed Media Heavystock card inked with Distress Inks, using the Love Notes Sidekicks die set. I folded the die cut along the scoreline to form the envelope and inked the edges with Walnut Stain Distress Ink before stamping the xoxoxo onto the top edge using a stamp from the Love Notes Stamp set. If you don't have this set, then you can write this instead.

BUILDING THE SCENE

With all my pieces ready, I built the scene and began by attaching the gauge, followed by the Count who I placed next to him.

All my pieces are attached with foam pads to add dimension.

I attached the Love Notes envelope to the bottom left of the ledge and then added moss to create texture.

To complete the project, I stamped the hearts using the heart from The Inspector stamp set. I stamped this in Fired Brick Archival Ink and then die cut the image with the co-ordinating SSS die set.

Place four of the stamped hearts around The Count using foam pads, and a fifth heart on the centre of the envelope to complete this make....

So, that's my project made and I hope you love this fun piece. It's definitely a piece that can be made for that person you love who isn't all about pink hearts and red roses!!


As always, if you make anything, or if you've been inspired by anything that you've seen here on my blog ~ then please, let me know by tagging me on social media or leaving a comment here and I will be right over to take a look!

Don't forget that every week, one lucky random participant has the chance to win a $25 gift voucher from Simon Says Stamp and you can join in up to 5 times, which means you could have 5 chances to win. You have until next Monday at 8am Ohio time. 1pm UK time, 2 pm CET to join in and good luck....


Thank you so much for taking the time to stop by today...see you soon!
Love Emma xxx

Recipe for project:

Distress Ink: Walnut Stain
Distress Spray Stains: Vintage Photo, Rusty Hinge, Crackling Campfire, Ground Espresso
Distress Oxide Spray: Speckled Egg
Distress Paint: Black Soot, Crackling Campfire, Antique Bronze
Distress Embossing Glaze: Rusty Hinge
Tim Holtz Idea-ology: Screw Heads

Monday, 27 January 2025

One Love...

Hello friends...

As another week flies by, it's time for the brand new Simon Says Stamp Monday Challenge and as Valentine's Day approaches, the DT are feeling the love with this week's challenge theme, which is called ~ Have A Heart. If you would like to join us, all the details can be found in this post and we would love to see what you create and hope you'll play along.

For my make, I decided to embrace the theme and inspired by this loving couple from the Mini Paper Dolls set, I used the Tim Holtz Stacked Hearts die set by Sizzix to create a dimensional background on a Stampers Anonymous Etcetera Panel before adding layers of Tim's idea-ology to complete the make.

So, let's begin because it's time for me to share the love!


PANEL

I used the largest size of the Rectangular Etcetera Panel.

Using various sizes of hearts from the Stacked Hearts Die Set, I cut three layers from Mixed Media Heavystock card, to form each heart, layered them over one another and adhered them with Collage Medium before adhering the completed hearts to the panel.

Once all my hearts were in position, I applied a coat of Gesso over the surface and allowed this to dry before then adding the colour.

For this I used a combination of Lumberjack Plaid first, and then once this layer was dry, I dry brushed Black Soot Distress Paint over the surface. If you feel at any point you need to add more of either colour, just go for it, but always remember to dry the layers thoroughly between applications.

After allowing the panel to dry, I then dipped a clean paintbrush into gesso and very lightly dry brushed over the surface to accentuate the raised areas and the edges of the panel.

Once again allow to dry before adding splatters of gold paint and some hints of script, which I stamped using the script stamp from the Tiny Toadstools stamp set.

To complete the panel, I used gold metallic flakes to add accents to the hearts. To adhere the flakes, I used Cosmic Shimmer Flake and Glitter Glue. Once you apply the glue, allow it to become tacky before adding the flakes. I then brush away any excess with a stiff brush.

ETCETERA TRIM

My panel is now ready to decorate and I began by attaching an Etcetera Trim. I used the widest trims in two different depths and after covering them with paper from the Backdrops Vol 1 paper pack. I then attached the layered scalloped trims across the panel before attaching a screw head on either end of the trim, painted with gold acrylic paint.

MAIN FOCAL POINT

Moving onto the main focal point, I began with the circles. Both of these circles are the waste that pops out from the centres of the Etcetera Facades. I painted the larger circle with gold paint, before I covered the smaller circle using a selection of Collage Strips that I attached to the circular panel before trimming away the excess. To neaten the edges, I used the sanding tool and then applied a layer of Collage Medium over the top. Once dry, I scribbled Walnut Stain Distress Crayon on each of the paper joins and blended the crayon with my finger.

For an added touch of opulence, I added some more of the gold flakes to the edges of the circles before layering them together and attaching them to my panel using collage medium. As a finishing detail, I added strips of Cello Sticker Tape ~ a product that I absolutely LOVE and can't get enough of!

Over the top of the circles I attached a piece of Mica Tile from my stash and attached three Screw Heads that I painted with gold acrylic paint.

PAPER DOLLS, SWEETHEART ADORMENTS, FLOURISH ADORNMENTS & FLORALS

We're now ready to alter those beautiful Floral and Flourish Adornments, together with the wreath at the back of the couple.

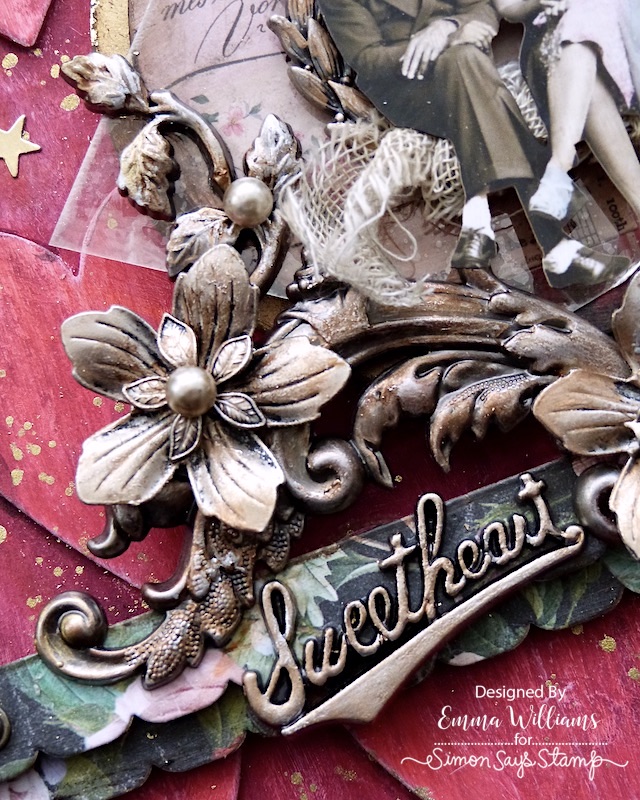
To add colour to the metal, I used Statue and Sterling on each of these pieces, applying one layer of wax at a time and then adding the second layer over the top, but not giving the metal a complete coverage. This will allow the layer of wax underneath to show through and create the variation of colour to the metal.

After I'd heat set the wax on all the pieces I used, I applied some dribbles of Mushroom alcohol ink over the metal before arranging and attaching them onto my panel with Matte Collage Medium, placing the flourishes across the bottom of the circle.

I altered the wreath and sweetheart metal pieces from the Sweetheart Adornments pack, together with a selection and florals in exactly the same way as the flourishes and attached these directly onto the flourishes themselves. In the centre of each flower, I added the smallest bauble finding, altered with Mushroom Alcohol Ink.

After colour tinting the paper dolls using Distress Crayons, I placed them onto the wreath, and sat them onto a bed of Mummy Cloth, dyed with a little Frayed Burlap Distress Spray Stain.

Finally, I added the Sweetheart piece, nestling it between the metal work, and attaching it to the trim.

In the photo below, you can see how much I built up the layers and the dimension this creates.

XO TYPOGRAPHY

We're nearly there and all that's left is to alter the XO Typography letters. I used the same Distress Paint colours as I used on the background for these letters, X and O and then once dry, accentuated them with some gold paint before attaching them to my panel, placing them in the centre of the heart, in the top left hand corner.

...and finished the piece with some gold die cut stars, that I had on my desk!

So that's my make for this week's challenge complete and I hope the ideas and techniques have inspired you to create some texture on your projects. 

As always, if you make anything, or if you've been inspired by anything that you've seen here on my blog ~ then please, let me know by tagging me on social media or leaving a comment here and I will be right over to take a look!

Don't forget that every week, one lucky random participant has the chance to win a $25 gift voucher from Simon Says Stamp and you can join in up to 5 times, which means you could have 5 chances to win. You have until next Monday at 8am Ohio time. 1pm UK time, 2 pm CET to join in and good luck....


Thank you so much for taking the time to stop by today...
Love Emma xxx


Powered By Blogger

Total Pageviews