
Hello friends...
Hope you're all well and having a great start to the week! As always, the start of a new week, means the start of a brand new Simon Says Stamp Monday Challenge and this week's challenge is called BEAUTIFUL BLOOMS and whether you choose stamps, dies, die cuts or papers ~ I'm sure you'll be spoilt for choice with all the amazing products that features flowers!
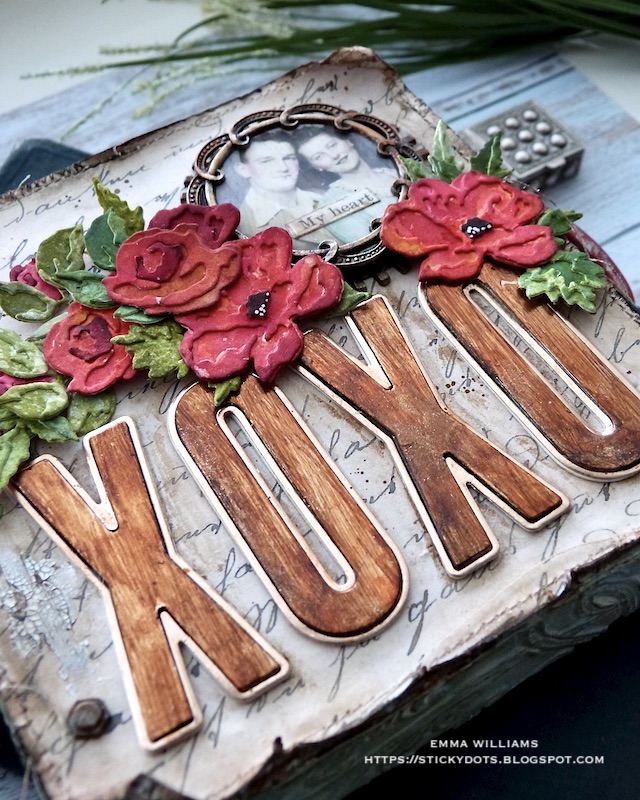
For my make, and with Valentine's Day just around the corner ~ I felt the love in the air and created a vintage style square vignette box that can be used as a home decor piece, telling the story of the couple in the photo booth image that I've used, and to bring this love story to life, I thought it would be perfect to make this piece using dies and an embossing folder from Sizzix and Tim Holtz, together with idea-ology products.


To begin with I used the medium sized idea-ology square vignette box which is from a set of 3.

COVERING THE BOX
I'll begin with the sides of the box and for this I used the beautiful new Embossing Folder from Tim, called Entangled and I embossed enough Mixed Media Heavystock card to cover all four sides of the box. Once I'd cut the panels to size, I then adhered them to the sides using Matte Collage Medium. Once dry, I painted each panel with Speckled Egg Distress Paint, wiping away the excess paint using a semi damp wipe, or you can use a soft cloth. I allowed for this to dry before applying a coat of the medium over the top of the painted side panels. Again I allowed for the medium to dry and then I took my Walnut Stain Distress Crayon, rubbed this over the side before blending the colour into the detail of the raised areas. Taking the soft cloth, remove any excess crayon.

Now for the front of the box and for this I started by applying some Crackle Paste around the edge of the front of the box. Allow for the paste to do it's thing before running the Walnut Stain Distress Crayon over the top to accentuate the crackles.


After cutting a panel of the script design paper from the Backdrops Vol 2 pack of background papers, I machine stitched a border around the outside edge before taking the edge of my scissors, and running them along the edge of the paper, to add small rips and tears.

Once happy, I inked the edges with Walnut Stain Distress Ink and adhered the paper panel into position.

Because I wanted a vintage feel, I curled back and folded the corners of the paper to reveal the crackle that sits underneath.

At this stage, I also added some Crackle Paste to the background, applying it with a palette knife and as before, once the paste was dry, I used the Walnut Stain Crayon to accentuate the cracks that have appeared.

We now have the box ready and set this to one side to move onto the design....
XOXO ~ Bulletin Dies
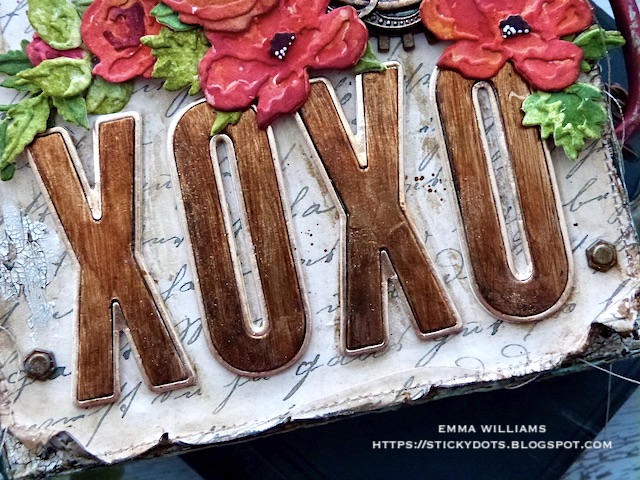
I wanted to make a real feature of the wording on this make, so I used the gorgeous new Bulletin Alphanumerics Die from the new Everyday 2023 collection. I cut four layers of the lettering and adhered these over the top of one another to form really thick die cut letters.

I then cut a final layer of gold metallic kraft card, keeping the shadow die cut for later, and adhered the gold layer over the top of the letters. To add the rusty, vintage tone to the gold metallic and knock back the shine a little, I used Distress Paints. I started with a layer of Black Soot, wiping away the excess and always drying between layers and then, one by one built up the colour using Crackling Campfire, Ground Espresso and Antiqued Bronze.
With my letters ready, I attached them to the box, aligning them with the bottom edge before adding the gold metallic shadow die cut around each of the letters.
FRAMED PHOTO
For the framed photo, I used the following:
Industrial Gears, the circular Deco Frame Adornment, a Photo Booth image and clippings sticker.
I started by cutting my photo into a circle. I used the Stacked Circles Dies for this but you can use any nesting die, punches or even cut by hand.

I colour tinted the photo using Distress Crayons and a water brush and then attached the photo to the centre of a Industrial Gear. I altered the colour of the gear using the same paints as I used on the die cut lettering.
I then layered the circular Deco Frame over the top, again altering the metal with the paints and then added a clipping sticker to the photo. The photo is attached with Matte Collage Medium to the top right hand corner of the box.

MINI BRUSHSTROKE FLOWERS
For this particular project, I wanted the image to be surrounded with red flowers, and greenery...so, I cut out two different flowers and a selection of foliage using the Mini Brushstroke Dies and then layered all my pieces to create the die cuts that I will be using.
I then water coloured each one individually using Distress Inks applied to my glass mat and picking up the colour with a water brush, or paint brush.

COLOURS USED;
Flowers: CracklingCampfire, Aged Mahogany, Kitsch Flamingo, Picked Raspberry, Wild Honey
Greenery: Peeled Paint, Shabby Shutters, Bundled Sage
Once each piece is ready, I added the centres to the larger flowers using black card and finished with some white pen details.

I adhered all my flowers into position using hot glue and foam pads which helps to create and add various heights and give a more realistic look to the layering.

To complete the front of my box, I added a Ephemera Snippets Number to the left hand side.

FINISHING DETAILS
As always, no project of mine feels complete without some Hardware Heads, so I added two of these to the either side of the panel, again these are painted to match the other metal on the make.

Finally, I added a handle which I painted red using Candied Apple Distress Paint and stuck to the side, placing hardware heads into the holes.
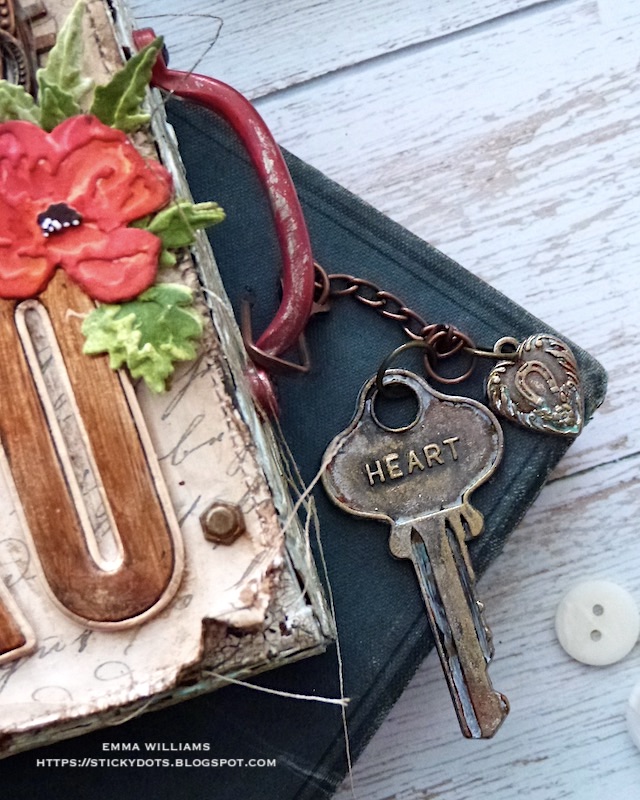
CHARMS
For one final touch to this make, I added a swivel clasp, that I clipped onto the handle. I then attached a Heart Adornment and a Word Key, complete with 'heart' written on it to the clasp ~ both of which I altered with the same paints as I've used throughout for all the metal.

That's it from me for today, and my project is complete! I hope you've loved the process and enjoyed looking at the piece I've made and the ideas I've given, which can be translated into scrapbook layouts, cards or you can use a photo of family members to make it more personal, the world is your oyster and you do you!

As always, if you make anything, or if you've been inspired by anything that you've seen here on my blog ~ then please, let me know by tagging me on social media or leaving a comment here and I will be right over to take a look!
Don't forget that every week, one lucky random participant has the chance to win a $25 gift voucher from Simon Says Stamp and you can join in up to 5 times, which means you could have 5 chances to win. You have until next Monday at 8am Ohio time. 1pm UK time, 2 pm CET to join in and good luck....


Recipe for project:


Such great inspiration Emma. Thank you
ReplyDelete