Showing posts with label remembrance day. Show all posts

Monday, 10 November 2025

Never Forget...

Hello friends....

This week's brand new Simon Says Stamp Challenge is called THINKING OF YOU and we would love for you to join us and play along with this fun theme!

As always, there are so many interpretations for this challenge and we can't wait to see what you create.

For my make, I chose to honour and remember all those who have fought so bravely for our countries and as tomorrow is Armistice Day, I thought there was no better time than to make this tag featuring a poppy wreath, made using Tim Holtz dies from Sizzix.

So, let's get started and here's how I created this tag!

For this project I used a Size 8 Mixed Media Heavystock Tag, and a Size 8 Etcetera Tag as my base.

BACKGROUND

To create the background, I used the Heavystock Tag and began by applying a coat of Black Opaque Paste through the Rosettes Mini Layering Stencil. I wanted quite a dark background for this piece to reflect the occasion, but used Mica Spray Stains to add a slight hint of shimmer and shine.

I allowed for the paste to dry thoroughly and then after misting the tag lightly with water, I applied my background colours:

DISTRESS SPRAY STAIN: Black Soot, Antique Linen

OXIDE SPRAY: Speckled Egg

MICA SPRAY STAIN: Crooked Broomstick, Unravelled, Iron Gate

Once I was happy with the colour, I dried the tag before adding some stamping across the bottom. For this I used the border stamp from The Inspector Stampers Anonymous set and stamped the border using clear embossing ink. I then sprinkled gold embossing powder over the top and heat embossed the powder until molten.

To complete the tag, I added some machine stitching around the edge before adhering the tag onto the Etcetera Tag, using Matte Collage Medium.

Finally, I used gold watercolour paint to add some splatters across the surface...

...and placed a Snippets Ephemera piece in the top right hand corner.

POPPY WREATH

To create the poppies and greenery for this wreath, I used a selection of the smaller floral and foliage dies from the Sizzix Brushstroke 2 Thinlits die set by Tim Holtz.

I began by using Distress Spray Stains to add colour to the Mixed Media Heavystock card...

POPPIES: Lumberjack Plaid, Crackling Campfire

LEAVES: Bundled Sage, Peeled Paint, Holly Branch Mica Spray

I then cut all my pieces ~ each poppy has two die cut layers and I also cut two layers of the stamens, from black card and inked the edges with Walnut Stain Distress Ink.

I layered the die cut pieces over the top of one another, offsetting the second layer and then shaped the petals. I made 8 flowers in total.

Cut the foliage pieces from the inky green card.

I then used circle dies to form my base. You will need approx 8cm and 6.5cm dies to form the frame for your poppy wreath.

I then built up my poppies and greenery around the circular frame, covering the circle so that it doesn't show.

With my wreath complete, I added gold Metallic Droplets into the centres of each poppy.

PLAQUE

To create the plaque that sits across the wreath, I cut a piece of gold metallic Kraft card, 8 x 2.5cm and then applied some Black Soot and Crackling Campfire Distress Paint over the surface. Wipe away any excess paint, as you don't want this to become too dark, you just want it to look weathered.

I then die cut each of my letters to spell the word "REMEMBER". I cut these four times to create and then layered them over the top of one another to create dimensional letters. I attached the letters to my strip and then dry brushed some Antiqued Bronze Distress Paint over the top.

Once dry, I then attached the plaque across the centre of the wreath, using foam pads to secure it into position.

Finally, I added two Tiny Clips to each side of the plaque.

FINISHING DETAILS

I finished this tag by adding 3 Hardware Heads across the bottom of the tag, all of which I painted with the same paints as I used on the plaque.

I then added some rope from my stash.

So, that's my tag complete, and I hope you love the details and techniques I've used to make it.

As always, if you make anything, or if you've been inspired by anything that you've seen here on my blog ~ then please, let me know by tagging me on social media or leaving a comment here and I will be right over to take a look!

Don't forget that every week, one lucky random participant has the chance to win a $25 gift voucher from Simon Says Stamp and you can join in up to 5 times, which means you could have 5 chances to win. You have until next Monday at 8am Ohio time. 1pm UK time, 2 pm CET to join in and good luck....


Thank you so much for taking the time to stop by today...
Love Emma xxx

Recipe for project:

Distress Ink: Walnut Stain
Distress Paint: Antiqued Bronze, Black Soot, Crackling Campfire
Mica Spray Stain: Crooked Broomstick, Unravelled, Iron Gate, Holly Branch
Distress Spray Stains: Black Soot, Antique Linen, Lumberjack Plaid, Crackling Campfire, Peeled Paint and Bundled Moss
Oxide Spray: Speckled Egg
Tim Holtz Idea-ology: Hardware Heads, Snippets Ephemera, Tiny Clips
Rope and Gold Watercolour Paint from my own stash

****These are not affiliate links****

Monday, 30 October 2023

We Will Not Forget...

Hello friends...

Hope you've all had a good weekend and for those who love Halloween, hope you're ready for some spooktacular fun tomorrow...

As always, the start of a new week brings a brand new Simon Says Stamp Monday Challenge and this week our theme is called "Thinking Of You". There are so many ways you can interpret this theme, whether it's to share the love, show you care or just that you're thinking of someone at Christmas...so, with all these ideas, we hope you'll come and join us and have some fun!

For my project, I created a tag for Remembrance Day, a piece to remember and honour those who have bravely fought for our countries, for the lives that have been lost and for those who are still fighting for peace. We will never forget....


They shall grow not old, as we that are left grow old: Age shall not weary them, nor the years condemn.
We will remember them.

So let's get started, it's time to show you how I created my tag....


I used a size 8 Mixed Media Tag and a size 8 Etcetera Tag.

TAG BACKGROUND

The background for this tag is to symbolise the fact that these people are remembered 365 days of the year, which is why I used numbers.

Taking my size 8 tag, I placed the Numeric Mini Layering Stencil from Set 7 over the top and then applied a layer of Translucent Grit Paste through the design. Remove the stencil and working quickly, sprinkle Pumice Stone Distress Glaze over the paste and then set to one side to dry.

Once the paste has set, then use a heat tool to gently melt the glaze to create the enamelled effect to the stencil work, moving the heat gun around and not concentrating on one area too long as this will cause bubbling.

Now to add the background colour and for this I used a combination of the following:

Distress Stain Sprays: Black Soot, Pumice Stone, Speckled Egg

Oxide Spray: Speckled Egg

Mist water to blend the colours and then either leave to air dry or gently dry with a heat tool. Sometimes it's really hard to cover up these backgrounds but, you can always make more....

After inking the edges with Black Soot Distress Ink, I machine stitched a border around the outside and then mounted the tag onto my Etcetera Tag using Matte Collage Medium.

Now we can move onto the poppies and quote plaque...

PLAQUE

To create the plaque, I used the Sizzix Label Alphanumeric Die Set by Tim Holtz and metallic kraft card. I cut the word REMEMBER twice from silver metallic card, then layered the letters over one another to form a double thickness. I then attached each letter to a strip of gold metallic kraft card.

Using Black Soot Distress Paint, apply the paint over the entire plaque, allow for the paint to become slightly tacky, not dry and then wipe away the excess. Take a second colour of Distress Paint, Ground Espresso and repeat the process. Finally to accentuate the lettering, apply a small amount of Gilded Foundry Wax over the top of the lettering and using a very gentle setting heat set the wax.

I matted the plaque onto a further strip of gold metallic card and once I'd machine stitched down either side, I mounted the plaque onto my tag using foam pads.

To complete the plaque, I hammered two Tack Nails into each side and altered them with a little Distress Paint in the same colours as I used on the plaque itself.

POPPIES

Now to make those poppies using the Sizzix Modern Floristry die set from Tim.

I began by colouring some Heavystock Card with Barn Door, Crackling Campfire and Candied Apple Distress Spray Stain. Once happy with the blend, I heat dried the card and then used two of the dies to make two sizes of poppies and the layers.

Each poppy has a double layer and if you take a look at the packaging itself, I used two of the dies that are shown as red flowers on the front and cut enough pieces to form 6 flowers.

You will need 3 x large flowers and 9 smaller flowers

With the die cut pieces on my glass mat, I then spritzed the backs of each die cut with water and scrunched the card to break down the fibres of the card itself before I opened them out again and shaped the petals. Ink the edges of each die cut with Lumberjack Plaid and Walnut Stain Distress Ink.

Place the smaller die cuts inside the larger ones to create three large poppies and then layer the remaining flowers to make the smaller poppies.

Die cut two centres from black cardstock for each poppy using the larger of the dies and then use a ball tool to shape them before layering them inside each flower.

In the centres, I added a small vintage pearl that I had in my stash but you can use baubles and colour them with alcohol inks.

ARRANGING THE POPPIES AND EMBELLISHMENTS

Arrange four poppies onto the top section of the tag.

The remaining two poppies are arranged with the metal branches that I took from the idea-ology Spiders and Branches Adornments set. I LOVE these and would be so happy to have just a pack of these for everyday embellishments.

To add some colour to the embellishments, I used a combination of Foundry Waxes and Mushroom Alcohol Ink. Firstly, I apply a layer of Statue Foundry Wax to the surface of the metal, heat set and then apply a layer of Sterling Foundry Wax over the top but this time, not a solid layer, you still want some of the colour from the previous wax to show underneath. Heat set again and then drip Mushroom Alcohol Ink over the top, dabbing away any excess puddles with a paper towel.

Attach the finished metal pieces with the poppies in a swathe across the bottom section of the tag.

FINISHING DETAILS

We're nearly there and all that's left is the finishing details.

I attached four Hardware Heads to each corner, and painted the metal with a combination of Black Soot and Tarnished Brass Distress Paint.

I then attached rope through the hole at the top of the tag...

...and pinned a Word Tag, "HOPE", altered with Distress Paints and Foundry Wax, using exactly the same technique as I used to alter the word plaque.

Down the left hand side of the tag, I added a Remnant Rub from the Labeled set, "Identification Card Stub".

FALLING PETALS

Finally, I added the falling petals. For these, I once again used the smaller flower die and cut one more petal. I then snipped into the flower to cut individual petals which I shaped before attaching them to my tag.

So, that completes my make for today and I hope you've loved the techniques of how I made it...

As always, if you make anything, or if you've been inspired by anything that you've seen here on my blog ~ then please, let me know by tagging me on social media or leaving a comment here and I will be right over to take a look!

Don't forget that every week, one lucky random participant has the chance to win a $25 gift voucher from Simon Says Stamp and you can join in up to 5 times, which means you could have 5 chances to win. You have until next Monday at 8am Ohio time. 1pm UK time, 2 pm CET to join in and good luck....


Thank you so much for taking the time to stop by today....love Emma xxx

Recipe for project:

Tim Holtz/Stampers Anonymous: Set 7 Mini Stencil Set, Size 8 Etcetera Tag
Distress Spray Stains: Black Soot, Pumice Stone, Speckled Egg
Oxide Spray: Speckled Egg
Distress Inks: Walnut Stain, Lumberjack Plaid
Distress Glaze: Pumice Stone
Distress Paint: Black Soot, Ground Espresso, Tarnished Brass

Monday, 25 October 2021

Where Poppies Blow....

Hello friends and happy Monday!

Hope you all had a wonderful weekend and as we head into the final week of October, it's time for a brand new Simon Says Stamp Monday Challenge and this week our theme is called THINKING OF YOU!

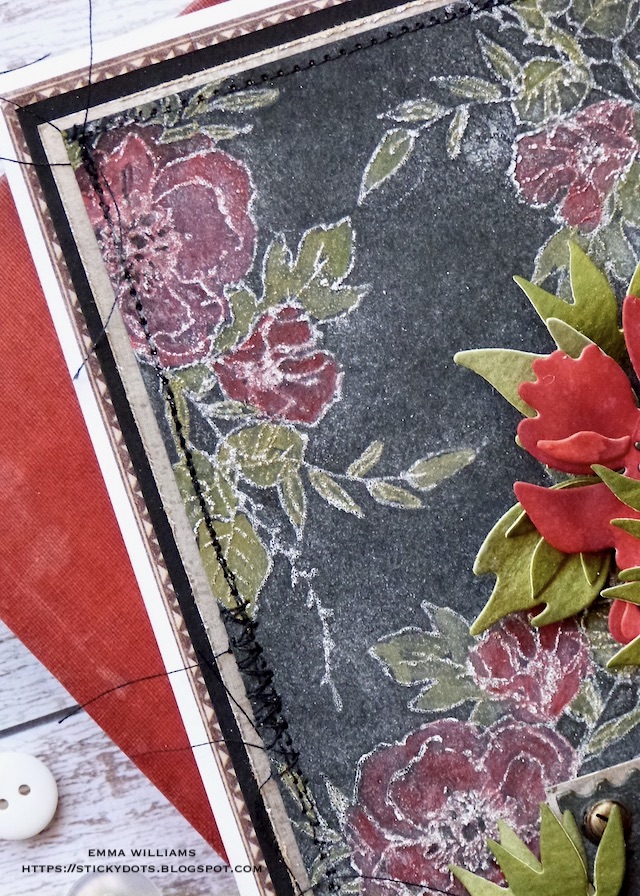
With Remembrance Day and Armistice Day just around the corner, as always at this time of the year, I felt inspired to create a card that would be a tribute to all those who have served our countries and used Tim Holtz products from Sizzix and Stampers Anonymous to make it!

So let's get started and here's how I created my tribute card...

To begin with I made a card blank from white card measuring 13.5 x 21cm with the fold at the top. I wanted a decorative border around the outside of my card layers that I will be mounting onto the card blank, so for this I used Design Tape and just stuck it around all four edges of the card to create a border. 

Now for the first layer, and the chalkboard effect that I created for the background....

I cut a piece of black card, 11.5 x 19cm ( I always use smooth card for this technique) and using the Stampers Anonymous Floral Outline stamp set, I took one of the three designs that features the poppy in the design and after inking up the stamp with clear Versamark embossing ink, I started stamping the floral image over the entire background to create my background design.

I then sprinkled the stamped images with Frosted Crystal Embossing Medium and after tapping away the excess, I heat embossed the images. 

TOP TIP: Do not overheat the powder, once it has melted and you can see that the texture has become crystallised, I always move onto the next section of embossing! 

This medium leaves a gorgeous crystal gritty textured finish and as Tim demonstrated in his recent YouTube Live, this is perfect for this chalkboard technique, which is so easy but so effective and all you need to do to make the images pop is rub a piece of chalk over the textured embossing and then rub it with your finger to make sure it really gets into all those raised areas.

Once I was happy, I then started colouring my flowers and for this I used Distress Paints and a waterbrush.

COLOURS: Barn Door, Candied Apple, Peeled Paint, Forest Moss.

When you watercolour each of the flowers using the combination of red paints, and the leaves coloured with the green paints, you will find that you lose some of the chalk outline, so once the artwork was dry, I just gently rubbed a light touch of Matte White Wax Paste over the top to accentuate the outlines again.

With the background finished, I machine stitched a border around the outside and then matted the panel onto silver kraft stock card, followed by another layer of black card.

At this stage, I dyed some Mummy Cloth with Black Soot Distress Spray Stain and once it was dry I wrapped the cloth around my card layers, and secured it with a knot on the right hand side.

I then mounted the layers onto my card blank with foam pads, placing it with the design tape border showing around the outside of the layers.

Moving onto the next stage ~ the sentiment plaque.

For this I cut a panel of black card using an older Tim Holtz die set, Stacked Postage Stamp Thinlits Die set which I have in my stash. I then cut my lettering, 'We Will Remember Them' cutting each letter from silver metallic kraft stock using the Alphanumeric Label die set. I always adhere a piece of adhesive sheet to the back of my card as this really does make sticking the smaller die cuts, including these letters so much easier.

After attaching the letters to the black postage stamp die cut, I matted it onto more of the silver metallic card. I didn't want the silver to be too shiny, so to knock it back I ran the Black Soot Distress Crayon over the top, before I adhered the plaque to the front of my card blank with foam pads.

To finish the plaque, I added a Hardware Head to each opposite corner of the plaque.

Now the poppies...

I used the Sizzix Brushstroke Flowers 1 Thinlits Die Set by Tim Holtz, and cut the main layered sections for three flowers from Mixed Media Heavystock card that I had coloured with Candied Apple, Aged Mahogany and Barn Door Distress Spray Stains. I inked the edges with a little more Aged Mahogany Distress Ink and then assembled each piece to create my poppies, adding a black centre die cut to each flower.

I then cut a selection of leaves using the same thinlits die set, and cut these from more of the Mixed Media Heavystock card coloured with Bundled Sage, Peeled Paint and Crushed Olive Distress Sprays.

The flowers are now ready to arrange on my card and I placed them to overlap the sentiment plaque and cascade down the card front, with the leaves nestled amongst them.

For the finishing touches, I added a mini pin, and story stick to the knot of the mummy cloth....

...before clipping a tiny clip, painted with Candied Apple Distress Paint, onto the right hand side of the plaque.

So that completes my tribute card which I hope you love and I hope you've been inspired by some of the tricks and techniques I've used.

As always, if you make anything, or been inspired by anything that you've seen here on my blog ~ then please, let me know by tagging me on social media or leaving a comment here and I will be right over to take a look!

Don't forget that every week, one lucky random participant has the chance to win a $25 gift voucher from Simon Says Stamp and you can join in up to 5 times, which means you could have 5 chances to win. You have until next Monday at 8am Ohio time. 1pm UK time, 2 pm CET to join in and good luck....


Thank you so much for taking the time to stop by today ~ stay safe and keep well.
Love Emma xxx

Recipe for project:

Stampers Anonymous: Floral Outline
Sizzix/Tim Holtz: Brushstroke Flowers 1, Alphanumeric Label Thinlits Die set, Stacked Postage Stamp Thinlits Die Set from my own stash
Distress Ink: Aged Mahogany
Distress Spray Stain: Candied Apple, Barn Door, Aged Mahogany, Peeled Paint, Bundled Sage, Crushed Olive, Black Soot
Distress Paint: Barn Door, Candied Apple, Peeled Paint, Forest Moss.
Distress Crayons ~ Black Soot
Powered By Blogger

Total Pageviews