Showing posts with label Birthday. Show all posts

Monday, 7 August 2023

Get The Party Started...

Happy Monday friends...

As always, a brand new week means the start of a new Simon Says Stamp Monday Challenge and this week, we are ready to party because our theme is called HAPPY BIRTHDAY and here on the SSS Monday Challenge Blog, we are celebrating 13 years of wonderful makes and inspiration.

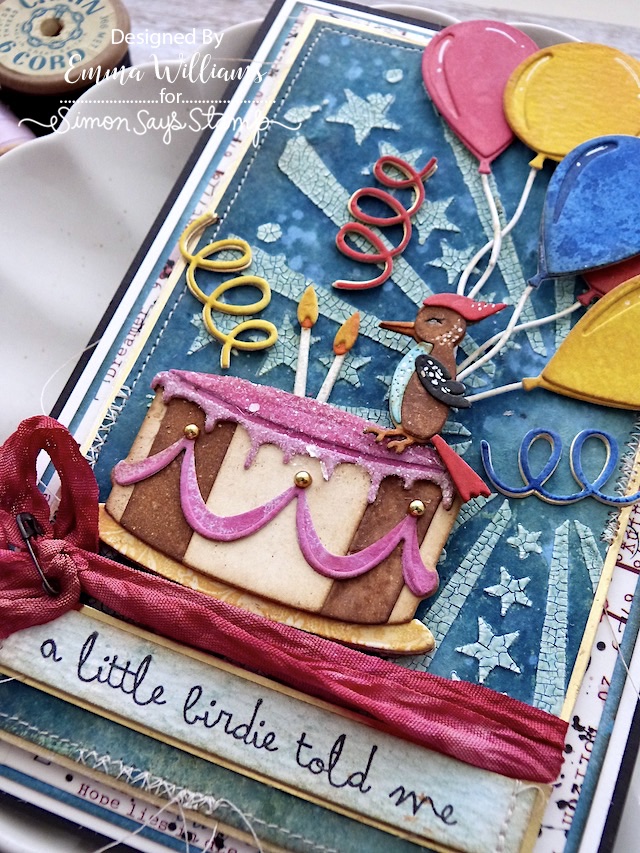
The DT are also showcasing AALL & Create products within their makes and I used their Stars and Rays Stencil combined with Tim Holtz and Sizzix products, to make a bold and bright birthday card, which I think you might agree is a slight departure for me but I thought it fit the scene and what's a party without some happy colours.

So let's get started, because a little birdie has told me, it's time to turn up the music and PARTAAAY....


To start with I made a black card blank that measures 18 x 11.5cm. I then cut a panel of white card and adhered a border of AALL & Create Twine Washi Tape around the edge to create a decorative border. I matted this onto a panel of blue card, followed by ivory card and mounted the layers onto my card blank.

BACKGROUND

I'll begin with the background and for this I cut a panel of Mixed Media Heavystock which I coloured using a combination of Distress Spray Stains and Oxide Sprays in the following colours;

DISTRESS STAINS: Uncharted Mariner, Old Paper, Speckled Egg

OXIDE SPRAYS: Speckled Egg

After misting the panel with water, I applied the sprays one by one, building up the colour and creating the perfect blend for my background. 

I made sure the card was thoroughly dry before laying the AALL & Create Stars and Rays stencil over the top and applying Distress Crackle Paste. I only used a section of the stencil for this particular project.

Remove the stencil and then whilst the paste is still wet, sprinkle Speckled Egg Distress Glaze over the top. Tap away the excess and set to one side for the paste to set and then once, that has happened and the crackles have appeared, it's time to heat set the glaze until molten and shiny.

I inked around the edges of the panel before machine stitching a border and then matted it onto a piece of gold metallic kraft card.

I wrapped some crinkle ribbon around the bottom section of my card layers and I dyed this with a combination of Antique Linen and Lumberjack Plaid to create the beautiful shade of red. This was secured with a knot and an idea-ology Mini Pin.

Using foam pads, I mounted these layers onto my card blank and we're now ready to decorate the card and start the party...

WOODY WOODPECKER

The little birdie is cut using the Cozy Winter die set and after colouring each die cut layer with Distress Watercolour Pencils, I assembled him and then added white pen detail.

CAKE & BALLOONS

To begin the party celebrations, using Mixed Media Heavystock card, I cut the cake, candles, swirls and the balloons using the Celebrate Colorize die set by Tim Holtz and Sizzix.

Each piece was inked using Distress Inks and Blending Tools in the following colours:

CAKE: Brushed Corduroy, Antique Linen, Kitsch Flamingo, Picked Raspberry and the plate from stamped leftover scraps in my scrap box

CANDLES: Antique Linen, Spiced Marmalade, Mustard Seed

BALLOONS: Prize Ribbon, Lumberjack Plaid, Mustard Seed, Wild Honey

SWIRLS: Prize Ribbon, Lumberjack Plaid, Mustard Seed

I assembled all my inked layers to create each piece and layered each of the swirls over gold metallic cardstock to add a shadow.

For the cake, I wanted to add some glitter to the pink frosting on the top and all that I did was apply some Glossy Accents over the frosting, and then sprinkled Rock Candy Glitter over the wet medium. Allow to dry and then add gold metallic droplets to the cake as decoration.

ASSEMBLING THE SCENE

Taking the cake, I placed foam pads on the back and then stuck it just above the ribbon that I wrapped around the card, placing it on the left hand side and adding the candles and the plate.

I then attached Woody to sit on the cake, adding the balloons to look as if he's holding them behind his back...

...and finished with the swirls, that can be seen all around the arrangement.

SENTIMENT

Finally, I added the sentiment. This is from the Stampers Anonymous Crazy Talk stamp set by Tim and I stamped it in Black Soot Archival Ink onto a piece of card that I inked with Speckled Egg Distress Spray Stain. I matted the sentiment strip onto gold metallic kraft card and then attached it to my card, placing it below the ribbon strip, using foam pads to secure it  into place.
So, that's my card ready for this week's party and I hope you've loved the ideas and inspiration.

As always, if you make anything, or if you've been inspired by anything that you've seen here on my blog ~ then please, let me know by tagging me on social media or leaving a comment here and I will be right over to take a look!

Don't forget that every week, one lucky random participant has the chance to win a $50 gift voucher from Simon Says Stamp and you can join in up to 5 times, which means you could have 5 chances to winYou have until next Monday at 8am Ohio time. 1pm UK time, 2 pm CET to join in and good luck....


Thank you so much for taking the time to stop by today ~ Love Emma xxx

Recipe for project:

Tim Holtz/Stampers Anonymous: Crazy Talk
Distress Spray Stain: Speckled Egg, Old Paper, Uncharted Mariner, Lumberjack Plaid
Distress Inks: Walnut Stain, Lumberjack Plaid, Prize Ribbon, Mustard Seed, Wild Honey, Picked Raspberry, Brushed Corduroy, Antique Linen, Kitsch Flamingo
Distress Glaze: Speckled Egg
Tim Holtz idea-ology: Mini Pins, Metallic Droplets

Monday, 5 August 2019

Busy, Busy Bees....

Hello friends...

Happy Monday everyone and hope you all had a fabulous weekend! Today, I'm back with my regular Simon Says Stamp Monday Challenge Blog Post and this week the DT are showcasing SSS products and combining it with our theme, HAPPY BIRTHDAY because this month is a very special month  ~ SSS are celebrating their 9th birthday and we hope you'll join us to congratulate them!

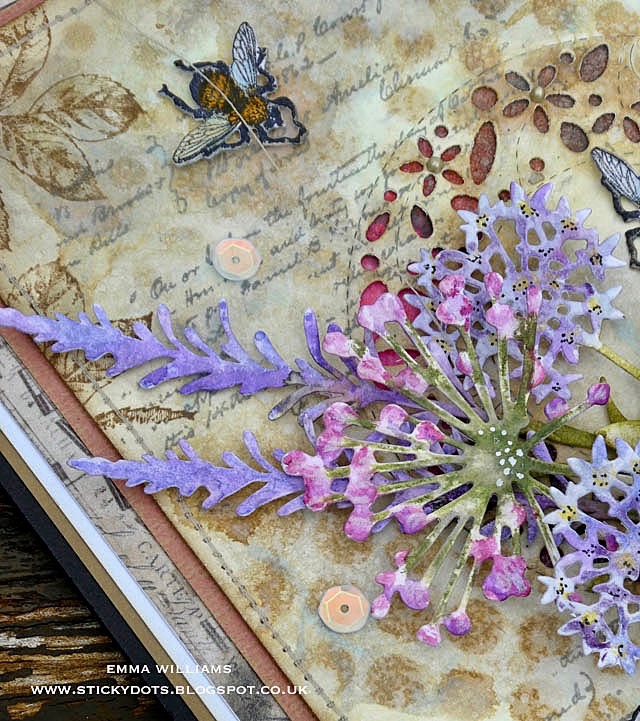
When it comes to birthdays, I think most of us send a card and that's why I chose to use some of Simon's goodies from some of their latest releases, including the gorgeous Filigree Wreath Die and combined these with some Tim Holtz, Stampers Anonymous and Sizzix products to create this card project, perfect for all those people who love vintage pieces.
So, let's get started and here's how I made this vintage style birthday card...


To begin with I created the background and the first layer of my card...

I cut a panel of Mixed Media Heavystock card, measuring 13 x 17cm and I began by adding some vintage colour and applied Pumice Stone Distress Ink to my glass mat. After spritzing the ink with water, I dragged the card through the ink and then heat dried the card. I usually go back in for a double, or even triple dip to make sure that I get every drop of ink from the glass mat before heat drying the card again and moving on to the next layer, Old Paper Distress Oxide Ink. Once again, I smooshed the ink onto the glass mat, spritzed and then picked up the colour onto my card by dipping, not dragging. Once again, I picked up as much ink as the card would take by keep dipping it into the colour. Finally, I applied another layer of Pumice Stone DI onto the card, using the same technique but this time just dipping the card into the misted inks, not dragging it through.

After heat drying the card, I placed the Filigree Wreath SSS Die onto the card and ran the panel through my die cutting machine to cut the decorative wreath into the card. 

I then took the Entomology Script stamp and inked it with Hickory Smoke Archival Ink, stamping the script onto random areas of my card. For the next inky layer, I took the Gradient Dot Layering Stencil and inked through the stencil using Frayed Burlap Distress Oxide Ink. I then spritzed the card with a light misting of water and heat dried the panel.
Using one of the leaf stamps from the Nature's Wonder Stamp Set, I stamped the leaf design over the background panel using Vintage Photo Archival Ink before inking the edges of the card panel with Walnut Stain Distress Ink. To complete the card panel, I added some machine stitching around the edge to create a border.

For the final stamped layers I used the Paris Postmark stamp that I stamped in the top right hand corner and then added No. 1411 from the Correspondence Stamp Set and popped that in the bottom left hand corner.
I had a piece of card that I found in my stash that was inked with some Distress Oxide Inks, (sorry I can't remember the colours but the overall card colour was definitely Picked Raspberry, lol) and placed this piece of card behind the die cut section of the background panel ~ you can see the colour just peeking through.
I then matted the background onto pink Classic Kraft card, followed by a panel of card that I applied some Design Tape around the edge to create patterned paper, followed by a layer of card inked with Old Paper Oxide Ink. I then matted the layers onto kraft card before attaching it to my black card blank.
For the Wildflower Bouquet, I cut my flowers from Distress Watercolour Card and then coloured them with Distress Marker Pens ~ a combination of Picked Raspberry, Wilted Violet, Shaded Lilac, Peeled Paint, Bundled Sage and Squeezed Lemonade.

I then arranged the flowers into a bouquet and tied them together with a piece of twine, which has an addition of a small key adornment, altered with a little Distress Paint and a SSS Sentiment Strip, Happy Birthday!

I attached the bouquet to my card front,  adding some carefully hidden foam pads at the back of the flowers so that it would create a small amount of dimension.
For the final touch, I added some bees, stamped onto watercolour card using the Entomology Stamp Set and then die cut with the corresponding die set.
I then coloured each bee with Distress Marker Pens before adding a Wink Of Stella shimmer to the wings.
I attached the bees to my card with foam pads, placing them all around the bouquet of flowers.
Finally, I added some Strawberry Shortcake Sequins around the arrangement...
...before adding some Nuvo Crystal Drops onto the Filigree Wreath Circle.
So, that's it from me for today and I hope you've loved the card I've made because I really enjoyed creating it!

Have fun creating your projects and don't forget, you can find more inspiration from my talented teamies over on the challenge blog and every week, one lucky random participant has the chance to win a $50 gift voucher from Simon Says StampYou have until Monday 8am Ohio time. 1pm UK time, 2 pm CET to join in and good luck....


Thank you so much for taking the time to stop by today and hope to see you again soon, love Emma xxx


Recipe for project:


SSS Products: Filigree WreathSimon Says Stamp Sentiment Strips, Strawberry Shortcake Sequins

Monday, 7 August 2017

Happy Birthday...

Hello everyone and welcome to the brand new Simon Says Stamp Monday Challenge! This month, Simon Says Stamp is celebrating their 7th birthday and because it's such a special occasion we would like you to create something to help with our birthday celebration! It could be a card, a tag to attach to a gift, a gift or maybe a birthday banner or cake topper! Whatever you decide to make we will be looking forward to seeing how you join us for the party!

As it is the first Monday of the month, and because it's our birthday, we are also showcasing our very own Simon Says Stamp Products!

For my card, I combined one of Tim Holtz's Crazy Dogs with a couple of SSS products and hope you love the card I've made...
It's time for the challenge to begin...
 

For this card, which measures approx 17cm square, I started by cutting two panels of textured card stock to create my background. I then placed the Collage Frond die in the centre of the first card panel and die cut the aperture. In the second piece of card, I place the die slightly offset to where the first die was placed on the first piece of card ~ by doing this, it will give me the double layer of leaf effect around the aperture. Once both card panels are die cut, layer the one over the top of the other, aligning the aperture to create a double layered frond effect around the circle.

I wanted to create a worn wood effect to the background and began by adding a layer of Antique Linen and Frayed Burlap Distress Paint, blending the colours with a semi dry baby wipe. I then heat dried the card before adding more colour using Distress Crayons ~ I chose, Ground Espresso, Black Soot, Walnut Stain and Pumice Stone. Scribble a small amount of colour from each crayon over the painted surface and then once again, using the semi dry baby wipe, I blended out the colour until I was happy with the desired effect.

I then used an old credit card to scrape some white gesso over the background to create the worn effect.
Once the background was thoroughly dry, I then moved onto the leaves and painted these with Peeled Paint Distress paint before adding a layer of Fairy Wings Sparks paint over the top for a slight shimmer.

Attach Hex Fasteners to each of the four corners and using Gold Rush and Steampunk Copper Alchemy Paints, paint the fasteners to create this gorgeous rusty look.
For the next layer on the card, I used the SSS Flora Background stamp and stamped this onto a piece of kraft card using Versamark Watermark Ink pad. Sprinkle with white embossing powder and heat until molten. I then cut the card to the same size as my painted panel before mounting the painted panel over the top using foam pads for dimension and lining it up perfectly so that the centre of the Flora stamp showed through the aperture of the Collage Frond die.

Matt the background layers onto a piece of blue card from the Classic Kraft stash, followed by a layer of gold metallic and finally a layer of black soot kraft stash card. Mount the matted layers onto a kraft card blank.

Now for the fun part...it's Crazy Dog time and I stamped two images of my cute little pup onto Mixed Media card, coloured both images using Distress Marker Pens before die cutting them with the corresponding Sizzix dies before layering the pieces to create my dimension pup. I then added a party hat and a balloon from the Crazy Things Stamp set, and again die cut using the Sizzix dies.
I then stamped used the Crazy Talk stamp set to stamp the message 'you're how old?' onto kraft card, matted onto a piece of red card. I attached the message to a memo pin, and tucked the pin behind the aperture of the Collage Frond.
I attached my crazy dog, his party hat and ballon onto the card, placing him so that it looked as if he was jumping out of the circle to say "you're how old?"!!!
I added some gems and sequins around the image before tying some red string down the spine of the card and adding some tokens ~ 'happy' and the number '7. I gave each token a rusty effect by applying Picket Fence Paint and a small amount of Rich Copper Alchemy Wax over the metal....
...which completes my card and project for this week and I hope you love this fun card and enjoyed the creative process behind it!
As always, if you do need any further inspiration, then look no further than our blog to see all the wonderful creations from all the very talented Design Team members and this week, not one but TWO lucky random participants have the chance to win a $50 gift voucher from Simon Says StampYou have until Monday 8am Ohio time. 1pm UK time, 2 pm CET to join in and good luck....


Thank you so much for stopping by today and see you again very soon!
Love Emma xxx


Heat Gun
Canvas paper from my own stash
Powered By Blogger

Total Pageviews