Happy Monday friends...
As always, a brand new week means the start of a new Simon Says Stamp Monday Challenge and this week, we are ready to party because our theme is called HAPPY BIRTHDAY and here on the SSS Monday Challenge Blog, we are celebrating 13 years of wonderful makes and inspiration.
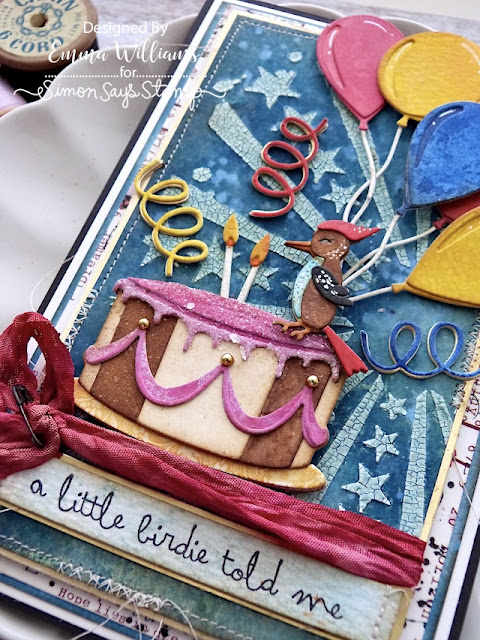
The DT are also showcasing AALL & Create products within their makes and I used their Stars and Rays Stencil combined with Tim Holtz and Sizzix products, to make a bold and bright birthday card, which I think you might agree is a slight departure for me but I thought it fit the scene and what's a party without some happy colours.
So let's get started, because a little birdie has told me, it's time to turn up the music and PARTAAAY....
BACKGROUND
I'll begin with the background and for this I cut a panel of Mixed Media Heavystock which I coloured using a combination of Distress Spray Stains and Oxide Sprays in the following colours;
DISTRESS STAINS: Uncharted Mariner, Old Paper, Speckled Egg
OXIDE SPRAYS: Speckled Egg
After misting the panel with water, I applied the sprays one by one, building up the colour and creating the perfect blend for my background.
I made sure the card was thoroughly dry before laying the AALL & Create Stars and Rays stencil over the top and applying Distress Crackle Paste. I only used a section of the stencil for this particular project.
Remove the stencil and then whilst the paste is still wet, sprinkle Speckled Egg Distress Glaze over the top. Tap away the excess and set to one side for the paste to set and then once, that has happened and the crackles have appeared, it's time to heat set the glaze until molten and shiny.
I inked around the edges of the panel before machine stitching a border and then matted it onto a piece of gold metallic kraft card.
I wrapped some crinkle ribbon around the bottom section of my card layers and I dyed this with a combination of Antique Linen and Lumberjack Plaid to create the beautiful shade of red. This was secured with a knot and an idea-ology Mini Pin.
Using foam pads, I mounted these layers onto my card blank and we're now ready to decorate the card and start the party...
WOODY WOODPECKER
The little birdie is cut using the Cozy Winter die set and after colouring each die cut layer with Distress Watercolour Pencils, I assembled him and then added white pen detail.
CAKE & BALLOONS
To begin the party celebrations, using Mixed Media Heavystock card, I cut the cake, candles, swirls and the balloons using the Celebrate Colorize die set by Tim Holtz and Sizzix.
Each piece was inked using Distress Inks and Blending Tools in the following colours:
CAKE: Brushed Corduroy, Antique Linen, Kitsch Flamingo, Picked Raspberry and the plate from stamped leftover scraps in my scrap box
CANDLES: Antique Linen, Spiced Marmalade, Mustard Seed
BALLOONS: Prize Ribbon, Lumberjack Plaid, Mustard Seed, Wild Honey
SWIRLS: Prize Ribbon, Lumberjack Plaid, Mustard Seed
I assembled all my inked layers to create each piece and layered each of the swirls over gold metallic cardstock to add a shadow.
For the cake, I wanted to add some glitter to the pink frosting on the top and all that I did was apply some Glossy Accents over the frosting, and then sprinkled Rock Candy Glitter over the wet medium. Allow to dry and then add gold metallic droplets to the cake as decoration.
ASSEMBLING THE SCENE
Taking the cake, I placed foam pads on the back and then stuck it just above the ribbon that I wrapped around the card, placing it on the left hand side and adding the candles and the plate.
I then attached Woody to sit on the cake, adding the balloons to look as if he's holding them behind his back...
...and finished with the swirls, that can be seen all around the arrangement.
SENTIMENT
Finally, I added the sentiment. This is from the Stampers Anonymous Crazy Talk stamp set by Tim and I stamped it in Black Soot Archival Ink onto a piece of card that I inked with Speckled Egg Distress Spray Stain. I matted the sentiment strip onto gold metallic kraft card and then attached it to my card, placing it below the ribbon strip, using foam pads to secure it into place.
So, that's my card ready for this week's party and I hope you've loved the ideas and inspiration.
Don't forget that every week, one lucky random participant has the chance to win a $50 gift voucher from Simon Says Stamp and you can join in up to 5 times, which means you could have 5 chances to win. You have until next Monday at 8am Ohio time. 1pm UK time, 2 pm CET to join in and good luck....
Recipe for project:


Emma you are amazing and I am so glad that I found you on Pinterest. Thank you for what you do. Can you tell me what sewing machine you use?
ReplyDeleteMany thanks,
Amy
Hi Amy! Thank you so much for your kind words, they made my day and I really do appreciate what you’ve said and so happy you did find me on Pinterest.! ❤️
DeleteWith regards to the sewing machine I use, it’s a Brother LS14! I’ve had it for a few years now and I love it, so…I hope that helps with your question but if you need to ask anything else, please don’t hesitate to message me!