Hello everyone...
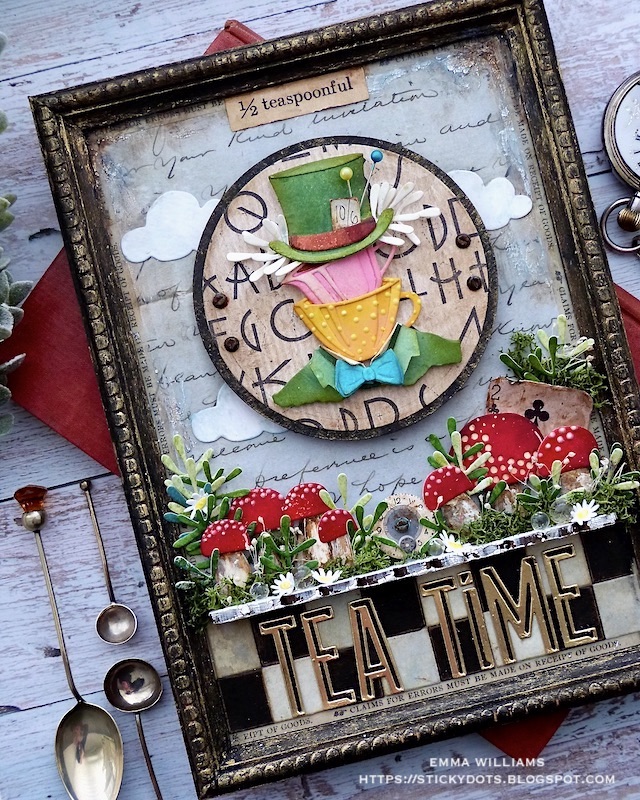
It’s the start of a bran node week and to celebrate, I'm actually going to be sharing two posts and my first post is something that I made using the Sizzix 2023 Everyday die collection by Tim Holtz. This project is actually a make that I started to think about as soon as I got my dies way back at the beginning of the year, and today, I finally get to share it.
Now some of you already know that I’m a big fan of the Tim Burton version of Alice In Wonderland, and I LOVE the Mad Hatter character that Johnny Depp portrayed but this particular make was inspired by the whimsical and colourful world of the Disney version of Alice, and of course in this version, the Mad Hatter has white hair and a green hat and jacket. So with this in mind, I thought about how I could recreate the tea party scene from the movie, and after a little play, I decided to use the Abstract Elements Thinlits die set to create many of the elements on this project, including the Mad Hatter's hair, the toadstools and the foliage, and once I’d combined this die with Alpha Emporium, Papercut Cafe and the Tailored die sets, my version of the Mad Hatter's Tea Party came to life.
So let’s get crafting because it's time for tea and you definitely don't want to be late....
I used one of Tim's idea-ology Framed Panels for this make ~ they are now sadly discontinued but I had some in my stash. If you don't have this frame, then no worries because any frame or canvas will work, or you can create these ideas on a card or vignette box.
FRAME
This frame comes in two separate pieces, the back panel and the frame itself and I began by painting the frame and the edges of the panel, with Black Soot Distress Paint.
Once dry, I lightly sanded the pieces and then applied a light coverage of Gilded Foundry Wax over the top of the beading to accentuate it. Heat set the wax with a heat tool.
Once I was happy with the frame, I cut a panel of paper from the Backdrops Vol 5 pack and adhered this to the back panel with Matte Collage Medium.
I then used Design Tape Trim around the edges, so that once my wooden frame goes over the top, you can see a border of the trim tape.
I fixed the wooden frame into position using Matte Collage Medium and then clamped the two pieces together with bulldog clips until it was completely dry and the adhesive had set.
BACKGROUND
With the frame completed, I moved onto my background and started by adding the checkerboard across the bottom section of the frame.
For this I used the smallest die in the Stacked Squares Thinlit set and cut the tiles from black kraft card, sanded around the edges and Mixed Media cardstock that I had inked with a combination of Antique Linen, Old Paper and Lost Shadow. Ink each square with Walnut Stain Distress ink and then attach them with matte collage medium, placing them alternatively across the bottom section of the frame.
Above the checkerboard I attached a Scalloped Etcetera Trim. I added Crackle Paste to the trim, top and bottom and then once the medium was dry and the crackles had appeared, I attached the trim to create a ledge, directly onto the background using Matte Collage Medium to secure it into place.
Around the top section of the frame, I applied crackle paste, just adding it around the edges and once again, allowed this to dry before colouring the paste with a combination of Speckled Egg, Walnut Stain, Gathered Twigs and Black Soot Distress Crayons, blending out any harsh line of colour using a damp paint brush.
Finally, I added some clouds to the background and for these I used the Christmas Cutouts Die Set to cut three clouds from watercolour card. I added a light wash of Speckled Egg Distress Ink over the top and then attached the three pieces to my background with Matte Collage Medium. TIP: If you don't have a cloud die, then clouds are really easy to cut by hand. Just draw a shape in pencil, onto the card and cut with scissors before rubbing out the pencil line.
We're now ready to create the trip to wonderland.....
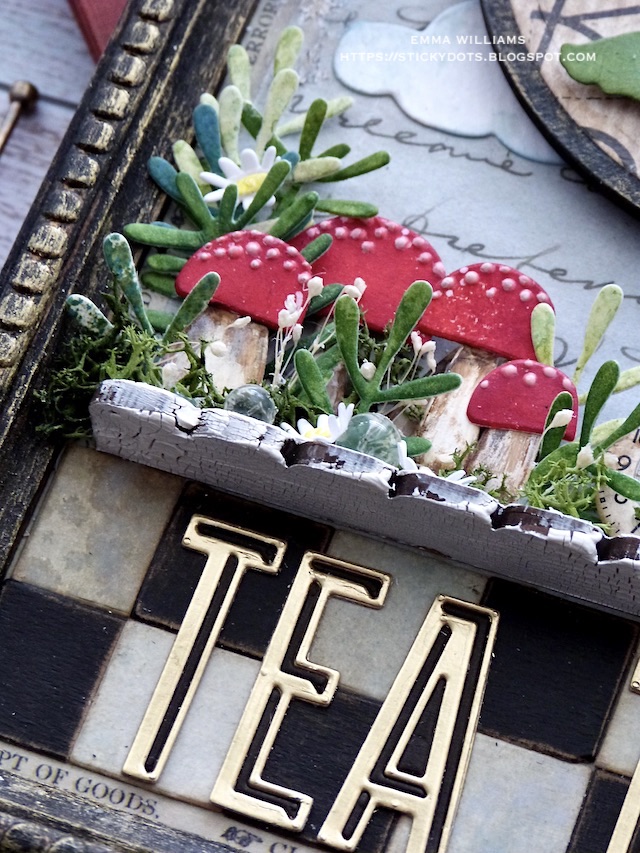
TOADSTOOLS AND FOLIAGE
For this I used dies from Abstract Elements and panels of Mixed Media Heavystock card coloured with Distress Spray Stains.
Toadstools: Candied Apple, Aged Mahogany
Greenery: Bundled Sage, Peeled Paint, Mowed Lawn and Shabby Shutters
Stalks: Lost Shadow, Frayed Burlap, Pumice Stone
Below are the dies that are in the Abstract Elements Die Set and to make the toadstools, I used four sizes of the domed shapes (all on the right hand side of the photo), including the largest dome that has the cut out dots, (the yellow shape on the right of the photo below). These will create the toadstool caps and are combined with the teardrop shapes that I used as stalks.

Cut a selection of the shapes and assemble the toadstools. On the the three sizes of the smaller toadstools, I added the white dots using Vintage Nuvo Drops in Chalk and once these are dry, I attached all of the different sized toadstools along the ledge, adding foam pads to the backs of some to create different dimensions.
Dotted in and around the toadstools is some greenery, again cut using the Abstract Elements dies and I chose to cut these pieces from various shades of inked green card. Attach the greenery, together with moss, placing some tiny idea-ology Bubbles and die cut daisies along the ledge. These tiny flowers are from the Bunny Games die set.
On the right hand side of the arrangement, I added a playing card. This piece is from the Junk Drawer Baseboards set and I just peeled away some of the layers to cut down on the thickness of the playing card, so that I could position it behind my toadstools. Ink this piece to make it look more grungy and vintage before tucking into behind the arrangement.
In the centre of the arrangement on this ledge, I placed a tiny clock. This is from the Mini Flair set and I just grunged it up with a little Walnut Stain and Black Soot Distress Crayon.
ALPHA TEA TIME
Cut the lettering once from gold metallic kraft card, and a second time from black kraft card.
Attach the gold lettering over the top of the checkerboard and then inlay each letter using the black die cut pieces. (Keep the remaining pieces to use on another project).
The ledge and background is now finished and it's time to move onto the star of the show, the Mad Hatter himself.
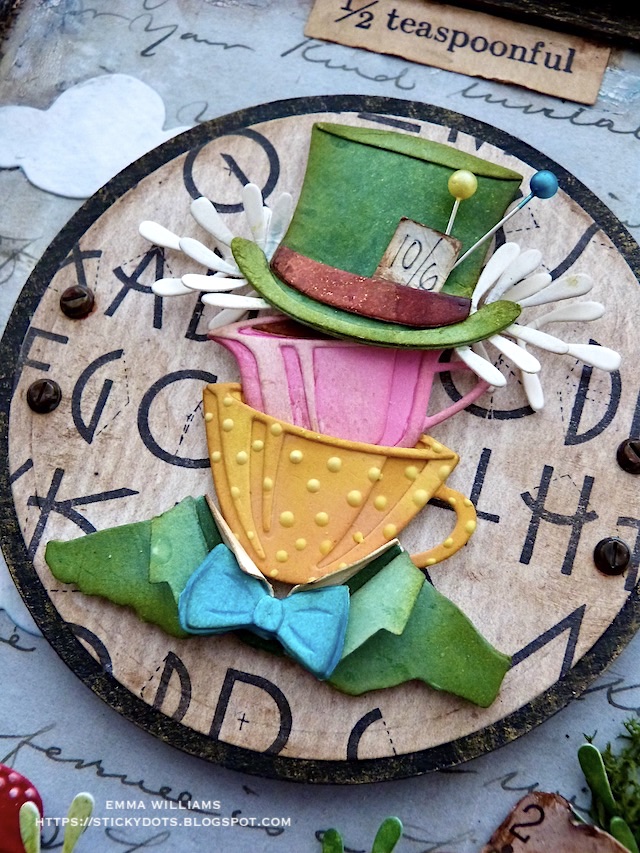
CIRCLE
The circle that sits behind the Mad Hatter, is actually the waste from a previous project and comprises of the cut out from one of the
Etcetera Facades, which I painted black and then I layered a circular panel of Backdrops Vol 4 paper over the top, applying a coat of Matte Collage Medium over the surface to seal it. This piece is stamped using the alpha typography stamp from
The Inspector. If you don't have the Facades, then a die cut circle of mountboard will do equally as well.
After applying Walnut Stain Distress Crayon around the edge, I attached the completed circle using foam pads.
PAPERCUT CAFE
Cut all the layers to create two teacups. I used Mixed Media Heavystock and inked each of the elements using Kitsch Flamingo and Fossillized Amber, Wild Honey and Mustard Seed. Assemble the teacups, ink the edges with Walnut Stain and attach them to the centre of the circle with foam pads. Add small dots to the yellow teacup using more of the Vintage Nuvo Drops.
MAD HATTER
The Mad Hatter is cut using from the Tailored Die Set and each piece is coloured with a blending tool and Oxide Inks.
Hat and Jacket: Mowed Lawn, Rustic Wilderness
Band: Vintage Photo
Bow Tie: Broken China
After I assembled the Tailored die cut pieces, I attached two dressmaking pins from my stash into the hat and then added the 10/6 label, (a tiny square of inked card and a handwritten price tag), which I tucked into the hat band.
I attached the pieces top and bottom of the two teacups using foam pads to add height.
For the mad, wild hair, I used the leaf sprig from the Abstract Elements die set and cut four pieces from white card. I then trimmed them down slightly and placed them on either side of the top hat.
We're nearly there and all that's left is the finishing details....
I added Hardware Heads to either side of the circle, and painted them for that vintage touch, using a combination of Black Soot and Crackling Campfire.
Finally, I adhered the 1/2 teaspoonful snippets ephemera piece along the top of my frame.
I really hope you love this make because it's been such a fun piece to work on. As always, I'd love to se if you've been inspired by my trip to Wonderland and if you do make anything, then please tag me on social media and I will be right over to take a look because I love seeing them all!
Thanks for stopping by and I'll be back later today with my regular Monday post for Simon Says STamp.
See you soon and take care...love Emma xx
RECIPE FOR MAKE
Distress Spray Stain:
Candied Apple, Aged Mahogany, Bundled Sage, Peeled Paint, Mowed Lawn and Shabby Shutters Oxide Inks: Mowed Lawn, Peacock Feathers, Wild Honey, Mustard Seed, Fossilized Amber, Kitsch Flamingo, Vintage Photo


Brilliant!!! Love everything about this make. I can see where this would be a fun one to work on... The Tailored Die Set made a fine and dandy Mad Hatter. Love the addition of the playing card. The mushrooms look like that is what those dies are for...Love!!!
ReplyDelete