Showing posts with label Distress Glaze. Show all posts

Monday, 19 January 2026

Spread Your Wings

Hello everyone...

Can you believe how fast this last week has gone? It's literally flown by, which also leads me nicely into the brand new Simon Says Stamp Monday Challenge. This week our theme is called THINGS WITH WINGS and we would love for you to join us and play along, and share your makes featuring something with wings!

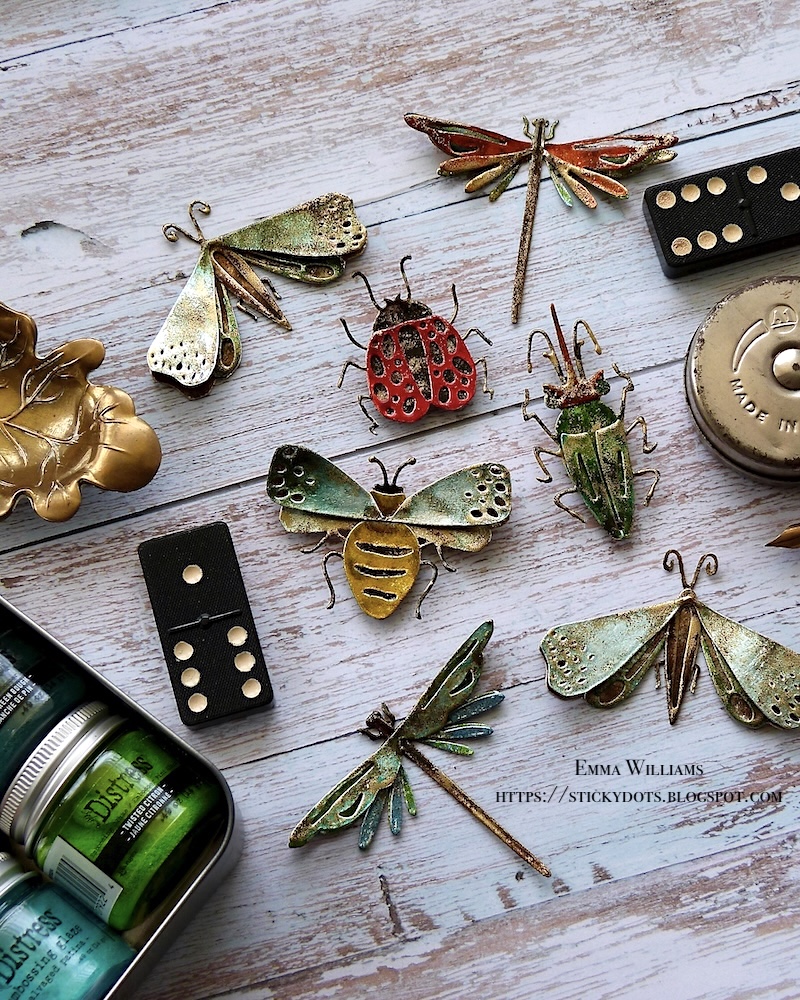
For my make, I chose to focus on insects and some of you might remember a post from last year where I showed you a technique for faux enamelling and how I used this to create some beautiful effects on the Funky Insects. Well, with this week's challenge in mind, I decided to make good use of one of those insects and create a tag to showcase things with wings...

So, let's get started and here's how I made my tag...

For this project, I used a Size 8 Etcetera Tag and Mixed Media Tag...

TAG

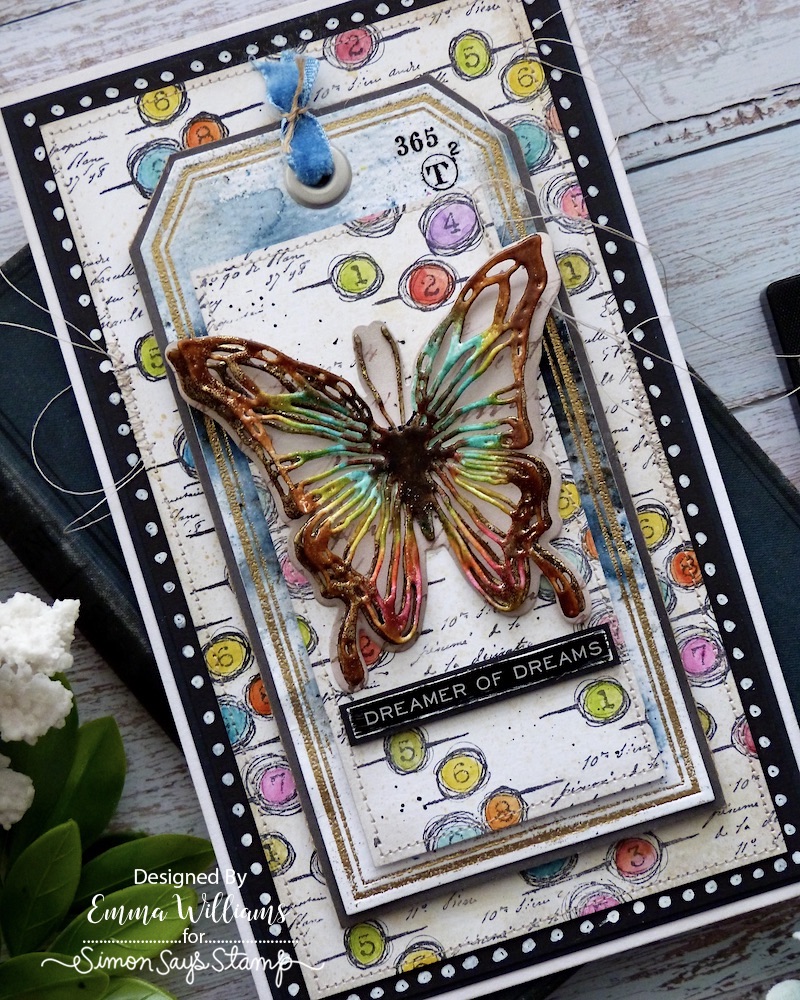
To begin with I started with the Mixed Media Heavystock Size 8 tag and I placed the Countdown Layering Stencil over the tag. Using a blending tool and Distress Micro Glaze, I dipped the sponge into the glaze, picking up a tiny amount of the medium, and dabbing away any excess from the sponge. You really only need a small amount of the glaze for this technique. I then applied the glaze through random areas of the stencil. When you remove the stencil and tilt the tag towards the light, you will be able to see the clear glaze that you've applied on the tag.

Allow for the glaze to dry before applying the colours. I used the following Distress Spray Stains:

SPRAY STAINS: Rusty Hinge, Chipped Sapphire, Vintage Photo, Ground Espresso, Antique Linen

OXIDE SPRAYS: Crackling Campfire

Once I was happy with the blend, I allowed the tag to dry, inked the edges with Walnut Stain Distress Ink before machine stitching a border around the outside edge. 

I then adhered the tag to my Etcetera Tag before adding the postmark stamp, from the Field Notes Stamp Set, which I placed in the top left hand corner.

I added a safety pin to the stitching and a Machinery Head, painted with Black Soot Distress Paint over the hole reinforcer. To accentuate the detail on the metal stud, I applied some gilding wax.

FUNKY INSECT

For the tutorial of how to create the faux enamelling for the insect using Distress Glazes and the Sizzix Funky Insects die set by Tim Holtz, just click HERE

Once the insect is complete, I set this to one side to work on the frame and the layers...

FRAMES

As you might have noticed, I LOVE dimension and layers and this piece has it all...

For the layered focal point, I used an idea-ology Label Frame, some cotton calico and a Mica Tile from my stash, and the idea-ology Optics Frame.

I started by dying my cotton calico using Frayed Burlap Distress Spray Stain. I misted the material with water, then applied the stain before heat drying the fabric and cutting it to size, slightly larger than the frame. I frayed the edges of the fabric before attaching it to my tag with Matte Collage Medium.

For my next layer, I used the Label Frame. I'm using it vertically, and altered the frame with Distress Paints, Crackling Campfire, Black Soot and Antiqued Bronze. I then applied some Gilding Wax over the surface.

I placed a panel of card behind the aperture which I had in my scraps box. This is just a piece of inked card, stamped with some calligraphy script. I attached the frame over the top of the cotton calico, again using Matte Collage Medium, which I used throughout.

I then attached the Mica Tile before altering the Optic Frame with the same paints as before. I then added some red cotton which I wound around the handle.

Attach the Optic Frame onto the Mica Tile and then add another smaller piece of Mica Tile before attaching the Funky Insect moth.

STAMPED DETAILS

To complete the tag, I added some stamping labels, the FRAGILE and HANDLE WITH CARE.

Both of these are from the Stampers Anonymous Mail Art Stamp set by Tim Holtz, and I stamped them in Fired Brick Archival Ink.

We're nearly there, and all that's left for me to do, is add the two metal studs at the bottom. These are both long fasteners and after carefully snipping off the legs of the fastener, I hammered the studs to look old and beaten up, then attached both in the bottom left and right hand corners of my tag.

I painted them with the same paints as I used to alter the metal frames, and added a touch of wax over the top.

I then completed my tag, by painting a Hinge Clip with a combination of Candied Apple and Black Sloot Distress Paint. Once dry, I clipped this to the side of my tag, added some chain from my stash and Hund a Word Tag, "Found" from the end of the chain.

So, that's my project complete and I hope you love the inspiration and techniques I've shared.

As always, if you make anything, or if you've been inspired by anything that you've seen here on my blog ~ then please, let me know by tagging me on social media or leaving a comment here and I will be right over to take a look!

Don't forget that every week, one lucky random participant has the chance to win a $25 gift voucher from Simon Says Stamp and you can join in up to 5 times, which means you could have 5 chances to winYou have until next Monday at 8am Ohio time. 1pm UK time, 2 pm CET to join in and good luck....


Thank you so much for taking the time to stop by today...
Love Emma xxx

Recipe for project:

Distress Crayons: Walnut Stain
Distress Spray Stains: Chipped Sapphire, Rusty Hinge, Vintage Photo, Crackling Campfire, Ground Espresso, Frayed Burlap
Distress Ink: Walnut Stain
Distress Paint: Candied Apple, Black Soot, Antiqued Bronze
Tools: Blending Tool, Heat Gun
Cotton Calico Fabric and Mica Tile from my stash

Tuesday, 27 May 2025

Enamelling Technique with Ranger Ink Distress Glaze by Tim Holtz

Hello everyone and Happy Tuesday...

I'm so excited to be here to share a fun tutorial of how to use Distress Glazes to emboss and glaze metallic card stock to make some spectacular enamelled results.

In this post, I’ll guide you through each step and show you how to create this simple layering technique on the Sizzix Funky Insects Thinlits Die by Tim. Then, if you’re anything like me, you’ll just want to keep on going, because this will work on so many pieces ~ from die cut gears to backgrounds, from alphanumerics to flowers ~ the choice is endless and your imagination is the only thing that you will need.

So let's get started and I began with the gorgeous Funky Insect Moth….

The first thing you need to do, is die cut the shapes and pieces you are using. I use the Sizzix Switch Plus Machine to die cut and as mentioned earlier, I will be using the insects which I cut from Silver Metallic Kraft Card. The reason I use silver, is because it's more of a neutral colour, and won't change the colours of the Distress Glaze.

With all your pieces die cut, you now need to choose the colours of Distress Glazes that you want to use. I will be listing the colours that I chose as a guide.

We're now ready for the fun to begin...

DISTRESS GLAZE COLOURS: Hickory Smoke, Speckled Egg, Salvaged Patina, Walnut Stain, Vintage Photo and Ranger Ink Fine Detail Gold Embossing Powder

Using the Tim Holtz Distress Embossing Dabber, I applied the ink over the entire surface of the first layer of the die cut. For this piece, it will be the solid body and I chose Hickory Smoke as my first colour of Distress Glaze.

Heat emboss the powder with a heat tool, until it becomes molten and shiny.

The glaze will cool down almost immediately, and once it is, I applied my second layer of ink using the Embossing Dabber and then sprinkled some Vintage Photo Distress Glaze over the top. When applying the dabber to this piece and any subsequent pieces, you only need to randomly dab the ink, not add a complete coverage. You can also add the ink to highlight certain areas, such as the legs, antennae, etc.

As with the dabber ink, you will also only need to apply the powder sparingly, not create a solid coverage ~ you are trying to achieve a marbled effect. If you find you have too much powder, then you can use a small paintbrush to brush away any excess. Once again, heat emboss the powder and set this piece to one side once finished.
Taking the wings, and using the same process as before ~ apply the Embossing Dabber to the surface and then a first layer of Speckled Egg Distress Glaze...
...followed by a second layer of Walnut Stain Distress Glaze. Always remember to heat emboss between the layers of glazes.
This Funky Insect has four separate die cut pieces, and for the third and final section, I chose to use Salvaged Patina as my first layer of Glaze...
...then a sprinkle of Rustic Wilderness, and finally a sprinkling of Walnut Stain.
For the final die cut piece, I used a solid coverage of Walnut Stain Distress Glaze, but applied two separate layers to this piece before moving onto the next step, adding some hints of gold.
With all my pieces complete, I added that touch of shimmering gold to each die cut, enamelled piece.

Once again, you need to apply the ink using the Embossing Dabber and then a very light sprinkling of Ranger Ink Fine Detail Gold Embossing Powder.

This powder does work in a slightly different way to the Glazes, so therefore you really do only need a dusting of the powder and if you find you have applied too much you can remove it before you heat emboss. Or if you do feel that once you've embossed the powder, it appears too thick, then you can apply more glaze over the top and blend the powders.
All my pieces are now ready to assemble and for this I chose Distress Matte Collage Medium, and I also used foam pads to add dimension to the wings.


Now that I've shown you the basic steps of how to enamel...the world is your oyster and I went onto creating more bugs using this technique and a few more things that will be coming soon!

 
I've listed the colours I chose to use as a guide, but you can choose whatever colours of Distress Glaze that you would like...

LADYBIRD ~ Distress Glazes:


Solid Base Layer: Hickory Smoke, Ranger Ink Fine Detail Black Embossing Powder
Top Layer: Lumberjack Plaid, Candied Apple
Ranger Ink Fine Detail Gold Embossing Powder

DRAGONFLIES....

DRAGONFLY Number 1 ~ Distress Glazes:


Solid Base Layer: Uncharted Mariner, Walnut Stain, Twisted Citron
Top Layer Wings: Cracked Pistachio, Rustic Wilderness, Walnut Stain
Wings: Uncharted Mariner, Walnut Stain
Ranger Ink Fine Detail Gold Embossing Powder

DRAGONFLY Number 2 ~ Distress Glazes:


Solid Base Layer: Uncharted Mariner, Walnut Stain, Twisted Citron
Top Layer Wings: Rusty Hinge, Walnut Stain
Wings: Fired Brick, Rusty Hinge, Walnut Stain
Ranger Ink Fine Detail Gold Embossing Powder

BEETLE


Solid Base Layer: Evergreen Bough, Cracked Pistachio, Twisted Citron, Walnut Stain and Fine Detail Black Embossing Powder
Top Layer Wings: Rustic Wilderness, Cracked Pistachio, Twisted Citron, Walnut Stain
Head: Rusty Hinge, Fired Brick, Walnut Stain, Hickory Smoke
Ranger Ink Fine Detail Gold Embossing Powder


BEE

Solid Base Layer: Hickory Smoke, Walnut Stain, Speckled Egg and Fine Detail Black Embossing Powder
Top Layer: Fossilised Amber, Hickory Smoke
Wings: Speckled Egg, Hickory Smoke
Ranger Ink Fine Detail Gold Embossing Powder

Thanks so much for stopping by today and I hope you've enjoyed the tricks and techniques to create these enamelled pieces...
 ...and if you are inspired by anything you see on my blog, then please just drop me a message, either here or over on my Instagram or Facebook profiles and I will always pop by to take a look.

Don't forget that you can click below to shop for all the products I've used in this tutorial...
SHOP HERE:
See you soon, Emma xxx

Monday, 4 March 2024

Sweet Dreams Are Made Of This...

Hello everyone...

Hope you all had a wonderful weekend and as we head into the new week, it's time for a brand new Simon Says Stamp Monday Challenge and this week, we want you to be BRIGHT + CHEERFUL with your makes! As always, on the first Monday of every month, the DT are showcasing a brand and this month, it's the fabulous products of PaperArtsy!

So, let's get started and with all the colours of the rainbow at your fingertips, we hope you'll join us and can't wait to see what you will create and I hope you'll be inspired by my card, which combines a PaperArtsy stamp by Seth Apter with Tim Holtz and Sizzix products, including Distress Watercolour pencils that make that background pop!

It's time to share how I made my bright and cheerful card...

This white card blank is an "Emma Sized" card and measures, 21 x 12.5cm in size. It also features a Size 8 Tag in the centre.

BACKGROUND

To begin with I created the stamped background panels of Distress Watercolor Card and for this I cut one panel to measure, 19 x 10.5cm and a second smaller panel, 12.5 x 6.3cm.

Before stamping, and to knock back the whiteness of the card, I spritzed Antique Linen Distress Spray Stain over the surface, then wiped away the ink, to leave just a faint tint on the cardstock.

After inking up the PaperArtsy Eclectica3 Mini 73 stamp by Seth Apter with Black Soot Archival Ink, I stamped randomly onto my two panels to create the background.

I then used a waterbrush to watercolour the stamped images with Distress Watercolor Pencils in the following colours:

Peacock Feathers, Abandoned Coral, Wilted Violet, Shabby Shutters, Peeled Paint, Mustard Seed, Lumberjack Plaid.

Once I was happy, I heat dried the panel and then used the text stamp from the Stampers Anonymous Tiny Toadstools stamp set to stamp text, using Black Soot Archival Ink, onto the white areas in between, before inking with Pumice Stone Distress Ink around the edges.

I machine stitched a border around each panel and then taking the larger panel, I matted it onto a piece of black cardstock, and doodled some white dots around the edge to form a border.

I then matted the layers onto a panel of grey card, slightly larger in size to create a border around the edge before mounting the panel onto a white card blank.

TAG

In the centre of the card, I used a tag and used the Framed Tag Thinlits die set to cut another piece of watercolor cardstock.

To create the gold debossed border around the edge of the tag, I picked up some Versamark Clear Ink directly from the ink pad using my brayer and gently rolled it over the raised edge of the die. Placing the panel of card over the top of the die, I then ran it through my machine.

After removing the tag from the die, I sprinkled gold embossing powder over the top and heat embossed the powder until molten.

I then spritzed the tag with a light misting of water and sprinkled some In The Navy Infusions over the surface. You only need the smallest amount of these crystals, as a little goes a long way and you can always add more if necessary. Spritz with a little more water to move the crystals around and create the bursts of colour.

I then heat dried the surface, inked the edges with Pumice Stone Distress Ink and matted the tag onto a panel of grey cardstock.

In the top of the tag, I attached an eyelet using a Crop-A-Dile Tool and threaded through a strip of Tim's Velvet Ribbon Trim before mounting the completed tag onto the centre of my card, using foam pads.

I attached the smaller stamped panel onto the tag and then added a couple of Remnant Rubs in the corner.

BUTTERFLY

For the enamelled effect on the surface of the die cut, I used Distress Glaze Embossing Powders in the following colours:

Salvaged Patina, Walnut Stain, Vintage Photo, Rusty Hinge, Picked Raspberry, Mustard Seed, Scorched Timer, Hickory Smoke

To create the butterfly, I used the Tim Holtz Vault Scribbly Butterfly die set by Sizzix and began by cutting two layers of the open butterfly. I also cut the solid layer from a piece of Backdrops paper that has script design on it.

Taking the first of the open butterfly die cuts, I started to add the glazes, using the darkest colour in the centre, a lighter shade around the edge and the coloured glazes on the wings.

To apply the glaze, I used the Embossing Dabber which I applied directly onto the die cut, applying one colour at a time, tapping away the excess. I then heat embossed the powders until molten. To build up the layers and create the look of faux enamel, I repeated this process a further two times.

I then sprinkled some gold embossing powder over the surface, just little hints here and there, and heat embossed again.

Repeat the process to add the glazes to the second layer and then attach the first die cut over the top of the second, attaching it by the body only and leaving the two layers of wings free. Shape the wings and then attach the enamelled butterfly to the solid layer.

Adhere the butterfly into position using Matte Collage Medium.

Finally I used a Metallic Quote Sticker, "Dreamer of Dreams" which I matted onto a strip of black card, and then mounted onto my tag, using foam pads, placing it just beneath the butterfly.

So that's my project finished and I hope you love what I've created and it inspires you with some of the ideas that I've used.

As always, if you make anything, or if you've been inspired by anything that you've seen here on my blog ~ then please, let me know by tagging me on social media or leaving a comment here and I will be right over to take a look!

Don't forget that every week, one lucky random participant has the chance to win a $25 gift voucher from Simon Says Stamp and you can join in up to 5 times, which means you could have 5 chances to winYou have until next Monday at 8am Ohio time. 1pm UK time, 2 pm CET to join in and good luck....


Thank you so much for taking the time to stop by today...love Emma xxx

Powered By Blogger

Total Pageviews