Showing posts with label Sizzix Vault. Show all posts

Monday, 19 May 2025

Black Coffee....

Hello everyone...

Hope you've all had a wonderful weekend and you're now ready for the week ahead! As always, a brand new week, means a brand new Monday Challenge and we are challenging you to create a project using our theme ~ FOOD AND DRINK, and with so many wonderful products available at Simon Says Stamp, I'm sure you'll be spoilt for choice and we can't wait to see what you create.

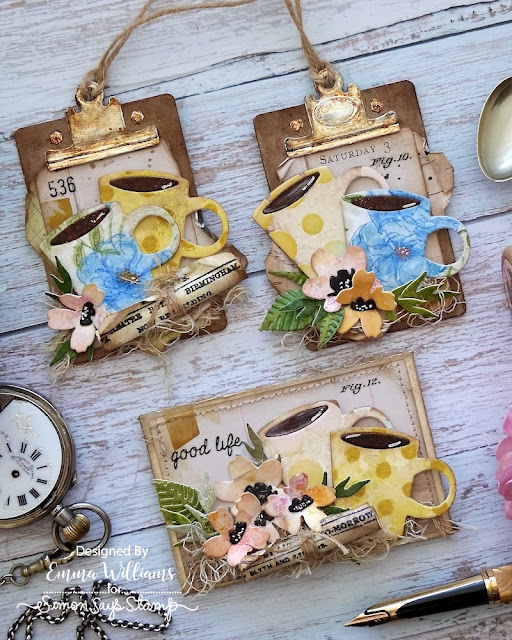
For my make, I chose to create a trio of gift tags and a tiny gift card holder, which is perfect for gifting to someone who loves their coffee, and food!

I used a combination of Tim Holtz dies to make these projects and also offcuts from my scraps box that are perfect for these smaller die cuts, such as the flowers and coffee cups!

So, it's time to get started and show you how I created these pieces.

To begin with I used Tim's Noteworthy and Postale dies by Sizzix to create the tag and envelope.

CREATING THE CUPS

Each cup, and I made 6 cups for these trio of projects are die cut using the mug die from the Sizzix Vault Fresh Brewed die set by Tim. I cut my pieces from leftover scraps that I had in my scrap box from previous projects. Each of these scrap pieces were either stamped or inked using stencils and I'm sure I'm not the only one who has these scraps, and this is the perfect project to use up all those tiny offcuts.

Once I'd cut all my pieces, I layered them together to form the six patterned cups.

FLORALS

The flowers and greenery were also die cut from inked card scraps that I had in my box and once again, were perfect for this make and after cutting each piece, I layered and shaped the florals to create my selection ready to use. To complete the flowers, I added white pen work to the centres.

NEWSPAPERS

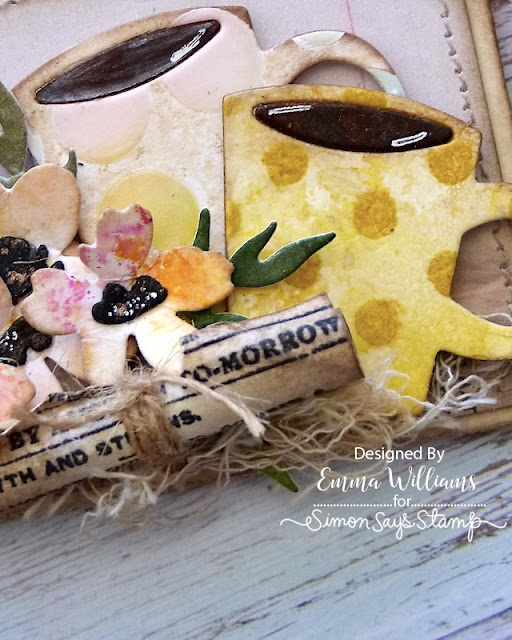
Now in the morning, no cup of coffee is complete without reading the morning news, I know you can do this online ~ but I still like the actual newspaper and with that in mind, I made some newspaper rolls.

For these, I used Tim's Newsprint stamp, which I stamped in Black Soot Archival Ink directly onto some vintage notepaper that I have in my stash.

I cut the stamped paper into small pieces which I then rolled, securing the ends with red line tape. I then tied a piece of twine around the centre, and made tiny rips and tears into the paper before inking the edges with Frayed Burlap Distress Ink.

We now have all the element to decorate, so it's time to make this trio come to life....

ENVELOPE

I cut the envelope using the main die in the Postale die set from Mixed Media Heavystock card. To knock back the 'clean' look of the card stock, I inked it with Old Paper Distress Ink, spritzed with a light mist of water, and then heat dried the card. I then folded the die cut along each scoreline before inking the edges with Frayed Burlap Distress Ink.

With my envelope ready, I needed to decorate the front.

For this I cut a panel of paper from the Memoranda Paper Stash but if you don't have this stash, any background paper of your choice, will work.

I machine stitched a border around the outside and then inked the edges before mounting it onto the front of my envelope.

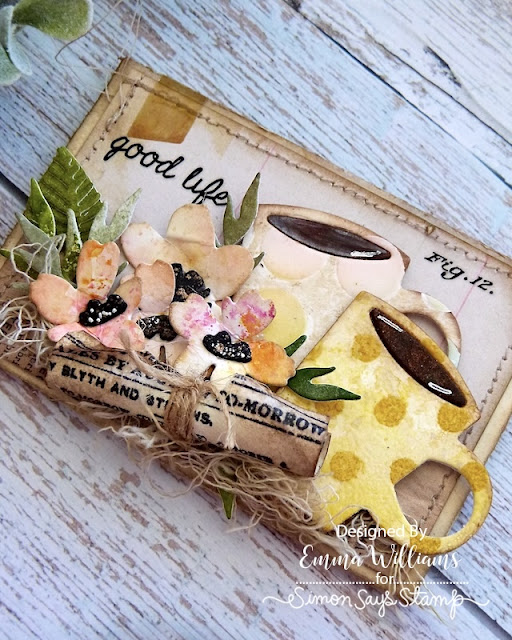
In the top left hand corner, I added a cello sticker and then arranged my die cuts, placing the mugs on the right hand side...

...and then the flowers and greenery to the left.

I placed the newspaper roll across the base of the arrangement, before adding some torn Mummy Cloth fibres that I had dyed with Frayed Burlap Distress Spray Stain.

To complete the envelope, I added some Remnant Rubs from my stash ~ I used the 'good life' Tiny Text Remnant Rubs in the left hand corner, but I'm sad to say, these are now retired. 

I also added the "Fig 12" in the top right hand corner.

Finally, I added a seal to the back of the envelope ~ once again, this was actually die cut using a die from the Vault Rosettes Die Set by Tim, and is the seal for the centre of the rosette.

TAGS

The tags are cut from Mixed Media Kraft heavy stock card and silver metallic Kraft stash, using the clipboard die in the Noteworthy set. I have a tutorial HERE, which shows how I made these tags, and these were created using exactly the same technique.

The only difference with these tags, is instead of using the Screwheads either side of the clips at the top, I chose to die cut these tiny screws from silver metallic Kraft stash card using the dies in the Vault Industrial die set. I then altered them using the same technique as I used to alter the clips using Distress Paints;

Crackling Campfire, Black Soot, Antique Bronze and a touch of Ground Espresso

I apply each paint individually and allow them to dry before layering. I then just build up the colours to create a rusty effect and finish to the metallic card stock.

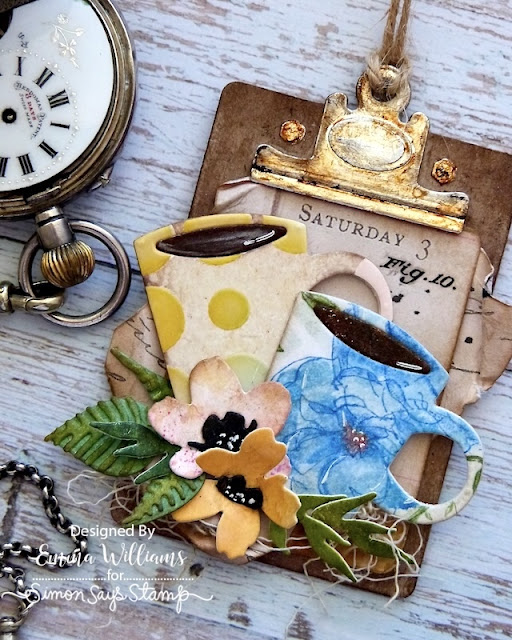
Once each of my tags were ready to decorate, I cut two panels of paper from the Memoranda paper stash, and after adding rips and tears around the edges and inking them with Frayed Burlap Distress Ink, I attached these papers to the tiny clipboards. You can see from the photos below how I arranged the papers to the board ~ I love how the one paper shows the day and date!

I then took my mugs, and attached two to each of the clipboards using foam pads to added dimension.

I added some florals and Mummy Cloth Fibres to each tag for texture...

...and then on the one tag, I attached one of the newspaper rolls.

To complete each tag, I threaded some twine through the clips and then added tiny remnant rubs ~ the number 536 on one....

...and the Fig 10 one the second tag.


As a final piece, I made a tiny matching gift card for the envelope...

Once again, this was cut from scraps from my box, using the rectangular die from the Postale set. I then layered this panel over the top of a piece of burlap and completed the card with a cello sticker tape and a snarky small talk sticker.

So that's my projects finished and I hope you love the pieces I've made....

As always, if you make anything, or if you've been inspired by anything that you've seen here on my blog ~ then please, let me know by tagging me on social media or leaving a comment here and I will be right over to take a look!

Don't forget that every week, one lucky random participant has the chance to win a $25 gift voucher from Simon Says Stamp and you can join in up to 5 times, which means you could have 5 chances to winYou have until next Monday at 8am Ohio time. 1pm UK time, 2 pm CET to join in and good luck....


Thank you so much for taking the time to stop by today...
Love Emma xxx

Recipe for project:

Tim Holtz/Stampers Anonymous: Newsprint and Type
Distress Paint: Black Soot, Crackling Campfire, Ground espresso, Antiqued Bronze
Distress Ink: Frayed Burlap, Old Paper
Distress Spray Stains: Frayed Burlap
Tim Holtz Idea-ology: Memoranda Paper Stash, Labeled Remnant Rubs, Cello Sticker Tape, Snarky Small Talk Stickers, Mummy cloth
Mediums: Matte Collage MediumFoam Pads, Black Soot Archival Ink
White Fine Line Pen

Monday, 13 May 2024

A Fine Romance...

Hello everyone and Happy Monday!

Hope you've all had a wonderful weekend and as we start the brand new week, it's time for a new Simon Says Stamp Monday Challenge! This week our theme is all about Romance, and whether you want to celebrate upcoming weddings, anniversaries or just feel the love in the air, then we are excited to see what you will be creating and hope you'll join us for this fun challenge.

For my make, I chose to make an Etcetera Tag and used some of my favourite Sizzix Vault Dies from Tim Holtz to create a project celebrating LOVE and I combined these amazing dies with Foundry Wax, an idea-ology photo and the Palette Collage Paper.

So, let's begin and hope you enjoy how I made this piece.


For this make I used a Mini Etcetera Tag and primed the surface with a coat of white Gesso, which I allowed to dry and I also used a Size 8 Mixed Media Heavystock Tag, that is layered over the top.

DOUBLE LAYERED TAGS

Once the gesso is completely dry, I began to cover the background of the tag using the Palette Collage Paper. You will need to do this in two sections, and I began by adhering the first section of collage paper along the top of the tag using Matte Collage Medium to attach it into position.

I carefully applied a coat of the medium over the top of the paper, making sure that I didn't tear it and then cut another panel which I attached to cover the remaining part of the tag, again applying a coat of the medium over the top.

I allowed for the medium to dry, and then used Design Tape Trims around the outside edge of tag itself.

Setting the etcetera tag to one side, I then prepped the Size 8 tag.

Once again, I covered the card tag using the Collage Paper, and applying it exactly the same as I did on the etcetera tag. I then allowed for this to dry before machine stitching a border around the outside.

To knock back the whiteness of both tags, I ran the Walnut Stain Distress Crayon around the outside edges and then blended the colour with my fingertip.

After attaching the smaller tag in the centrally onto the Etcetera Tag using foam pads, I splattered white gesso across the surface and set them to one side to dry.

In each of the four corners of the Etcetera Tag, I attached Hardware Heads, which I painted with a combination of Antiqued Bronze and Ground Espresso Distress Paint.

PHOTO WREATH

Moving on to the wreath and the photo and for this I used the Sizzix Vault Funky Wreath Die Set by Tim and an idea-ology photomatic image.

To begin with I took a panel of black heavystock card and cut all my pieces using a selection of the dies from the Vault Funky Wreath Die Set by Tim. With my die cut pieces in front of me, I wanted to create this brushed metallic effect, aged bronze effect and for this I used Statue and Sterling Foundry Waxes.

I began by squeezing a little of the Statue Foundry wax onto my glass mat and then taking a brush, I picked up a little of the wax on the brush, wiped away the excess onto a tissue and then dry brushed the wax across the surface.

I then heat set the wax with my heat tool before adding another layer, this time using the Sterling Foundry Wax.

You can keep alternating and building up the intensity as you go, heat drying between applications but always allow some of the black card to show through.

I then layered the wreath to create the dimension ~ I cut three layers of the wreath which I layered over the top of one another, slightly offsetting them to form more of a fluffy, layered look to the finished piece.

I then took all the tiny pieces of foliage and flowers and layered these onto the wreath. To stick these into position, I just add a dab of collage medium to the ends of then tuck each piece into the main wreath itself.

I then added the beautiful die cut flowers, layering them and shaping them to create more dimension, and once again just tucking them in and placing them amongst the foliage.

Once I was happy with the wreath itself, I added pearls to the centres of the flowers.

Inside the wreath, I inlaid the photo. I used an image of a couple from the Photomatic set and to inlay the image, I used the large wreath die to cut the photo. It won't look perfect at this stage, but don't worry, all that is hidden by the wreath itself.

With my photo cut. I then applied a coat of Matte Collage Medium over the top, and colour tinted the image with Distress Crayons and a waterbrush.

Taking the dimensional wreath, I placed this over the top of the die cut photo, lining up the two pieces so that the wreath will seamlessly fit into the cuts on the photo, therefore creating an inlaid appearance.
I then attached the finished wreath onto my smaller tag, placing it over the top of a piece of Mica tile from my stash.

On the Mica Tile, I placed a Clippings Sticker, "in my heart", attaching it to the bottom right of the wreath itself.
LOVE PLAQUE

Now for the plaque...

For this I used the alphanumeric letters from the Vault World Travel die set and cut three layers of each of the four letters.

After layering them over the top of one another to form the thickness of chipboard, I attached each of the letters onto a strip of black card.

I then created the aged bronze effect on this strip of black card using the same technique with the Foundry Waxes as I used on the wreath, highlighting the lettering with a touch of Gilded Foundry Wax.

On either side of the card strip, I punched two holes using the Crop-A-Dile Tool and fixed eyelets into the position.

I attached the plaque using foam pads, and placing it across the bottom section of the smaller tag.

In the centre of the 'O', I placed a small heart which I die cut from some inky red card that I had in my stash box, using the Falling Hearts die. Once again, I cut three layers to form one heart, which I then attached inside the 'O'. 
I also placed two further hearts just to the top left of the plaque.

We're nearly there and all that's left is the final detail...the clip!

CLIP

The clip is from Tim's idea-ology range and they come in a set of 3. Using one of these Vintage Clips, I wanted to continue with the aged bronze effect on the clip and again, I used Foundry Wax to achieve this.

Before applying the wax, I applied a small amount of Translucent Grit Paste over the surface of the clip, and allowed for this to dry.

Once dry, I applied the waxes but this time I used my fingertip to create a heavier coverage. You can use a brush if you have allergies or sensitivities to the waxes, please always check before using.

I heat set the wax between applications and then wrapped some twine around the neck of the clip itself.

From the twine, I hung a Heart Adornment which I painted using Distress Paint. I used Candied Apple on the heart itself and then dry brushed Black Soot over the top to give more of an aged effect. I attached the adornment to a ring fastener and then hung it from the twine.
I then clipped it to the top of my tag.
Finally, I added a small torn piece of linen from my stash. I dyed the linen with some Brushed Corduroy Distress Stain, added some stitching and then placed a tiny stitch die cut, that I had left over from a previous project in the centre. I attached the linen with Matte Collage Medium, placing it on the left hand side of the tag.
That final touch, completes my project for this week and I hope you love my interpretation of the challenge theme and the techniques I've used to create an aged bronze finish to the pieces on this tag, and how I created the dimension on the photo wreath.

As always, if you make anything, or if you've been inspired by anything that you've seen here on my blog ~ then please, let me know by tagging me on social media or leaving a comment here and I will be right over to take a look!

Don't forget that every week, one lucky random participant has the chance to win a $25 gift voucher from Simon Says Stamp and you can join in up to 5 times, which means you could have 5 chances to winYou have until next Monday at 8am Ohio time. 1pm UK time, 2 pm CET to join in and good luck....


Thank you so much for taking the time to stop by today...Love Emma xxx

Powered By Blogger

Total Pageviews