
Hello everyone...
Hope you all had a wonderful weekend and as we head into the new week, it's time for a brand new Simon Says Stamp Monday Challenge and this week, we want you to be BRIGHT + CHEERFUL with your makes! As always, on the first Monday of every month, the DT are showcasing a brand and this month, it's the fabulous products of PaperArtsy!
So, let's get started and with all the colours of the rainbow at your fingertips, we hope you'll join us and can't wait to see what you will create and I hope you'll be inspired by my card, which combines a PaperArtsy stamp by Seth Apter with Tim Holtz and Sizzix products, including Distress Watercolour pencils that make that background pop!

It's time to share how I made my bright and cheerful card...

BACKGROUND
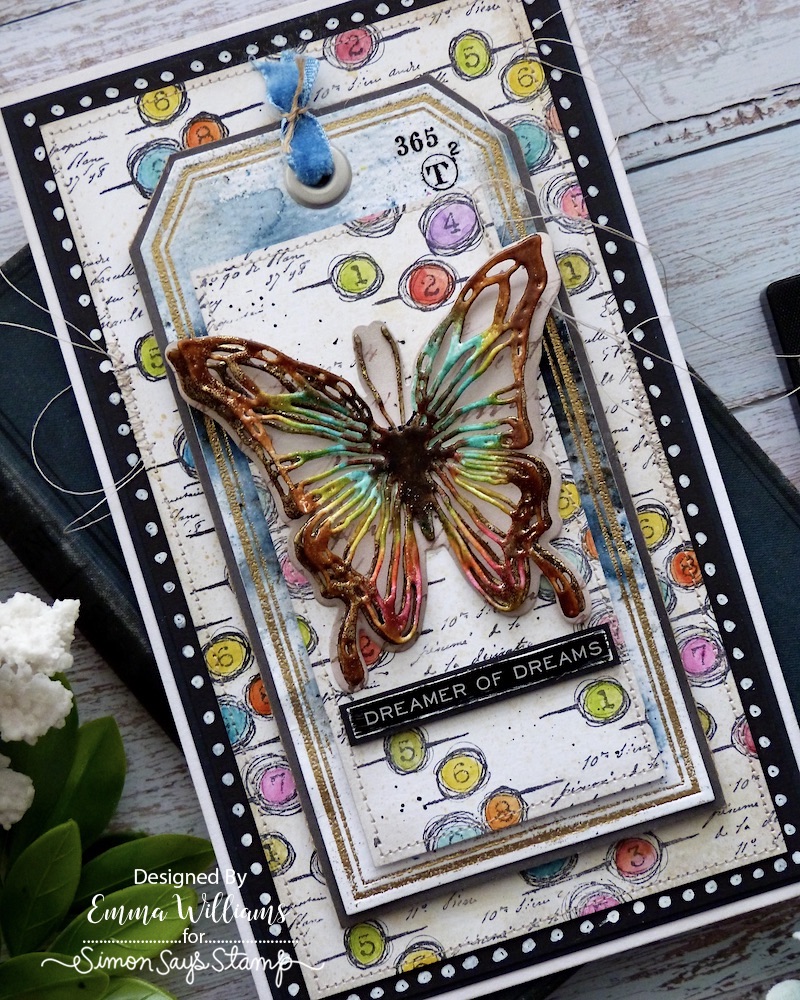
To begin with I created the stamped background panels of Distress Watercolor Card and for this I cut one panel to measure, 19 x 10.5cm and a second smaller panel, 12.5 x 6.3cm.

Before stamping, and to knock back the whiteness of the card, I spritzed Antique Linen Distress Spray Stain over the surface, then wiped away the ink, to leave just a faint tint on the cardstock.
After inking up the PaperArtsy Eclectica3 Mini 73 stamp by Seth Apter with Black Soot Archival Ink, I stamped randomly onto my two panels to create the background.

I then used a waterbrush to watercolour the stamped images with Distress Watercolor Pencils in the following colours:
Peacock Feathers, Abandoned Coral, Wilted Violet, Shabby Shutters, Peeled Paint, Mustard Seed, Lumberjack Plaid.
Once I was happy, I heat dried the panel and then used the text stamp from the Stampers Anonymous Tiny Toadstools stamp set to stamp text, using Black Soot Archival Ink, onto the white areas in between, before inking with Pumice Stone Distress Ink around the edges.

I machine stitched a border around each panel and then taking the larger panel, I matted it onto a piece of black cardstock, and doodled some white dots around the edge to form a border.

I then matted the layers onto a panel of grey card, slightly larger in size to create a border around the edge before mounting the panel onto a white card blank.

TAG
In the centre of the card, I used a tag and used the Framed Tag Thinlits die set to cut another piece of watercolor cardstock.

To create the gold debossed border around the edge of the tag, I picked up some Versamark Clear Ink directly from the ink pad using my brayer and gently rolled it over the raised edge of the die. Placing the panel of card over the top of the die, I then ran it through my machine.
After removing the tag from the die, I sprinkled gold embossing powder over the top and heat embossed the powder until molten.

I then spritzed the tag with a light misting of water and sprinkled some In The Navy Infusions over the surface. You only need the smallest amount of these crystals, as a little goes a long way and you can always add more if necessary. Spritz with a little more water to move the crystals around and create the bursts of colour.

I then heat dried the surface, inked the edges with Pumice Stone Distress Ink and matted the tag onto a panel of grey cardstock.
In the top of the tag, I attached an eyelet using a Crop-A-Dile Tool and threaded through a strip of Tim's Velvet Ribbon Trim before mounting the completed tag onto the centre of my card, using foam pads.

I attached the smaller stamped panel onto the tag and then added a couple of Remnant Rubs in the corner.
BUTTERFLY
For the enamelled effect on the surface of the die cut, I used Distress Glaze Embossing Powders in the following colours:
Salvaged Patina, Walnut Stain, Vintage Photo, Rusty Hinge, Picked Raspberry, Mustard Seed, Scorched Timer, Hickory Smoke
To create the butterfly, I used the Tim Holtz Vault Scribbly Butterfly die set by Sizzix and began by cutting two layers of the open butterfly. I also cut the solid layer from a piece of Backdrops paper that has script design on it.

Taking the first of the open butterfly die cuts, I started to add the glazes, using the darkest colour in the centre, a lighter shade around the edge and the coloured glazes on the wings.
To apply the glaze, I used the Embossing Dabber which I applied directly onto the die cut, applying one colour at a time, tapping away the excess. I then heat embossed the powders until molten. To build up the layers and create the look of faux enamel, I repeated this process a further two times.
I then sprinkled some gold embossing powder over the surface, just little hints here and there, and heat embossed again.
Repeat the process to add the glazes to the second layer and then attach the first die cut over the top of the second, attaching it by the body only and leaving the two layers of wings free. Shape the wings and then attach the enamelled butterfly to the solid layer.

Adhere the butterfly into position using Matte Collage Medium.

Finally I used a Metallic Quote Sticker, "Dreamer of Dreams" which I matted onto a strip of black card, and then mounted onto my tag, using foam pads, placing it just beneath the butterfly.

So that's my project finished and I hope you love what I've created and it inspires you with some of the ideas that I've used.

As always, if you make anything, or if you've been inspired by anything that you've seen here on my blog ~ then please, let me know by tagging me on social media or leaving a comment here and I will be right over to take a look!
Don't forget that every week, one lucky random participant has the chance to win a $25 gift voucher from Simon Says Stamp and you can join in up to 5 times, which means you could have 5 chances to win. You have until next Monday at 8am Ohio time. 1pm UK time, 2 pm CET to join in and good luck....


Recipe for project:


Gorgeous card Emma :-) the background is amazing and I absolutely love the glazed butterfly! How stunning is that! :-)
ReplyDeleteHope you have a great week!
luv
Lols x x x