Showing posts with label Sizzix Chapter 2 2021. Show all posts

Monday, 31 January 2022

Love Struck...

Hello everyone!

So another week has flown by and can you believe that tomorrow is the 1st of February?!? What happened to January? But as the light during the day gets longer, it means there is more crafting time which has been a bonus as I've been crafting for England, and now I can't wait to share everything I've made...all of which will be coming very soon, it's going to be exciting!!!

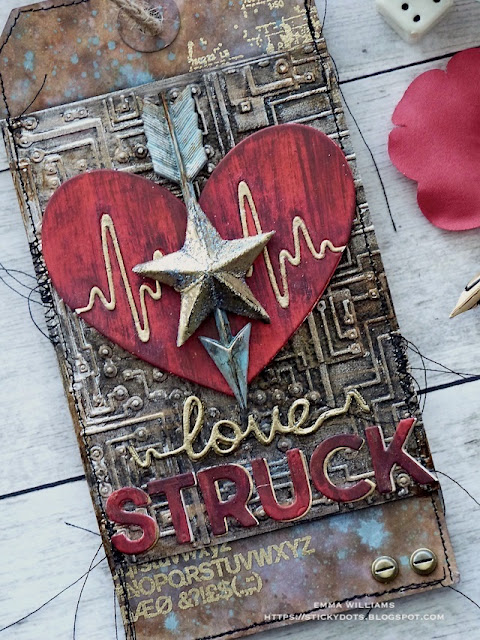
But before that, it's time for the brand new Simon Says Stamp Monday Challenge and this week our theme is USSE AN EMBOSSING FOLDER! I will admit that last week's Furry Friends challenge saw me step out of my comfort zone, I'm not a cute person but this week was perfect for me and with love in the air, I chose to create a tag that would be perfect for those men in our lives to show them how much they're loved! I actually made this tag at the beginning of last week and if you want to see more Valentine inspiration, then look no further than Tim's Valentine's YouTube live, as he created so many wonderful projects and it made my heart so happy to see what he made using this beautiful Heartfelt die.

So let's get started and here's how I created my tag...


To begin with I'll start with the base tag which is a Size 8 tag from Tim's Distress range. After misting the surface with a light spritz of water, I then sprayed the tag with Brushed Corduroy, Ground Espresso, Antique Linen and Speckled Egg Distress Spray Stains before adding Rusty Hinge, Salvaged Patina and Speckled Egg Oxide Sprays.
I then gave the tag another spritz to make sure the inks blended perfectly before I heat dried the surface and inked the edges with Walnut Stain Distress Ink.
At this stage, I added some text stamping onto the background and for this I used a couple of stamps from the Mini Glitch Stamp Set by Stampers Anonymous, stamped in clear embossing powder and then heat embossed in the SSS UltraFine Gold powder.

I also added some in the top right hand corner, again using a stamp from the Mini Glitch set.

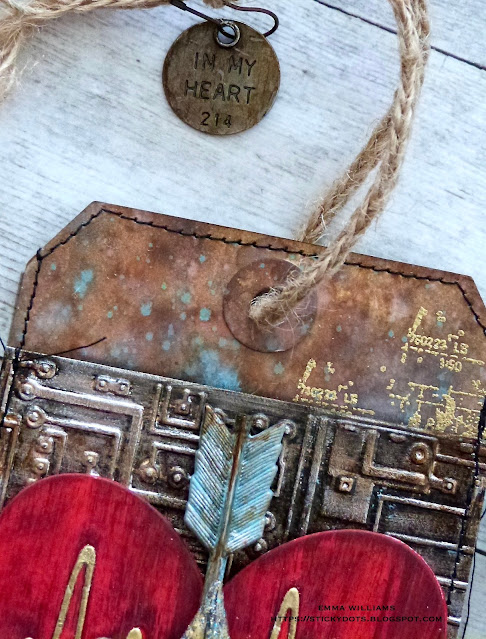
Moving onto the embossed layer, and for this I used the Circuit 3D Embossing Folder and a piece of Silver Metallic Kraft card.
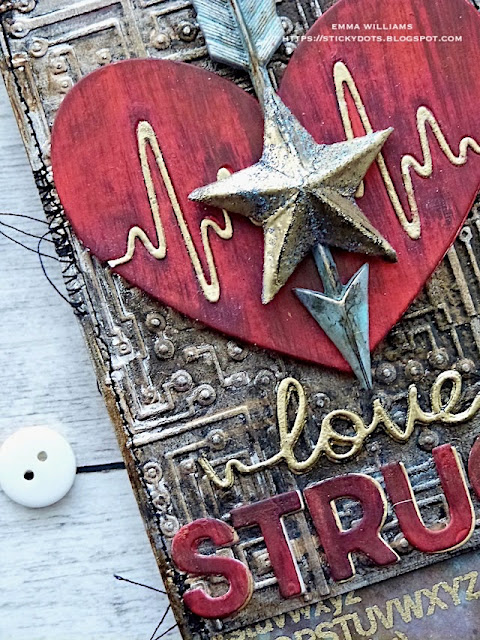
I placed the card in the folder and then ran the card through my machine, running it backwards and forwards 3 times to create a deep impression and capture all those details.

Cover the metallic surface with a layer of Black Soot Distress Paint and then after wiping away the excess, you will notice that the paint sits nicely in all those little embossed areas, accentuating the details.

I then rubbed swiped the surface with some Gilded Alloy Alcohol Ink, before I flicked Cracked Pistachio Oxide Spray across the surface.

I cut the panel down to size before attaching it across the middle of my inked tag, and then machine stitching a border around the outside.
Now for the heart...

I used the Sizzix Heartbeat Thinlits die by Tim Holtz to cut Mixed Media Heavystock card. This die actually cuts into the card but I wanted to have a stand alone heart. So to create this, I began by die cutting the heart as normal and then just used the pieces that fall out of the die cut. I also removed the heartbeat rhythm line from inside the die cut, before putting the waste to one side to use later.

At this stage, I also cut the Love heartbeat line that is included with the die set. I cut this three times, then layered the separate pieces together to form one piece the thickness of chipboard.

Taking the two heart sections, I painted these with a combination of Candied Apple and Black Soot Distress Paint, applying a layer of Candied Apple first and then dry brushing a layer of Black Soot over the top to deepen and intensify the colour.
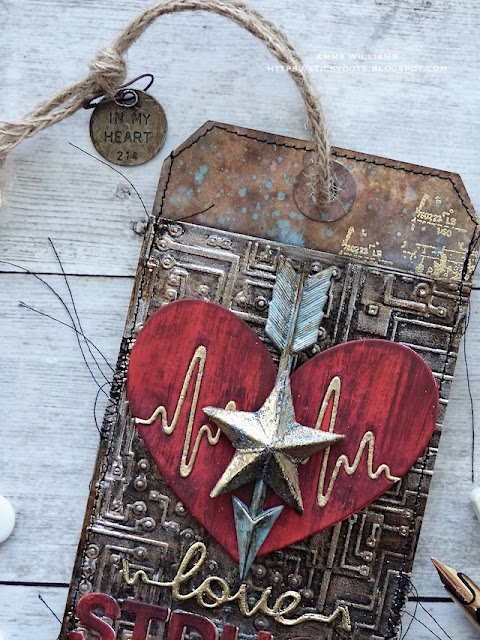
Taking the heartbeat line and the love heartbeat, I applied Tim's Embossing Dabber over the surface of each, sprinkled it with SSS Ultra Fine Gold embossing powder and heat embossed until molten. I repeated this another couple of times to create an enamelled sentiment.

Now to piece my heart back together and remember that die cut heart aperture section that I placed to one side? Well you need that for the next stage of creating a solid heart shape that I can mount my pieces on to and I used it as a stencil to trace around the heart onto a piece of card or mountboard, before cutting around the pencil outline to give me one solid heart.

I then adhered my painted heart sections and the heartbeat line onto the solid heart that I cut, giving me one complete red heart.

I attached the heart to the tag using foam pads and then placed an arrow adornment over the top, attaching it vertically with the arrow pointing downwards. I altered the arrow with a little Distress Paint, using Speckled Egg, Rusty Hinge and Black Soot to create an oxidised effect to the surface of the metal.

Over the top of the arrow, I added a star.

For this I used the largest of the star dies from the 2021 Christmas Vault Series Thinlits set by Tim Holtz and cut the star from card. I folded it along the score lines and shaped the star before adding a layer of embossing dabber over the surface and sprinkling Wow Oiled Slate Embossing Powder over the top. I repeated this process but for the second layer, I added Gold Embossing Powder but before heating the powder, I wiped away some of the gold from the surface to reveal the layers underneath.

Heat emboss the star and then attach over the top of the arrow, carefully balancing the points on the arrow. I used Matte Collage Medium and balanced it onto the arrow but you can use hot glue or foam pads.

Attach the gold love sentiment underneath the heart and then I cut the word "STRUCK" using the Sizzix Bold Alphanumeric die set by Tim and cut one layer from gold metallic and a second layer from card that I coloured using the same paints and technique as I used on the heart.

I then layered the red letters over the top of the gold, slightly offsetting them to create a drop shadow.

Attach each letter to the tag, placing them underneath the love sentiment.

Finally, I added two Hardware Heads to the bottom right hand corner, both of which I coloured with a combination of Gilded Alloy and Mushroom Alcohol Ink.

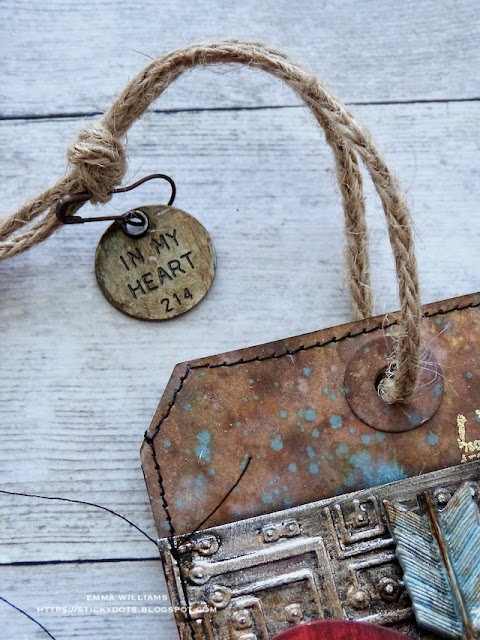
For the finishing touch, I added some rope to the tag, and hung an idea-ology Thought Token from the end....

My tag is now finished and ready for Valentine's Day...

...and as always, I hope you love what I've made, and enjoyed all the techniques I've used. If you make anything, or if you've been inspired by anything that you've seen here on my blog ~ then please, let me know by tagging me on social media or leaving a comment here and I will be right over to take a look!

Don't forget that every week, one lucky random participant has the chance to win a $25 gift voucher from Simon Says Stamp and you can join in up to 5 times, which means you could have 5 chances to win. You have until next Monday at 8am Ohio time. 1pm UK time, 2 pm CET to join in and good luck....


Thank you so much for taking the time to stop by today ~ stay safe and keep well.
Love Emma xxx

Recipe for project:

Stampers Anonymous: Mini Glitch
Distress Ink: Walnut Stain
Distress Spray Stain: Brushed Corduroy, Ground Espresso, Antique Linen and Speckled Egg
Distress Oxide Spray: Cracked Pistachio, Speckled Egg, Rusty Hinge
Distress Paint: Candied Apple and Black Soot
Alcohol Inks: Gilded Alloy, Mushroom

Monday, 5 July 2021

I Meant To Behave...

Hello all...

Hope you've had wonderful and happy weekend and for all my US friends ~ I hope you had a happy 4th July!

As Monday comes around once again, the brand new Simon Says Stamp Monday Challenge begins and this week our theme is all about Fun and Quirky and the DT are also showcasing Katzelkraft within their projects! If you would love to join us, all the details are at the end of my post and we can't wait to see what you create...

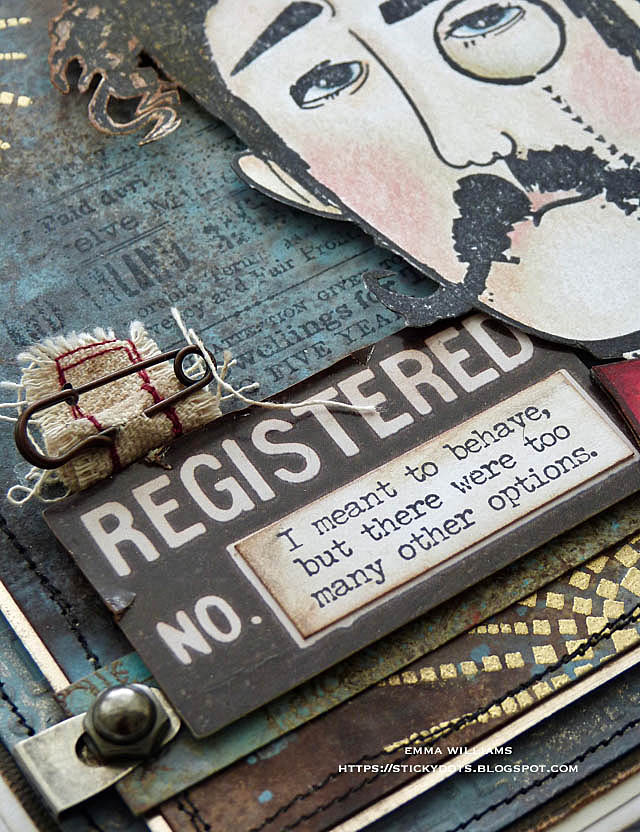
I decided to make a card, and as Tim refers to them ~ this is an Emma sized card which measures 19.5 x 15.5cm! You'll also notice that I can't get enough of the brand new Stampers Anonymous releases from Tim Holtz and this time I'm using the Observations set. I just love this gentleman, so regal and every time I see him, he reminds me of the actor who played Queen Victoria's husband, Prince Albert in the drama series Victoria!


So let's get started ~ it's time for me to share this project and here's how I made this card...

I started by creating the backgrounds and for this I used two separate panels of Mixed Media Heavystock card, one measuring 18 x 14cm and a second to measure, 16 x 12cm. I then spritzed the card with a light misting of water before spritzing the following sprays over the surface and blending them with another misting of water:

Speckled Egg Distress Spray Stain

Ground Espresso Distress Spray Stain

Antique Linen Distress Spray Stain

Frayed Burlap Distress Spray Stain

Crackled Campfire Oxide Spray

Tumbled Glass Oxide Spray

After heat drying the backgrounds thoroughly, I began by embossing the larger panel using the Circuit 3D Texture Fade Embossing Folder. Because of the size of the panel, I ran this through a couple of times to ensure the entire panel was embossed. I then machine stitched a border in black cotton around the outside.

After matting the embossed panel onto black kraft stash card from the Neutrals set, I mounted the layered panels onto the white card blank.

Now for the smaller panel and I stamped some text on the background using the advertising stamp from The Professor 2 stamp set. I stamped this in Black Soot Archival Ink and just rolled the stamp over the background, allowing it to kiss the surface but not stamping the whole image.

Now for the gold bursts and I used the Halftones Etoile stamp by Katzelkraft and using Versamark clear ink, I stamped this three times, top left hand corner, along the bottom edge and on the right ahdn side fo the panel, just taking each image over the edge of the panel and then sprinkled gold embossing powder over the images, and heat embossed them until molten.

To complete the panel, I inked up the tiny little crosses from the Inquisitive stamp set, and stamped these in the top right hand corner before I machine stitched a wonky border around the outside of the panel.

I matted the panel onto gold metallic kraft stash which I sanded around the edge and placed foam pads on the back before mounting the panel onto my card blank. To complete the panel, I attached a strip of card across the bottom of the panel, this was an offcuts from the card panel and inked in the same colours and I added it to just give a base for the face to sit on so that it won't be floating in mid air.

Now for the star of the show...Albert!

I stamped the image onto watercolour card and then coloured him with a combination of Distress Re-inkers and Polychromos pencils.

Once I was happy, I fussy cut around the outline and placed him on foam pads to add some height and dimension to the face. I added a gold Metallic Droplet to create the look of a button on his jacket.

I made a few rips and tears in a Urban Layers Ephemera piece, Registered No. and inked around the edge with Walnut Stain Distress Ink. I then stamped my quote in the box. I took the quote from the Halloween Snarky Cats stamp set and just thought it worked for my quirky card. I did stamp the quote directly onto the ephemera piece but I'll admit I smudged it, so had to re-stamp it onto white card and then mount it over the top of the smudgey mistake!!

For the final details, I added a Stitched Scrap which I rolled up and then attached above the ephemera piece and I added a Wire Pin from my stash.

I also attached an Index Clip and some Machine Heads hardware onto each end of the strip that is attached to my panel.

Finally I added a Mini Flair in the top left hand corner, placing it in the centre of one of the golden bursts.

So that completes this week's project which I hope you love...

...as always, if you make anything, or been inspired by anything that you've seen here on my blog ~ then please, let me know by tagging me on social media or leaving a comment here and I will be right over to take a look!

Don't forget that every week, one lucky random participant has the chance to win a $25 gift voucher from Simon Says Stamp and you can join in up to 5 times, which means you could have 5 chances to win. You have until Monday 8am Ohio time. 1pm UK time, 2 pm CET to join in and good luck....


Thank you so much for taking the time to stop by today ~ stay safe and keep well.
Love Emma xxx

Recipe for project:

Distress Inks: Walnut Stain
Distress Spray Stain: Speckled Egg Distress Spray Stain, Ground Espresso Distress Spray Stain, Antique Linen Distress Spray Stain, Frayed Burlap Distress Spray Stain
Oxide Sprays: Crackled Campfire Oxide Spray, Tumbled Glass Oxide Spray

Monday, 21 June 2021

Just Keep Swimming....

Hello everyone and Happy Monday!

Hope you've all had a good weekend and you're ready for the brand new Simon Says Stamp Monday Challenge which this week is called "We Can See Clearly Now'. So if you love acetate and vellum or maybe you have a different interpretation of this theme, then we would love for you to join us and play along!

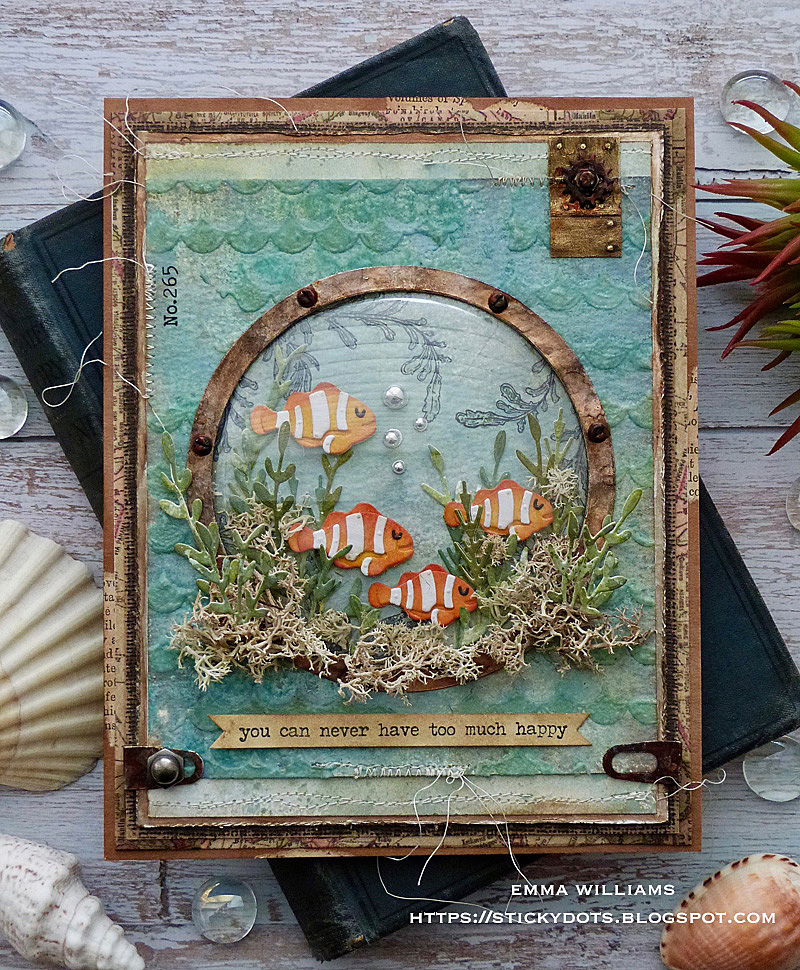
For my project, I had a clear idea of what I wanted to make and inspired by the Disney Classic, Finding Nemo, I created my own little fish tank on the front of a card, using a Sizzix 3.5" Shaker Dome! I hope that the photos do this justice and you will have to excuse any reflections you can see on the photos ~ as you can imagine, photographing acetate isn't the easiest thing and I think I needed Annie Leibovitz on hand, lol!

So let's get the challenge started and here's how I made this card...

BACKGROUNDS

To begin with I'll start with the background and for this I used a panel of Distress Watercolour Card 12 x 14cm and a second panel 12 x 16cm. Using my splat box, I placed the card panels inside and spritzed them with a light mist of water before spritzing the card with Speckled Egg, Bundled Sage, Frayed Burlap Distress Spray Stains and Speckled Egg Oxide Spray.

I spritzed another light mist of water over the inks to blend the colours together to form the beautiful colour ~ as you will see I did make the smaller panel slightly darker in colour than the larger one.

After heat drying the backgrounds, I machine stitched a wiggly border on the top and the bottom of the larger panel which I then matted onto gold metallic kraft stash, distressed around the edges, then a layer of black kraft card from the Neutrals set and finally a panel of patterned paper that I have in my stash.

Set this to one side until you've finished the dome and the scene...

SHAKER DOME APERTURE

Moving on, I cut a circular aperture in the centre of the smaller panel ~ I used a 9cm circle die from a Sizzix Framelits set that I have in my stash and this die will fit the dome perfectly. Once you cut the circle, keep this piece of card as you will need it for later.

I then wanted to add some texture to this panel and for this I applied some Translucent Grit Paste through the Scales Layering Stencil from Tim Holtz and whilst the paste was still wet, I sprinkled Speckled Egg Distress Glaze over the top. Tap away the excess and then set the card panel to one side to allow the paste to dry. Once this has happened, then the magic begins and using a heat embossing tool, I very carefully heated the texture paste to melt the glaze to create the enamelled effect on the card panel. I finished the panel with some zig zag machine stitching around the edges.

Taking the die cut circle that I cut from the centre of the panel, I inked up the seaweed stamp from the Sea Life stamp set and stamped it around the edge of the circle.

I then watercolored it with Peeled Paint Distress Ink before attaching this circle onto the centre of the larger inked panel.

CREATING THE SCENE INSIDE THE SHAKER DOME

For the foliage that fits inside the circle, I used a couple of the dies from the Sizzix Funky Florals 2 die set by Tim Holtz and cut a selection from Distress Watercolour Card that I inked with Peeled Paint and Bundled Sage Distress Sprays.

I then attached the foliage, adding it so that it was placed along the bottom curve of the circle.

With the foliage in place, I moved onto creating those adorable little fish, and for these I used the Under The Sea 1 Thinlits Die Set. I inked each of the main bodies with a blend of Spiced Marmalade and Crackling Campfire.

After assembling the four separate fish, adding the white stripes and tiny little eyes that are cut from black card, I attached all four onto the circle using foam pads, adhering them so that it looks as if they're swimming and weaving their way, in and out of the fronds. I also added some small tufts of moss to complete the scene.

For the bubbles, I used four silver metallic droplets and placed these directly onto the background.

TOP TIP: When adding all the elements to the circle, I really recommend that you keep checking that the dome still fits over the top comfortably.

Adhere the dome over the top of the scene in the circle and then place the background panel over the top of the dome, leaving some of the lighter coloured panel showing at the top and bottom. I used red line tape to secure this panel into place.

After attaching some Index Clips, altered with a little Distress Paint to add a rusty colour to each of them and clipped these near the bottom of the panels.

I mounted the matted panels onto my kraft card blank which I'd inked with Walnut Stain Distress Ink. You might also notice that I also adhered some torn pieces of book paper around the edges of the card blank to add some more interest.

For the metal circle that sits around the outside of the dome, I cut a circle of metallic kraft stash card, approx 9.5cm in diameter and then placed the circle die in the centre before running this through my die cutting machine. I now have a perfect frame that once I'd inked with Pitch Black, Rust and Foundry Alloy Alcohol Inks for a rusty finish I attached with Matte Collage Medium, placing the frame around the outside of the dome.

FINISHING DETAILS

I adhered some Hardware Heads onto the metallic frame and then painted these with Rusty Hinge and Black Soot Distress Paints to match them with the rusted frame.

I also attached some more moss around the base of the dome, together with some more die cut foliage.

In the top right hand corner, I added a small offcuts of metallic kraft stash card that I had left over from a previous project. This is embossed with the 3D Foundry Folder and I adhered them onto the card before attaching a sprocket gear and a hardware head over the top. I used the same paints as I used before to add colour to the metal hardware.

We're nearly there and all that's left is to stamp the sentiment, 'you can never have too much happy' which I stamped with Black Soot Archival Ink onto a scrap of inked card. I then cut an inverted 'v' into each end of the banner and attached the sentiment underneath the dome.

To complete the card, I added a Remnant Rub number in the top left hand corner.

So that's my project finished for today and I hope you've enjoyed the step by step of how I made it.

As always, if you make anything, or been inspired by anything that you've seen here on my blog ~ then please, let me know by tagging me on social media or leaving a comment here and I will be right over to take a look!

Don't forget that every week, one lucky random participant has the chance to win a $25 gift voucher from Simon Says Stamp and you can join in up to 5 times, which means you could have 5 chances to win. You have until Monday 8am Ohio time. 1pm UK time, 2 pm CET to join in and good luck....


Thank you so much for taking the time to stop by today ~ stay safe and keep well.
Love Emma xxx

Recipe for project:

Sizzix/Tim Holtz Dies: Under The Sea 1 Colorize, Funky Florals 2, Sizzix Making Essentials Framelits Die Set from joy stash, 3.5" Shaker Dome
Distress Paint: Rusty Hinge, Black Soot
Distress Spray Stain: Frayed Burlap, Speckled Egg, Bundled Sage, Peeled Paint
Distress Oxide Spray: Speckled Egg
Distress Embossing Glaze: Speckled Egg
Distress Inks: Peeled Paint, Spiced Marmalade and Crackling Campfire
Powered By Blogger

Total Pageviews