Showing posts with label katzelkraft. Show all posts

Monday, 6 June 2022

Hello, My Friend...

Hello friends and welcome to another week over on the Simon Says Stamp Monday Challenge Blog.

This week our theme is all about everything Bright and Cheerful and the DT will also be showcasing the products of Katzelkraft within their makes.

Now I will admit, bright is slightly out of my comfort zone ~ I'm more of a subtle colour addict, preferring my blue and neutral tones, but this wasn't a time to shy away from the brighter end of the spectrum and with this in mind, I chose to make a card packed full of colourful florals and a cute little birdie sitting there amongst them.


So let's get started and here's how I created this abundance of bright florals set against the dramatic black and gold background...

CARD BLANK AND BACKGROUND

To begin with I cut a black card blank to measure 18 x 14cm and machine stitched a border around the edge of the front of the card. I then cut a second panel of black card 16 x 12cm and using the Katzelkraft Etoile stamp, I stamped a repeat background over the card panel using clear embossing ink. I sprinkled Fine Detail Gold Embossing Powder over the top, tapped away the excess and then heat embossed the powder until molten.

After machine stitching a border around the outside, I added splatters of gold watercolour paint, then matted the card panel onto gold cardstock, followed by a layer of black kraft card. I then mounted the layers onto my card blank using foam pads.

SENTIMENT CIRCLE

Now for the sentiment and once again, I used the Etoile background stamp but this time inked it with Barn Door Archival Ink and stamped the image onto White Heavystock Card.

Using a nesting circle die, that was roughly the same diameter as the stamped image, I cut a circle and then inked the surface with Old Paper Distress Ink. I lightly spritzed water over the top of the circle, dabbed away the excess and then heat dried the card.

Using the Stampers Anonymous Bolding Sayings stamp set by Tim Holtz, I stamped the sentiment 'Hello My Friend' in Black Soot Archival Ink before mounting the circle onto foam pads and adhering it to the front of my card, placing it centrally, on the right hand side.

MODERN FLORISTRY

Now for those florals and for these I used as selection of the dies from the Sizzix Modern Floristry Die set by Tim Holtz to cut watercolour card and inked them with the following:

Large Floral: Picked Raspberry, Crackling Campfire; Middle of flower: Crackling Campfire, Spiced Marmalade

Smaller Florals: Mustard Seed, Wild Honey; Middle of flower: Black Cardstock

Foliage: Peeled Paint, Bundled Sage

With my flowers assembled and shaped to create more dimension, I arranged them around the left hand side of the sentiment circle, tucking pieces of foliage in amongst the florals.

In the centres of all the florals, I used a white gel pen to add the tiny little dots.

In the bottom right hand corner, you'll see there's a tiny little friend and this cute bird is from the Sizzix Silhouette Bird Die Set. I cut the image from watercolour card, before I inked the die cut with Gathered Twigs and Walnut Stain Distress Inks.

I mounted the little silhouette birdie onto foam pads and then tucked him into the arrangement.

For the finishing touches, I added three gold metallic droplets around the edge of the sentiment...

...and finally, I sewed a button onto a stitched scrap, pinned a mini pin onto the scrap and then folded the material in half and attached this to the card blank. placing it on the right hand side of the sentiment circle.

So, that's my project ready to share and I hope you love what I've made.

As always, if you make anything, or if you've been inspired by anything that you've seen here on my blog ~ then please, let me know by tagging me on social media or leaving a comment here and I will be right over to take a look!

Don't forget that every week, one lucky random participant has the chance to win a $25 gift voucher from Simon Says Stamp and you can join in up to 5 times, which means you could have 5 chances to win. You have until next Monday at 8am Ohio time. 1pm UK time, 2 pm CET to join in and good luck....


Thank you so much for taking the time to stop by today ~ stay safe and keep well.
Love Emma xxx

Recipe for project:

Stampers Anonymous: Bold Sayings
Distress Ink: Picked Raspberry, Mustard Seed, Crackling Campfire, Wild Honey, Peeled Paint, Bundled Sage, Old Paper, Walnut Stain, Gathered Twigs
Tim Holtz idea-ology: Metallic Droplets

Monday, 5 July 2021

I Meant To Behave...

Hello all...

Hope you've had wonderful and happy weekend and for all my US friends ~ I hope you had a happy 4th July!

As Monday comes around once again, the brand new Simon Says Stamp Monday Challenge begins and this week our theme is all about Fun and Quirky and the DT are also showcasing Katzelkraft within their projects! If you would love to join us, all the details are at the end of my post and we can't wait to see what you create...

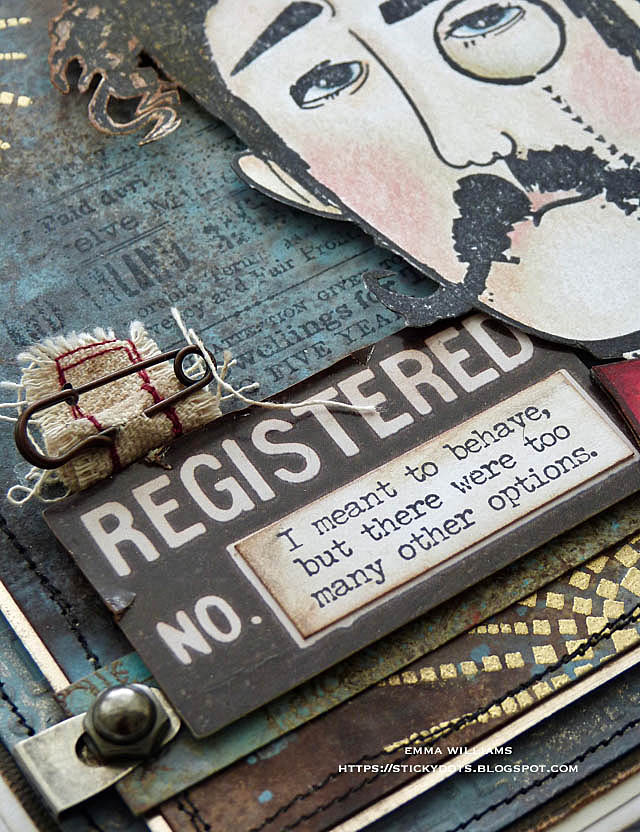
I decided to make a card, and as Tim refers to them ~ this is an Emma sized card which measures 19.5 x 15.5cm! You'll also notice that I can't get enough of the brand new Stampers Anonymous releases from Tim Holtz and this time I'm using the Observations set. I just love this gentleman, so regal and every time I see him, he reminds me of the actor who played Queen Victoria's husband, Prince Albert in the drama series Victoria!


So let's get started ~ it's time for me to share this project and here's how I made this card...

I started by creating the backgrounds and for this I used two separate panels of Mixed Media Heavystock card, one measuring 18 x 14cm and a second to measure, 16 x 12cm. I then spritzed the card with a light misting of water before spritzing the following sprays over the surface and blending them with another misting of water:

Speckled Egg Distress Spray Stain

Ground Espresso Distress Spray Stain

Antique Linen Distress Spray Stain

Frayed Burlap Distress Spray Stain

Crackled Campfire Oxide Spray

Tumbled Glass Oxide Spray

After heat drying the backgrounds thoroughly, I began by embossing the larger panel using the Circuit 3D Texture Fade Embossing Folder. Because of the size of the panel, I ran this through a couple of times to ensure the entire panel was embossed. I then machine stitched a border in black cotton around the outside.

After matting the embossed panel onto black kraft stash card from the Neutrals set, I mounted the layered panels onto the white card blank.

Now for the smaller panel and I stamped some text on the background using the advertising stamp from The Professor 2 stamp set. I stamped this in Black Soot Archival Ink and just rolled the stamp over the background, allowing it to kiss the surface but not stamping the whole image.

Now for the gold bursts and I used the Halftones Etoile stamp by Katzelkraft and using Versamark clear ink, I stamped this three times, top left hand corner, along the bottom edge and on the right ahdn side fo the panel, just taking each image over the edge of the panel and then sprinkled gold embossing powder over the images, and heat embossed them until molten.

To complete the panel, I inked up the tiny little crosses from the Inquisitive stamp set, and stamped these in the top right hand corner before I machine stitched a wonky border around the outside of the panel.

I matted the panel onto gold metallic kraft stash which I sanded around the edge and placed foam pads on the back before mounting the panel onto my card blank. To complete the panel, I attached a strip of card across the bottom of the panel, this was an offcuts from the card panel and inked in the same colours and I added it to just give a base for the face to sit on so that it won't be floating in mid air.

Now for the star of the show...Albert!

I stamped the image onto watercolour card and then coloured him with a combination of Distress Re-inkers and Polychromos pencils.

Once I was happy, I fussy cut around the outline and placed him on foam pads to add some height and dimension to the face. I added a gold Metallic Droplet to create the look of a button on his jacket.

I made a few rips and tears in a Urban Layers Ephemera piece, Registered No. and inked around the edge with Walnut Stain Distress Ink. I then stamped my quote in the box. I took the quote from the Halloween Snarky Cats stamp set and just thought it worked for my quirky card. I did stamp the quote directly onto the ephemera piece but I'll admit I smudged it, so had to re-stamp it onto white card and then mount it over the top of the smudgey mistake!!

For the final details, I added a Stitched Scrap which I rolled up and then attached above the ephemera piece and I added a Wire Pin from my stash.

I also attached an Index Clip and some Machine Heads hardware onto each end of the strip that is attached to my panel.

Finally I added a Mini Flair in the top left hand corner, placing it in the centre of one of the golden bursts.

So that completes this week's project which I hope you love...

...as always, if you make anything, or been inspired by anything that you've seen here on my blog ~ then please, let me know by tagging me on social media or leaving a comment here and I will be right over to take a look!

Don't forget that every week, one lucky random participant has the chance to win a $25 gift voucher from Simon Says Stamp and you can join in up to 5 times, which means you could have 5 chances to win. You have until Monday 8am Ohio time. 1pm UK time, 2 pm CET to join in and good luck....


Thank you so much for taking the time to stop by today ~ stay safe and keep well.
Love Emma xxx

Recipe for project:

Distress Inks: Walnut Stain
Distress Spray Stain: Speckled Egg Distress Spray Stain, Ground Espresso Distress Spray Stain, Antique Linen Distress Spray Stain, Frayed Burlap Distress Spray Stain
Oxide Sprays: Crackled Campfire Oxide Spray, Tumbled Glass Oxide Spray
Powered By Blogger

Total Pageviews