Happy Monday everyone...
How are these weeks going so fast?!?! I can't believe we're already at the end of February but a new week, means that we have a brand new Simon Says Stamp Monday Challenge and this week our theme is called FUR OR FEATHERS and I'm sure that so many of you will enjoy joining us for this challenge.
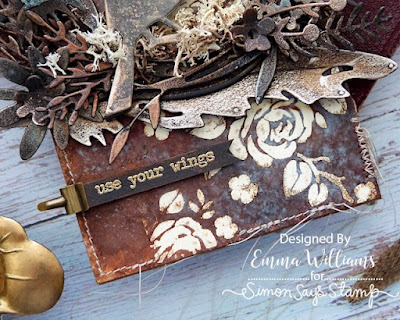
For my make, I chose to go with feathers and created a Size 8 Etcetera tag using a combination of Sizzix and Stampers Anonymous products, all by the amazing Tim Holtz. As a focal point, I chose to use the Funky Floral Wreath and Lovebirds Die Sets, which are back from the vault and I decided to create the whole tag using warm shades of brown and rust, with a hint of metallic glimmer shining through.
To begin with I used a Size 8 Heavystock Tag and a Size 8 Etcetera tag.
TAG BACKGROUND
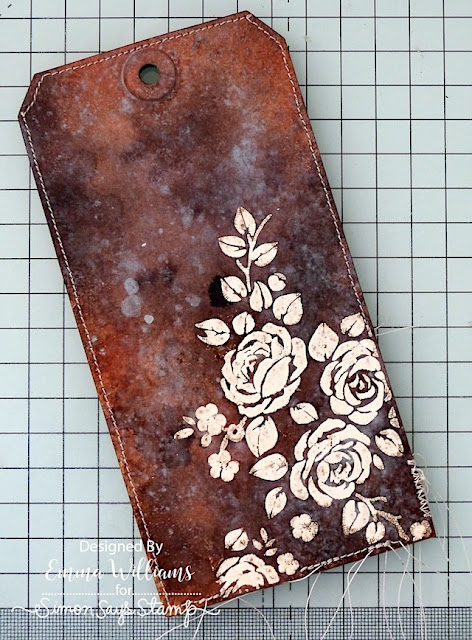
Starting with the tag background, I applied Translucent Texture Paste through the Roses Mini Layering Stencil, concentrating on just a small section of the stencil, and applying the paste in the bottom right hand corner, twisting up the right hand side.
I allowed for the paste to dry thoroughly before moving onto the next step of adding the colour.
For this, I used a combination of Distress Spray Stains and Oxide Sprays in the following colours:
DISTRESS SPRAY STAIN; Ground Espresso, Rusty Hinge, Antique Linen, Speckled Egg
OXIDE SPRAY; Tumbled Glass
After spritzing the tag with a light mist of water, I spritzed each stain, drying in between layers and adding more water to blend the colours if necessary.
Once I was happy, I gently heat dried the tag, avoiding the pasted area as much as possible and then dabbed away any ink that was on the texture paste, so that the pasted area would still remain ivory in colour.
To add more depth and layers to the background, I added some stamping using a selection of stamps from the Eccentric, Field Notes, and Tiny Toadstools sets, using Black Archival Ink.
I added some text to the background using the text stamp in the Tiny Toadstools set and...
...in the top right hand corner, I added the Book No. 710 from Field Notes, and the stars from Eccentric.
After machine stitching a border around the outside of the tag, I inked the edges and then attached it with Matte Collage Medium onto my Size 8 Etcetera Tag. This isn't necessary but I like using these, and would recommend them, as they are more substantial for the layers that I will be adding.
FEATHER
We're now ready for the embellishments and I started with the feather that sits across the tag.
I cut this from black heavystock card, using the die in the Tim Holtz Vault Lovebirds die set by Sizzix, and then to achieve the metallic finish, I applied Foundry Wax. I added Statue to begin with, and used my fingertip to give a solid layer across the die cut feather. After heat setting the wax, I then applied a lighter layer and not a solid layer of Sterling, just applying it where my fingertip touched.
Heat set the wax again and if necessary, and you feel too much Sterling has been applied, just go back in with some Statue, remembering to heat set it.
I ran my Black Soot Distress Crayon around the edge of the feather, shaped it to create more dimension and then attached this across my tag, overhanging each of the sides.
WREATH AND BIRD
Now for the wreath and my little birdie....
To begin with I took a panel of black heavystock card and I spritzed the card with a combination of, Unravelled, Fallen Acorn, Decayed Mica Stains to add a touch of shimmer and a metallic finish to the cardstock. Heat dry the panel, or allow to dry naturally.
I then used this card panel for all my die cuts, cutting the wreath, the bird and the foliage and flowers.
I always cut two layers of the wreath which I then attach over the top of one another, slightly offsetting them to form more of a fluffy, layered look to the finished piece.
To add more depth and variant of colour to all my die cut pieces, I used Finnabair Waxes in Firebird and Patina Green, just using my fingertip to add a hint of this wax because the smallest amount goes a long way.
I attached the layered circular wreath to my tag using foam pads, strategically placed behind so that you can't see them from the front, and placed it so that it is positioned slightly over the top of the feather.
I then took all the tiny pieces of foliage and flowers and layered these onto the wreath. To stick these into position, I just add a dab of collage medium to the ends of then tuck each piece into the main wreath itself.
I then added the beautiful die cut flowers, layering them and shaping them to create more dimension, and once again just tucking them in and placing them amongst the foliage.
To complete the little bird's nest, I attached tiny clumps of moss.
Now for the main star of the piece, the little birdie who is sitting proudly in his/her nest.
Once again, I cut the bird twice and layered him so that he is more substantial and will be more supported, and to add a highlight around the edge, I used the Unravelled Pearl Crayon from the Halloween set no.5 and ran this around the edge of the die cut to create a subtle shadow.
After adding foam pads to the back, I placed him in the centre of the wreath.
We're nearly there and all that's left is the tiny details...
FINISHING DETAILS
For the sentiment, 'use your wings', I took the stamp from the Stampers Anonymous Tiny Text stamp set and stamped it onto black card, using Versamark Clear Ink. I then heat embossed it with gold embossing powder before cutting it down to size and attaching it to my tag, adding a Tiny Clip to the end.
I added a stamp in the top left corner, which is from the Field Notes Snippets Ephemera set and finished with some rope, threaded through the hole at the top of the tag, adding a mini pin to complete it.
So, that's my tag for this week complete and I hope you love what I've made using feathers as my inspiration.
As always, if you make anything, or if you've been inspired by anything that you've seen here on my blog ~ then please, let me know by tagging me on social media or leaving a comment here and I will be right over to take a look!
Don't forget that every week, one lucky random participant has the chance to win a $25 gift voucher from Simon Says Stamp and you can join in up to 5 times, which means you could have 5 chances to win. You have until next Monday at 8am Ohio time. 1pm UK time, 2 pm CET to join in and good luck....
Recipe for project:


A very beautiful tag, thank you for sharing the details of your feather inspired creation. I’ve just received my black heavystock, curious what to create with it, so your tag has been quite inspiring for me. 🤗
ReplyDeleteStunning , thank you for sharing the details of how you made the tag xxx
ReplyDeleteSuch a beautiful work of art. You inspired me to make a similar tag and attached a bible verse to give to my God children❤️
ReplyDeleteThis is such a beautiful tag. I'm in love with it,..that brown has taken my heart.
ReplyDelete