
Hello everyone and welcome to this week's brand new Simon Says Stamp Monday Challenge!
This week, we want you to create ANYTHING BUT A CARD and hope you'll join us and play along with our fun theme!
For my make, I created a vintage style panel and of course, I used products from Tim Holtz and Stampers Anonymous to bring this piece to life and tell the story of a travelling showman who travels from New York to London, UK to make his dreams come true.

So let's get started, and here's how I created this project...

For this make, I used the larger sized Rectangular Etcetera Panel by Stampers Anonymous and began by applying Design Tape around the four edges to prep the board ready to decorate.

BACKGROUND
For the background I used paper from the Backdrops Vol 4 pack and I cut one panel that fits the board and I added rips and tears all around the edges, folding back and adding creases to the corners.

To add the double layer I then took some offcuts from my pack and just placed these behind the creased corners, attaching them so that there would look as if there are two layers of paper. This technique means that you don't have to use two sheets of that precious paper, and it's a great way to use those offcuts.
I added a machine stitched border around the outside and then ruffled and creased the remaining corners before adhering the paper to my board using Matte Collage Medium.
You can see in the photo below the double layer of paper and then design tape in the corner.

To complete the background, I splattered Black Soot Distress Paint across the surface and then once this was dry, I ran Walnut Stain Distress Crayon around the edges.
The board is now ready to decorate and tell the story of this showman.

LEDGE
To create the ledge, I used two different widths of the longest length of Pinked Etcetera Trims, and one of the shortest lengths of the trims.

I used the Decorative Trim Die Set to cut a piece of paper from the Backdrops Vol 4 pack and attached this to the wider trim. I painted the narrower trim with Black Soot Distress paint and then attached the two trims to form one solid piece.
I adhered this piece across my panel, placing it flat against the board.
I painted the smaller trim with Black Soot Distress Paint and once this was dry, I sanded the surface to create some ageing and then attached the trim at a 90° angle to the trim already attached to the board and placed it on the left hand side.

To complete the ledge, I attached the longest length of ruler from the Measurements idea-ology pack and placed this along the trim. This won't fit the whole length of the etcetera trim, but we'll be placing the paper doll on the right hand side, so you won't notice this.

WINDOW FRAME
With the ledge in place, I moved onto the window frame.

The frame is from the Baseboards Window Frame pack and I lightly sanded the surface before inking with Walnut Stain Distress Ink.
I then cut a panel of the Shattered Windows and popped this behind the frame, attaching it with red line tape. The shatter is really hard to photograph, but I think you can just see it in the photo below, in the top left corner of the frame.
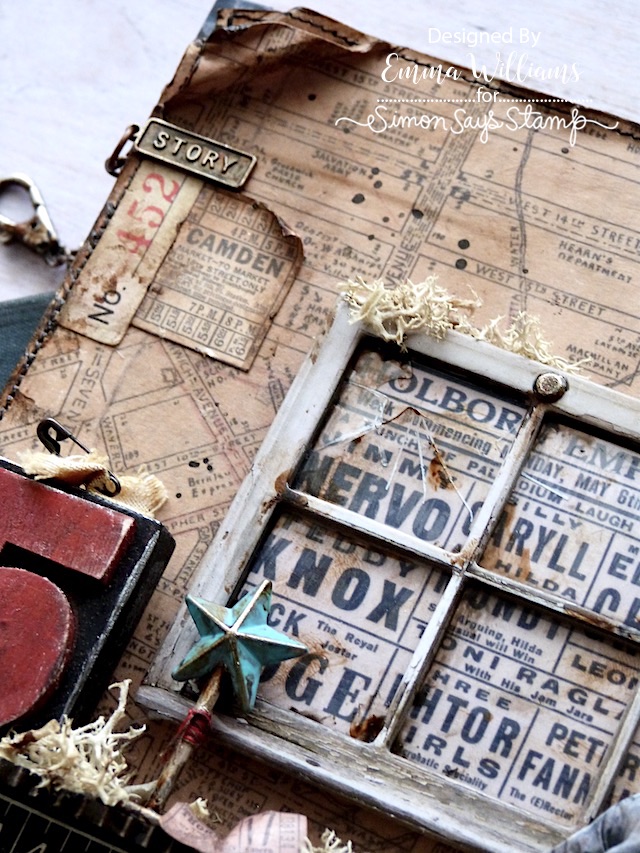
Behind the completed frame, I placed an Advertising ephemera piece that I took from the Memoirs Ephemera Pack. I just adore this piece because it features my home town of London and the historic Holborn Empire. This theatre was originally called Weston's Music Hall and was built in 1857 but changed its name to the Holborn Empire in 1906, which it remained as until it was bombed in WW2.
After ageing the ephemera piece using Gathered Twigs Distress Ink, I placed it behind the window frame. I attached some mountboard to the back of the whole piece to give it more of a substantial backing before attaching it to my panel using foam pads.

I attached two Hardware Heads at the top of the frame, which I altered with a little Black Soot and Crackling Campfire Distress Paint, before adding a touch of gold paint from my stash, just dry brushing it over the top of the metal.

Around the top of the frame, I added moss and then completed it with a label ephemera piece, and a pointy finger taken from the Snippets pack. On the label, I used the '1917' Remnant Rub from the Eccentric Pack.
PAPER DOLL
The paper doll is one of my favourite images and I love how he sits so comfortably on this piece.

I colour tinted him using Distress Crayons and a waterbrush, using blues and browns tones for his clothing and for his face and pads, I used Tattered Rose, adding a touch of Aged Mahogany onto his cheeks.
I attached him to sit on the right hand side of the trim, and used foam pads to add dimension.

idea-ology FINDINGS
On the left of the ledge, I used a couple of idea-ology findings ~ the number block and the star Figure Stand.
I painted the number on the number block with Candied Apple Distress Paint and once it was dry, I sanded the surface to remove some of the paint.
I then attached the number block to my panel with Matte Collage Medium.

On top of the number block, I added an offcuts of linen. This is from my fabric stash and is then dyed with a little Frayed Burlap Distress Spray. Once it was dry, I attached a Tiny Pin and adhered it to the block.

To the right of the block, I attached the Figure Stand ~ this piece comes in two separate pieces and I painted each piece using Distress Paints:
STAR: Salvaged Patina, Crackling Campfire
STAND: Crackling Campfire, Black Soot, Antiqued Bronze
Once both of my pieces were dry, I attached the star to the stand, securing it into position with a dab of collage medium. Before attaching the stand to my ledge, I wound some red cotton thread around the base and secured this with a knot.

As a finishing touch, I added some moss along the ledge and then added a tiny ticket stub, which I crumpled and inked before attaching next to the stand itself.

QUOTE
The quote is from the Quote Label Chips and after sanding the edges, I inked it with Walnut Stain Distress Ink and then placed it into the Label Frame. These frames are the perfect fit for the quotes, and were designed to work in conjunction with the chips.
The metal of the frame is altered with the same Distress Paints as I used on the stand but I also applied a touch of Statue and Sterling Foundry Wax over the top. I apply these separately, directly onto the metal and I never apply a complete solid coverage, I just use my fingertip to touch the metal with the wax and where it hits, that's where it stays. After I had heat set the wax with a heat tool, I adhered the frame and chip into place using Matte Collage Medium, placing it in the bottom left hand corner.

FINISHING DETAILS
Now for all those tiny little finishing details, and starting in the top left hand corner of the panel, I collaged some ephemera pieces, together with a offcut of paper, that shows a ticket stub to Camden…the original Holborn Empire was built in what is now the London borough of Camden. This off-cut snippet is actually cut from one of Tim's older paper stashes, called Etcetera and was an 8" square paper pad but if you don't have this, then any piece of ephemera will work just as well.

I collaged this piece with a Numbers Snippet and a Word Tag with the word "Story" on it. The metal on this tag is altered using the exact same technique as I used on the frame and the stand.
I hung a Hook Clasp from the tag and then attached the tag to my panel, together with the ephemera pieces.

Finally, I adhered some strips of metallic cardstock that I had on my desk from a previous project. These strips were cut from a larger sheet of cardstock, embossed using the Tim Holtz Circuit Embossing Folder by Sizzix and altered with the same colours as used before.
I then attached the tiny little offcuts to my panel.


Don't forget that every week, one lucky random participant has the chance to win a $25 gift voucher from Simon Says Stamp and you can join in up to 5 times, which means you could have 5 chances to win. You have until next Monday at 8am Ohio time. 1pm UK time, 2 pm CET to join in and good luck....


Recipe for project:


I love the history you’ve worked into your project Emma, and of course all of the beautiful details. Thank you for the inspiration!
ReplyDeleteSheila Styre-Briere