Hello everyone...
As another week flies by, it's time for the brand new Simon Says Stamp Monday Challenge and this week, we are asking you to USE YOUR FAVOURITE COLOUR!
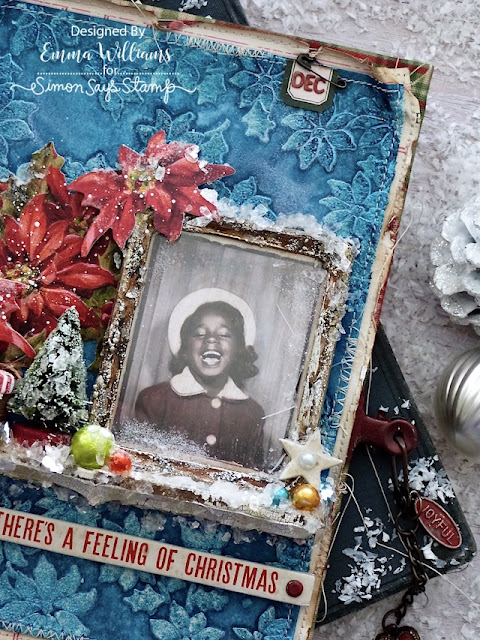
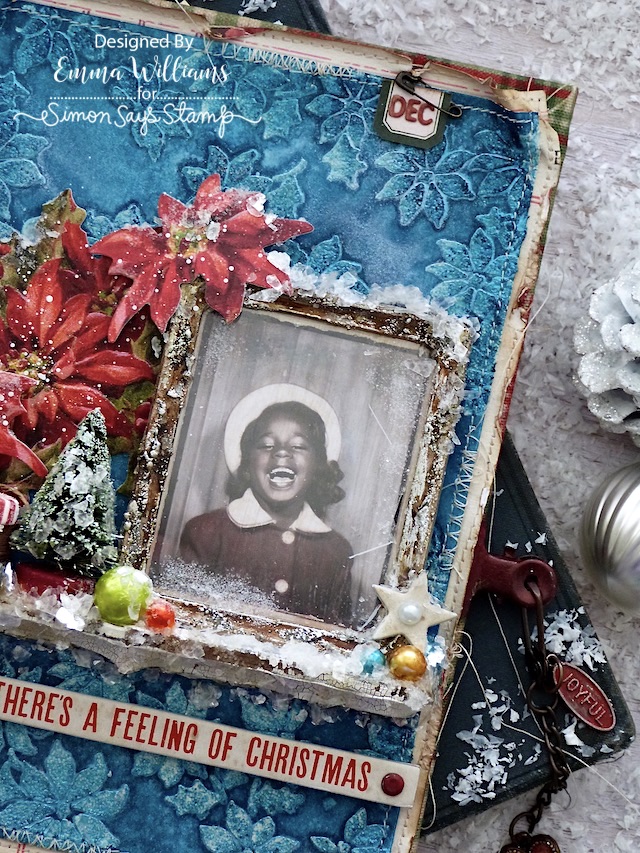
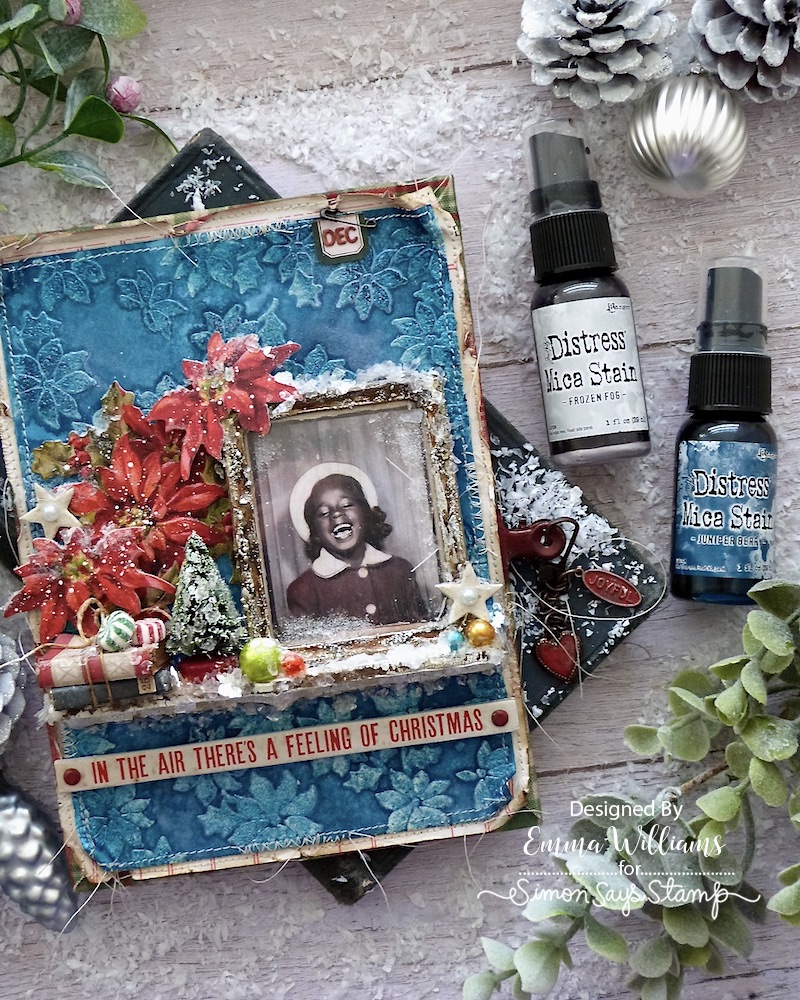
When it comes to my favourite colour, even though I love the colours of Autumn and I do love black, there was always only one colour that I would choose above all others ~ and that is, blue! Yes, blue is my go-to colour and whether it's home decor, clothes or as most of you might have noticed by now, in crafting...I will always have some shade of blue going on somewhere. So with this in mind, I decided to create a project that would use blue as a background for a Christmas themed panel. I actually decided to make this based on another project I made in August using the Halloween 2023 idea-ology and I was so happy with the make, I thought it would be cool to do a Christmas version, and here it is...
So, let's begin because in the air, there's a feeling of Christmas!

For this make, I used the smallest sized of the rectangular Etcetera Panels as my base and I covered the edges with Christmas Fabric Tape.
I then cut a panel of Backdrops paper, and I added rips and tears around the edges. I then inked with Walnut Stain Distress Ink before machine stitching a border around the edge. I then mounted the panel onto my board using Collage Medium to adhere it into position. The Backdrop paper that I used, was a design from last year's Christmas pack but if you haven't got this set, then you are hiding most of it, so it really doesn't matter what you choose.
BACKGROUND
To create this background, I cut a panel of Mixed Media Heavystock card, slightly smaller in size than the panel itself and then I directly applied the Snowfall paste through the Tiny Poinsettia Layering Stencil to cover the entire panel.
After allowing the paste to dry, I spritzed the card with Juniper and Frozen Fog Mica Sprays and a light mist of water and then set the card to one side to dry.
Once the card is thoroughly dry, I machine stitched a border around the edge and then mounted it onto my panel, placing it centrally over the top of the previous layers. I did just crumple the edges slightly and folded back the corners to add more texture.
In the top right hand corner, I had a little label on my desk that I didn't use on a previous project, but it fit this one perfectly ~ so I just attached it in the corner, and added a Mini Pin.
LEDGE
We're now ready to start bringing the scene to life and to begin with I made the shelf that everything will sit on. I used two different widths of the Bracket Trims and attached these to form an 'L' shape and a 90° angle.
I then covered the ledge with crackle paste and once the crackles have appeared and the medium is dry, I ran the Hickory Smoke crayon over the surface, blending out the colour with a damp brush, so it seeps into the cracks to accentuate them.
Attach the ledge to the panel.
FRAME
Now we're ready to move onto the frame and for this I used the larger sized idea-ology Photo Frame, and added a smear of Translucent Grit Paste over the surface to make it look more vintage. Once the paste was dry, I applied Foundry Wax over the metal surface ~ firstly, I used Statue, which I heat set and then applied a lighter layer of Sterling over the top, not applying a complete coverage and making sure the previous layer showed through in random areas. Finally, I smeared a touch of Burnt Sienna Acrylic Paint over the surface, again just applying it with my fingertip.
I then attached a piece of the Shattered Windows behind the frame, there is a slight shatter on the right hand side but I didn't want too much on this piece, just a crack.
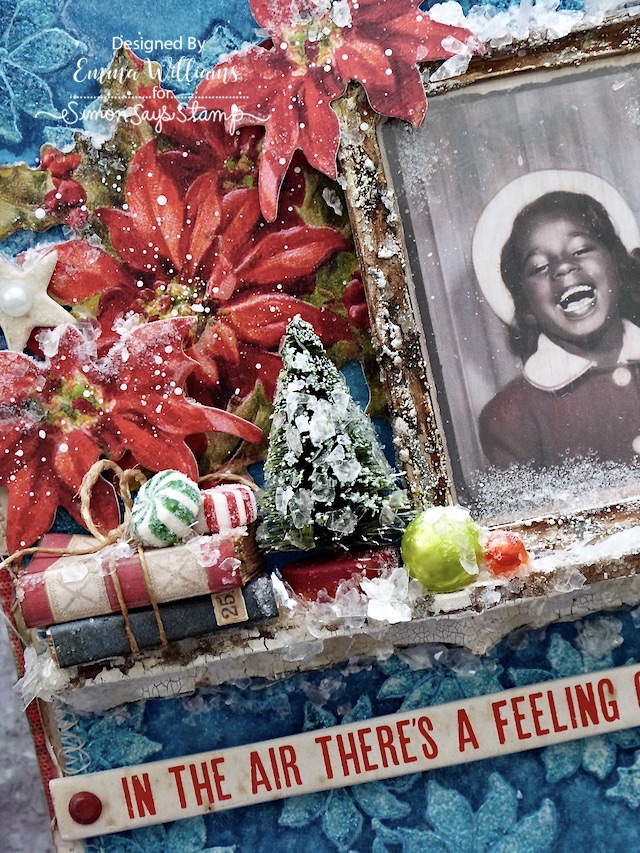
With the frame ready, I colour tinted the photo using Distress crayons and a waterbrush. This photo is one of my favourites, she is just joyous and that smile is perfect. I attached the frame over the photo using foam pads and then I placed it onto my ledge/shelf, attaching it a slight angle so it looks as if it's leaning.
To add the icy effect, I dribbled some Glossy Accents over the frame and then sprinkled Mica Flakes over the top. I also smeared a small amount to Snowfall Paste onto the acetate.
POINSETTIAS
To the left of the frame, I added some poinsettias. These are from the Layers pack and are just beautiful ~ you don't need to do much with them except add some shape and attach them to the panel with foam pads to add dimension. Once the poinsettias are in place, I used a Splatter Brush and splattered them with Picket Fence Distress Paint and then added a touch of Snowfall paste and some Mica Flakes.
SHELF ARRANGEMENT
CHRISTMAS TREE: I used the smallest sized tree in the woodland tree lot pack and after adding gesso to the tips of the tree, I allowed the paint to dry before adding the colour. For this I used Rustic Wilderness Distress Spray Stain. Dab away the excess ink with a paper towel and allow to dry before rolling the tree in Glossy Accents, just enough to add the medium to the tips and then sprinkling Mica Flakes over the top.
With the tree all sparkly and beautiful, I painted the wooden base with Candied Apple Distress Paint, allowed this to dry and then attached it to my ledge.
BOOKS:
The books are so easy to make, and I warn you, once you start ~ they are addictive. The covers are from the Christmas Ephemera Pack and to build these three books that I used on this make, you will need either old book pages, or you can use some of Tim's idea-ology papers ~ I do tend to use book pages, because they are easier to manipulate when building the pages, but the choice is yours and both work ok!
Taking the book covers from the Ephemera Pack, I scored the book to create the back and front and a spine and folded along the scorelines. I then cut my book pages to size ~ for this you will need to measure the front cover, width and height and then double the measurement to give you the pages that fit inside the book cover.
Once you've cut enough pages to fill the book and you do want to make sure it's really full, then fold each of them in half and then start adhering them inside the cover. I used Matte Collage Medium.
When the pages are all fixed into place and the secure, I scuffed the edges of the book pages, and then dipped my finger into some paint, and with the book closed, I rubbed the paint along the scuffed edges to add that gorgeous look of an old book.
I tied some twine around one of the books and added a Clippings Sticker to the spine to complete it.
I attached the books on the left hand side of the shelf.

On top of the book I placed two confection pieces, one red and one green and both of these are covered in Rock Candy Distress Glitter. I always use Glossy Accents to adhere my glitter as this helps to keep the sparkle.
BAUBLES: I coloured a selection of various sized baubles with Alcohol Ink, the colours I used are listed at the end of this post and then attached them along the ledge with Glossy Accents.
Now for the finishing touches and I added some Snowfall Paste along the ledge, and a good sprinkle of Mica Flakes.
I also attached the flakes along underneath of the ledge, again using Glossy Accents.
Finally, I took two of the white stars from the Christmas Baseboard and Transparencies pack and after coating these with Glossy Accents, I sprinkled Rock Candy Glitter over them and arranged them on either side of my project, netting them amongst the other pieces.
I then attached a Christmas Droplet in the centre of each.
All that's left now is to attach the quote chip, again from the Christmas Baseboard pack. I attached below the shelf using foam pads and adding a Hardware Head on either side, which I painted with Candied Apple Distress Paint.
I finished the project by clipping a Hinge Clip, painted with Candied Apple Distress Paint to the right hand side, complete with Swivel Clasp attached. I then hung a Heart Adornment and a "Joyful" Tiny Tag, again all painted with Candied Apple Distress Paint.
So that's my make finished and I hope you love what I've created using my favourite colour, courtesy of Tim Holtz and Ranger Ink, to create that gorgeous blue background.
As always, if you make anything, or if you've been inspired by anything that you've seen here on my blog ~ then please, let me know by tagging me on social media or leaving a comment here and I will be right over to take a look!
Don't forget that every week, one lucky random participant has the chance to win a $25 gift voucher from Simon Says Stamp and you can join in up to 5 times, which means you could have 5 chances to win. You have until next Monday at 8am Ohio time. 1pm UK time, 2 pm CET to join in and good luck....
Thank you so much for taking the time to stop by today ~ stay safe and keep well.
Love Emma xxx
Recipe for project:
Tim Holtz Idea-ology: Shattered Windows, Hardware Heads, Photo Frame, Christmas Fabric Tape, Baubles, Woodland Tree Lot, Christmas Confections, Christmas Layers and Paper Dolls, Christmas Baseboards and Transparencies, Christmas Ephemera,
Christmas Droplets,
Swivel Clasp,
Heart Adornment,
Tiny Tag, Hinge Clip
Hot Glue Gun
****These are not affiliate links****


No comments:
Post a Comment
Thank you for all your comments and messages, they are all appreciated and I hope you'll come back and visit again soon...
Emma ~xx