
Hello everyone...
Hope you are all well and had a fabulous weekend. As always, a brand new week means the new Simon Says Stamp Monday Challenge has begun and this week our theme is called TAKE FLIGHT!
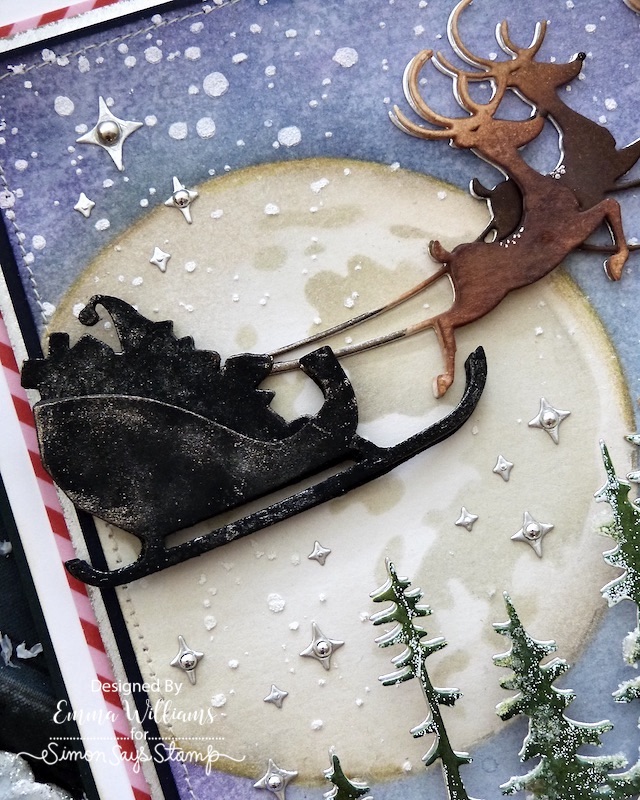
Now there are many interpretations for this theme, birds, insects, planes ~ you name it, they will all work so well but when it came to my make, I had one thing in mind ~ Santa Claus! How could I resist the brand new Reindeer Sleigh die set from Tim Holtz and Sizzix, it was just sitting on my desk and perfect for this challenge. So, with this in mind, it was time to bring the wintery scene to life and if you listen, you might just hear those sleigh bells ringing as Santa and his reindeers, including Rudolph start their journey....

So let's get started and here's how I created my card...


To begin with I cut a card blank from black card, 15.5 x 21cm, this is what Tim refer’s to as an ‘Emma sized’ card, and I matted a layer of white heavystock card onto the front, leaving a narrow border of the black showing. I then cut a second panel of white heavystock card, 14 x 19.5cm and added a border of Candy Cane Christmas Design Tape. If you don't have this, then patterned paper or any design of tape you have to hand will work equally as well. I adhered the tape around all four of the edges to create the patterned border for my finished card.

BACKGROUND
I then started creating the background for the scene and placed the medium size of the set of 3 Stampers Anonymous Moon Masks on the left hand side of a panel of White Distress Watercolor card, 13 x 18.5cm, which is flipped over to reveal the smooth side.
With the moon mask in place, I used Stormy Sky and Chipped Sapphire Distress Inks and a blending tool, to ink the top section of my card panel, leaving the lower section white.

I then applied Villainous Potion Distress Ink over the top, gradually working from the outside towards the moon, so that it would be a slightly darker shade around the edge.

Now that the colour of my sky is complete, I removed the moon mask, replaced it with the second mask and used Hickory Smoke to ink the second layer onto the inside of the moon to form the craters. I also added shading around the edge of the moon with the same ink. Over the top of this, I lightly blended Antique Linen to create the solid colour of the moon.

After flicking water over the top and dabbing away the drips with a paper towel, I heat dried the inked surface to set the inks and then applied Grit Paste through the Speckles Layering Stencil to add the snowy effect.

On the white section I added some shading to give the look of snow drifts using Speckled Egg Distress Ink and then completed the panel with some machine stitching around the outside.
To complete the panel, I stamped the sentiment, "a wonderful Christmas" onto the bottom section of the panel in Black Soot Archival Ink. This sentiment comes from the Christmas Time 3 stamp set and is one of my favourite stamps from Tim ~ I just love that font so much, it's perfect for capturing some vintage magic.

I matted the finished panel onto a piece of navy blue card, followed by silver metallic kraft card and then, using foam pads I mounted it onto the card blank.
With the panel complete, it's time to start die cutting....
FOREST SHADOWS
To begin with I coloured a piece of mixed media heavystock card using the following combination:
DISTRESS SPRAY STAINS: RUSTIC WILDERNESS, BUNDLED SAGE
MICA STAINS: TREE LOT
Once the card was dry and the blend was just right, I used the trees from the Forest Shadows Die Set to cut my two separate images to create the background layer and the foreground. I also cut a second layer of silver metallic card, which I used as a drop shadow behind each of the green layers.
To create the snowy effect on the edges of the trees, I brushed the Embossing Dabber very lightly over the tips and then sprinkled White embossing Powder over the top. Tap away the excess and heat emboss the powder.

Because I wanted to add some glitter and snow, I applied a light coverage of Micro Glaze over the top of each die cut. This will stop any ink turning your snow green and bleeding into the Grit Paste, which I added along the bottom of the die cut.
I allowed for the paste to dry, before drizzling some Glossy Accents over the Grit Paste. Working quickly, I sprinkled Mica Flakes and Rock Candy Glitter over the top, tapped away the excess and set this aside to dry.
...and once the pieces are dry enough to handle, I attached them to my card front, placing them across the background, slightly overlapping the edges and creating different heights to each piece by adding foam pads to the larger die that sits in the foreground.

At this stage, I also added some Snowfall Paste to the trees, just using my finger to apply it on the tips of each one.
The trees are now in place and we're ready to welcome Santa....

REINDEER SLEIGH
To build santa's sleigh, I cut 4 separate images from black card. Layer the die cuts over one another to make two separate pieces and then I placed them in my splatter box and spritzed each one with Frozen Fog Mica Stain, dabbing away any excess with a paper towel. Once dry, I cut one of the pieces into the shape of santa's sleigh and then layered this over the top of the second one, attaching it with foam pads to add some dimension.

I finished the die cut by adding a touch of gilding wax around the edge, this will help to create a shimmer from the moon.

Moving onto the reindeers and for this, I cut all my reindeers from Distress Watercolour Card. I then inked the images with a combination of Gathered Twigs, Walnut Stain, and Vintage Photo, making sure that I didn't ink the antlers.

Once I was happy, I spritzed a light mist of water over the top and then heat dried each piece before assembling them to create the complete die cut.

I just love how Tim has given us the option to layer the deers to create more dimension, they look amazing.

Taking the larger reindeer die, cut a panel of silver metallic kraft card, sand around the edges before adhering the reindeers over the top of the metallic die cut to create a shimmery shadow.

After adding some white pen detail work, I attached santa and his friends to my card, placing santa against the moon.
DETAILS, DETAILS, DETAILS
For the finishing details to this card, I added some of the tiny sparkly stars from the Forest Shadows Die Set. I cut these from silver metallic kraft stash card and then adhered them onto my background. In the centres of some of the stars, I added silver metallic droplets.
So that's my card finished and I hope you love what I've made and LOVE the new dies from Tim, as much as I do ~ they are gorgeous and I can see many Christmas projects being made with all the dies from this amazing release, which you can check out HERE and if you did miss the LIVE launch party on Saturday, just pop on over to Tim's blog to check out the replay.

As always, I hope you love the card I've made and the techniques I've used and if you make anything, or if you've been inspired by anything that you've seen here on my blog ~ then please, let me know by tagging me on social media or leaving a comment here and I will be right over to take a look!
Don't forget that every week, one lucky random participant has the chance to win a $25 gift voucher from Simon Says Stamp and you can join in up to 5 times, which means you could have 5 chances to win. You have until next Monday at 8am Ohio time. 1pm UK time, 2 pm CET to join in and good luck....


Recipe for project:


Hi Amy…
ReplyDeleteThank you so much for your lovely comment, I really do appreciate your kind words, they mean the absolute world to me and I’m over the moon that you love the projects I share…it makes all the hard work so worthwhile when I read comments like this! ♥️
I’m not sure if it was you who asked about the sewing machine on a previous post and I did reply, but you might not have seen it! 😊 The machine I use is a Brother LS14! I’ve had it for a few years now and as you can imagine from all the projects I make, it really has been a little workhorse, lol! I hope that helps with your question but if you need to ask anything else, please don’t hesitate to message me!
Thank you again for your support and looking forward to sharing more projects with you…
This is AWESOME! Thanks for sharing the details.
ReplyDeleteThank you Emma for the response! And yes that probably was me about the sewing machine....I am new to all this blogging and probably missed it, so thank you for taking the time to reply again. One other question, is it hard to learn to use it? is there a particular base weight paper that use when sewing on it and what types of thread? I can't remember off the top of my head if you mentioned this already. I am so excited to know this as I have wanted to purchase a machine for awhile now. I just love how it looks. Thanks again Emma, you're amazing!! -Amy
ReplyDeleteI thought it might’ve been you, but wasn’t sure and wanted to check just in case you had missed my reply and thought I was ignoring you! Anyway, you are so welcome for any help I can give you and any questions you have, I’m willing to help if I can! As for the paper weight, I have sewn through 3 layers of Tim’s Mixed Media Heavystock card and so far, fingers crossed, so good, lol! I would just say, if you feel a resistance or it feels like the needle won’t go through, don’t push it but mine glided through those 3 layers quite easily and I didn’t need to change the needle of tension… Hope that helps and have a great weekend! x
ReplyDeleteI have gathered all my supplies and ready to go. A little confused on how many layers of white cardstock have been used and what type of cardstock? What paper was used for the card base? You have listed 3. White heavy stock, mixed media and distress watercolor. The first paragraph of instructions are a bit confusing. Thank you so much for your help. I love this card and I am making it for my husband. 😊
ReplyDeleteI hope this helps with your questions…
DeleteI’ve used the three types of card to create different colour tones and textures. The white heavystock card was used to create the base layers to create frame around the card. I used one layer to create the white frame and a second layer that I edged with the Candy Cane Design Tape. This layer obviously doesn’t appear white, as it has the design tape around the edge.
Moving on, I used a panel of Distress Water-colour card to create the moon background, but I flipped this over to work on the smooth side, not the rough side! When using the inks and water, I find this card is better to work with and the inks blend seamlessly.
When it comes to the dies cuts, I used the mixed media Heavystock card for the trees and the textured side of the watercolour card for the reindeers.
Hope that helps and explains which card stock is used for which section but if you have any other questions, please don’t hesitate to ask! 😊 Enjoy your weekend…
I forgot to say thank you for your kind words about this card and I’m sure your husband is going to love his…if you have time to share it, then please tag me on my social pages, as I would love to see it! ♥️
Delete