
Hello friends...
By now, many of you will have seen the latest YouTube Live from Tim Holtz for the release of the Sizzix Everyday 2023 collection! I'm sure you'll agree with me that this release is one of the best ever ~ so much to love and so many eclectic dies, there really is something for everyone and thank you so much for all the messages and lovely comments I've received since Saturday about the projects I made! You've all made my day with your kind words and all that hard work that goes into my makes is so worthwhile ~ THANK YOU!
So back to today, and as always on a Monday we have a brand new Simon Says Stamp Monday Challenge and this week our theme is all about 4 LEGGED ANIMALS and for my project, I created a tag featuring one of my favourite dies from recent years, Harrison the Lion and combined him with a few of the newer 2023 dies.


BACKGROUND
For the background, I cut a panel of Distress Watercolor Card the same size as the tag. I spritzed the card with a light misting of water and then applied Distress Spray Stain and Oxide Sprays:
Speckled Egg, Tumbled Glass, Antique Linen, Speckled Egg Oxide Spray
After another spritz of water, and once I was happy with the blend, I heat dried the surface and stamped some text onto the background. I used the
To add a little more depth to the background, I applied Frayed Burlap Distress Ink onto my glass mat, spritzed the ink with water and then dipped the card into the inky droplets. I heat dried the card once more and then inked around the edges with Walnut Stain Distress Ink before machine stitching a border around the edge.

Now to add some layers and texture to the background and started by adding the text using the Botanic Collage Stamp Set, inked with Black Soot Archival Ink.

I then applied Grit Paste through the Hocus Pocus Layering Stencil. Allow the panel to dry before adhering it to the tag using Matte Collage Medium. To complete the background, I applied a Labeled Remnant Rub, No. 5726, to the top right hand corner.

We now have the surface ready to decorate...
PODIUM
...starting with the podium that Harrison is proudly sitting on and this comes from one of the new dies, Celebrate Colorize and actually started life as the birthday cake.
After cutting all my pieces from from the following cardstock:
Light Grey Woodgrain Card
Metallic Kraft Cardstock
Mixed Media Heavystock Card inked with Prize Ribbon Distress Spray Stain
I layered and assembled each of the pieces and then added gold metallic droplets.

HARRISON
We have the podium ready and next stop is to die cut and assemble Harrison. I cut all my pieces from watercolour card and then using various shades of brown Distress Ink and a touch of Aged Mahogany, I inked each piece individually ~ I find this helps to control the shading that is needed for all the different layers. To blend the colours. I spritzed water over the top of each piece and then dried them.
With all my pieces in front of me, I added Harrison's eyes and little pink ears to complete him.
Now because Harrison is the king for a day, I decided he needed a few little additions and began with the little bow tie, which I cut from card inked with Lumberjack Plaid Distress Ink and used one of the dies in the Tailored Thinlits Die Set from the new release and attached it around Harrison's neck.
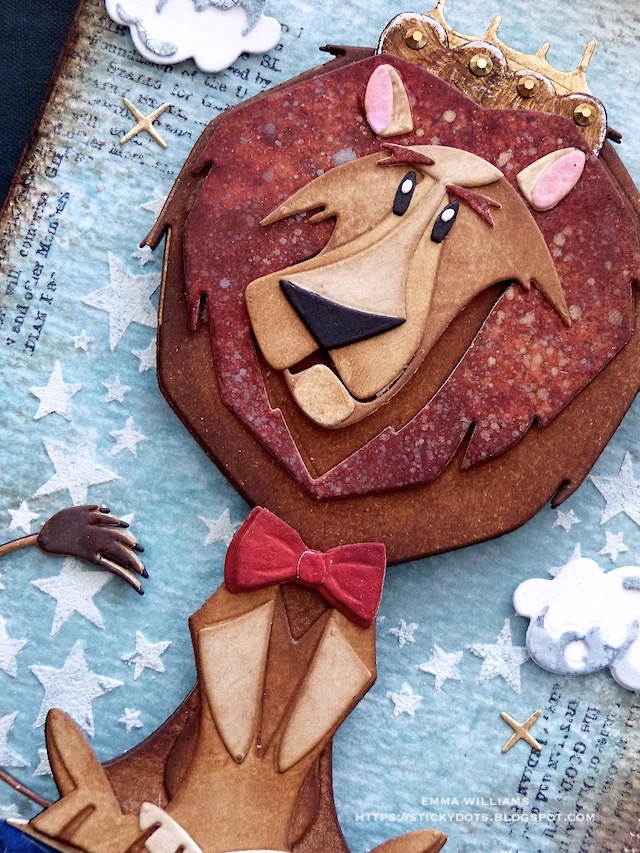
Now for the crowning glory ~ his crown.
There are crown dies out there but I didn't have one, so thought of how I could make it and after looking at a few dies, I came up with this idea using one die from the Abstract Elements die set and the icing die from the Celebrate Colorize. I cut each piece and then layered the scalloped die shape over the top of the icing die shape, which I turned around so the points were facing upwards. I then trimmed away any excess to create the crown before adding some gems.
I placed the crown on top of Harrison's head ~ it was the perfect fit for the King of the Jungle!

BANNER STRIP
To make the banner that sits across the bottom of the tag, I cut a strip of watercolor card, and inked it to match the background. I then layered it onto metallic kraft cardstock, followed by a layer of brown card each time leaving a border around the edge. After cutting an inverted 'v' into either end, I mounted the banner across my tag using foam pads.

I cut each of the letters for the "King For A Day" sentiment from black kraft card using the Alphanumeric Label Thinlits Die and then adhered them to the banner.

BUILDING THE SCENE

We're now ready to bring this together and I used foam pads to attach the podium to sit on the top edge of the banner strip before showing Harrison to his seat.

I then added some fluffy clouds around him, which I had left over from a previous make using the Road Trip Colorize Die Set but if you don't have this, you might have other cloud dies in your stash or, you can easily cut out cloud shapes.

I completed my scene by adding some Mummy Cloth to either side of the podium to ground it and adding some Hardware Heads to banner.

So that's my project for this week and hope you love and feel inspired by my make which mixes dies that you probably have in your stash, with some of the newer dies.

As always, if you make anything, or if you've been inspired by anything that you've seen here on my blog ~ then please, let me know by tagging me on social media or leaving a comment here and I will be right over to take a look!
Don't forget that every week, one lucky random participant has the chance to win a $25 gift voucher from Simon Says Stamp and you can join in up to 5 times, which means you could have 5 chances to win. You have until next Monday at 8am Ohio time. 1pm UK time, 2 pm CET to join in and good luck....


Recipe for project:


He’s adorable! Emma, your makes always inspire me! I stop by your blog often for inspiration and to just be amazed by your work!
ReplyDeleteLove it...the cake makes the perfect podium!!! Harrison looks very Kingly sitting on his throne.
ReplyDeleteI love this! His crown and podium are spectacularly made 🥰! You give such great step by step instructions, too! Fabulous tag (said at roaring volume)!
ReplyDelete