
Happy Monday friends...
Hope you've all had a wonderful start to 2023 and you're ready for the second Simon Says Stamp Monday Challenge of the new year! This week our theme is called Shake It Up. So whether you decide to make shaker cards and projects, or have something completely different in mind that fits the theme, then we can't wait to see what you create and hope you'll join us!
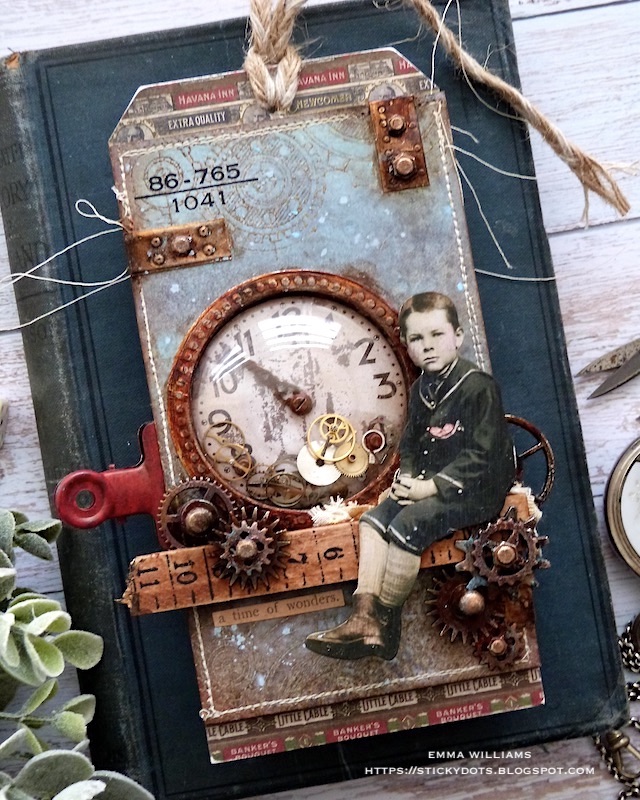
For my project, I decided to create a shaker, or as Tim says, a "shakety shake" tag but because I'm not a huge fan of sparkly things, I went down the steampunk route and used Tim Holtz and Sizzix products to bring this story to life!


INKED SHAKER PANEL
Now to create the shaker panel, and for this I cut a piece of Heavystock Mixed Media Card to measure. 8 x 13cm. I misted water onto the card panel and then to colour it, I spritzed the following combination of spray stains and oxide sprays:
Spray Stains; Ground Expresso, Speckled Egg, Antique Linen, Frayed Burlap
Oxide Sprays; Speckled Egg, Tumbled Glass
After a light misting of water, I allowed the panel to dry before flicking Speckled Egg Oxide Spray across the surface.

At the top and bottom of the panel, I added some very subtle stamping using the gears stamp from the Observations stamp set. I inked the stamp with clear embossing ink and then sprinkled Walnut Stain Distress Glaze over the top. After tapping away the excess, I heat embossed the powder until molten.


Ink the edges of the panel with Walnut Stain Distress Ink and then machine stitch a border around the outside edge.

CREATING THE DOME
To create the aperture, I used a 2" circle die from my stash. This die is by Sizzix but I'm sure SSS stock plenty of circle dies that will be the same size and can be used.
I placed the die on the left hand side of my panel and ran it through the die cutting machine. Place a 2" Sizzix Dome behind the aperture. These domes are self adhesive on one side, but I always attach the upper side to my card to ensure it's completely sealed. Place foam pads on the back of the panel.
Behind the dome, I used a clock from the Tim Holtz idea-ology Urban Layers pack. I added a clock hand and some hardware heads to the clock face before I attached the piece directly onto my covered tag, making sure it will be aligned with the dome and panel that fits over the top.

I then added some old watch parts that I've had in my stash for a while and just added a selection in the centre of the clock face.

Place and adhere the dome and panel over the top, sealing those tiny watch parts inside the dome itself.

I now have my shaker but wanted to add a frame around the edge of the dome and for this, I used the Sizzix Seal Switchlit Die and Embossing folder to cut a piece of silver metallic kraft card.
I then placed the same 2" circle that I used before centrally inside the circle and ran this through my cutting machine to create the frame.

I applied Crackling Campfire, Black Soot and Ground Espresso Distress Paints over the top to create a rusty colour to the metal and then attached to frame my dome.
CREATING THE SCENE
Now to bring the scene to life and to begin with I colour tinted my paper doll using Distress Crayons and a water brush. I always add a coat of clear gesso to my doll to prime the surface before adding the colour.
Setting the coloured doll to one side, I took a ruler piece and broke the end of it before swiping Walnut Stain over the surface. I used a baby wipe to blend the colour into the wood before I picked a selection of various sizes of Sprocket Gears that I painted with the same Distress Paint colours as I used on the frame around the dome.
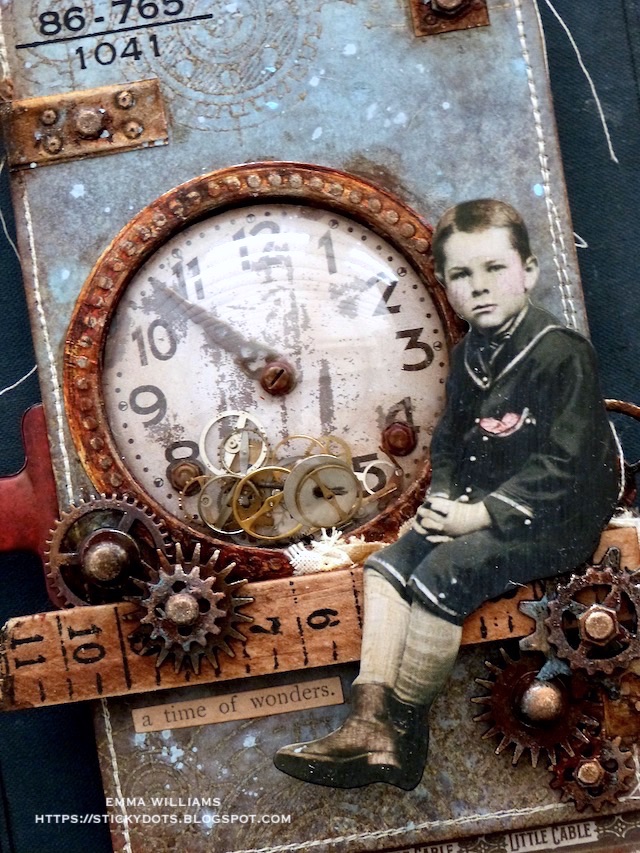
After attaching the ruler underneath the clock face using foam pads, I sat the paper doll on the right hand side of the clock, placing him to sit on torn pieces of linen. I then arranged the sprocket gears to cascade around the ruler and the paper doll. In the centres of the gears, I added Hitch Fasteners and Hardware Heads, all painted with the same paints as before.

DETAILS
To complete the tag, I added tiny offcuts of metal that I had leftover from a previous project. These are cut from metallic kraft stash that are embossed using the Foundry 3D folder and coloured with the same paints as I've used throughout the project.
I attached the offcuts to the background panel, and then added hardware heads to each piece before adding a Labelled Remnant Rub number in the top left hand corner.

To complete the panel, I threaded some rope through the hole in the top of the tag...

...before I painted a large Hinge Clip with Candied Apple Distress Paint and clipped this to the left hand side of my tag.

For the very final details, I added a Clippings Sticker, "a time of wonders' and placed this in the bottom left hand corner of the tag.

So that completes my project for this week, and I hope you've loved the piece I've made and it's given you inspiration to "Shake It Up".
As always, if you make anything, or if you've been inspired by anything that you've seen here on my blog ~ then please, let me know by tagging me on social media or leaving a comment here and I will be right over to take a look!
Don't forget that every week, one lucky random participant has the chance to win a $25 gift voucher from Simon Says Stamp and you can join in up to 5 times, which means you could have 5 chances to win. You have until next Monday at 8am Ohio time. 1pm UK time, 2 pm CET to join in and good luck....


Recipe for project:


I've never been so captivated!!! Reading your instructions are just a delight, so inspiring. Your work is tops, I've just never told you so but I love it!
ReplyDeleteGotta love a Shakity-Shake...<3 =love
ReplyDeleteEmma, I was a subscriber to your blog until all of a sudden my subscription disappeared (at some time in July 2022, I think). I have tried to resubscrube without success. How may I join your subscription members again? Please advise,
ReplyDeleteMarilyn Marie Wolk - wolkhaus@comcast.net
Hi Marilyn...
DeleteThank you so much for reaching out to me and so sorry you've been having difficulties with subscribing to my blog. Unfortunately, since Blogger removed their "Follow By Email" service and BlogLovin's demise, I have been trying to find a suitable subscription service to replace both of these and hope to have it in place very soon. In the meantime, I can recommend Feedly, which is similar to Bloglovin and is a site that I use. I hope this will be of some help to you until I have a new service up and running. Thanks again for your message, I do appreciate it...
https://feedly.com
Am loving your vintage shaker!! So cute with the TH little boy!!
ReplyDelete