Monday, 28 February 2022

Feeling Good...

Hello friends...

Thank you for all the lovely messages I received last week when I was missing from the Monday Challenge and the only reason I couldn't play along was because of Storm Eunice who took down the power and internet as she blasted her way through the UK but this week I'm back and the DT are ready to begin the brand new Simon Says Stamp Monday Challenge! We are challenging you to USE AT LEAST ONE STENCIL and can't wait to see what you create.

For my make, I chose to create a tag, and chose to use three Tim Holtz Layering Stencils to create a rusty, crusty background which is packed full of texture. This is actually inspired by a make that is coming very, very soon...so keep watching this space!

So let's get started, it's time to pull up a chair to see how I created this week's make!

BACKGROUND

To begin we start with the background and I applied some Humidor Design Tape down the two longest sides of a Mini Etcetera Tag. I then cut a panel of Mixed Media Heavystock card, slightly smaller in width than the tag itself and after spritzing the tag with a light misting of water, I applied Distress Spray Stains, and Oxide Sprays to add colour. I used Ground Espresso, Pumice Stone, Bundled Sage and Speckled Egg sprays and added a small amount of Speckled Egg Oxide Spray into the mix. Once happy, I heat dried the background ready for the stencils.

STENCILING

The first stencil I used was the Script Layering Stencil by Tim Holtz and using a blending tool, I applied Gathered Twigs Distress Ink directly onto the background. Unfortunately, most of this ended up underneath the main design but you can see a small amount just above the Paper Doll's head.

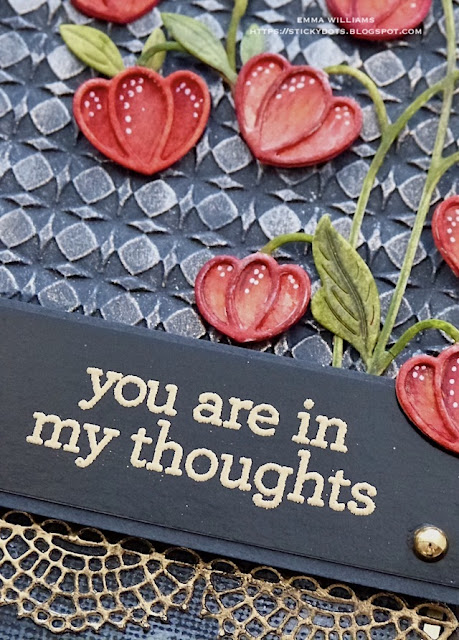
I then went on to adding my next stencil to create the enamelled effect that you can see at the top of the tag and applied Translucent Grit Paste through the Mosaic Layering Stencil, moving the stencil around the tag to create the areas where I wanted to apply the paste. Whilst the paste is still wet and working quickly, I sprinkled Walnut Stain, Crackling Campfire and Speckled Egg Distress Glazes over the top and then set to one side to dry.

...and once the paste is dry, I then heat embossed the glaze very gently and this melts beautifully over the top of the raised areas of paste. Be sure not to overheat the pasted areas as it will bubble!

The final layer of stencilling is created using the Digits Layering Stencil and once again, I used areas of the stencil, not the entire design and applied the paste through it. This time I added Walnut Stain Glaze with a sprinkling of Gold embossing powder over the top and once dry, I heat embossed the stencilled areas.

My background is ready and after inking the edges with Walnut Stain Distress Ink and then adding a machine stitched border, I matted it onto a piece of Backdrops paper and then mounted this onto the centre of my etcetera tag.

Now for the focal point and creating that scene...

BUILDING THE SCENE

GEARS

I started with the gears and these are a combination of dies and idea-ology. I used a few of the original Sprocket Gears, two of the metal Industrial gears, including that half one which I just LOVE and I then used the Mechanical Bigz L die to cut some chipboard dies.

The next stage is to create a rusty finish on the gears and whether it's for metal or for chipboard, the process is exactly the same and I used the following...

I apply a layer of Translucent Grit Paste over the top of the surface, sometimes just a smear and other times I leave it chunky.

Once the paste is dry, I then add Distress Paints ~ a combination of Black Soot, Ground Espresso, Rusty Hinge, Antiqued Bronze, Salvaged Patina and Picket Fence are my go-to colours and I just apply the paints one at a time, building up the colour and always drying between my layers.

The gears needed a platform and for this I used a Ruler piece which I broke on one end before applying Walnut Stain Distress Ink to add more richness to the wood colour. I attached my ruler across the tag, slightly overhanging the edges and used foam pads for a little height.

In the centres of all my gears, I added Hardware Heads. Now, I am completely out of these at the moment but I really did need them for this make...so, I borrowed them from previous projects, picking them off one at a time and transferring them to this make! That's how serious my Hardware Head addiction is and I promise I will replace them to the old makes, as soon as my new packs arrive because they're now BACK IN STOCK at SSS!!!

I then attached all of my gears, layering them with foam pads for various depths and attaching them to form a cluster so that my Paper Doll will nestle comfortably.

PAPER DOLL

I chose this paper doll because I've basically wanted to use him for a while but just haven't found the right project, until now and he was perfect for this one.

I always apply a layer of Clear Gesso over my Paper Doll before adding colour, and then I coloured him using Distress Crayons and a water brush.

I used Faded Jeans, Frayed Burlap, Walnut Stain, Gathered Twigs and Peeled Paint crayons.

My gentleman is now ready to be seated and after adding some Mummy Cloth dyed with a little Frayed Burlap Spray, I placed him on the gears.

To complete the arrangement, I added a Mini Flair to the left of the paper doll.

We're nearly there and all that's left is the quote and a few more embellishments

QUOTE

I was intending to use the brand new Sizzix Bold Text 1 die set by Tim but it didn't fit in the space, so I took just the word "Focus" from one of the dies in the set which I cut from gold metallic kraft card, and I combined this with die cut letters from the Alphanumeric Tiny Type Upper die set to complete the quote ~ FOCUS ON THE GOOD!

For the word "FOCUS" I used the same paints as I used on the metal to create more of a rusty finish, and then layered them over a second die cut to create a drop shadow, and then attached each letter underneath the ruler piece using the adhesive backing sheets that I applied to the metallic kraft stash before die cutting the lettering.

Finally, I added a Machinery Head at the top of my tag, (and a huge thank you to Mario for arranging it that I had a a few of these to be going on with 🤎) and once again coloured this with the same paints as I used on the gears.

The finishing touch is the Hinge Clip, that I just clipped to the top which means my make is finished for this week and I hope you've loved and been inspired by it.

As always, if you make anything, or if you've been inspired by anything that you've seen here on my blog ~ then please, let me know by tagging me on social media or leaving a comment here and I will be right over to take a look!

Don't forget that every week, one lucky random participant has the chance to win a $25 gift voucher from Simon Says Stamp and you can join in up to 5 times, which means you could have 5 chances to winYou have until next Monday at 8am Ohio time. 1pm UK time, 2 pm CET to join in and good luck....


Thank you so much for taking the time to stop by today ~ stay safe and keep well.
Love Emma xxx

Recipe for project:

Distress Spray StainsGround Espresso, Pumice Stone, Bundled Sage and Speckled Egg
Distress Oxide Sprays: Speckled Egg
Distress Paints: Crackling Campfire, Salvaged Patina, Ground Espresso, Rusty Hinge, Antiqued Bronze, Black Soot and Picket Fence
Distress Glaze: Walnut Stain, Crackling Campfire, Speckled Egg
Distress Crayon: Walnut Stain

Saturday, 19 February 2022

Simon Says Stamp Good Luck Charm Blog Hop ~ Day 2

Hello friends and welcome to Day 2 of the Simon Says Stamp Good Luck Charm Blog Hop...if you missed yesterday's hop, then don't worry because you can catch up with Day 1 over on the Simon Says Stamp Blog.

I'm so excited to be joining so many of the talented designers on this hop and if you've arrived here from  Barbara Tarayao's blog, then hello, but if not, and you want to catch up with everyone who is participating in this hop, then don't worry because you can head back to the beginning HERE!

There are so many gorgeous new products in this release and I can guarantee that you’ll be spoilt for choice and every single one of them will get you heading for your craft room, make you feel happy and so uplifted. So, if you want to see this fabulous new release in full, then click HERE!

Now, back to my make and I created a card using the gorgeous Chinese Lantern Stem Die, the Well Wishes Stamp Set and gorgeous black glossy card.

So, let's get started and here's how I created this card...

To begin with I used black card stock to make a tent fold card, measuring 20 x 13cm. I then cut a further panel of the card, 10 x 13cm and I ran the card through my die cutting machine using the SSS Circle Rings Embossing Folder.

To accentuate the embossing, I used a small amount of Pearl White Alchemy Wax by Prima and lightly applied it over the top of the raised areas with my fingers.

I cut a piece of textured black card, and again used the Pearl White Wax to accentuate the texture. Adhere both of the panels onto a piece of Matte Gold Card, placing the embossed card at the top and the textured card underneath and attaching them to leave a border around the outside. You will be hiding the join, so don't worry about that.

Matt the card panels onto black kraft stock card, and a piece of black glossy card before mounting the panels onto the front of the card blank using foam pads.

Cut a second panel of the glossy black card, 11 x 2.5cm, and using Versamark Embossing Ink, I stamped the sentiment ~ 'You Are In My Thoughts" onto the card and embossed it with Fine Detail Gold Embossing Powder.

Moving onto those beautiful Chinese Lanterns and to begin with I cut three separate images from Distress Watercolour card. I kept some of the waste from the flowers as I will use these too.

I then used a water brush to watercolor the stems using Peeled Paint and Bundled Sage Re-Inkers and the lanterns with a combination of Candied Apple, Crackling Campfire and Aged Mahogany Re-inkers.

After layering the outlines over the top of each of the lanterns, I then added white pen work to each of the flowers.

We're ready to put the card together, and to begin with I mounted my sentiment strip onto black cardstock, then attached it across the card blank, placing it over the top of where the embossed panel and the textured panel join. This now hides that ugly part.

Underneath the sentiment strip, I attached a crochet border ~ this is cut from the Matte Gold Cardstock using the Sizzix Crochet Dies by Tim Holtz. I wanted to knock the shine back slightly, so to do this I applied some Black Soot Distress Paint over the top, and then wiped away any excess. This creates more of a vintage feel to the gold crochet detail.

Attach one of the stems to the card, tucking the base of it behind the sentiment strip. 

Now for the reason I cut three separate die cut images, and that's because I'm going to snip into the remaining two die cuts and add these tiny pieces to my main stem, this will elongate the bough and create the curve.

You can see the finished bough below...

I also added some foam underneath some of the lanterns, to create variations in height and dimension.

Remember the waste from the Chinese Lanterns...well this is where I used that, a finishing detail that I added to my card to create the tiny petals that are falling down from the bough and I attached these with Matte Collage Medium.

To complete the card, I added some Metallic Droplets onto the sentiment strip.

My card for the hop is now finished and I hope you love it and enjoyed the techniques I've used to make it.

Simon Says Stamp is giving away a $25 coupon to every stop on the blog hop! This means you can leave a comment here and on every stop along the way to increase your chances. Winners will be posted on the Simon Says Stamp blog on Wednesday, 23rd February and all winners will need to contact/email Simon Says Stamp to claim their prize. 


Also, last but by no means least ~ if you shop during the Good Luck Charm blog hop, then you can get yourself a beautiful Birthday Cupcake Stamp Set FREE with any purchaseThe offer is valid until 20th February 2022 at 11:59 ET, or while supplies last and the code you need to use to claim your gift, is: YUM20

Thank you so much for stopping by today and hope you enjoy this fun hop....see you soon, Emma x

RECIPE FOR CARD:

Sizzix/Tim Holtz: Crochet Thinlits
Distress Paint: Black Soot
Distress Re-Inkers: Peeled Paint, Bundled Sage, Candied Apple, Crackling Campfire and Aged Mahogany
Tim Holtz idea-ology: Metallic Droplets
Paint Brush

Tuesday, 15 February 2022

Bunny Games Panel for Simon Says Stamp

Hello friends!

Today, I'm so happy to be back on the Simon Says Stamp Store blog to share my latest project with you all and if you love the sneak peek below and want to see more of this piece, then you can head over to their blog, CLICK HERE to check out the step by step process of how I created this piece!


 Hope you love what I've made and as always, I can't wait to see if you've been inspired by this make and if you are, then please tag me on social media or here on the blog and I will pop by to see your gorgeous pieces!

Thanks so much for stopping by and see you again soon!
Love Emma x

Monday, 14 February 2022

High Society...

Happy Monday friends...

Hope you all had a great weekend and enjoyed Tim's latest YouTube Live! Wasn't it just the best kept secret and such a wonderful surprise to see all those brand new inks and glazes! Thank you for all the lovely comments about my makes, I will be sharing step by steps of many of the makes that I'm working on, so please do keep checking back here, or over on Instagram!

In the meantime, it's Monday and that means we have a brand new Simon Says Stamp Monday Challenge and this week our theme is all about, FOOD & DRINK!

Now, I always like to think outside the box and I've done many food and drink projects over the years, so this time I wanted to take a different route and I decided to make a vintage style tag that features a very dapper gentleman who is out to dinner and has a table reserved at the Grand Hotel Continental!

So let's get started, it's time to pull up a chair to see how I created this week's make!

To begin with I used a small etcetera tag, flipped it upside down so the narrow part is at the bottom and then applied Humidor Design Tape around the edge of the tag itself.

I then took a piece of paper from the Backdrops Vol 2, this particular one has the Grand Hotel Continental as the heading.

After trimming the paper down to size, I machine stitched around the outside to create a border and then ripped and tore the edges to add more of a vintage feel.

I adhered the paper onto the tag with Matte Collage Medium and added some more tears where necessary.

Around the edges of the tag, I added some crackle paste and once this was dry, I then ran my Walnut Stain Distress Crayon over the top of the paste, blending it into the cracks with a brush.

Now to form the ledge that sits across the tag, I used a Pinked Etcetera Trim that is slightly longer in length than the tag itself but I like that it overhangs. I then used the Decorative Thinlits Die set to cut a piece of paper from the Backdrops pack ~ I believe this is from Backdrops Vol 1 and adhered it to my trim.

I attached the trim across the bottom section of the tag and then I added a metal embossed strip. This is actually an older Impresslits Embossing Folder that I have in my stash! It's called the Lattice Trim and once again, if you have don't own it ~ you could use any metal offcuts from Tim's Texture Fades. I just liked this design and it was sitting in my "bits and pieces, offcuts box".

I cut the trim from silver metallic kraft card, and then applied Black Soot Distress Paint over the top, wiped away the excess and once dry, attached this to my tag.

On the centre of the etcetera trim, I attached a Junk Drawer Baseboard Layer and applied a little Grit Paste around the edges to age it. Once the paste was dry, I covered it with Distress Paints, Black Soot and Ground Espresso.

To complete the trim, I added a Drawer Pull, with two Hardware Heads attached to either side and added the wording "Reserved" in the window which is from the Clipping Sticker Book.

Finally, I added some metal hardware to either side of my trim and undereath the ledge, I added a Specimen Remnant Rub ~ Orders Attended To Day or Night.

Now my tag is ready for the star of the show and you might recognise this dapper gent from Halloween!! Yep, this is the count but rather than going down the vampire route, I dressed him up using a few accessories from other die sets. If you don't own these dies, then there are plenty of others from Tim that can be used...so just play around and as Tim always says ~ YOU DO YOU!

Using Mixed Media Heavystock card and black kraft card, I die cut and assembled The Count but didn't use the cape...that's the only difference with this make.

But now he need's to be turned into the dapper gent and for this I used the bowler hat and monocle from The Gent Thinlits Die Set...

...and the umbrella from The Park Thinlits Die Set. These are the perfect size accessories for this gent and are die cut from black and red cardstock for the hat, and black and metallic kraft card for the umbrella.

As a backdrop to the count, I used a label taken from the Urban Layers Ephemera pack and adhered this directly onto the tag using Matte Collage Medium.

Attach the count with foam pads, placing him on the right hand side of the label.

For the "Out To Dinner" wording, I used the Alphanumeric Tiny Type Upper Thinlits die set and cut the letters from blue card and attached them to the Urban Layers Piece.

Underneath the label I added a 'pointy finger" which is from the Christmas Ephemera pack and also placed a Perishable Urban Layer onto foam pads and attached this directly beneath. I added a touch more Crackle Paste around the edges of the label and once that was dry and inked, I attached my count using foam pads.

I placed some Star Adornments onto the label, which I painted red using Candied Apple Distress Paint and attached these with Matte Collage Medium.

Just above the label, I added a fork which is one of the pieces from the idea-ology Silverware Adornments pack. I placed this onto a piece of mountboard that I covered with an offcuts of the Backdrops paper and just aged the metal finish of the fork by using Distress Paints ~ Salvaged Patina, Tarnished Brass, Black Soot and Picket Fence.

We're nearly there and all that's left is to add some more metal hardware down the side ~ I used Hardware Heads and created a rusty finished around each of them.

...and with that final detail, my dapper city gent is ready for dinner!

As always, if you make anything, or if you've been inspired by anything that you've seen here on my blog ~ then please, let me know by tagging me on social media or leaving a comment here and I will be right over to take a look!

Don't forget that every week, one lucky random participant has the chance to win a $25 gift voucher from Simon Says Stamp and you can join in up to 5 times, which means you could have 5 chances to winYou have until next Monday at 8am Ohio time. 1pm UK time, 2 pm CET to join in and good luck....


Thank you so much for taking the time to stop by today ~ stay safe and keep well.
Love Emma xxx

Recipe for project:

Tim Holtz for Stampers Anonymous: Small Etcetera Tag, Pinked Etcetera Trims
Distress Paints: Candied Apple, Salvaged Patina, Tarnished Brass, Black Soot and Picket Fence.
Distress Crayon: Walnut Stain
Powered By Blogger

Total Pageviews