
Happy Monday friends...
Hope you all had a great weekend and enjoyed Tim's latest YouTube Live! Wasn't it just the best kept secret and such a wonderful surprise to see all those brand new inks and glazes! Thank you for all the lovely comments about my makes, I will be sharing step by steps of many of the makes that I'm working on, so please do keep checking back here, or over on Instagram!
In the meantime, it's Monday and that means we have a brand new Simon Says Stamp Monday Challenge and this week our theme is all about, FOOD & DRINK!
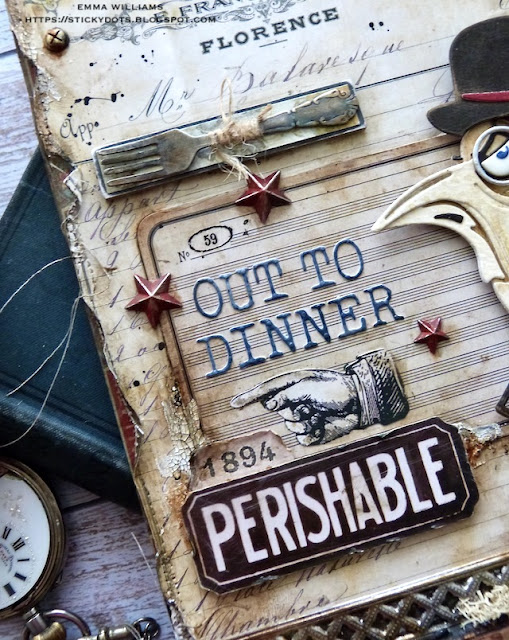
Now, I always like to think outside the box and I've done many food and drink projects over the years, so this time I wanted to take a different route and I decided to make a vintage style tag that features a very dapper gentleman who is out to dinner and has a table reserved at the Grand Hotel Continental!


After trimming the paper down to size, I machine stitched around the outside to create a border and then ripped and tore the edges to add more of a vintage feel.
I adhered the paper onto the tag with Matte Collage Medium and added some more tears where necessary.
Around the edges of the tag, I added some crackle paste and once this was dry, I then ran my Walnut Stain Distress Crayon over the top of the paste, blending it into the cracks with a brush.

Now to form the ledge that sits across the tag, I used a Pinked Etcetera Trim that is slightly longer in length than the tag itself but I like that it overhangs. I then used the Decorative Thinlits Die set to cut a piece of paper from the Backdrops pack ~ I believe this is from Backdrops Vol 1 and adhered it to my trim.
I attached the trim across the bottom section of the tag and then I added a metal embossed strip. This is actually an older Impresslits Embossing Folder that I have in my stash! It's called the Lattice Trim and once again, if you have don't own it ~ you could use any metal offcuts from Tim's Texture Fades. I just liked this design and it was sitting in my "bits and pieces, offcuts box".

I cut the trim from silver metallic kraft card, and then applied Black Soot Distress Paint over the top, wiped away the excess and once dry, attached this to my tag.
On the centre of the etcetera trim, I attached a Junk Drawer Baseboard Layer and applied a little Grit Paste around the edges to age it. Once the paste was dry, I covered it with Distress Paints, Black Soot and Ground Espresso.
To complete the trim, I added a Drawer Pull, with two Hardware Heads attached to either side and added the wording "Reserved" in the window which is from the Clipping Sticker Book.

Finally, I added some metal hardware to either side of my trim and undereath the ledge, I added a Specimen Remnant Rub ~ Orders Attended To Day or Night.
Now my tag is ready for the star of the show and you might recognise this dapper gent from Halloween!! Yep, this is the count but rather than going down the vampire route, I dressed him up using a few accessories from other die sets. If you don't own these dies, then there are plenty of others from Tim that can be used...so just play around and as Tim always says ~ YOU DO YOU!
Using Mixed Media Heavystock card and black kraft card, I die cut and assembled The Count but didn't use the cape...that's the only difference with this make.
But now he need's to be turned into the dapper gent and for this I used the bowler hat and monocle from The Gent Thinlits Die Set...

...and the umbrella from The Park Thinlits Die Set. These are the perfect size accessories for this gent and are die cut from black and red cardstock for the hat, and black and metallic kraft card for the umbrella.

As a backdrop to the count, I used a label taken from the Urban Layers Ephemera pack and adhered this directly onto the tag using Matte Collage Medium.

Attach the count with foam pads, placing him on the right hand side of the label.

For the "Out To Dinner" wording, I used the Alphanumeric Tiny Type Upper Thinlits die set and cut the letters from blue card and attached them to the Urban Layers Piece.
Underneath the label I added a 'pointy finger" which is from the Christmas Ephemera pack and also placed a Perishable Urban Layer onto foam pads and attached this directly beneath. I added a touch more Crackle Paste around the edges of the label and once that was dry and inked, I attached my count using foam pads.

I placed some Star Adornments onto the label, which I painted red using Candied Apple Distress Paint and attached these with Matte Collage Medium.

Just above the label, I added a fork which is one of the pieces from the idea-ology Silverware Adornments pack. I placed this onto a piece of mountboard that I covered with an offcuts of the Backdrops paper and just aged the metal finish of the fork by using Distress Paints ~ Salvaged Patina, Tarnished Brass, Black Soot and Picket Fence.

We're nearly there and all that's left is to add some more metal hardware down the side ~ I used Hardware Heads and created a rusty finished around each of them.

...and with that final detail, my dapper city gent is ready for dinner!

As always, if you make anything, or if you've been inspired by anything that you've seen here on my blog ~ then please, let me know by tagging me on social media or leaving a comment here and I will be right over to take a look!
Don't forget that every week, one lucky random participant has the chance to win a $25 gift voucher from Simon Says Stamp and you can join in up to 5 times, which means you could have 5 chances to win. You have until next Monday at 8am Ohio time. 1pm UK time, 2 pm CET to join in and good luck....


Recipe for project:


That hat on The Count is everything! He is absolutely dapper in his attire. The details are amazing and this project shows off the best of them! Bravo Emma!
ReplyDeleteFabulous make Emma! That snooty gent is perfect for the fancy hotel. Happy Valentine's Day! Maura
ReplyDelete