
I can't believe that we're in May already ~ lockdown life sure goes quickly!!! But as we head into another creative week, our theme is all about Spritz and Splatter, and the DT are also showcasing PaperArtsy products within their projects!
With the challenge theme in mind, I instantly thought about water and decided to go under the sea and used PaperArtsy Infusions to build up the background, combining these with some new, and older Tim Holtz stamps.


So, let's get started because it's time to share all the details of how I created my life beyond the sea...

To begin with I started with the background and cut a panel of Distress Watercolor card, 19.5 x 15cm which I then misted very lightly with water. I then started using my Infusions ~ these are water soluble particles with a dye colour pigment and all you need to do is use the smallest amount, less is more! So, taking In The Navy, I sprinkled the particles onto the dampened card, concentrating on the central area and then added a little more water over the top so that the colour starts to pool and intensify.
Between each layer, I tend to heat dry and once the first layer was dry, I then spritzed droplets of water across the card, and added some more of the Infusions ~ The Sage and Violet Storms. If you feel there's too much colour, just dab some away with a towel but I just kept going until I achieved the desired effect of a watery world, under the sea.
I wanted to maintain some white space around the colour, so...I directed any of the droplets or the infusions towards the centre, but allowed some to just spray out from that area.

To add some layers of interest to the background, I used the Field Notes and the Mini Glitch stamp set and stamped wording, numbers and imagery onto the top left...
 ...and the bottom right hand corners. I used Barn Door and Black Soot Archival Inks to stamp.


Finally, I added some machine stitching to the edges of the panel, leaving some loose strands of thread hanging.
So, I now have the background and after heat setting the inks, I matted it onto dark blue classic kraft card and a layer of silver metallic card, lightly sanding each of the card layers.
I then matted my layers onto a canvas panel, 22.5 x 18cm. I coloured this panel using Ground Espresso and Black Soot Distress Paints, added some torn book paper to give more of a vintage feel to the background and then applied Walnut Stain Distress Crayon around the edges.

After stamping the octopus onto watercolour card, I then fussy cut around the outline before watercoloring it with Distress Marker Pens and a water brush. To complete the octopus, I added some white highlights with a Posca Pen.

Using an offcut of watercolour card ~ this had a smattering of the infusions on the strip and it just worked so well ~ I stamped the wording Shipment Collect from the Field Notes stamp set onto the strip in Barn Door, overstamped with Black Soot Archival Ink.

I machine stitched a border around the edge of the strip and then mounted it across my panel, over a layer of Mummy Cloth that I arranged so that it would show above and below the strip. I then attached a Hardware Head to either side of the strip before placing my Octopus onto the panel, using foam pads to add some height and definition.
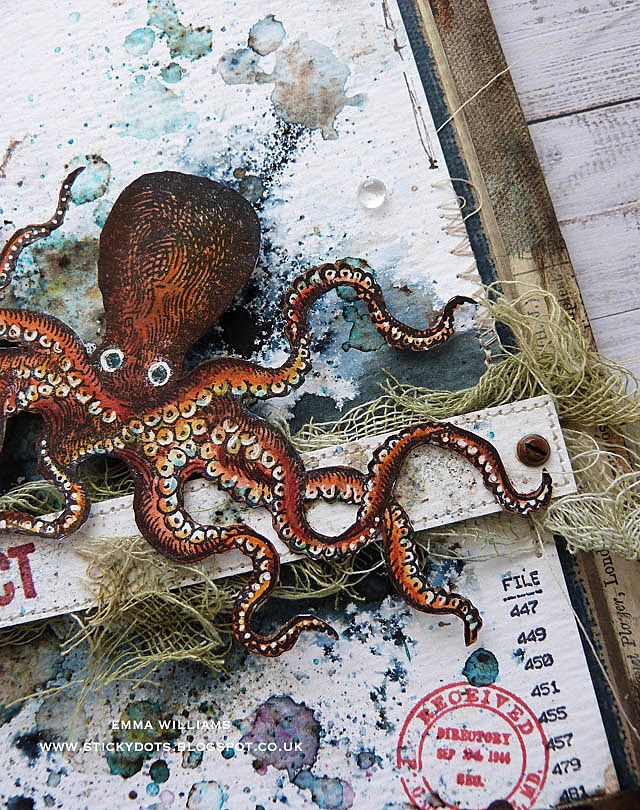
Around the edge of the panel and to look as if the scene has been riveted onto the background, I embossed some silver metallic kraft stash with the Foundry 3D Folder and then cut the embossed card into small strips. Taking four strips, I wrapped these around the edges of the canvas and attached them to my panel. I then added some Machinery Heads and some Hardware Heads to each of the metal sections.

To create the rusty look to the metal, I used a combination of Distress Paints ~ Ground Espresso, Rusty Hinge, Vintage Photo and Black Soot and just built up the colour onto each piece and the metal hardware, creating the look of rust.
We're nearly there and all that's left is the details....
...I added some Clippings Stickers to create a quote, " The color of the sea, where only the imagination can go".

And to complete the scene I added some of the smallest size of Melange Pebbles to look like bubbles.


So, that's it from me for today and I hope you love this project and all the techniques I've used to create this underwater scene ~ it was so much fun to create!

As you may know the lovely Heidi, and all the people working behind the scenes at the Simon Says Stamp Store are running on limited operations ~ they are still accepting orders but due to the current Coronavirus (Covid-19) situation, shipping times are going to be slightly longer than usual!
But due to the outbreak we have made the very difficult decision to suspend the $50 vouchers for now but we know that many people are staying safe at home and we would love it if you would continue to enter the challenges and have fun! We are all in this together!


Thank you so much for taking the time to stop by today and see you again soon.
Stay safe everyone and take care of yourselves and your loved ones...
....love, care, believe ~ Emma
xxx
Recipe for project:
Tim Holtz/Sizzix: Foundry 3D Texture Fade Embossing Folder
Tim Holtz/Stampers Anonymous: Sea Life, Mini Glitch, Field Notes
Distress Spray Stain: Shabby Shutters, Peeled Paint, Antique Linen
Distress Paint: Black Soot, Ground Espresso, Rusty Hinge, Vintage Photo
Distress Crayons: Walnut Stain
Distress Marker Set
Tim Holtz/Stampers Anonymous: Sea Life, Mini Glitch, Field Notes
Distress Spray Stain: Shabby Shutters, Peeled Paint, Antique Linen
Distress Paint: Black Soot, Ground Espresso, Rusty Hinge, Vintage Photo
Distress Crayons: Walnut Stain
Distress Marker Set
Tim Holtz Idea-ology: Index Clips, Clippings Stickers, Mummy Cloth, Hardware Heads, Machinery Heads
Mediums: Matte Collage Medium, Gesso, Archival Ink Set 1 and Set 3, Posca Pen


this is absolutely amazing Emma! That Stampers Anonymous Octopus is PERFECT for the centerpiece!! I love the addition of the rusted elements on the edges. That really completes the entire picture!
ReplyDeleteLove the background on this. It's beautiful!
ReplyDeleteWhat an so Gorgeous canvas Emma !! Really Stunning. I love all the layers you create, and the fantastic octopus and the underwater scene and details. Great !
ReplyDeleteHave a very nice day, and stay safe
Big hugs, Caty